
Passky KDM52PLY6B01R1
Contents
Passky 52-inch Ceiling Fan with Light User Manual
Model: KDM52PLY6B01R1
Introduction
This manual provides detailed instructions for the safe installation, operation, and maintenance of your Passky 52-inch Ceiling Fan with Light. Please read this manual thoroughly before installation and retain it for future reference. This ceiling fan is designed for both indoor and outdoor use (not directly exposed to rain) and features a remote control, reversible DC motor, dimmable LED light, and multiple speed settings.
Safety Information
Always follow basic safety precautions when installing and operating this appliance to reduce the risk of fire, electric shock, and personal injury.
- Ensure the power is turned off at the circuit breaker before installation or maintenance.
- All wiring must be in accordance with national and local electrical codes.
- The mounting structure must be capable of supporting the fan's weight (14.3 pounds).
- Do not connect the fan to a dimmer switch or fan gear switch, as this will lead to abnormal operation. Use only the provided remote control.
- Keep hands, clothing, and other objects clear of the fan blades when the fan is operating.
- This fan is suitable for indoor and covered outdoor spaces. Do not expose directly to rain.
Package Contents
Verify that all components are present before beginning installation.
- Ceiling Fan Unit
- Light Kit
- Remote Control
- Mounting Hardware
- Instruction Manual (this document)
- AAA Batteries (2, for remote control)

Image: Overview of included components for the Passky 52-inch Ceiling Fan.
Setup and Installation
Installation requires basic electrical knowledge. If you are unsure, consult a qualified electrician. A step-by-step illustrated guide is provided in the physical manual. Ensure the mounting location can support the fan's weight and is within 8-10 feet of ceiling height for optimal performance.
Pre-Installation Checks
- Turn off power at the main circuit breaker.
- Ensure the electrical box is securely mounted and rated for ceiling fan support.
- Unpack all components and inspect for damage.
Mounting the Fan
- Attach the mounting bracket to the electrical box using the provided screws.
- Assemble the downrod and canopy to the motor housing.
- Carefully lift the fan assembly and hang it from the mounting bracket.
Wiring Connections
Connect the fan's electrical wires to the household wiring according to the wiring diagram in the physical manual. Ensure all connections are secure and insulated with wire nuts.

Image: Important note on switch compatibility. Only conventional on/off switches are supported; dimmer or fan gear switches are not compatible.
Attaching Fan Blades and Light Kit
- Attach the fan blades to the motor housing. Note that blades are double-sided (black and walnut) for aesthetic choice.
- Connect and secure the light kit to the fan assembly.
- Install the LED light panel and light cover.

Image: The Passky ceiling fan installed in various room settings, including living room, bedroom, and terrace, highlighting its suitability for different environments.
Operating Instructions
Your Passky ceiling fan is controlled by the included remote control. Ensure the remote has 2 AAA batteries installed.
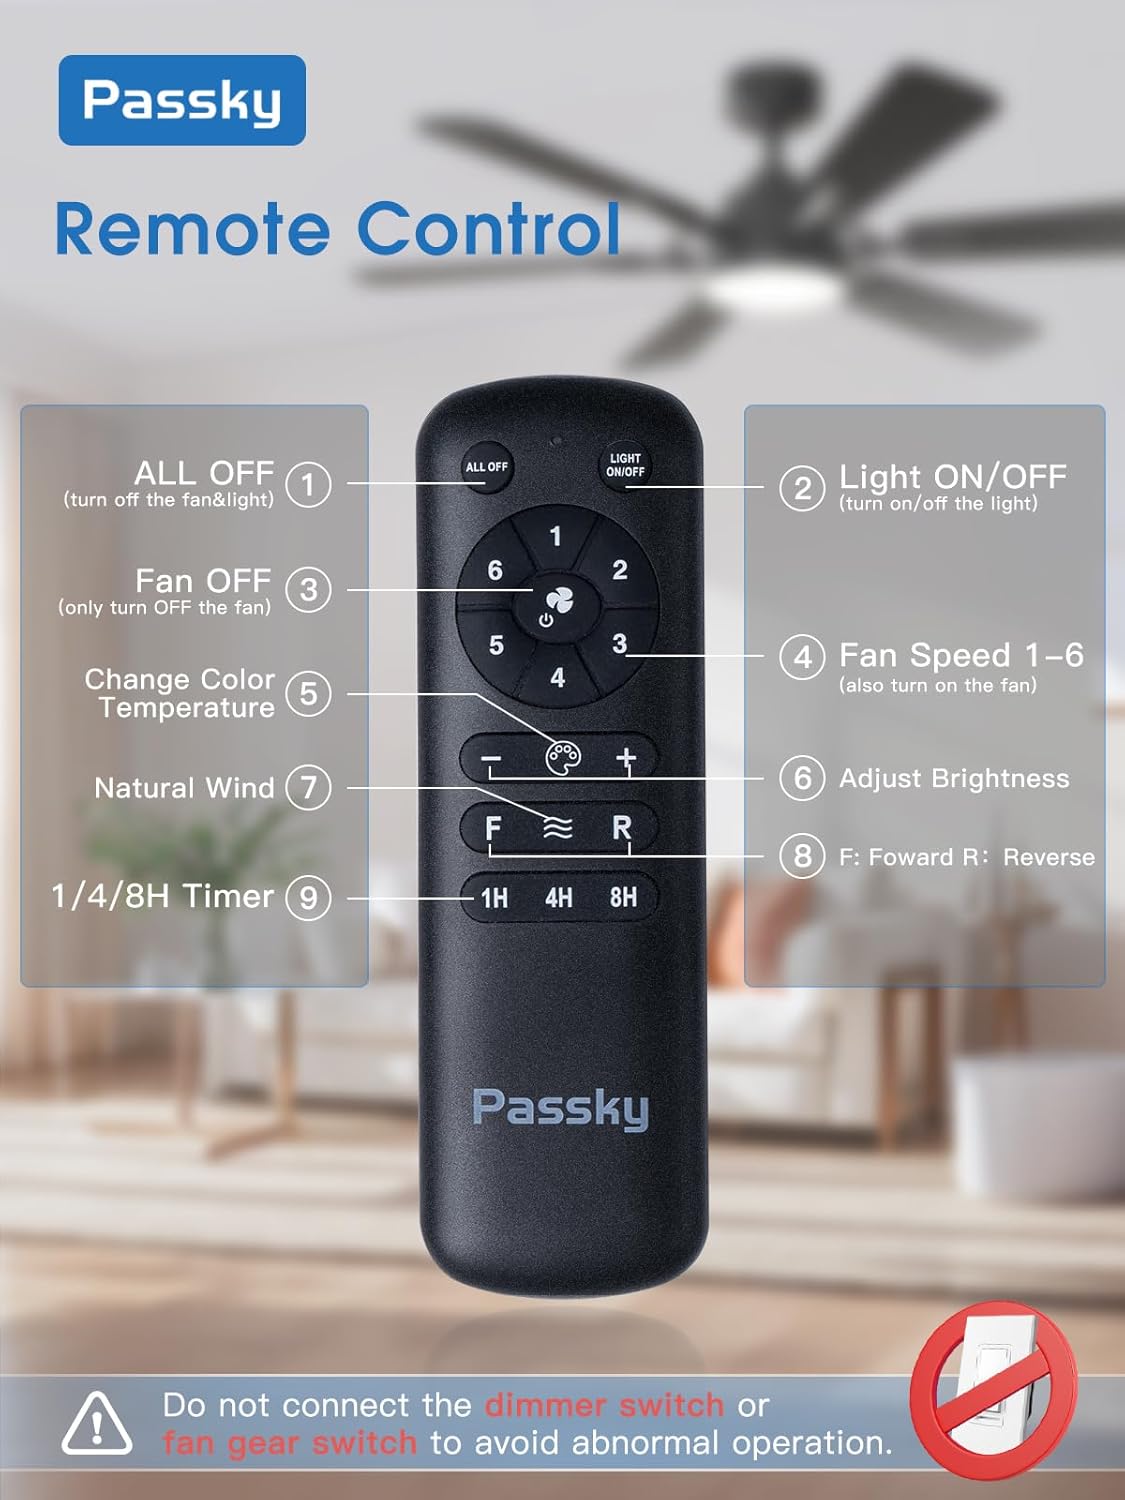
Image: Remote control layout with functions: ALL OFF, Light ON/OFF, Fan OFF, Fan Speed 1-6, Change Color Temperature, Adjust Brightness, Natural Wind, Forward/Reverse, and 1/4/8 Hour Timer.
Remote Control Functions:
| Button | Function |
|---|---|
| ALL OFF | Turns off both the fan and the light. |
| Light ON/OFF | Turns the light on or off. |
| Fan OFF | Turns off only the fan. |
| Fan Speed 1-6 | Adjusts fan speed from 1 (lowest) to 6 (highest). Also turns on the fan if it's off. |
| Change Color Temperature | Cycles through 3 color temperatures: 3000K (warm light), 4000K (cool white), 6000K (daylight white). |
| Adjust Brightness (+/-) | Adjusts light brightness from 10% to 100%. |
| Natural Wind | Activates a fluctuating wind mode to simulate natural breezes. |
| F/R (Forward/Reverse) | Changes the direction of fan blade rotation. Forward (downward airflow) for cooling in summer, Reverse (upward airflow) for circulating warm air in winter. |
| 1H/4H/8H Timer | Sets the fan to turn off automatically after 1, 4, or 8 hours. |
Fan Speed and Airflow
The fan offers 6 adjustable speeds. Levels 1-2 provide a low, comfortable wind, levels 3-4 offer a medium natural wind, and levels 5-6 deliver a strong cooling wind.

Image: Explanation of the 6 wind speed settings and their corresponding airflow types.
Reversible DC Motor
The reversible DC motor allows for year-round use. In summer, set the fan to rotate counter-clockwise for a cooling downward airflow. In winter, set it to rotate clockwise for an upward airflow that helps circulate warm air trapped near the ceiling.

Image: Visual representation of the reversible DC motor function for summer cooling and winter warming.
Customizable LED Light
The integrated LED light offers dimmable brightness from 10% to 100% and three color temperature options: 3000K (warm light), 4000K (cool white), and 6000K (daylight white). Adjust these settings to suit your preference and activity.

Image: Demonstration of the customizable LED light's color temperature options and infinite dimming range.
Memory Function
The fan and light feature a memory function. When you turn off the power by remote or wall switch, the fan and light settings (color temperature, brightness, and fan speed) will be saved and restored to the previous settings when turned back on.

Image: Explanation of the fan and light memory function, showing how settings are retained after power cycling.
Maintenance
Regular maintenance ensures optimal performance and extends the lifespan of your ceiling fan.
- Cleaning: To clean the fan, wipe with a soft, damp cloth. Do not use abrasive cleaners or solvents, as they may damage the finish.
- Blade Cleaning: Dust the fan blades regularly to prevent dust buildup, which can affect balance and airflow.
- Tightening Screws: Periodically check all screws on the fan and mounting hardware to ensure they are tight. Loose screws can cause wobbling or noise.
- Lubrication: The fan's DC motor is permanently lubricated and does not require additional oiling.
Troubleshooting
Before attempting any repairs, ensure the power is disconnected at the circuit breaker.
| Problem | Possible Cause | Solution |
|---|---|---|
| Fan does not start | No power to the fan; Loose wire connections; Remote control battery low or not paired. | Check circuit breaker and wall switch. Ensure all wiring connections are secure. Replace remote batteries or re-pair remote according to instructions. |
| Light does not work | Loose wire connection to light kit; LED panel issue; Remote control issue. | Check light kit wiring. Ensure light is turned on via remote. If problem persists, contact customer support. |
| Fan wobbles | Loose fan blades or mounting screws; Unbalanced blades. | Ensure all blade screws and mounting screws are tight. Check if blades are bent or damaged. Use a balancing kit if necessary (not included). |
| Noisy operation | Loose screws; Motor hum (normal for DC motors, but should be minimal); Obstruction. | Tighten all screws. Ensure no wires or objects are touching the fan blades or housing. The fan is designed for quiet operation (approx. 30dB). |
| Remote control not working | Low or dead batteries; Remote not paired; Obstruction between remote and receiver. | Replace batteries. Ensure remote is pointed at the fan's receiver. Re-pair the remote if necessary (refer to physical manual for pairing steps). |
Specifications
| Feature | Detail |
|---|---|
| Brand | Passky |
| Model Name | KDM52PLY6B01R1 |
| Product Dimensions | 52"L x 52"W x 12.6"H |
| Item Weight | 14.3 Pounds |
| Color | Black |
| Material | Engineered Wood (Blades) |
| Power Source | AC 120V Power, DC motor |
| Voltage | 120 Volts |
| Wattage | 50 watts (Fan), 24 watts (Light) |
| Light Source Type | LED |
| Brightness | 2000 Lumens |
| Color Temperature | 3000K, 4000K, 6000K (Adjustable) |
| Dimming | 10%-100% Dimmable |
| Control Method | Remote Control |
| Fan Speeds | 6 Speeds |
| Motor Type | Reversible DC Motor |
| Timer Function | 1/4/8 Hours |
| Indoor/Outdoor Usage | Indoor & Covered Outdoor (Not directly exposed to rain) |
| Airflow | 5000 CFM |
Warranty and Support
Passky provides comprehensive support for your ceiling fan.
- Warranty: The product is backed by a 24-month worry-free service.
- Technical Support: 24-hour technical support is available. For assistance, please refer to the contact information provided in your physical manual. Email responses are available 24/7, and phone customer service hours are Monday through Friday.
- Missing Parts: If any components are missing from your package, please contact customer service immediately for assistance.

Image: Warranty details: 2 years for the whole fan, 10 years for the motor. Contact support for missing accessories or manual issues.
Ask a question about this manual
Ask about setup, troubleshooting, compatibility, parts, safety, or missing instructions. Manuals+ will review the question and use this page’s manual context to help answer it.