1. Introduction
Thank you for purchasing the Rampage HYDRA PRO Wireless Gamepad. This device is designed to provide a versatile gaming experience across multiple platforms, featuring both 2.4 GHz wireless and Bluetooth connectivity, along with a convenient charging station. This manual provides detailed instructions on setup, operation, maintenance, and troubleshooting to ensure optimal performance and longevity of your gamepad.
2. Package Contents
Please check the package contents to ensure all items are present:
- Rampage HYDRA PRO Wireless Gamepad
- Charging Station
- USB-C Charging Cable
- 2.4 GHz Wireless Receiver
- User Manual
3. Product Overview
3.1 Gamepad and Charging Station

Figure 3.1: The Rampage HYDRA PRO Gamepad resting on its dedicated charging station, showcasing its white finish and RGB lighting accents.

Figure 3.2: Front view of the gamepad and charging station, highlighting the ergonomic design and the charging indicator light on the station.
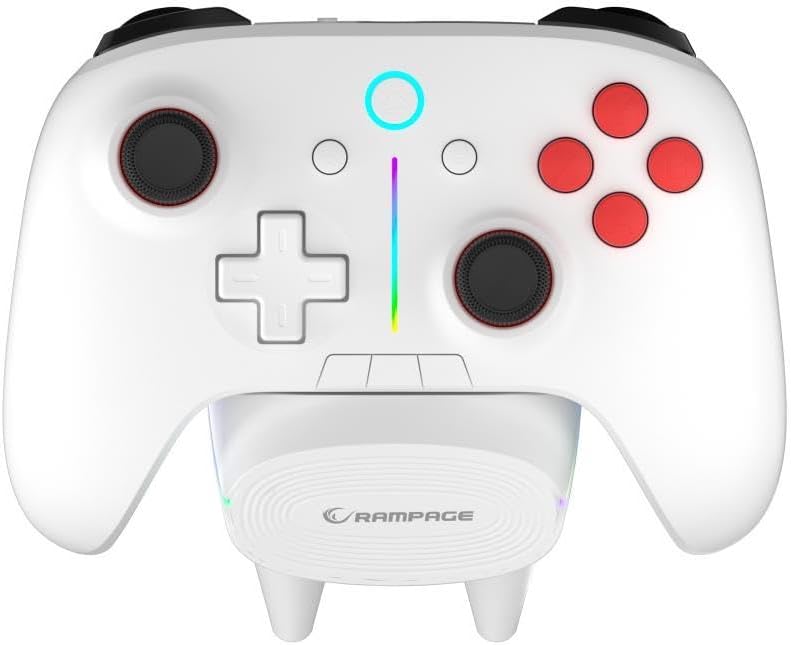
Figure 3.3: Top-down view illustrating the full button layout, including analog sticks, D-pad, action buttons, and central function buttons, with the RGB light bar visible.
3.2 Rear and Side Views
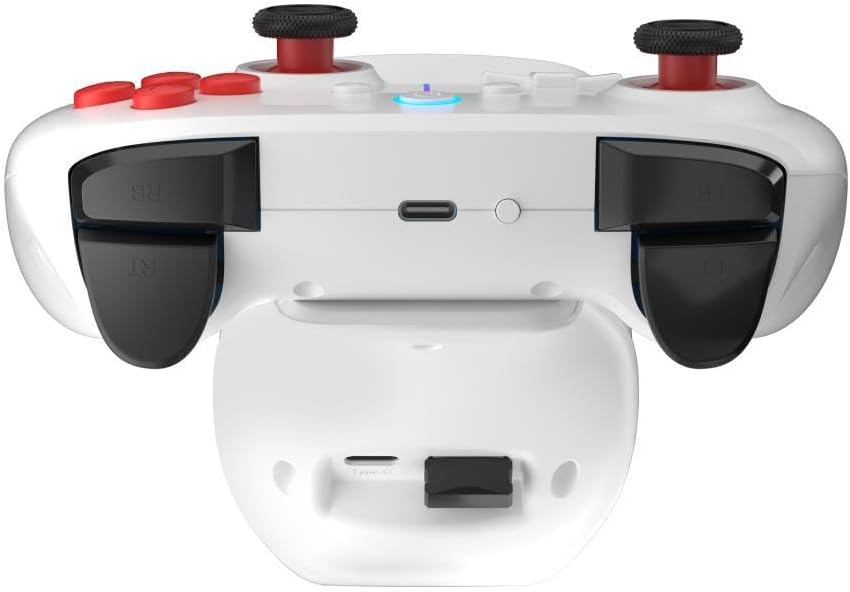
Figure 3.4: Rear view of the gamepad, detailing the placement of the LB/RB shoulder buttons, LT/RT triggers, and the USB-C charging port at the top edge.

Figure 3.5: Side-rear perspective of the gamepad, providing a clearer view of the USB-C port for wired connection or direct charging.
4. Setup and Connection
4.1 Charging the Gamepad
Before first use, fully charge the gamepad. You can charge it by placing it on the charging station or by connecting the USB-C cable directly to the gamepad and a power source (e.g., PC USB port, USB wall adapter).
- Charging Station: Align the gamepad with the charging pins on the station. The indicator light on the gamepad or station will show charging status.
- Direct USB-C: Connect the provided USB-C cable to the gamepad's port and the other end to a USB power source.
4.2 2.4 GHz Wireless Connection (PC/Console)
- Insert the 2.4 GHz wireless receiver into an available USB port on your PC or compatible console.
- Turn on the gamepad by pressing the Home button.
- The gamepad will automatically attempt to connect to the receiver. The indicator light on the gamepad will become solid when connected.
4.3 Bluetooth Connection (PC/Mobile Devices)
- Ensure Bluetooth is enabled on your device (PC, smartphone, tablet).
- On the gamepad, press and hold the Bluetooth pairing button (refer to button layout for exact location, usually a small button near the Home button) until the indicator light starts flashing rapidly.
- On your device, search for new Bluetooth devices and select "Rampage HYDRA PRO" from the list.
- Once paired, the indicator light on the gamepad will become solid.
4.4 Wired Connection
Connect the USB-C cable directly from the gamepad to a USB port on your PC or compatible device. The gamepad will be recognized as a wired controller. This mode also charges the gamepad.
5. Operating Instructions
5.1 Button Functions
- Home Button: Powers on/off the gamepad, returns to home screen (console dependent).
- A/B/X/Y Buttons: Standard action buttons.
- D-Pad: Directional input.
- Left/Right Analog Sticks: Provide precise 360-degree movement. Press down for L3/R3 functions.
- LB/RB (Shoulder Buttons): Top-mounted buttons for various in-game actions.
- LT/RT (Triggers): Analog triggers for precise control (e.g., acceleration, braking).
- Select/Back Button: Accesses menus or specific in-game functions.
- Start/Menu Button: Accesses pause menus or game options.
- Share Button: Captures screenshots or video clips (platform dependent).
5.2 RGB Lighting Control
The HYDRA PRO features customizable RGB lighting. Specific button combinations or dedicated buttons (if present) allow you to cycle through different lighting modes, colors, or turn the lighting off. Refer to the quick start guide or product page for specific RGB control instructions.
5.3 Battery Status
The gamepad's indicator light will typically flash slowly when the battery is low. During charging, the light will indicate charging status (e.g., solid while charging, off when fully charged, or a specific color change).
6. Maintenance
- Cleaning: Use a soft, dry cloth to clean the gamepad and charging station. For stubborn dirt, slightly dampen the cloth with water. Do not use harsh chemicals or abrasive cleaners.
- Storage: Store the gamepad in a cool, dry place away from direct sunlight and extreme temperatures.
- Battery Care: To prolong battery life, avoid fully discharging the gamepad frequently. Charge it regularly, even if not in use for extended periods.
- Avoid Drops: Protect the gamepad from drops and impacts, which can damage internal components.
7. Troubleshooting
| Problem | Possible Cause | Solution |
|---|---|---|
| Gamepad does not turn on. | Low battery. | Charge the gamepad fully. |
| Gamepad does not connect wirelessly. | Receiver not properly inserted; Bluetooth not enabled/paired; interference. | Ensure receiver is fully inserted. Re-pair Bluetooth. Move closer to the receiver/device. Check for other wireless devices causing interference. |
| Buttons/sticks are unresponsive or drifting. | Software glitch; physical damage; dust/debris. | Restart the gamepad. Clean around buttons/sticks. If problem persists, contact support. |
| Charging station not charging. | Gamepad not properly seated; power cable issue. | Ensure gamepad is correctly aligned on the pins. Check USB-C cable connection to the station and power source. |
8. Specifications
| Feature | Detail |
|---|---|
| Brand | Rampage |
| Model | HYDRA PRO |
| Connectivity | 2.4 GHz Wireless, Bluetooth, Wired (USB-C) |
| Weight | 0.4 Kilogram |
| Manufacturer | Rampage |
| Special Features | RGB Lighting, Charging Station Included |
9. Warranty and Support
The Rampage HYDRA PRO Gamepad comes with a standard manufacturer's warranty. Please refer to the warranty card included in your package for specific terms and conditions. For technical support, product inquiries, or warranty claims, please contact Rampage customer service through their official website or the retailer where you purchased the product.
Please retain your proof of purchase for warranty purposes.


