
1. Product Overview
Thank you for choosing a Hotpoint electric dryer. This manual provides essential information for the safe and efficient operation, maintenance, and troubleshooting of your HTX26EASWWW model. This dryer features a durable aluminized drum, multiple temperature selections, and a reversible dryer door for flexible installation.

Figure 1: Front view of the Hotpoint HTX26EASWWW electric dryer, showcasing its white finish and control panel.
2. Important Safety Information
Read all instructions before using the appliance. To reduce the risk of fire, electric shock, or injury to persons when using your appliance, follow basic precautions, including the following:
- Do not dry articles that have been previously cleaned in, washed in, soaked in, or spotted with gasoline, dry-cleaning solvents, or other flammable or explosive substances, as they give off vapors that could ignite or explode.
- Do not allow children to play on or in the appliance. Close supervision of children is necessary when the appliance is used near children.
- Before the appliance is removed from service or discarded, remove the door to the drying compartment.
- Do not reach into the appliance if the drum is moving.
- Do not install or store this appliance where it will be exposed to the weather.
- Do not tamper with controls.
- Clean the lint filter before each load. Failure to do so can increase drying time and fire risk.

Figure 2: Removing the lint filter, a crucial step for safety and efficiency before each use.
3. Installation and Setup
Proper installation is crucial for the safe and efficient operation of your dryer. It is recommended that installation be performed by a qualified installer.
3.1 Location Requirements
- Ensure the dryer is installed on a level floor.
- Provide adequate clearance for air circulation and servicing.
- Do not install in areas where water freezing may occur.
3.2 Electrical Requirements
This electric dryer requires a 240V, 30A dedicated circuit. Consult a qualified electrician if you are unsure about your home's electrical system.
3.3 Exhaust Requirements
The dryer must be exhausted to the outdoors using a rigid metal duct. Flexible plastic or foil ducts are not recommended and can pose a fire hazard.
3.4 Reversible Dryer Door
The dryer door can be reversed to open from the left or right side, depending on your laundry room layout. Refer to the detailed instructions in the full installation guide for this procedure.
4. Operating Instructions
Your Hotpoint dryer is designed for ease of use. Follow these steps for optimal drying results.
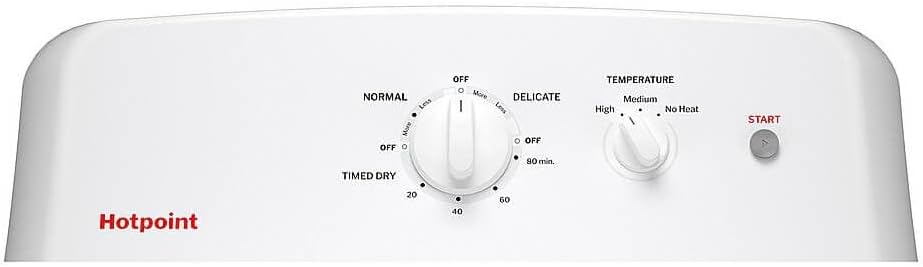
Figure 3: Close-up of the control panel with Timed Dry, Temperature, and Start controls.
4.1 Loading the Dryer
- Load the dryer loosely. Do not overload.
- Mix large and small items for better tumbling.
- Close the dryer door firmly.
4.2 Selecting a Cycle and Temperature
Your dryer offers two main drying options: Timed Dry and Auto Dry (Normal/Delicate).
- Timed Dry: Turn the Timed Dry knob to the desired drying time (up to 90 minutes). This setting is ideal for small loads or when you need a specific drying duration.
- Auto Dry (Normal/Delicate): For most loads, select either NORMAL or DELICATE. The dryer will automatically sense the moisture level and stop when clothes are dry, saving energy and preventing over-drying.
- Temperature Selection: Turn the Temperature knob to select the appropriate heat setting: High, Medium, or No Heat. Refer to garment care labels for recommended temperatures.
4.3 Starting the Dryer
- After selecting your cycle and temperature, press the START button.
- The dryer will begin tumbling and heating.
5. Maintenance and Care
Regular maintenance ensures the longevity and efficiency of your dryer.
5.1 Cleaning the Lint Filter
Clean the lint filter before every load. Pull the lint filter straight up and out. Roll the lint off the filter with your fingers. Do not rinse or wash the filter.
5.2 Cleaning the Dryer Interior
Wipe the dryer drum with a damp cloth as needed. For stubborn stains, use a mild household cleaner and then wipe thoroughly with a damp cloth.
5.3 Cleaning the Dryer Exterior
Wipe the exterior surfaces with a soft, damp cloth. Do not use abrasive cleaners or solvents.
6. Troubleshooting
Before calling for service, check the following common issues and solutions:
| Problem | Possible Cause | Solution |
|---|---|---|
| Dryer does not start | Power cord unplugged; circuit breaker tripped; door not closed; START button not pressed. | Check power connection; reset breaker; ensure door is latched; press START firmly. |
| No heat | Temperature setting is on "No Heat"; heating element issue; thermal fuse tripped. | Select a heat setting; contact service if problem persists. |
| Clothes not drying completely | Lint filter clogged; overloaded dryer; improper temperature setting; restricted exhaust. | Clean lint filter; reduce load size; select higher temperature; check exhaust duct for kinks or blockages. |
| Excessive noise | Foreign objects in drum; dryer not level. | Check drum for loose items; ensure dryer is level. |
7. Specifications
Key specifications for the Hotpoint HTX26EASWWW Electric Dryer:
- Brand: Hotpoint
- Model: HTX26EASWWW
- Capacity: 6.2 Cu. Ft.
- Color: White
- Item Weight: Approximately 100 pounds
- Product Dimensions: Approximately 46 x 28.5 x 28.5 inches (Height x Width x Depth)
- Drum Material: Aluminized
- Door Type: Reversible
- UPC: 084691942832
8. Warranty and Support
For warranty information, service, or technical support, please refer to the warranty card included with your appliance or visit the official Hotpoint website. Keep your purchase receipt for warranty claims.
Hotpoint Customer Service: For assistance, please contact Hotpoint customer support through their official channels.


