1. Introduction
Thank you for choosing the KEENSTAR 20Bar Espresso Machine, Model JH-C5210. This manual provides essential information for the safe and efficient operation, maintenance, and care of your new espresso machine. Please read these instructions thoroughly before first use and retain them for future reference.
2. Important Safety Instructions
When using electrical appliances, basic safety precautions should always be followed to reduce the risk of fire, electric shock, and/or injury to persons, including the following:
- Read all instructions.
- Do not touch hot surfaces. Use handles or knobs.
- To protect against fire, electric shock, and injury to persons, do not immerse cord, plugs, or appliance in water or other liquid.
- Close supervision is necessary when any appliance is used by or near children.
- Unplug from outlet when not in use and before cleaning. Allow to cool before putting on or taking off parts, and before cleaning the appliance.
- Do not operate any appliance with a damaged cord or plug or after the appliance malfunctions, or has been damaged in any manner.
- The use of accessory attachments not recommended by the appliance manufacturer may result in fire, electric shock, or injury to persons.
- Do not use outdoors.
- Do not let cord hang over edge of table or counter, or touch hot surfaces.
- Do not place on or near a hot gas or electric burner, or in a heated oven.
- Always attach plug to appliance first, then plug cord into the wall outlet. To disconnect, turn any control to "off", then remove plug from wall outlet.
- Do not use appliance for other than intended use.
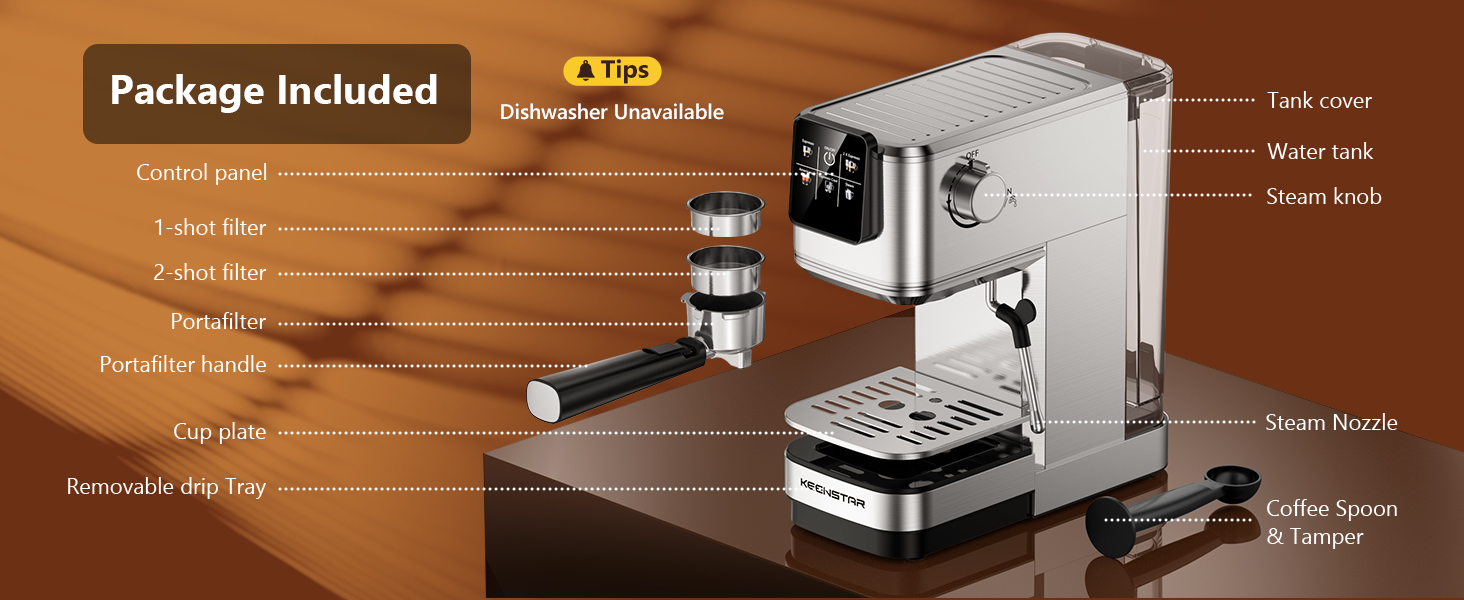
3. Product Components
Familiarize yourself with the parts of your KEENSTAR Espresso Machine:
- Control Panel (Touch Screen)
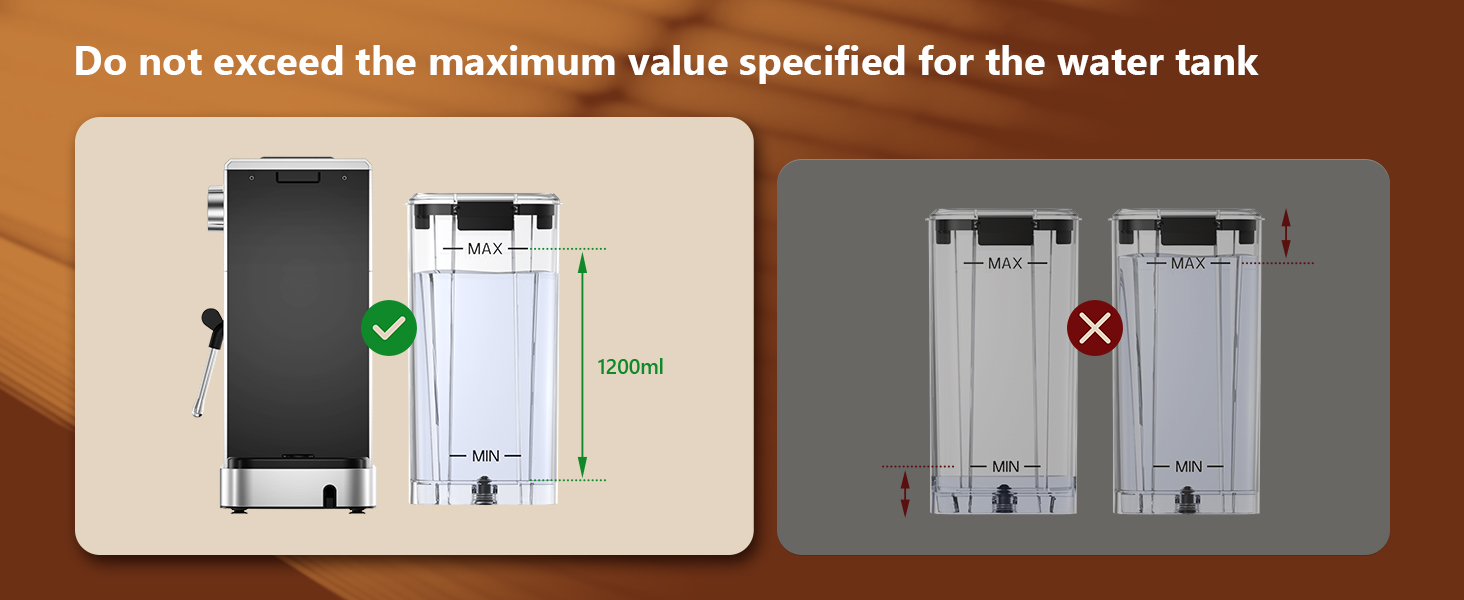
- Water Tank (40oz / 1200ml capacity)
- Steam Knob
- Portafilter Handle
- 1-shot Filter Basket
- 2-shot Filter Basket
- Steam Wand / Nozzle
- Removable Drip Tray
- Cup Plate (Heated)
- Coffee Spoon & Tamper
4. Initial Setup and First Use
Before using your espresso machine for the first time, follow these steps:
- Unpack: Carefully remove all packaging materials and ensure all components are present.
- Clean: Wash the water tank, portafilter, and filter baskets with warm soapy water. Rinse thoroughly and dry. Wipe the exterior of the machine with a damp cloth.
- Fill Water Tank: Fill the water tank with fresh, cold water up to the MAX line. Do not exceed the maximum fill level.
- Power On: Plug the machine into a grounded electrical outlet.
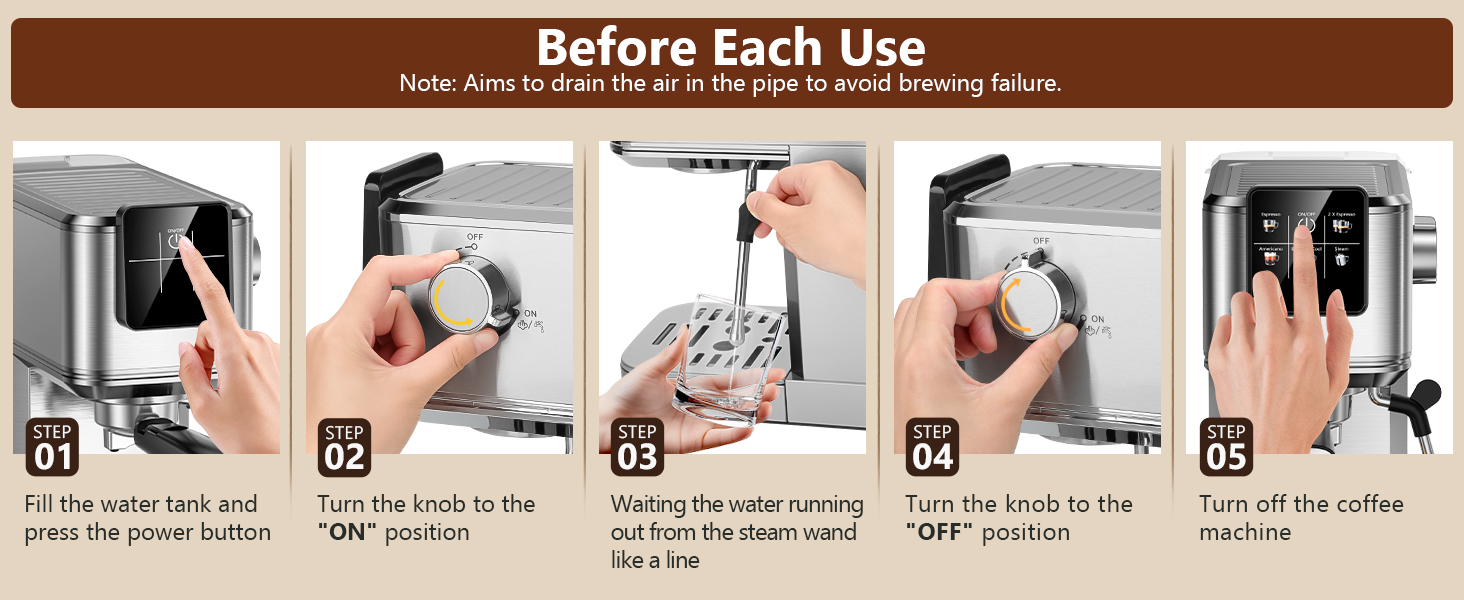
- Prime the Machine (Before Each Use): This step drains air from the internal pipes to prevent brewing failure.
- Press the power button on the control panel.
- Turn the steam knob to the "ON" position.
- Wait for water to run out from the steam wand in a steady stream.
- Turn the steam knob to the "OFF" position.
- Turn off the coffee machine.


5. Operating Instructions
5.1 Brewing Espresso (Single or Double)
Ensure the steam knob is in the "OFF" position before brewing coffee.
- Power On: Press the power button on the control panel. The indicator will blink, signifying preheating.
- Prepare Ground Coffee: Use medium ground coffee (>0.5mm). Load the appropriate filter basket (1-shot or 2-shot) with ground coffee (7g for single, 14g for double) and tamp it firmly with the coffee spoon/tamper.
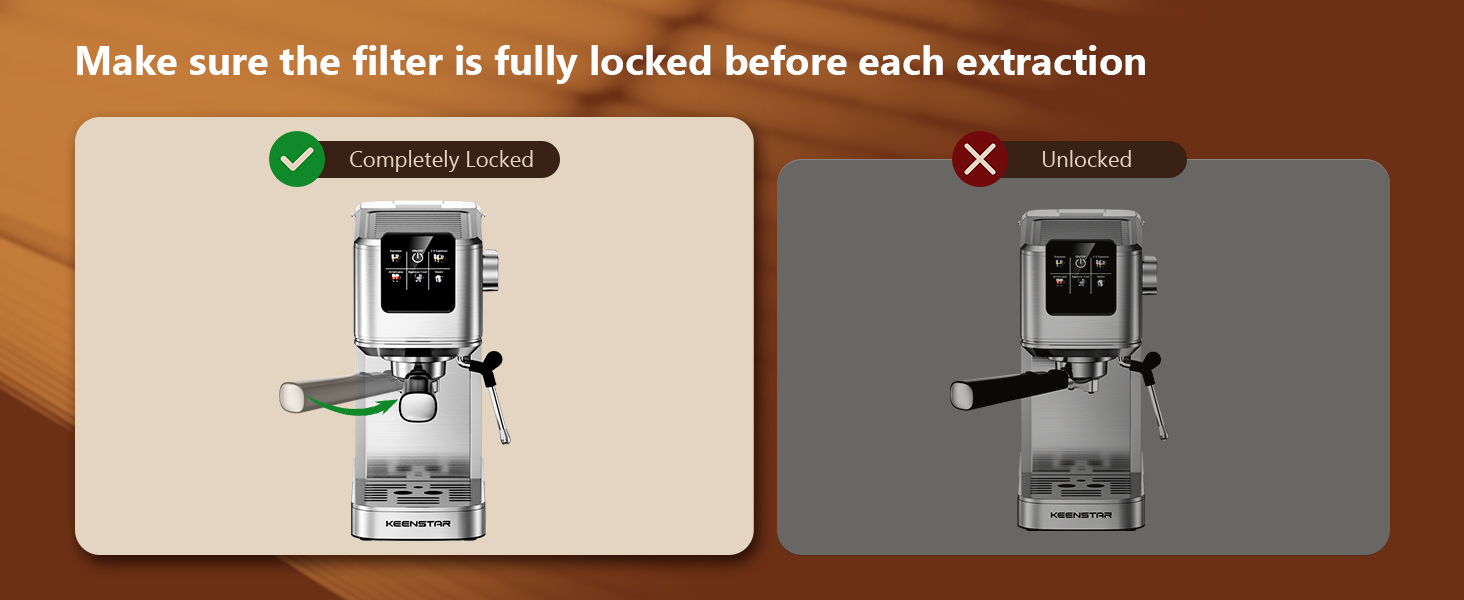
- Attach Portafilter: Insert the portafilter into the group head and turn it firmly to the right until it is completely locked. Place a cup(s) on the drip tray.
- Preheat: Wait for the indicator light to become steady, indicating the machine is preheated and ready to brew.
- Brew: Select "Espresso" for a single shot or "2X Espresso" for a double shot on the touch screen. The machine will begin brewing.
5.2 Making Cold Brew Espresso
The machine offers a rapid cold brew function:
- Prepare: Fill the water tank approximately 2/3 full with ice cubes.
- Brew: Follow steps 1-3 from "5.1 Brewing Espresso".
- Select Cold Brew: On the touch screen, select "Espresso Cool". The machine will brew a cold espresso shot.

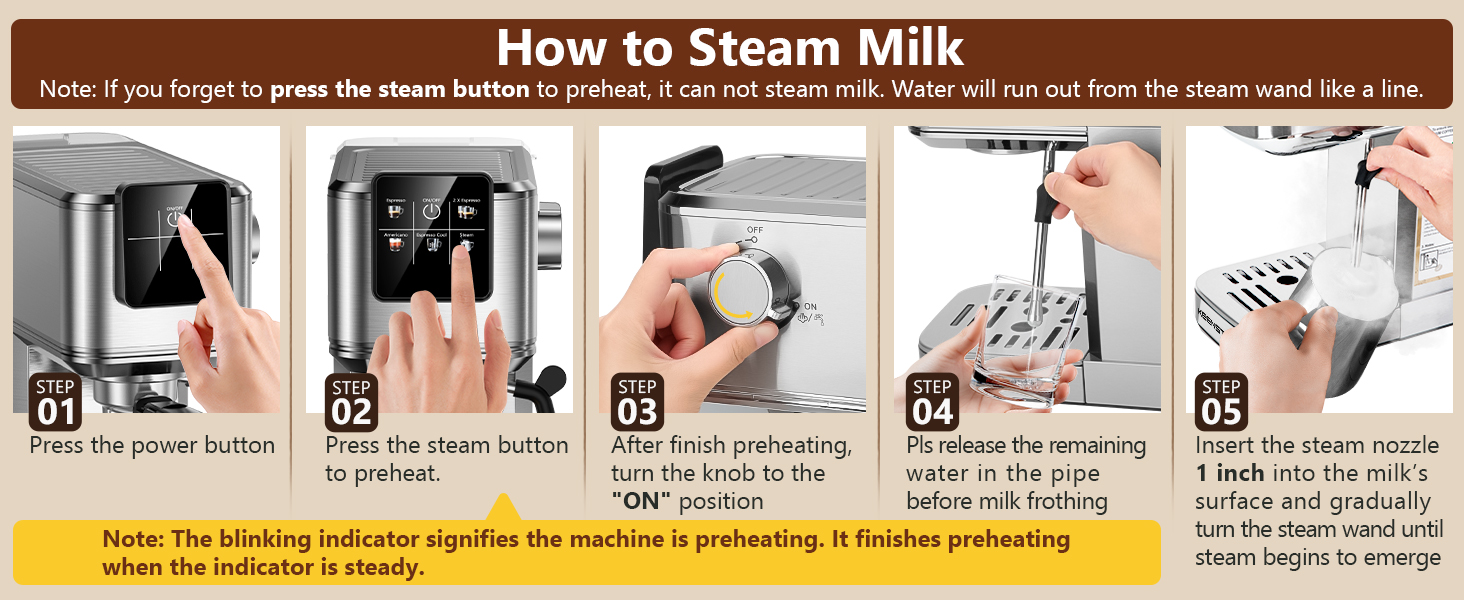
5.3 Frothing Milk with the Steam Wand
To create creamy milk foam for lattes and cappuccinos:
- Power On: Press the power button.
- Preheat Steam: Press the "Steam" button on the touch screen to preheat the steam function. The indicator will blink during preheating.
- Purge Steam Wand: After preheating is complete (indicator is steady), turn the steam knob to the "ON" position briefly to release any condensed water from the wand. Turn it OFF.
- Froth Milk: Insert the steam nozzle approximately 1 inch into the surface of cold milk in a frothing pitcher. Gradually turn the steam knob to the "ON" position.
- Texture Milk: Move the pitcher up and down to create microfoam. Once desired texture is achieved, turn the steam knob to "OFF" and remove the pitcher.
- Clean Wand: Immediately wipe the steam wand with a damp cloth to prevent milk residue from drying. Briefly turn the steam knob ON again to clear any internal milk.

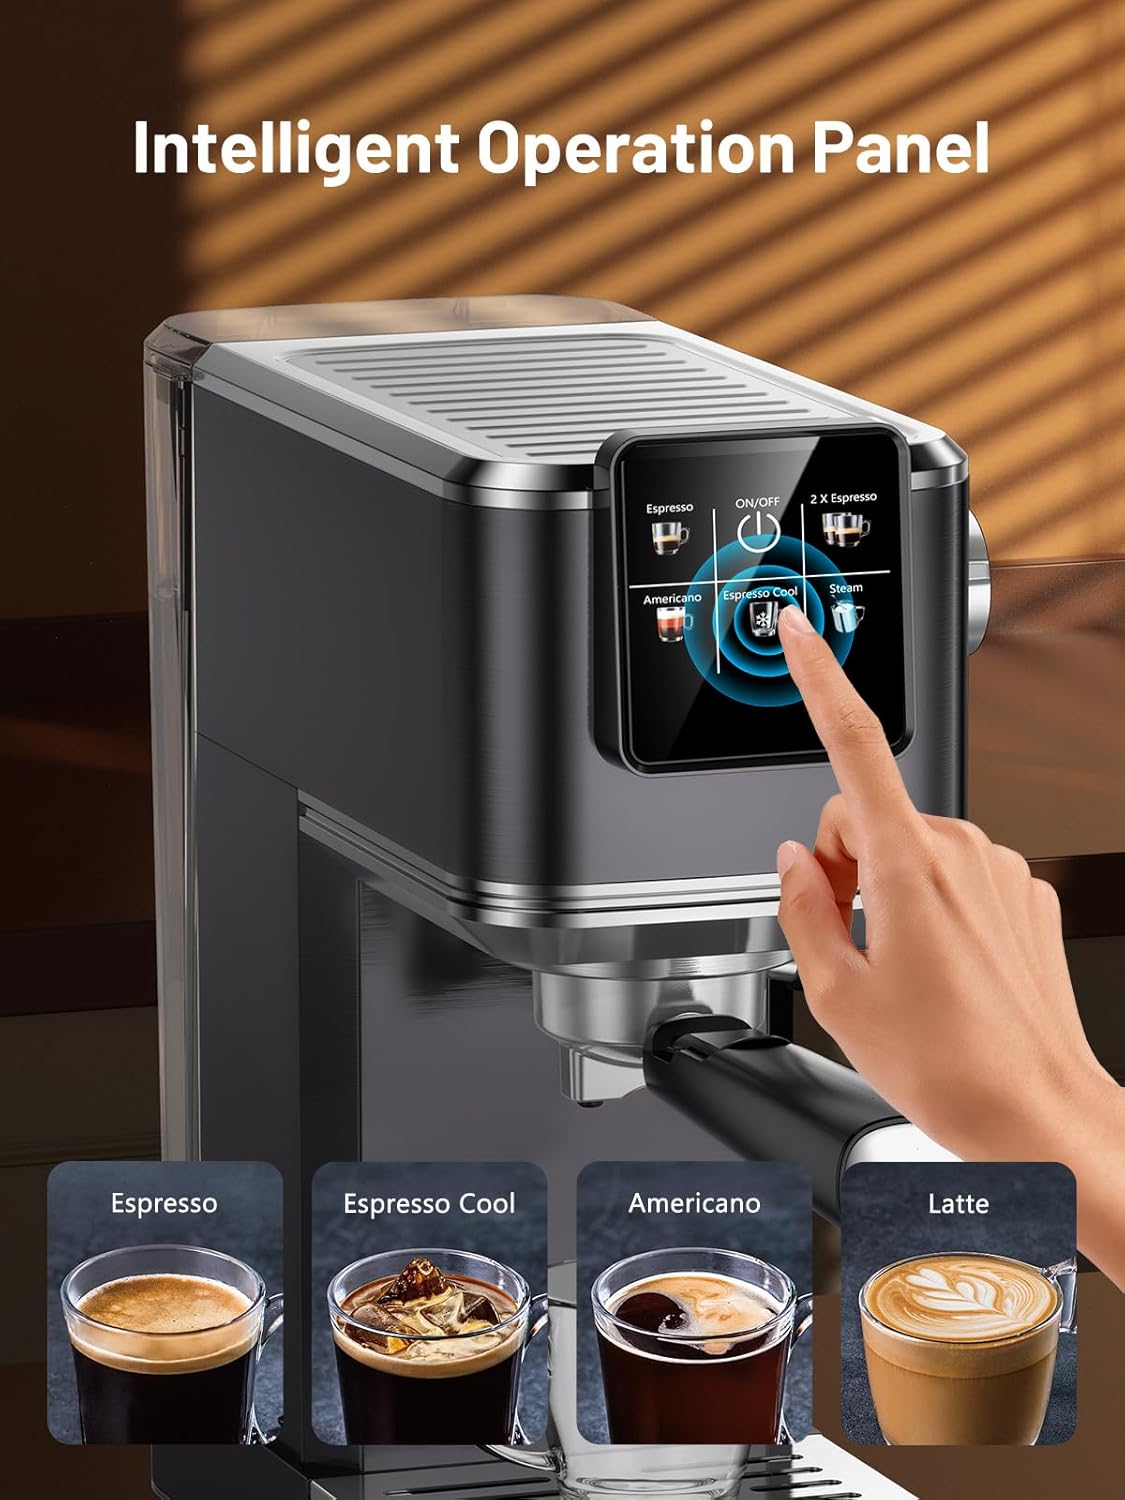
5.4 Touch Screen Operation
The machine features an intuitive touch screen for various functions:
- Espresso: Brews a single shot of espresso.
- 2X Espresso: Brews a double shot of espresso.
- Espresso Cool: Brews a cold espresso shot (requires ice in water tank).
- Americano: Brews an Americano.
- Steam: Activates the steam wand for milk frothing.
- ON/OFF: Powers the machine on or off.
6. Maintenance and Cleaning
Regular cleaning ensures optimal performance and longevity of your espresso machine.
6.1 Daily Cleaning
- Drip Tray: Empty and clean the removable drip tray after each use or when the indicator floats up.
- Portafilter and Filter Baskets: Remove spent coffee grounds and rinse the portafilter and filter baskets under warm water.
- Steam Wand: As mentioned in section 5.3, wipe the steam wand immediately after frothing milk.
- Exterior: Wipe the exterior of the machine with a soft, damp cloth. Do not use abrasive cleaners or scouring pads.


6.2 Descaling
Over time, mineral deposits can build up in the machine, affecting performance. Descale your machine every 2-3 months, or more frequently if you have hard water.
- Prepare Descaling Solution: Mix a descaling solution according to the manufacturer's instructions (or use a mixture of white vinegar and water, 1:1 ratio).
- Fill Water Tank: Pour the descaling solution into the water tank.
- Run Solution: Place a large container under the portafilter and steam wand. Run the descaling solution through the machine by performing several espresso cycles and activating the steam wand for a few minutes.
- Rinse: After the solution has run through, rinse the water tank thoroughly and fill it with fresh water. Run several cycles of fresh water through the machine to remove any residual descaling solution.
7. Troubleshooting
If you encounter issues with your espresso machine, refer to the following common problems and solutions:
| Problem | Possible Cause | Solution |
|---|---|---|
| No coffee dispenses / Slow flow |
|
|
| Water leaks from portafilter |
|
|
| No steam from wand / Weak steam |
|
|
| Coffee is not hot enough |
|
|
8. Product Specifications
| Feature | Detail |
|---|---|
| Brand | KEENSTAR |
| Model Name | JH-C5210 |
| Pressure System | 20 Bar Professional Pump |
| Power | 1350W |
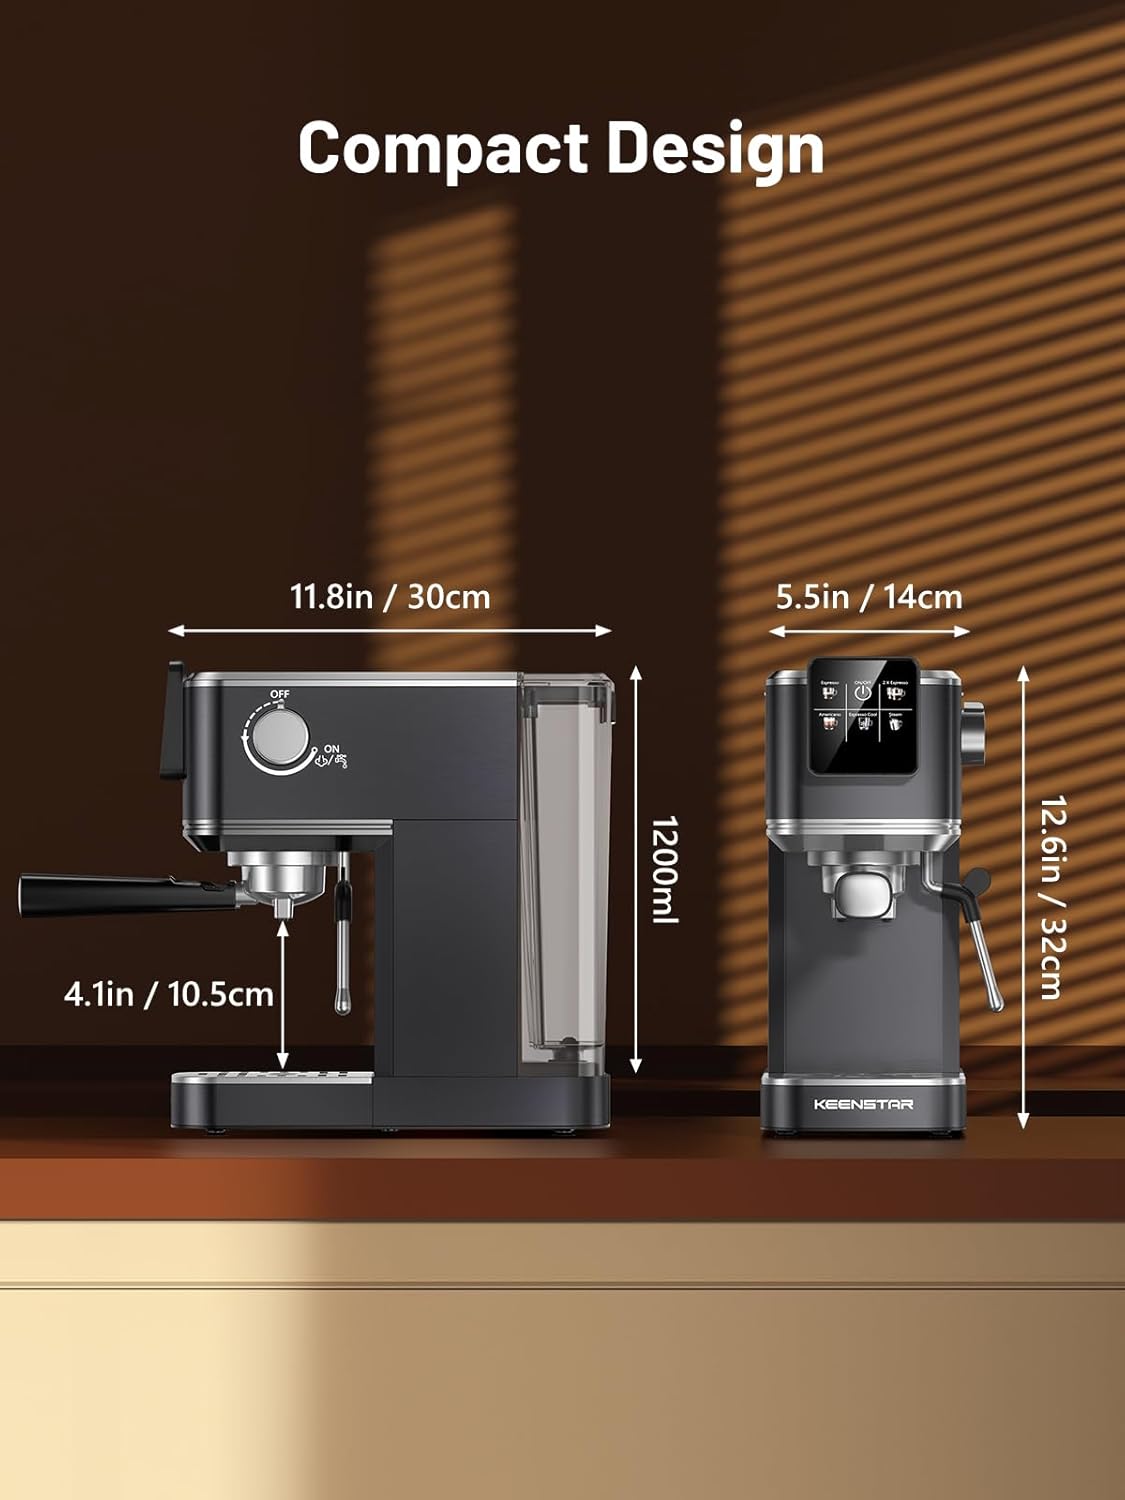
| Water Tank Capacity | 40 oz (1200 ml) |
| Product Dimensions (D x W x H) | 11.8"D x 5.5"W x 12.6"H (30cm D x 14cm W x 32cm H) |
| Item Weight | 10 pounds |
| Coffee Input Type | Ground Coffee, Coffee Beans |
| Operation Mode | Fully Automatic (for brewing functions) |
| Special Features | Rapid Cold Brew, Milk Frother Steam Wand, Touch Screen, Heated Cup Holder |
9. Warranty and Support
KEENSTAR offers the following support for your product:
- 30-Day Money-Back Guarantee: If you are not satisfied with your purchase.
- 1-Year Free Replacement: For manufacturing defects from the date of purchase.
- Lifetime After-Customer Service: For ongoing support and assistance.
For customer service inquiries, please refer to the contact information provided with your product packaging or visit the official KEENSTAR website.


