Introduction
This manual provides comprehensive instructions for the safe and efficient operation of your BeLink MX7900 Pro Ultra HD Smart Video Projector. Please read this manual thoroughly before using the product and retain it for future reference.
What's in the Box
- BeLink MX7900 Pro Projector
- Adapter
- Remote Control
- User Manual
Product Overview

Figure 1: Front View of the Projector. This image displays the front of the BeLink MX7900 Pro projector, highlighting the projection lens and the front panel design. The lens is centrally located at the top, with indicator lights and control symbols above it.

Figure 2: Rear View and Connectivity Ports. This image shows the rear panel of the BeLink MX7900 Pro projector, featuring various input/output ports and the air outlet. Visible ports include USB, Reset button, DC 12V power input, Power button, and HDMI. A prominent warning advises not to block the air outlet, which is located above a large ventilation grille.
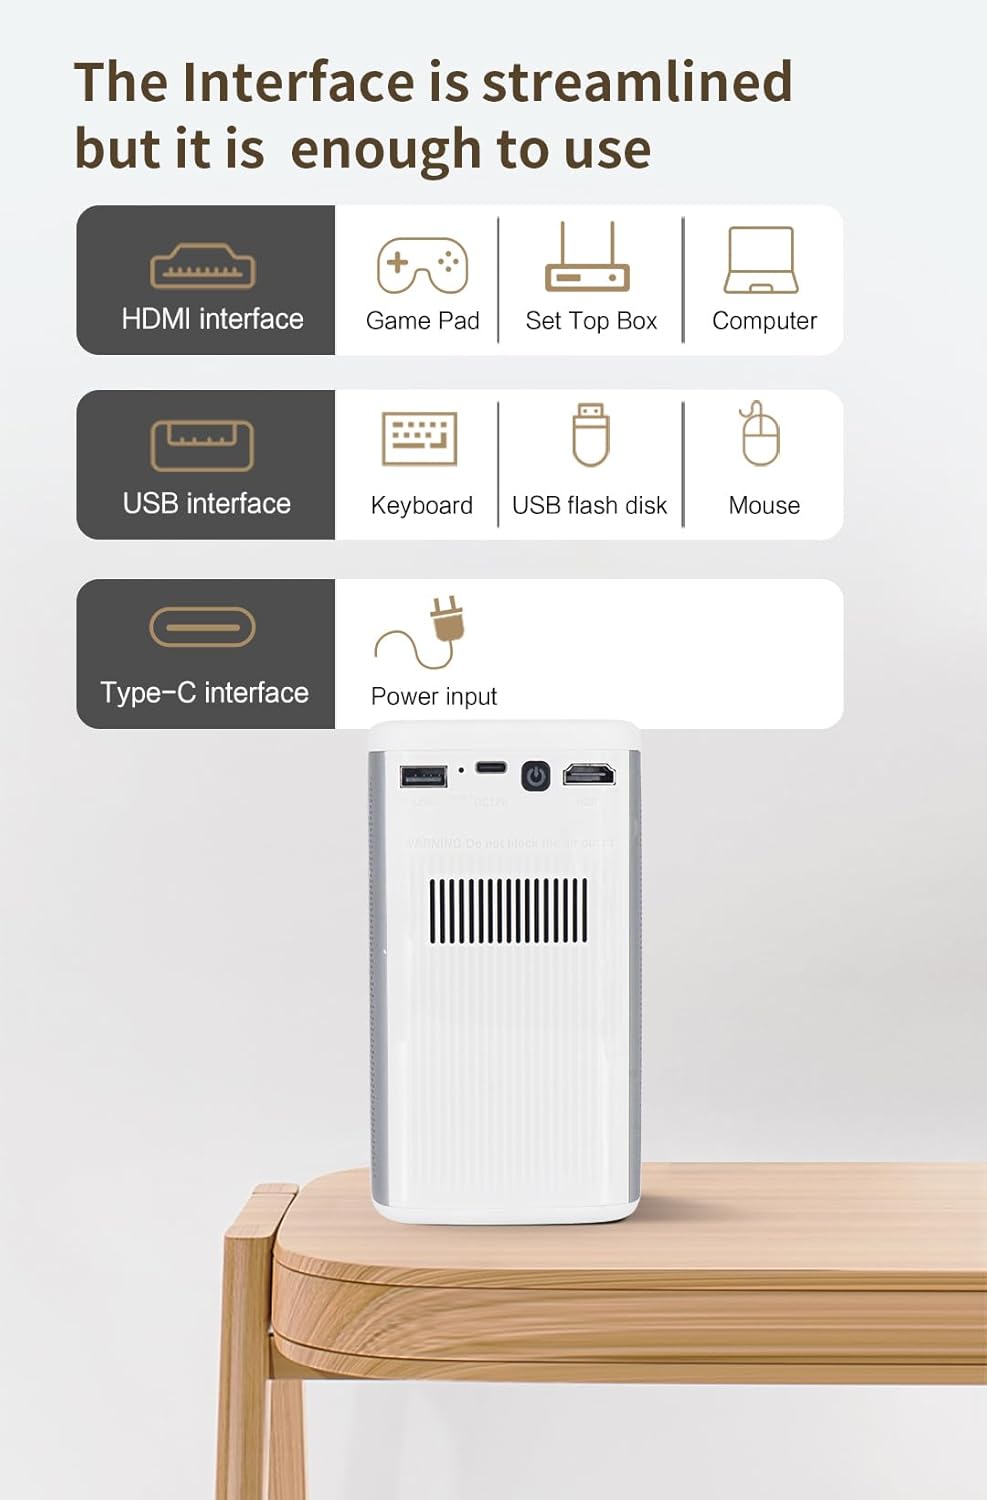
Figure 3: Streamlined Interface Options. This diagram illustrates the various input interfaces available on the BeLink MX7900 Pro projector. It categorizes them into HDMI interface (for Game Pad, Set Top Box, Computer), USB interface (for Keyboard, USB flash disk, Mouse), and Type-C interface (for Power input). This visual guide helps users identify and connect their devices correctly.

Figure 4: Enhanced Sound Effect. This image highlights the advanced audio features of the BeLink MX7900 Pro projector. It states that the projector breaks traditional limitations by including two 5W full-frequency subwoofers, providing 360° stereo sound. Icons represent surround sound effect, dual speakers, and dynamic enhancement.
Setup
1. Placement
Place the projector on a stable, flat surface. Ensure there is adequate ventilation around the unit, keeping at least 30 cm (12 inches) clear space from walls or other objects to prevent overheating. Avoid direct sunlight or strong light sources that may affect projection quality.
2. Power Connection
- Connect the provided power adapter to the DC 12V input port on the projector (refer to Figure 2).
- Plug the power adapter into a suitable electrical outlet.
3. Initial Power On
- Press the Power button on the projector or the remote control to turn on the device.
- Allow a few moments for the projector to boot up.
4. Focus and Keystone Adjustment
Adjust the focus ring near the lens until the projected image is clear. If the image appears trapezoidal, use the keystone correction feature (usually found in the projector's settings menu) to square the image.
Operating Instructions
1. Connecting Devices
- HDMI: Connect your game console, set-top box, or computer to the HDMI port (refer to Figure 3). Select the HDMI input source from the projector's menu.
- USB: Insert a USB flash drive into the USB port to play media files directly. You can also connect a USB keyboard or mouse for easier navigation (refer to Figure 3).
- Wi-Fi: Navigate to the network settings in the projector's menu to connect to a wireless network. This enables smart features and streaming.
2. Navigation and Settings
Use the remote control or the physical buttons on the projector to navigate through the on-screen menu. Adjust settings such as picture mode, sound mode, input source, and network configuration as needed.
3. Playing Media and 3D Content
Once a source is selected, the projector will display the content. For 3D content, ensure your source material is 3D compatible and use appropriate 3D glasses (sold separately) for an immersive experience.
Maintenance
- Lens Cleaning: Gently wipe the projector lens with a soft, lint-free cloth specifically designed for optical surfaces. Do not use abrasive cleaners.
- Air Vent Cleaning: Regularly check and clean the air vents to ensure proper airflow and prevent overheating. Use a soft brush or compressed air to remove dust. Important: Do not block the air outlet during operation.
- Storage: When not in use for extended periods, store the projector in a cool, dry place, away from direct sunlight and extreme temperatures.
Troubleshooting
| Problem | Possible Cause | Solution |
|---|---|---|
| No Power | Power cable disconnected; Power outlet issue | Check power cable connection; Try a different outlet |
| No Image | Incorrect input source; Cable not connected properly | Select correct input source; Reconnect HDMI/USB cable |
| Blurry Image | Out of focus; Incorrect keystone correction | Adjust focus ring; Adjust keystone settings |
| No Sound | Volume too low; Muted; External audio device issue | Increase volume; Unmute; Check external audio connections |
Specifications
| Feature | Detail |
|---|---|
| Brand | BeLink |
| Model | MX7900 Pro |
| Display Resolution | 1920 x 1200 |
| Connectivity Technology | Wi-Fi |
| Special Feature | 3D-Ready |
| Recommended Uses | Home Cinema |
| Color | White |
| Country of Origin | USA |
Warranty and Support
Warranty Information
The BeLink MX7900 Pro Projector comes with a standard manufacturer's warranty. Please refer to the warranty card included with your product for specific terms and conditions, including coverage period and limitations.
Customer Support
For technical assistance, troubleshooting, or warranty claims, please contact BeLink customer support. Contact details can typically be found on the official BeLink website or on the product packaging.


