
Introduction
Thank you for choosing the Generisch Tektro HD-T275 Hydraulic Brake System. This manual provides essential information for the safe installation, operation, and maintenance of your new hydraulic disc brake. Please read this manual thoroughly before installation and use to ensure optimal performance and safety.
The Tektro HD-T275 is an open hydraulic system featuring a two-piston caliper and a 3-finger aluminum lever with adjustable reach. It is designed for reliable braking performance on sports and daily bicycles, utilizing organic brake pads and supporting easy replacement of 160mm diameter brake discs.
Important Safety Instructions
- Professional Installation Recommended: Installation of hydraulic brake systems requires specialized tools and knowledge. It is highly recommended to have this system installed by a qualified bicycle mechanic.
- Brake-In Period: New brake pads and rotors require a break-in period to achieve full braking power. Perform several moderate stops from a safe speed before relying on full braking power.
- Regular Inspection: Regularly inspect brake pads for wear, brake lines for damage, and fluid levels. Replace worn components immediately.
- Brake Fluid: This system uses mineral oil. Do not use DOT fluid, as it will damage the system. Avoid contact with skin and eyes.
- Rotor Compatibility: Ensure your bike's frame and fork are compatible with disc brakes and the specified rotor size (160mm).
- Lever Adjustment: Adjust the brake lever reach to a comfortable position, ensuring full engagement without bottoming out.
- Wet Conditions: Braking performance may be reduced in wet or muddy conditions. Exercise caution and allow for longer stopping distances.
Package Contents
Please verify that all the following components are included in your package:
- Brake Lever (3-finger, aluminum)
- Brake Caliper (two-piston)
- Brake Pads (organic, pre-installed)
- Hose Clamp Ring
- Connection Screws
- Support Bushing
- Mounting Screws
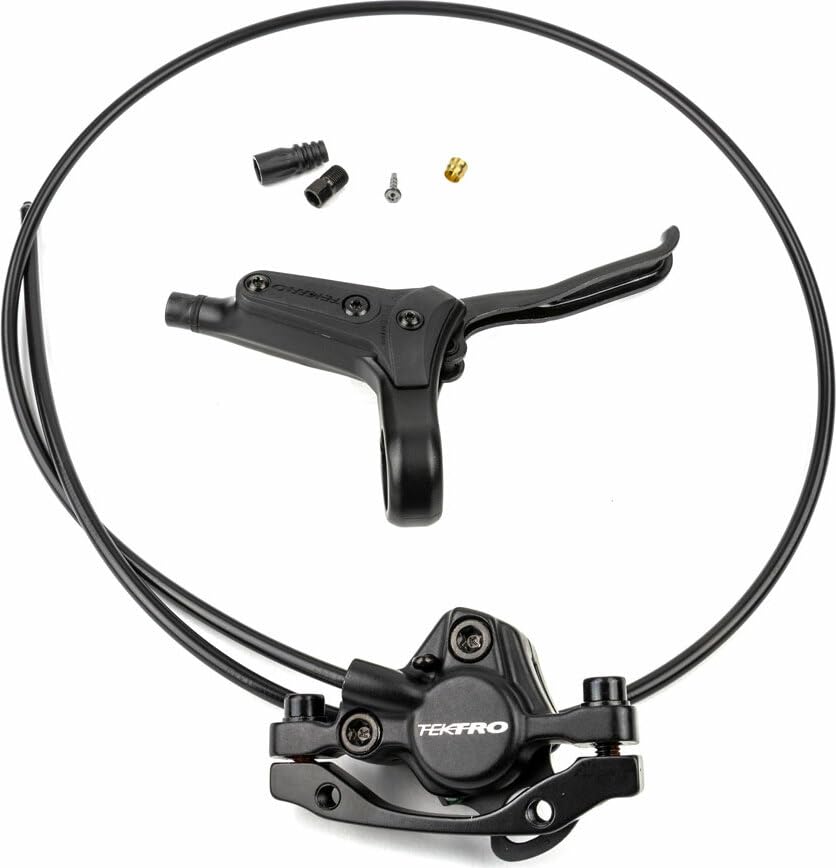
Image showing the Generisch Tektro HD-T275 hydraulic brake system, including the lever, caliper, and hose, representing the main components.
Setup and Installation
This section outlines the general steps for installing the Tektro HD-T275 hydraulic brake system. For detailed, model-specific instructions, always refer to a professional bicycle mechanic or a comprehensive workshop manual.
1. Mount the Brake Lever
- Position the brake lever on your handlebar. Ensure it is on the correct side (rear brake lever typically on the left for European bikes, right for US bikes).
- Secure the lever using the provided clamp ring and screws. Do not overtighten; allow for slight rotation for final adjustment.
2. Mount the Brake Caliper
- Attach the brake caliper to your bike's frame or fork using the appropriate mounting screws. Ensure the caliper is correctly aligned with the disc brake rotor.
- Use any necessary adapters if your frame/fork mount type differs from the caliper's native mount.
3. Connect the Brake Hose
- The brake system comes pre-bled and assembled with a 1700mm hose for the rear brake.
- Route the brake hose along your bike's frame, securing it with cable ties or frame clips to prevent snagging.
- Ensure the hose has enough slack for handlebar movement and suspension travel without being excessively long.
4. Align the Caliper
- Loosen the caliper mounting bolts slightly so the caliper can move freely.
- Squeeze the brake lever firmly and hold it. This will center the caliper over the rotor.
- While holding the lever, tighten the caliper mounting bolts evenly. Release the lever.
- Spin the wheel to check for rotor rub. Adjust if necessary.
5. Break-In Procedure
- Find a safe, open area.
- Accelerate to a moderate speed (e.g., 15-20 km/h) and apply the brakes firmly but not to a complete stop. Repeat this 20-30 times.
- Allow the brakes to cool between sets. This process beds the pads into the rotor, optimizing braking performance and reducing noise.
Operation
Braking Technique
- Progressive Braking: Apply the brake lever smoothly and progressively. Avoid sudden, hard braking unless in an emergency.
- Lever Feel: The hydraulic system provides a consistent and firm lever feel. If the lever feels spongy, the system may need bleeding (see Maintenance).
- Rear Brake Use: The rear brake (1700mm hose) is primarily used for speed modulation and stability. Over-reliance on the rear brake can lead to skidding.
- Adjustable Reach: The 3-finger lever allows for reach adjustment. Use a small hex key to adjust the distance of the lever from the handlebar for comfortable finger placement.
Maintenance
Regular maintenance ensures the longevity and safe operation of your hydraulic brake system.
1. Brake Pad Inspection and Replacement
- Inspect brake pads regularly for wear. Replace pads when the friction material is less than 0.5mm thick.
- To replace pads, remove the wheel, then remove the retaining pin or clip from the caliper. The old pads can then be pulled out.
- Gently push the caliper pistons back into their bores using a plastic tire lever or a dedicated piston press tool.
- Insert new organic pads, secure them with the retaining pin, and reinstall the wheel.
2. Brake Bleeding
- If the brake lever feels spongy or lacks power, air may have entered the system, or the fluid may be contaminated.
- Bleeding the brakes removes air and replaces old fluid. This process requires a specific bleed kit for Tektro hydraulic brakes and mineral oil.
- It is highly recommended to have brake bleeding performed by a professional mechanic. Incorrect bleeding can compromise braking safety.
3. Cleaning
- Keep brake rotors and calipers clean. Use a clean cloth and isopropyl alcohol or a dedicated disc brake cleaner.
- Avoid getting oil, grease, or lubricants on brake pads or rotors, as this will severely reduce braking performance.
4. Hose and Lever Inspection
- Periodically check the brake hoses for any signs of damage, kinks, or leaks.
- Ensure the brake lever pivots smoothly and returns fully. Lubricate the pivot point with a small amount of light grease if necessary.
Troubleshooting
| Problem | Possible Cause | Solution |
|---|---|---|
| Spongy brake lever | Air in the hydraulic system; low fluid level. | Bleed the brake system. Check for leaks. |
| Poor braking power | Worn brake pads; contaminated pads/rotor; improper break-in; air in system. | Replace brake pads. Clean rotor and pads (if not too contaminated). Re-perform break-in. Bleed system. |
| Squealing or grinding noise | Contaminated pads/rotor; misaligned caliper; worn pads; loose bolts. | Clean rotor and pads. Realign caliper. Replace worn pads. Check all mounting bolts. |
| Rotor rubbing on pads | Misaligned caliper; bent rotor; sticky pistons. | Realign caliper. True or replace bent rotor. Clean and lubricate pistons (professional service recommended). |
| Brake lever not returning | Sticky lever pivot; internal lever mechanism issue. | Clean and lubricate lever pivot. If issue persists, professional inspection is needed. |
Specifications
| Feature | Detail |
|---|---|
| Model | Tektro HD-T275 |
| Brake Type | Hydraulic Disc Brake (Open System) |
| Caliper Design | Two-Piston |
| Lever Design | 3-Finger, Aluminum, Adjustable Reach |
| Hose Length | 1700 mm (Rear Brake) |
| Brake Fluid | Mineral Oil |
| Brake Pads | Organic |
| Recommended Rotor Diameter | 160 mm |
| Material | Aluminum (Lever) |
| Color | Black |
| Included Components | Brake Lever, Brake Caliper, Brake Pad, Clamp Ring, Connection Screws, Support Bushing, Mounting Screws |
Warranty and Support
Specific warranty information for the Generisch Tektro HD-T275 Hydraulic Brake System is not provided in the product details. For warranty claims or technical support, please contact your retailer or the manufacturer directly.
Always retain your proof of purchase for any warranty-related inquiries.