
1. Introduction
This manual provides detailed instructions for the installation, operation, and maintenance of your Fockety Keypad Door Knob with Key. Please read this manual thoroughly before installation and use to ensure proper function and longevity of the product.
Key Features:
- Premium aluminum alloy and stainless steel construction.
- Keyless entry with keypad, supporting 45 user codes (3 administrators, 42 regular users).
- Password length of 6 to 8 digits.
- Virtual password guard feature for enhanced security, allowing dummy digits before or after the correct code (max 16 digits total).
- Suitable for door thicknesses from 35mm to 55mm.
- Emergency key access and Type-C emergency power port.
2. Safety Information
- Do not attempt to disassemble or repair the lock yourself. Contact qualified personnel for service.
- Keep keys in a secure location away from the lock.
- Ensure the door frame and door are structurally sound before installation.
- Avoid exposing the lock to extreme temperatures or direct water spray.
- Regularly check battery levels to prevent unexpected lockouts.
3. Package Contents
Verify that all components are present before beginning installation:
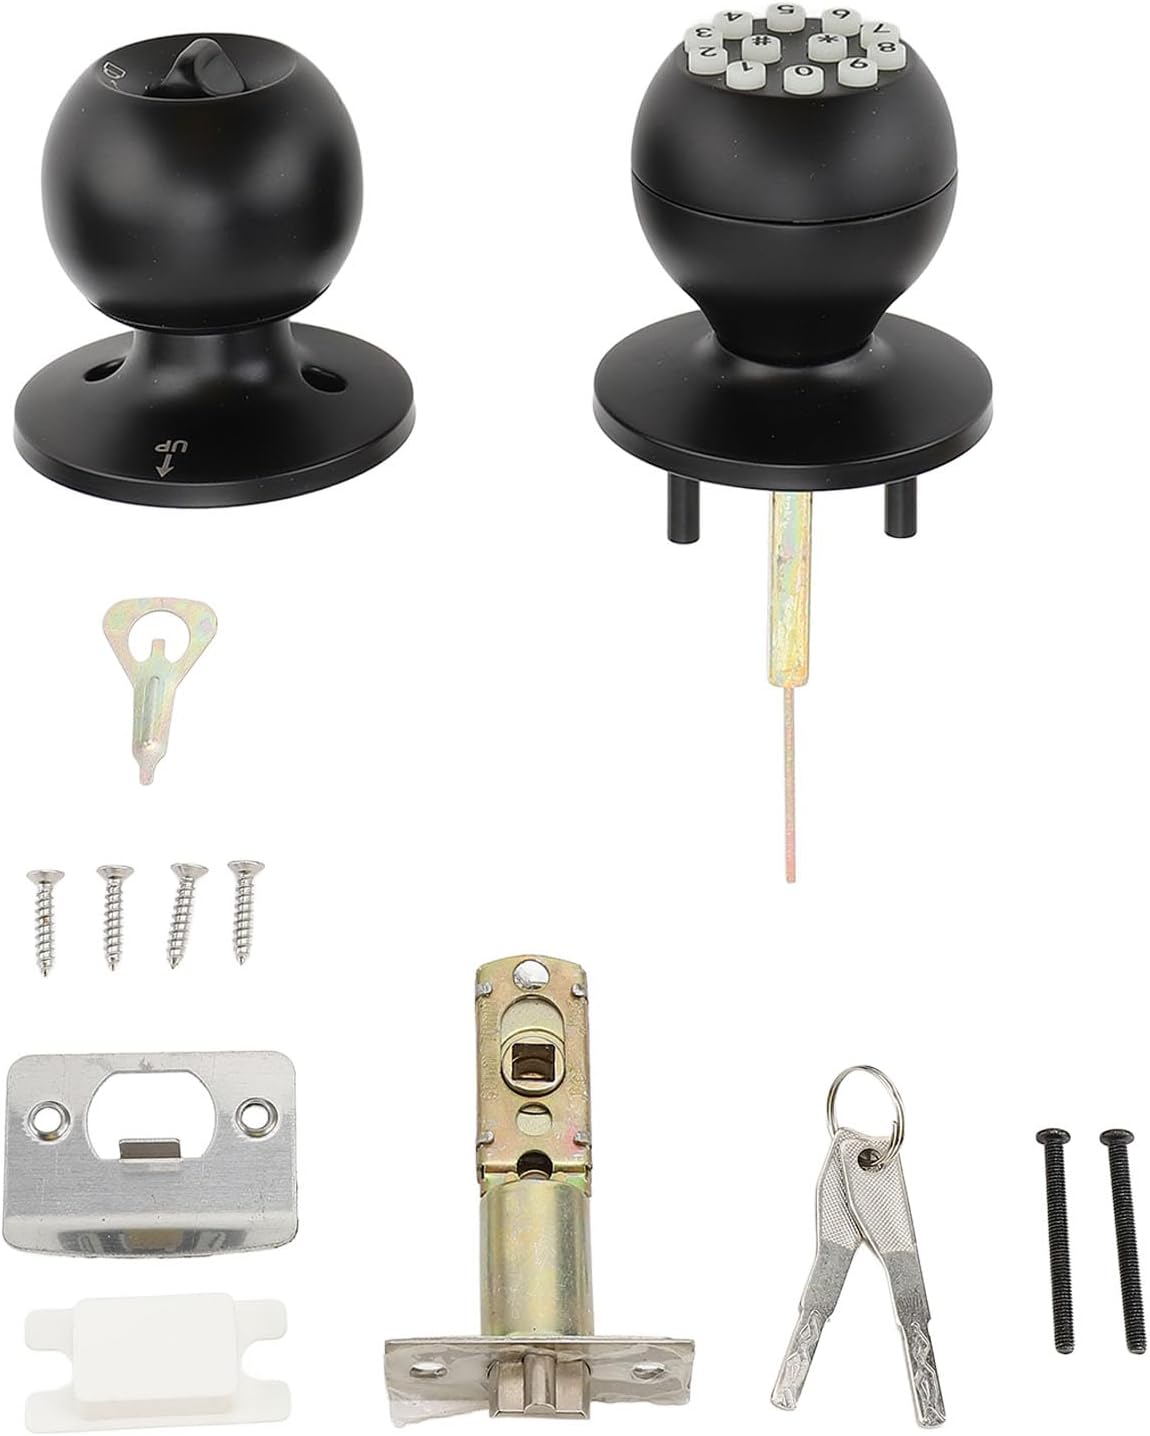
Image: All components included in the package, including the two round ball knobs, lock body, keys, screws, corner support plate, installation key, and corner support plate shell.
- 2 x Round Ball Knobs (one with keypad, one plain)
- 1 x Lock Body
- 1 Bunch x Keys (2PCS Keys)
- 1 x User Manual (this document)
- 4 x Short Screws
- 2 x Long Screws
- 1 x Corner Support Plate
- 1 x Installation Key
- 1 x Corner Support Plate Shell
4. Setup and Installation
The Fockety Keypad Door Knob is designed for easy, wire-free installation, typically requiring only a screwdriver. It is suitable for most wooden and room doors with a thickness between 35mm and 55mm.

Image: The keypad door knob installed on a door, emphasizing its wireless and easy installation.
Installation Steps:
- Prepare the Door: Ensure your door has standard boreholes for a knob lock. The lock is compatible with door thicknesses from 35mm to 55mm.
- Install the Latch: Insert the latch mechanism into the edge of the door and secure it with screws. Ensure the latch bolt faces the correct direction for your door swing.
- Install the Exterior Knob: Place the exterior knob (with keypad) through the borehole, aligning the spindle with the latch mechanism.
- Install the Interior Knob: Connect the interior knob to the exterior knob assembly, ensuring all components align correctly. Secure with the provided screws.
- Test Functionality: After installation, test the lock with both the key and a default code (if applicable) to ensure smooth operation before closing the door.

Image: Visual examples of different existing door knobs (round, lever, deadbolt) being replaced by the Fockety keypad door knob, illustrating its versatility.

Image: An internal view of the door knob installation, demonstrating the simplicity of the process with a screwdriver.
5. Operating Instructions
Unlocking Methods:
- Password Entry: Enter your 6-8 digit user code on the keypad, then turn the knob to open.
- Key Access: Insert the physical key into the keyhole and turn to unlock.
Programming Passwords:
Detailed programming instructions for administrator and user codes are typically found in a separate quick start guide or on the manufacturer's website. Generally, the process involves:
- Entering a default administrator code or pressing a programming button.
- Following voice prompts or indicator lights to set new administrator codes.
- Using an administrator code to add or delete regular user codes.
The lock supports 3 administrator codes and 42 regular user codes.
Virtual Password Guard (Anti-Peep Function):
To prevent others from guessing your code, you can enter random digits before or after your actual 6-8 digit password. The lock will recognize the correct sequence within a maximum of 16 digits. For example, if your code is 123456, you can enter 987123456000 or 111123456222.
Normally Open Mode:

Image: The keypad door knob illustrating its 'normally open mode' functionality, allowing free passage without code entry.
This lock features a normally open mode, allowing the door to be opened without entering a code. This mode is automatically engaged under certain conditions and does not require separate setup. When in this mode, the handle remains disengaged, allowing free entry and exit.
6. Maintenance
Battery Management:

Image: An illustration of the internal lithium battery and a detailed view of the knob's emergency keyhole and Type-C charging port.
The lock is powered by a built-in 3.7V 400mAh ternary lithium battery. This battery is rechargeable and designed for long-lasting performance, capable of being recharged and discharged thousands of times.
- Charging: If the battery runs low, use the Type-C emergency power supply port located on the knob to provide temporary power for unlocking or to recharge the internal battery.
- Battery Life: While designed for longevity, actual battery life varies based on usage frequency. Replace the battery if performance significantly degrades.
Cleaning:
Wipe the lock surface with a soft, dry cloth. Avoid using abrasive cleaners, solvents, or harsh chemicals, as these can damage the finish or electronic components.
7. Troubleshooting
- Lock not responding to keypad:
- Check battery level. Use the Type-C emergency power port if needed.
- Ensure the correct password is being entered.
- Try using the physical key to confirm the lock mechanism is not jammed. - Knob turns but door does not open:
- This indicates the latch bolt is not retracting. Check for obstructions in the door frame or latch mechanism.
- Ensure the lock body is correctly installed and aligned. - Difficulty programming codes:
- Refer to the specific programming instructions provided with your lock or on the manufacturer's website.
- Ensure you are using an administrator code to add or modify user codes. - Keys not working:
- Ensure the key is fully inserted and turned correctly.
- If the key is bent or damaged, do not force it.
8. Specifications

Image: Dimensional drawing of the keypad door knob, showing its width of 80mm (3.15in) and depth of 57mm (2.24in).
| Feature | Specification |
|---|---|
| Model Number | Focketypw3gozg4ks-12 |
| Material | Aluminum Alloy, Stainless Steel |
| Door Thickness Compatibility | 35 to 55mm (1.38 to 2.17in) |
| Password Length | 6 to 8 Digits |
| User Capacity | 45 Sets (3 Administrators, 42 Regular Users) |
| Virtual Password Guard | Max 16 Digits (including correct password) |
| Power Supply | 1 x 3.7V 400mAh Ternary Lithium Battery (Built-in) |
| Unlocking Method | Password or Key |
| Round Ball Knob Size | Approx. 80x57mm (3.15x2.24in) |
9. Warranty and Support
For warranty information, technical support, or service inquiries, please contact the seller or manufacturer directly. Keep your purchase receipt as proof of purchase.