1. Introduction
This manual provides essential information for the safe and efficient operation, installation, and maintenance of your VIKIO HOME Under Cabinet Range Hood. Please read this manual thoroughly before installation and use, and retain it for future reference.

Image 1: Front view of the VIKIO HOME Under Cabinet Range Hood.
2. Safety Information
WARNING: To reduce the risk of fire, electric shock, or injury to persons, observe the following:
- Installation work and electrical wiring must be done by qualified person(s) in accordance with all applicable codes and standards, including fire-rated construction.
- Sufficient air is needed for proper combustion and exhausting of gases through the flue (chimney) of fuel burning equipment to prevent back-drafting.
- When cutting or drilling into wall or ceiling, do not damage electrical wiring and other hidden utilities.
- Ducted fans must always be vented to the outdoors.
- Always disconnect power from the unit before servicing or cleaning.
- Do not use the range hood for exhausting hazardous or explosive materials.
- Clean grease filters frequently. Grease should not be allowed to accumulate on the fan or filter.
3. Package Contents
Verify that all components are present and undamaged before proceeding with installation.
- VIKIO HOME Under Cabinet Range Hood Unit
- 5-layer aluminum filter (pre-installed or separate)
- Mounting Hardware (screws, anchors, etc.)
- User Manual
- Duct adapters (6" round and 10" x 3.25" rectangular, for top/rear venting)
4. Setup and Installation
Proper installation is crucial for optimal performance and safety. This range hood is designed for under-cabinet mounting and can accommodate both top and rear venting configurations.
4.1 Installation Requirements
- Ensure cabinets are wider than 30 inches for proper fit.
- Recommended mounting height: Minimum 24 inches to Maximum 30 inches from the cooking surface to the bottom of the range hood.
- Electrical supply: 120 Volts, 60 Hz, 1.3 Amps.
- Ductwork: Compatible with 6-inch round ductwork for top venting or 10" x 3.25" rectangular ductwork for top/rear venting.
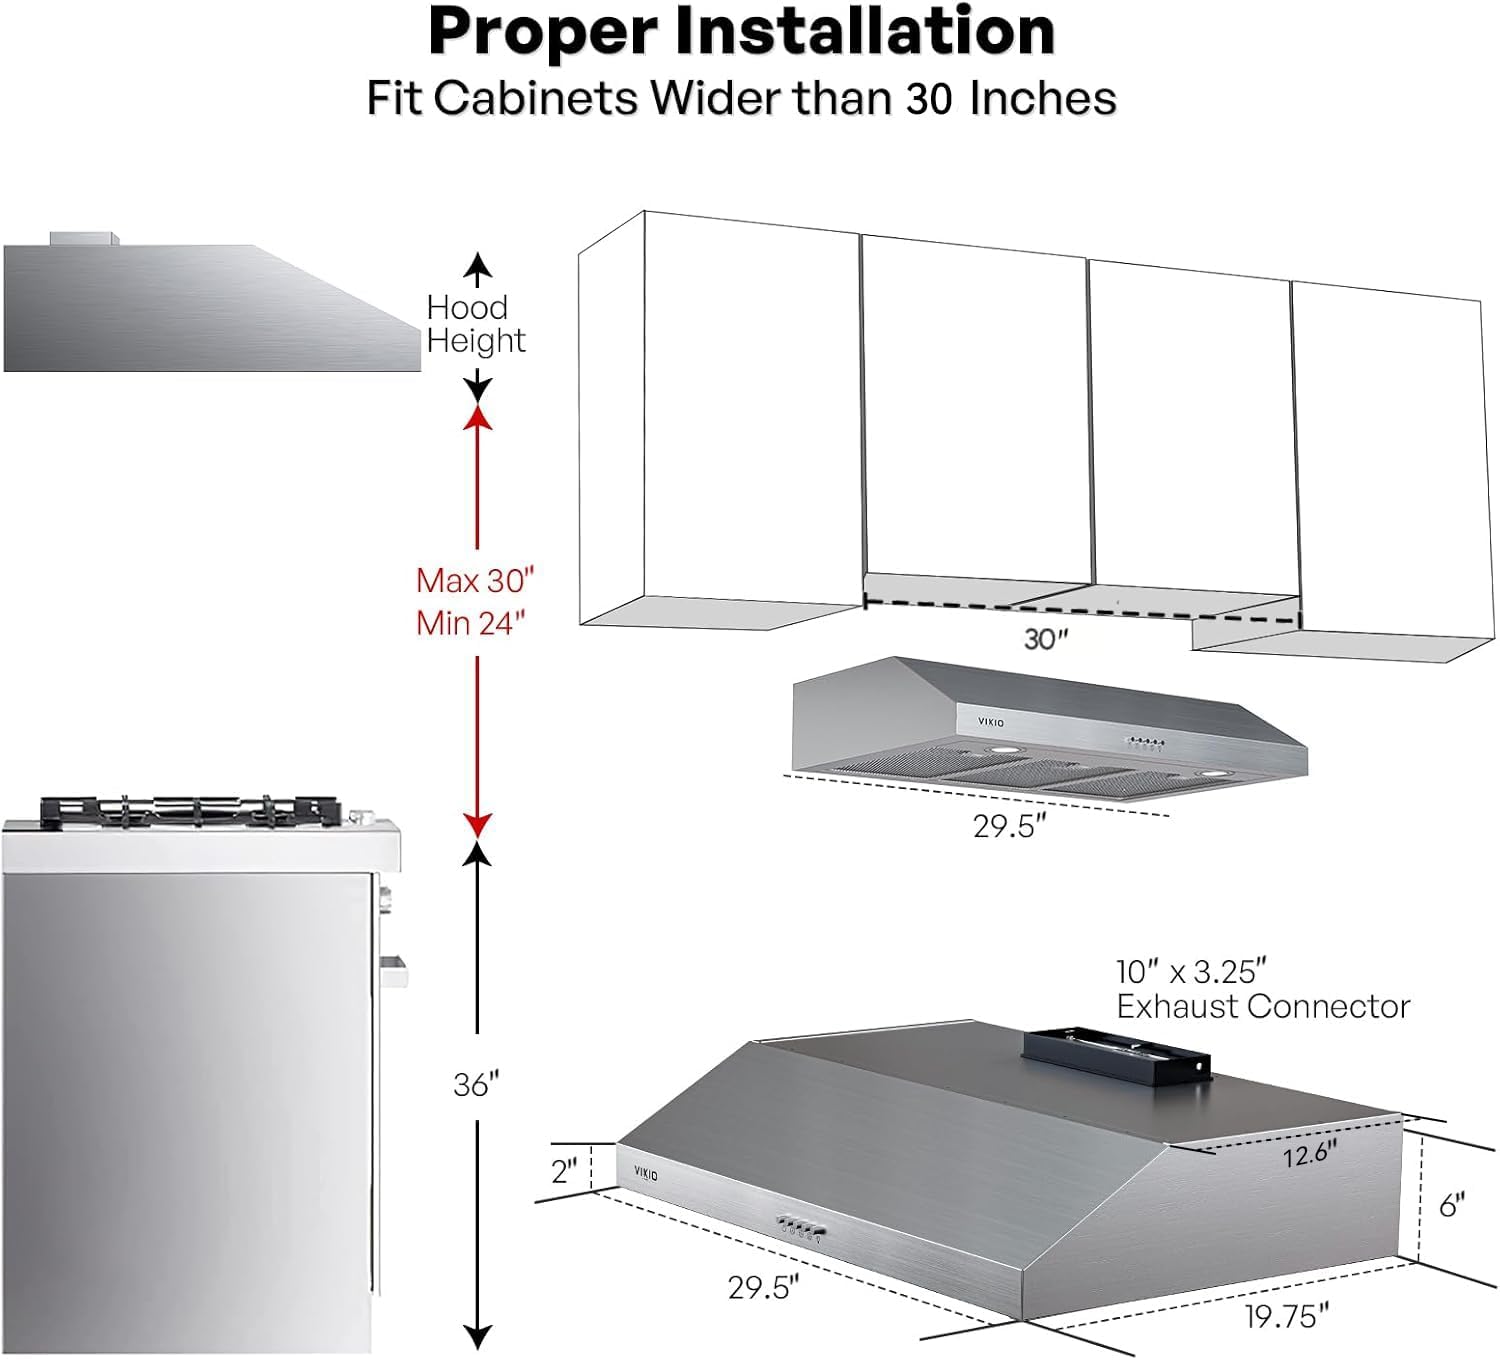
Image 2: Proper installation dimensions and clearances for the range hood.

Image 3: Illustration of top and back venting configurations.

Image 4: Adapters for both round (top) and rectangular (top/rear) ductwork.
4.2 Installation Steps (General Overview)
- Prepare the Area: Ensure power is off at the circuit breaker. Mark the location for the range hood and ductwork opening.
- Mounting: Secure the range hood to the underside of the cabinet using the provided mounting hardware. Ensure it is level and firmly attached.
- Duct Connection: Connect the appropriate ductwork (not included) to the exhaust connector on the range hood. Seal all connections with duct tape to prevent air leaks.
- Electrical Connection: Connect the range hood to the household electrical supply according to local codes.
- Install Filters: Insert the 5-layer aluminum filters into their designated slots.
- Test Operation: Restore power and test all functions of the range hood.
5. Operating Instructions
Your VIKIO HOME range hood features user-friendly mechanical push-button controls for efficient operation.
5.1 Control Panel Overview

Image 5: Detailed view of the mechanical control panel.
- Power ON/OFF Button: Press to turn the range hood on or off.
- Speed Buttons (Low, Med, High): Select the desired fan speed.
- Low Speed: Ideal for light cooking or simmering.
- Medium Speed: Suitable for general cooking.
- High Speed: For heavy cooking, frying, or strong odors, utilizing the full 580 CFM airflow.
- Light ON/OFF Button: Press to turn the LED lights on or off.
5.2 Dual-Motor Technology and Performance
This range hood is equipped with an advanced dual-motor system, providing superior suction and quiet operation. The dual motors work in tandem to deliver an impressive 580 CFM airflow, effectively removing smoke, grease, and cooking odors from your kitchen environment.

Image 6: Illustration of the dual-motor system and its powerful airflow.

Image 7: Close-up view of the powerful dual fans within the range hood.

Image 8: Infographic highlighting the benefits of dual motors, including high CFM and low noise levels.
The range hood operates at noise levels as low as 35 dB and up to 60 dB, ensuring a quiet cooking environment even at maximum power.

Image 9: The range hood maintains a quiet operation, allowing for a peaceful kitchen environment.
5.3 LED Lighting
The range hood features powerful, energy-efficient 4000K LED lights. These lights provide a clear, bright glow over your entire cooking area, enhancing visibility and creating a welcoming ambiance. The GU10 LED type allows for quick and easy replacement if needed.

Image 10: The integrated LED lights provide clear and bright illumination for your cooking space.
6. Maintenance
Regular maintenance ensures the longevity and optimal performance of your range hood.
6.1 Cleaning the Exterior
The stainless steel finish is resistant to oil and grease buildup and is easy to clean. Use a soft cloth with a mild, non-abrasive cleaner specifically designed for stainless steel. Avoid harsh chemicals or abrasive pads that could scratch the surface.

Image 11: The stainless steel finish is designed for easy cleaning and maintenance.
6.2 Cleaning the Aluminum Filters
The 5-layer aluminum mesh filters are designed to trap grease effectively. For optimal performance, clean the filters regularly (e.g., monthly, depending on cooking frequency). The filters are dishwasher safe for convenient cleaning.
- To remove filters: Locate the release tabs or handles on each filter and gently pull them down or slide them out.
- Cleaning: Place filters in a dishwasher or wash by hand with hot water and a degreasing detergent.
- Reinstallation: Ensure filters are completely dry before reinserting them into the range hood.

Image 12: The 5-layer aluminum filters efficiently trap grease, ensuring a cleaner kitchen.
7. Troubleshooting
Refer to this section for common issues and their potential solutions.
| Problem | Possible Cause | Solution |
|---|---|---|
| Range hood does not operate. | No power supply; circuit breaker tripped; loose wiring. | Check power connection; reset circuit breaker; ensure all wiring is secure (consult a qualified electrician if unsure). |
| Insufficient suction. | Grease filters are clogged; ductwork is obstructed or too long/restrictive; fan speed too low. | Clean or replace filters; check ductwork for obstructions or proper sizing; increase fan speed. |
| Lights not working. | Bulb is faulty; loose wiring. | Replace LED bulb (GU10 type); check electrical connections. |
| Excessive noise. | Fan blades are dirty or damaged; loose mounting; ductwork vibration. | Clean fan blades; ensure unit is securely mounted; check ductwork for proper installation and sealing. |
8. Specifications
Technical specifications for the VIKIO HOME Under Cabinet Range Hood (Model: VKH-RC10-30SI).
| Feature | Specification |
|---|---|
| Brand | VIKIO HOME |
| Model Number | VKH-RC10-30SI |
| Air Flow Capacity | 580 Cubic Feet Per Minute (CFM) |
| Noise Level | 35 dB (Min) to 60 dB (Max) |
| Number of Speeds | 3 |
| Mounting Type | Under Cabinet Mount |
| Ventilation Type | Ducted |
| Product Dimensions (W x D x H) | 29.5" x 19.68" x 6" |
| Item Weight | 27 Pounds |
| Material | Carbide (Stainless Steel Finish) |
| Controls Type | Push Button |
| Voltage | 120 Volts |
| Amperage | 1.3 Amps |
| Wattage | 146 watts |
| Light Source Type | LED (4000K, GU10) |
| Filter Type | 5-layer Mesh Aluminum Filter |
| Special Features | Dual-Motor Technology, Noise Reduction |
9. Warranty and Support
VIKIO HOME stands behind the quality of its products. Your purchase includes a reliable guarantee. In the event of any issues or the need for replacement accessories such as filters or lights, please contact our dedicated customer support team.
For assistance, please refer to the contact information provided with your product packaging or visit the official VIKIO HOME website for support resources.


