1. Introduction
Thank you for choosing the Cooler Master Hyper 612 APEX CPU Air Cooler. This manual provides essential information for the proper installation, operation, and maintenance of your new CPU cooler. Please read these instructions carefully before proceeding with installation to ensure optimal performance and longevity of your product.
2. Safety Information
- Always disconnect power from your computer before installing or removing any components.
- Handle the cooler and its components with care to avoid damage.
- Keep out of reach of children.
- Ensure proper grounding to prevent electrostatic discharge (ESD) damage to sensitive components.
- Refer to your motherboard and CPU manuals for additional compatibility and installation guidelines.
3. Package Contents
Verify that all items are present in your package:
- Hyper 612 APEX CPU Air Cooler
- Installation Kit (includes mounting brackets for various sockets, screws, and thermal paste)
- Instruction Manual
4. Setup and Installation
The Hyper 612 APEX is designed for simplified installation on a variety of platforms. Follow these general steps, referring to the specific instructions for your CPU socket type (AMD AM5/AM4 or Intel LGA 1851/1700) provided in the installation kit.
4.1. Prepare Your Motherboard
Identify your CPU socket type. Install the appropriate backplate (if required) and mounting standoffs onto your motherboard. Ensure the CPU is correctly seated in its socket.
4.2. Apply Thermal Paste
Clean the CPU surface and the cooler's base. Apply a small amount of thermal paste to the center of the CPU's integrated heat spreader (IHS). Refer to the thermal paste manufacturer's instructions for the recommended application method.
4.3. Mount the Cooler
Carefully place the Hyper 612 APEX onto the CPU, aligning the mounting holes with the standoffs. Secure the cooler using the provided screws, tightening them in a diagonal pattern until snug. Do not overtighten.

Image: Redesigned installation brackets for AMD AM5/AM4 and Intel LGA 1851/1700 platforms, simplifying the mounting process.
4.4. Install Fans and Connect Cables
Attach the Mobius 120 fans to the heatsink using the included clips. Connect the 4-pin PWM fan cables to the CPU_FAN headers on your motherboard. Ensure correct fan orientation for optimal airflow (typically pulling air through the heatsink towards the rear exhaust fan of your case).

Image: The Cooler Master Hyper 612 APEX CPU cooler installed in a PC, showcasing its stealth aesthetic and compact design with RAM modules visible.
4.5. Removable Top Cover
The Hyper 612 APEX features a removable top cover for easier access during installation and future maintenance. This design simplifies the process of securing the cooler and cleaning the heatsink.

Image: Exploded view showing the removable top cover of the CPU cooler, designed for easy installation and maintenance access.
4.6. Installation Video Guide
For a visual guide on the installation process and product features, please refer to the official video below:
Video: Official product video for the Cooler Master Hyper 612 APEX CPU Air Cooler, demonstrating its features and design, including aspects relevant to installation.
5. Operating Instructions
The Hyper 612 APEX is designed to provide efficient cooling for your CPU. Once installed, the cooler operates automatically, with fan speeds adjusted by your motherboard's PWM control based on CPU temperature.
5.1. SuperConducting Heat Pipes
The cooler utilizes six proprietary SuperConducting Composite Heat Pipes. These advanced heat pipes incorporate evaporator and condenser wick structures to enhance heat dissipation, ensuring optimal thermal performance for demanding CPUs like AMD Ryzen 9 and Intel Ultra 9/i7.

Image: Diagram illustrating the six copper heat pipes and copper base of the Hyper 612 APEX, designed for efficient heat dissipation from high-performance CPUs.

Image: Detailed diagram explaining the SuperConducting Composite Heat Pipes, showing the evaporator, adiabatic, and condenser sections with heat and coolant movement within the capillary structure.
5.2. Dual Mobius 120 Fans
The Hyper 612 APEX features dual Mobius 120 fans with Loop Dynamic Bearing and optimized PWM blades. These fans provide premium airflow while maintaining quiet operation. The dynamic PWM fan allows adjustable speeds from 0 to 2,400 RPM to balance noise and airflow effectively.

Image: The Mobius 120 fan, displaying key performance metrics: 2400 RPM speed, 30 dBA (max) noise level, 78.2 CFM airflow, and 3.63 mmH2O air pressure.

Image: Comparison image showing the Ring Blade Design (RBD) of the fan, which features interconnected blades for reduced vibration and stable airflow, versus a fan without RBD.

Image: The dynamic PWM fan, indicating its adjustable speed range from 0 to 2400 RPM for balancing noise and airflow, with visual representations of different fan speeds.
6. Maintenance
Regular maintenance ensures the longevity and optimal performance of your CPU cooler.
6.1. Cleaning the Heatsink and Fans
Over time, dust can accumulate on the heatsink fins and fan blades, reducing cooling efficiency. It is recommended to clean the cooler every 3-6 months, or more frequently in dusty environments.
- Disconnect power from your computer.
- Remove the removable top cover for easier access.
- Carefully remove the fans from the heatsink.
- Use compressed air to blow dust out of the heatsink fins. Hold the fans in place while cleaning to prevent over-spinning.
- Wipe fan blades with a soft, dry cloth.
- Reattach the fans and the top cover, ensuring all cables are properly connected.
7. Troubleshooting
If you encounter issues with your Hyper 612 APEX, consider the following:
7.1. High CPU Temperatures
- Check Thermal Paste: Ensure thermal paste was applied correctly and evenly. Reapply if necessary.
- Verify Mounting Pressure: Confirm the cooler is securely mounted and making firm contact with the CPU. Tighten screws diagonally.
- Inspect Fan Operation: Ensure both fans are spinning correctly and connected to the motherboard's CPU_FAN headers. Check for obstructions.
- Clean Dust: Dust buildup can significantly reduce cooling performance. Refer to the Maintenance section for cleaning instructions.
- Case Airflow: Ensure your PC case has adequate airflow with properly configured intake and exhaust fans.
7.2. Excessive Fan Noise
- Check for Obstructions: Ensure no cables or objects are interfering with the fan blades.
- Fan Mounting: Verify fans are securely attached and not vibrating against the heatsink or case.
- Motherboard Fan Control: Adjust fan curves in your motherboard's BIOS/UEFI settings to optimize noise levels.
8. Specifications
Detailed specifications for the Cooler Master Hyper 612 APEX CPU Air Cooler:
| Feature | Specification |
|---|---|
| Brand | Cooler Master |
| Model Number | MAP-T6PN-225PK-R1 |
| Compatible Devices | CPU, Desktop |
| Cooling Method | Fan |
| Material | Copper, Plastic |
| Heat Pipes | 6 SuperConducting Composite Heat Pipes |
| Fan Type | Dual Mobius 120 PWM Fans |
| Maximum Rotational Speed | 2400 RPM |
| Air Flow Capacity | 78.2 Cubic Centimeters Per Minute (CFM) |
| Noise Level | 30 Decibels (Max) |
| Power Connector Type | 4-Pin |
| Product Dimensions | 5 x 4.4 x 6.2 inches (127 x 111.76 x 157.48 mm) |
| Item Weight | 2.98 pounds (1.35 kg) |
| UPC | 884102127267 |
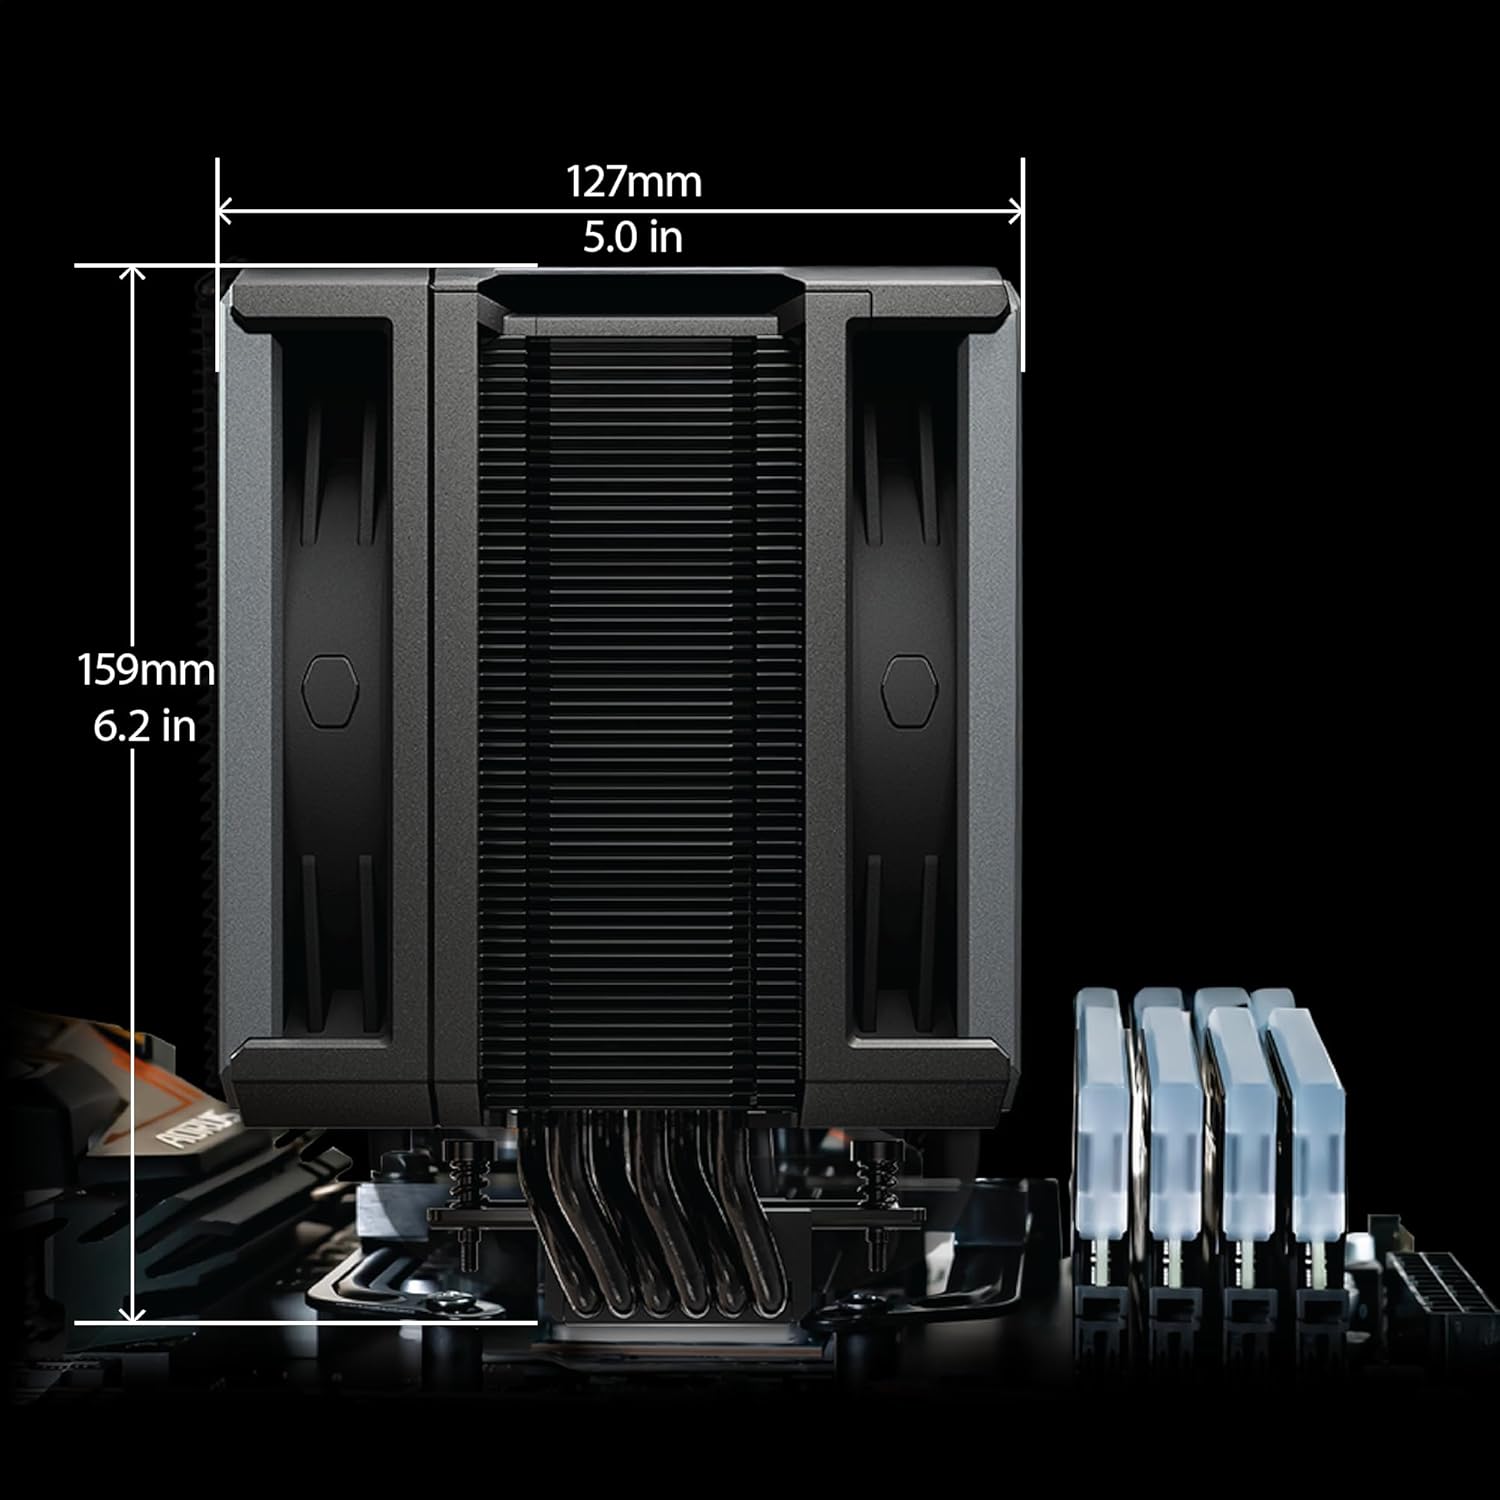
Image: Dimensions of the Cooler Master Hyper 612 APEX CPU Air Cooler, showing 127mm (5.0 in) width and 159mm (6.2 in) height.
9. Warranty and Support
For detailed warranty information and technical support, please visit the official Cooler Master website or contact their customer service. Warranty terms may vary by region and retailer.
For product support and further assistance, please visit: Cooler Master Official Website


