
1. Introduction
Thank you for choosing the outequip Summit 2 RV Air Conditioner. This manual provides essential information for the safe and efficient operation, installation, and maintenance of your new air conditioning unit. Please read this manual thoroughly before installation and use, and keep it for future reference.
The outequip Summit 2 is a 12V 10000 BTU rooftop air conditioner designed for RVs, trucks, vans, campers, and tractors. It features a low-profile, quiet design and is battery-powered, offering efficient cooling and supplementary heating with its 4,500 BTU PTC heater.
2. Safety Instructions
WARNING: Failure to follow these instructions could result in electric shock, fire, serious injury, or death.
- Always disconnect power before installing, servicing, or cleaning the unit.
- Installation must be performed by a qualified technician in accordance with all local and national electrical codes.
- Ensure the power supply matches the unit's voltage (12V DC).
- Do not operate the unit with damaged wiring or if it has been dropped or damaged.
- Keep hands and objects clear of the fan blades during operation.
- Do not block air inlets or outlets.
- The PTC heater is for supplementary warmth only and is not intended as a primary heat source in extreme cold or very large spaces.
3. Product Overview
The outequip Summit 2 RV Air Conditioner is engineered for optimal performance and durability in mobile environments. Key features include:
- Efficient Cooling: 10,000 BTU capacity cools your RV quickly.
- Supplementary Heating: 4,500 BTU PTC heater for mild temperatures.
- Durable & Weather-Resistant: Constructed with UV-stabilized ABS materials, EPDM foam gasket, and zinc-coated condenser for longevity.
- Quiet Operation: Features brushless copper motor fans, spring-supported mounts, and a directional duct for reduced noise.
- Smart Control: Includes remote control, temperature monitoring, and multiple modes (eco, sleep, turbo) for personalized comfort.
- Low Profile Design: 6.3-inch height reduces wind resistance and integrates seamlessly with your vehicle's exterior.
- Compact & Lightweight: Weighs 45 lbs, saving roof space and improving fuel efficiency.
Components and Features

Figure 3.1: OutEquip Summit 2 RV Air Conditioner exterior unit.

Figure 3.2: Exploded view showing the outdoor unit, mounting frame, and indoor panel set.

Figure 3.3: Included components: Outdoor Unit, Indoor Panel Set, mounting hardware, and remote control.

Figure 3.4: Dimensions of the indoor panel (14.5 x 10 inches) and mounting frame (22 x 17.5 inches).

Figure 3.5: The unit features a 6.3-inch low-profile design to reduce wind resistance.

Figure 3.6: Compact 28.3 x 28.3 inch design saves roof space for other installations like solar panels.
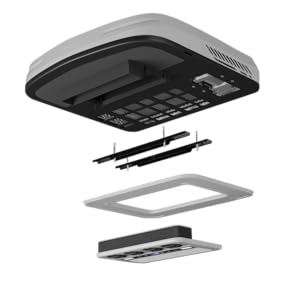
Figure 3.7: Durable copper coils for efficient heat exchange and long lifespan.
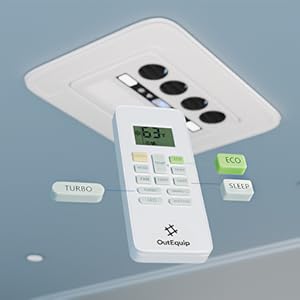
Figure 3.8: Brushless motor fans contribute to quiet operation and energy efficiency.
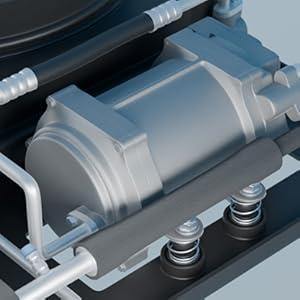
Figure 3.9: Spring-supported compressor mounts reduce vibration and noise during operation.
4. Setup and Installation
Proper installation is crucial for the performance and longevity of your RV air conditioner. It is recommended that installation be performed by a professional.
4.1 Pre-Installation Checklist
- Verify roof opening dimensions: The unit is designed to fit standard 14x14 inch openings.
- Check roof thickness: Ensure it is within the acceptable range for the mounting hardware.
- Confirm power supply: A stable 12V DC power source capable of handling the unit's current draw (approx. 50 amps on max cooling) is required.
- Gather necessary tools: Standard tools for electrical work and mounting.
4.2 Mounting the Unit
The unit is designed for rooftop mounting. It weighs approximately 45 pounds, making solo installation easier than heavier traditional units.
- Carefully lift the outdoor unit onto the prepared roof opening.
- Position the unit to align with the interior opening.
- Install the EPDM foam gasket around the opening to ensure a watertight seal. Ensure the area around the condenser is fully sealed to prevent water intrusion.
- From inside the RV, install the mounting frame and secure it to the outdoor unit using the provided bolts. Tighten evenly to compress the gasket.
4.3 Electrical Connection
The unit operates on 12V DC power. Connect directly to your vehicle's battery bank using the included power cord.

Figure 4.1: Connect the unit to your vehicle's 12V or 24V battery system using the provided 12-foot power cord.
- Route the power cable safely, avoiding sharp edges or heat sources. Some installations may allow routing through the same opening as the return air.
- Connect the positive (+) cable to the positive terminal of your 12V battery bank and the negative (-) cable to the negative terminal. Ensure proper polarity.
- Install appropriate circuit protection (fuse or breaker) as close to the battery as possible.
- The unit can be used while driving or parked, making it suitable for off-grid camping.
5. Operating Instructions
Your outequip Summit 2 RV Air Conditioner can be controlled via the included remote control.
5.1 Remote Control Functions

Figure 5.1: Remote control for accessing various operating modes and settings.
- ON/OFF: Powers the unit on or off.
- MODE: Cycles through operating modes: Cool, Heat (PTC heater), Fan, Dry.
- TEMP +/-: Adjusts the desired temperature setting.
- FAN: Adjusts fan speed (Low, Medium, High, Auto).
- ECO Mode: Optimizes power consumption for extended battery life. In this mode, the variable-speed compressor adjusts output to maintain temperature with minimal power draw.
- SLEEP Mode: Provides quiet operation and adjusts temperature for comfortable sleeping conditions.
- TURBO Mode: Activates maximum cooling/heating for rapid temperature change.
- TIMER: Sets a timer for automatic power on/off.
- LED: Controls the internal LED lighting.
- VOLTAGE: Displays current battery voltage.
5.2 Efficient Operation

Figure 5.2: Inverter technology ensures stable temperature with low power consumption by adjusting output power.
The Summit 2 utilizes inverter technology, allowing the compressor to vary its speed and output. This results in more stable temperatures and significantly lower power consumption once the desired temperature is reached, compared to traditional on/off compressors.
6. Maintenance
Regular maintenance ensures optimal performance and extends the lifespan of your RV air conditioner.
- Filter Cleaning: Periodically clean or replace the air filters located in the indoor panel. Refer to the indoor panel instructions for filter access.
- Exterior Cleaning: Keep the exterior unit clean from dirt, leaves, and debris. Use a soft cloth and mild detergent. Do not spray water directly into the unit.
- Condenser Coils: Inspect the condenser coils on the outdoor unit for dirt buildup. Clean gently with a soft brush if necessary.
- Gasket Inspection: Annually inspect the roof gasket for cracks or deterioration. Replace if necessary to maintain a watertight seal.
- Electrical Connections: Periodically check all electrical connections for tightness and corrosion.
7. Troubleshooting
This section addresses common issues you might encounter. For problems not listed here, please contact customer support.
| Problem | Possible Cause | Solution |
|---|---|---|
| Unit does not turn on. | No power, low battery voltage, tripped breaker/fuse, loose connection. | Check battery charge, verify all electrical connections, reset breaker/replace fuse. |
| Insufficient cooling. | Dirty air filter, blocked air vents, low refrigerant (professional service required), unit too small for space, poor insulation. | Clean air filter, ensure vents are clear, improve RV insulation, consider professional inspection. |
| Unit is noisy. | Loose components, debris in fan, unit not level, fan motor issue. | Check for loose screws, remove debris, ensure unit is level. If noise persists, contact support. |
| Water leaking from unit. | Clogged condensate drain, improper installation seal. | Clear condensate drain. Inspect and re-seal the roof gasket if necessary, especially around the condenser area. |
| Remote control not working. | Dead batteries, obstruction, remote out of range. | Replace batteries, ensure clear line of sight to indoor unit, move closer. |
8. Specifications
| Feature | Specification |
|---|---|
| Model | Summit 2 (OEP2500A) |
| Brand | outequip |
| Cooling Capacity | 10,000 BTU |
| Heating Capacity | 4,500 BTU (PTC Heater) |
| Voltage | 12 Volts DC |
| Power Source | Battery Powered |
| Item Weight | 45 pounds |
| Product Dimensions (L x W x H) | 28.3 x 28.3 x 6.3 inches |
| Noise Level | 40 dB |
| Special Features | Fast Cooling, Remote Controlled, Sleep Mode, Eco Mode, Turbo Mode |
9. Warranty and Support
outequip is committed to providing high-quality products and excellent customer service. For any questions, technical assistance, or warranty claims, please contact outequip customer support.
While specific warranty details are not provided in this manual, please refer to your purchase documentation or the official outequip website for the most current warranty information. Protection plans may also be available for extended coverage.
For customer support, please visit the OutEquip Store on Amazon or contact their support channels as indicated on your product packaging or purchase receipt.


