Introduction
This instruction manual provides detailed guidance for setting up and operating your CMSTEDCD HDMI KVM Switch Dual Monitor (Model SW220). This device allows you to control two computers using a single set of keyboard and mouse, while sharing two monitors and up to four USB 3.0 devices. Please read this manual thoroughly before use to ensure proper installation and functionality.
Package Contents
- 1 x CMSTEDCD HDMI KVM Switch Dual Monitor (Model SW220)
- 1 x 12V Power Adapter
- 2 x USB 3.0 Cables (USB-A to USB-B)
- 1 x Wired Remote Controller
- 1 x User Manual (this document)
Product Overview
The CMSTEDCD HDMI KVM Switch is designed for efficient management of multiple computers with a shared display and peripherals. It supports high-resolution video and high-speed data transfer.
Front Panel
The front panel features USB 3.0 ports for connecting your keyboard, mouse, and other USB devices, along with a manual switch button and control port for the wired remote.
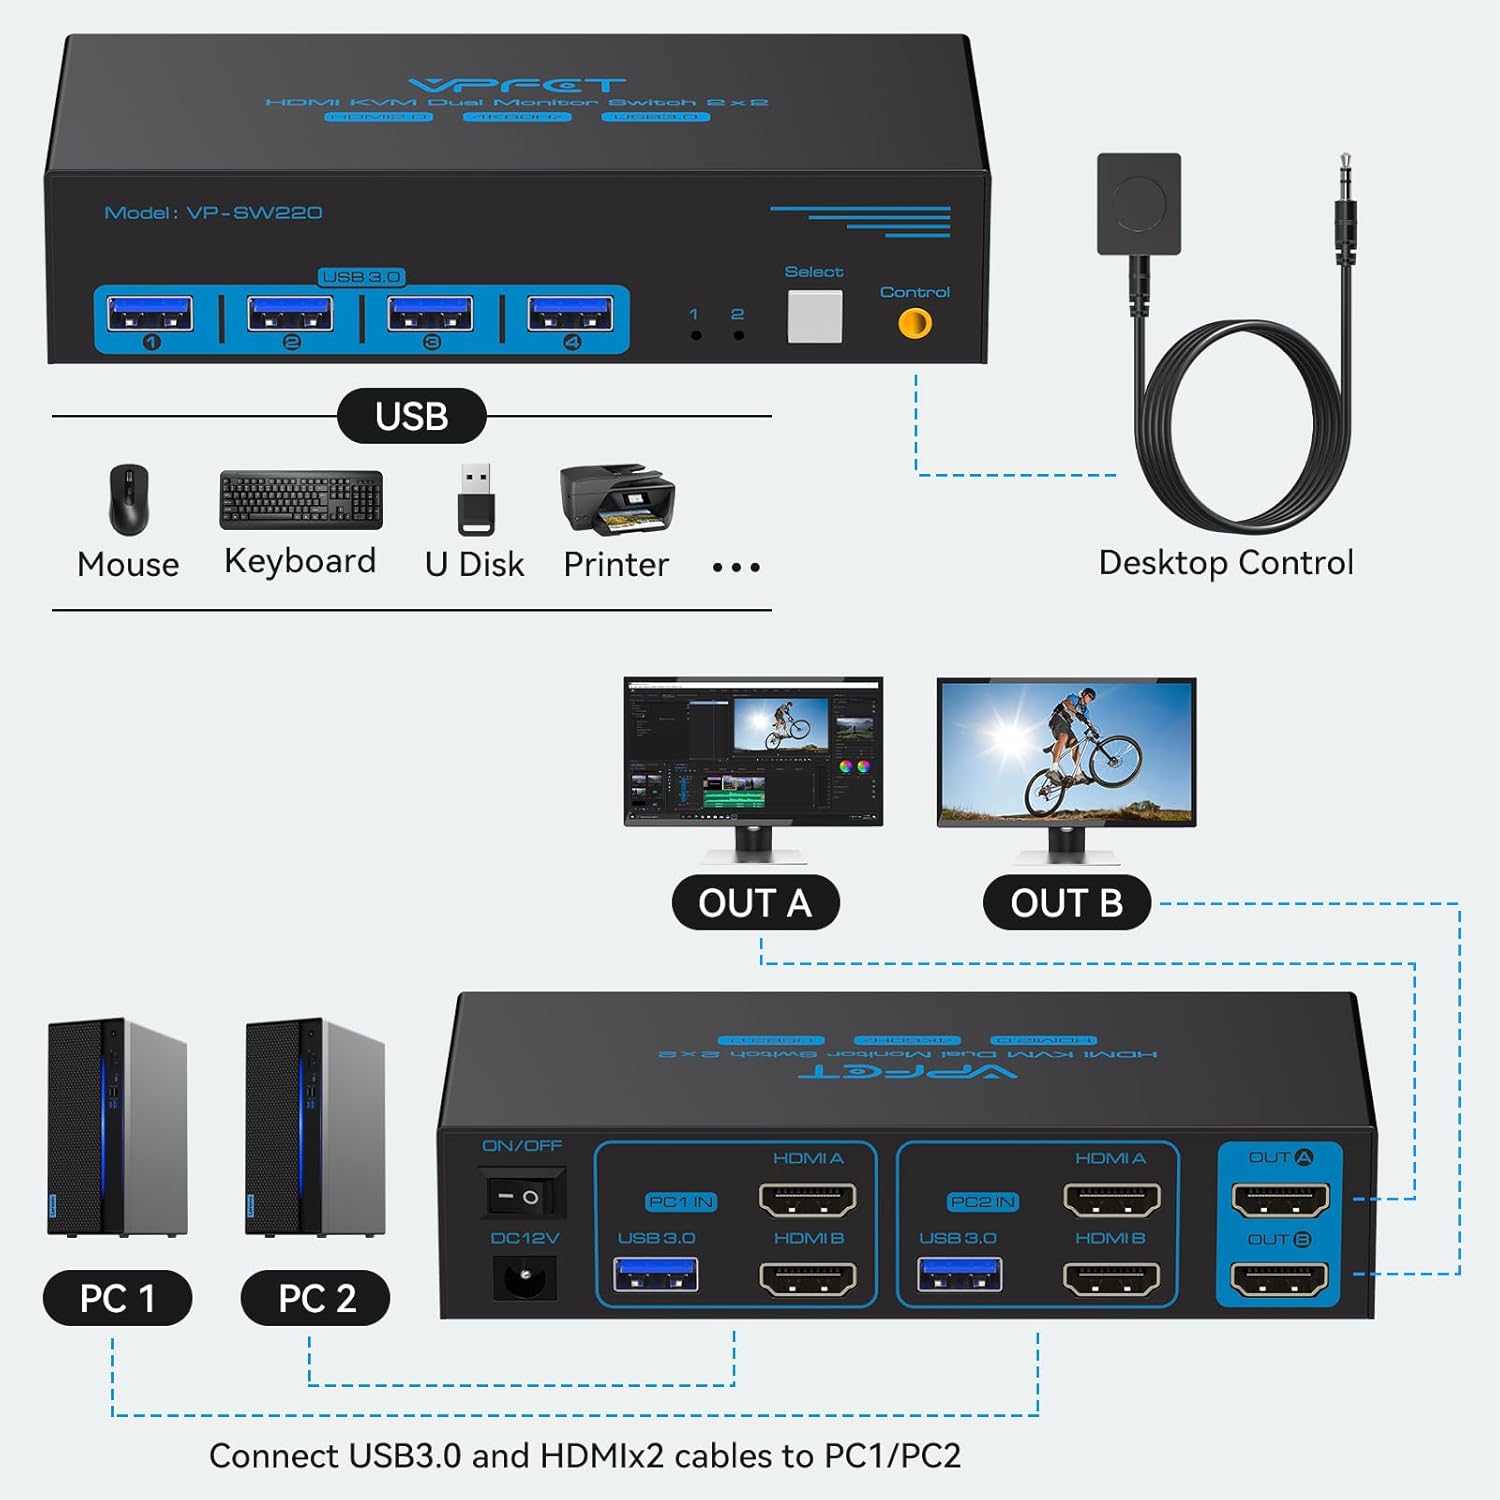
- USB 3.0 Ports (x4): For connecting USB devices like keyboard, mouse, printer, USB drive.
- Select Button: Manually switch between PC1 and PC2.
- Control Port: Connect the wired remote controller for convenient switching.
- LED Indicators: Show which PC is currently selected.
Rear Panel
The rear panel provides all the necessary connections for your computers and monitors, including HDMI inputs, USB inputs, and HDMI outputs.
- DC 12V Power Input: Connect the included 12V power adapter.
- ON/OFF Switch: Power on or off the KVM switch.
- PC1 IN (HDMI A, HDMI B, USB 3.0): Connect to your first computer. Requires two HDMI cables and one USB 3.0 cable.
- PC2 IN (HDMI A, HDMI B, USB 3.0): Connect to your second computer. Requires two HDMI cables and one USB 3.0 cable.
- OUT A (HDMI), OUT B (HDMI): Connect to your two monitors.
Setup Guide
Follow these steps to properly set up your HDMI KVM Switch.
Step 1: Connect Computers to the KVM Switch
- For PC1: Connect two HDMI cables from your PC1's HDMI output ports to the "PC1 IN HDMI A" and "PC1 IN HDMI B" ports on the KVM switch.
- For PC1: Connect one USB 3.0 cable (USB-A to USB-B) from your PC1's USB port to the "PC1 IN USB 3.0" port on the KVM switch.
- Repeat the above steps for PC2, connecting its HDMI and USB cables to the "PC2 IN" ports on the KVM switch.

Step 2: Connect Monitors to the KVM Switch
- Connect an HDMI cable from your first monitor to the "OUT A" port on the KVM switch.
- Connect an HDMI cable from your second monitor to the "OUT B" port on the KVM switch.
Step 3: Connect USB Peripherals
- Connect your USB keyboard, mouse, and other USB 3.0 devices (e.g., printer, webcam, USB drive) to the USB 3.0 ports on the front panel of the KVM switch.
- If using the wired remote controller, plug it into the "Control" port on the front panel.
Step 4: Power On the KVM Switch
- Connect the 12V power adapter to the "DC 12V" port on the rear panel of the KVM switch, then plug it into a power outlet.
- Flip the "ON/OFF" switch to the ON position. The LED indicators on the front panel will light up.
Note: For high-power USB devices, ensure the 12V power supply is connected to the KVM switch for stable operation.
Setup Demonstration Video
Video: Detailed setup guide for the HDMI KVM Switch, demonstrating cable connections for computers, monitors, and USB peripherals. (Source: KK-Home)
Operating Instructions
Switching Between Computers
You can switch between connected computers using two methods:
- Front Panel Button: Press the "Select" button on the front panel of the KVM switch to toggle between PC1 and PC2.
- Wired Remote Controller: Press the button on the wired remote controller to switch between PC1 and PC2. This allows for convenient switching if the KVM switch is out of reach.
Note: Keyboard shortcuts (hotkeys) are not supported by this model.

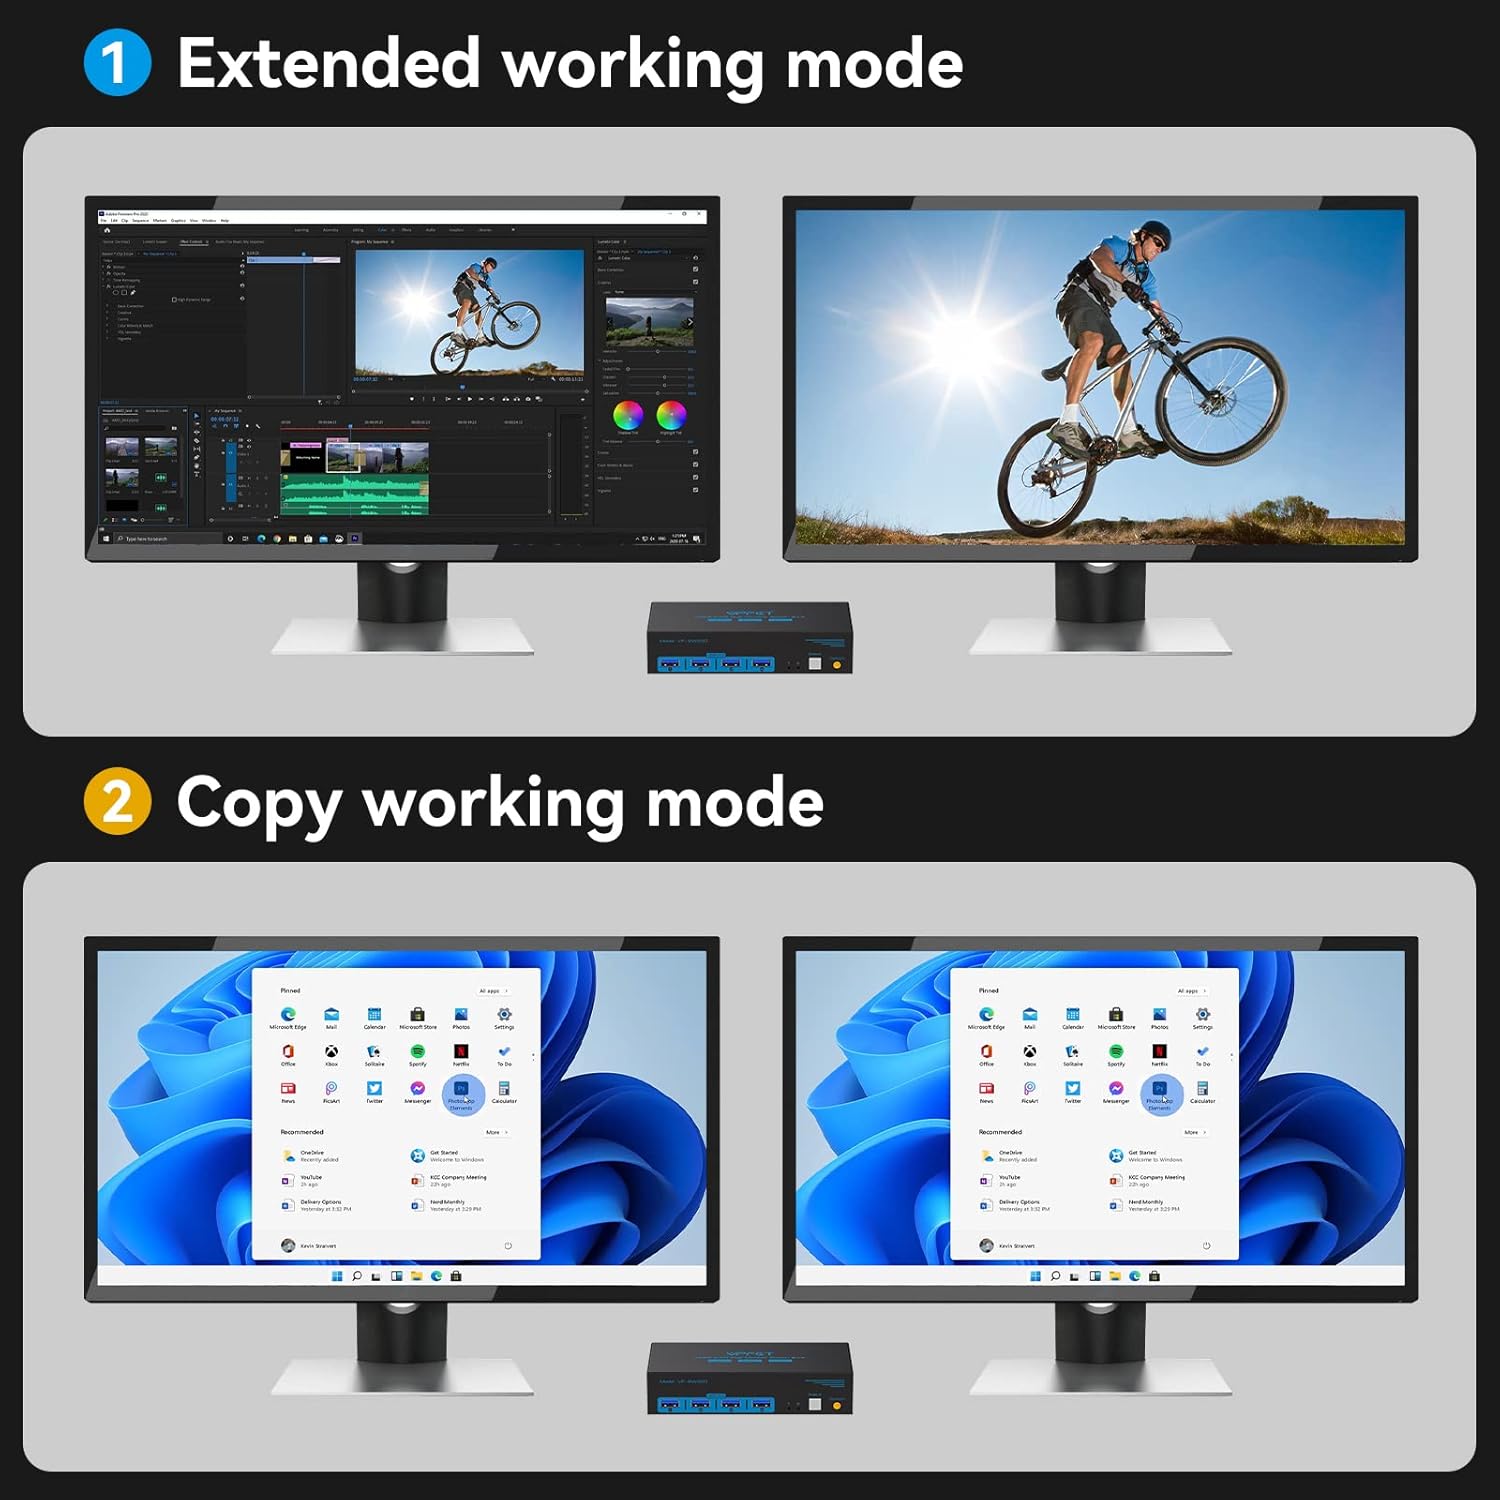
Display Modes (Copy and Extended)
This KVM switch supports both copy mode and extended mode for your dual monitors. Your computer must have two HDMI output ports to utilize dual monitor functionality.
- Copy Mode: Both monitors display the same image.
- Extended Mode: Monitors display different images, extending your desktop workspace.
Important: If your computer only supports a single monitor output, this KVM switch will not enable dual monitor functionality. Ensure your computer's graphics card supports dual HDMI outputs.
USB 3.0 Functionality
The four USB 3.0 ports on the front panel allow you to share USB devices between the two connected computers. Data transfer rates are up to 5Gbp/s, which is 10 times faster than USB 2.0.

Troubleshooting
If you encounter any issues, please refer to the following common solutions:
USB Devices Not Working
- Confirm that the USB 3.0 cable is properly connected between the computer and the KVM switch.
- Verify that the computer's USB port is functioning correctly.
- Ensure that the latest USB driver is installed on your computer.
- If using high-power USB devices, confirm the 12V power adapter is connected to the KVM switch.
Display Has No Image
- Confirm that the KVM switch and KVM video ports match the correct inputs/outputs.
- Ensure PC to KVM input cables are connected correctly (e.g., Input A to OUT-A display, Input B to OUT-B display).
- Use high-quality HDMI cables (preferably 3.3ft or shorter). Conversion cables are not supported.
- If an adapter is required, please use an active adapter.
- Verify that your computer has dual graphics cards (2 HDMI output ports) to support dual monitor functionality.
Specifications
| Feature | Detail |
|---|---|
| Model Number | SW220 |
| Video Resolution | Up to 4K@60Hz (4096x2160@60Hz), backward compatible with 4K@30Hz, 1080P |
| USB Ports | 4 x USB 3.0 (5Gbp/s data transfer rate) |
| Switching Methods | Front Panel Button, Wired Remote Controller |
| Power Supply | DC 12V (adapter included) |
| Material | Metal |
| Product Dimensions | 14.99 x 6.48 x 3.51 cm |
| Item Weight | 560 g |
| Supported OS | Windows/Vista/XP, Mac OS, Linux, Unix |
Warranty and Support
CMSTEDCD is committed to providing high-quality products and excellent customer service.
- Warranty: This KVM switch includes a 12-month replacement warranty from the date of purchase.
- Technical Support: If you have any questions or encounter difficulties during use, please contact our professional technical team for assistance.
- Contact Information: For support, please refer to the contact details provided in your product packaging or visit the official CMSTEDCD website.


