1. Introduction
This manual provides comprehensive instructions for the installation, operation, and maintenance of your Inefala 1 DIN Car Stereo. Please read this manual thoroughly before using the product to ensure proper function and safety. Keep this manual for future reference.
2. Safety Information
- Always consult a professional for installation to avoid damage to the unit or vehicle.
- Do not operate the unit in a way that distracts you from driving.
- Ensure all wiring is correctly connected to prevent short circuits or electrical hazards.
- Do not expose the unit to extreme temperatures, moisture, or direct sunlight.
- Use only specified voltage (12V) for operation.
3. Package Contents
Verify that all items are present in the package:
- Inefala 1 DIN Car Stereo Unit
- Power Cord
- Microphone
- Steering Wheel Control (SWC) Remote
- Reversing Camera (with 12 LED lights)
- Remote Control
- User Manual (this document)

Figure 3.1: Included accessories and wiring diagram. The image displays the main car stereo unit, a power cord, an external microphone, a steering wheel control remote, a rear view camera, and the user manual. A detailed wiring diagram is also visible, illustrating connections for speakers, power, ignition, and other functions.
4. Product Overview
The Inefala 1 DIN Car Stereo features a 4.1-inch capacitive touch screen and supports various multimedia functions.

Figure 4.1: Front panel of the Inefala 1 DIN Car Stereo. The image shows the main unit with its 4.1-inch touch screen display, a rotary knob, and various buttons. Below the main unit, the included accessories are displayed: a reversing camera, an external microphone, a steering wheel control remote, and a smartphone displaying a call interface.
4.1 Front Panel Features
- 4.1-inch Capacitive Touch Screen: For interactive control and display.
- Rotary Knob: For volume control and menu navigation.
- USB-A Ports (x2): One for music playback, one for fast phone charging.
- AUX Input: For connecting external audio devices.
- Microphone Input: For hands-free calling.
- Mode Button: To switch between functions (Radio, Bluetooth, USB, AUX, etc.).
- Band Button: To switch between FM/AM bands.
4.2 Rear Connections
Refer to the wiring diagram in Section 5.2 for detailed connections.
- Power Connector: For vehicle power supply (12V).
- Speaker Outputs: For connecting vehicle speakers (4 x 45W max output).
- Reversing Camera Input: For connecting the included rear camera.
- Steering Wheel Control (SWC) Input: For connecting vehicle steering wheel controls.
- Antenna Input: For FM/AM radio reception.
5. Setup
5.1 Installation
- Ensure the vehicle's ignition is off and the battery is disconnected before starting installation.
- Remove the existing car stereo unit from the dashboard.
- Mount the Inefala 1 DIN Car Stereo into the dashboard opening.
- Proceed with wiring as described in Section 5.2.
- Secure the unit in place.
- Reconnect the vehicle battery and test the unit.
5.2 Wiring Diagram
Carefully follow the wiring instructions to ensure correct and safe operation. Incorrect wiring can damage the unit or vehicle electrical system.
Figure 5.1: Wiring connections for the Inefala 1 DIN Car Stereo. This diagram illustrates the connections for the power cord (including +12V Constant Power Supply, +12V Ignition Switch, Ground Wire), speaker outputs (Front Right, Front Left, Rear Right, Rear Left), brake line, small light line, backing line, steering wheel control line, and auto antenna.
- Yellow Wire (B+): Connect to +12V Constant Power Supply.
- Red Wire (ACC): Connect to +12V Ignition Switch.
- Black Wire (GND): Connect to Ground Wire.
- Blue Wire: Connect to Power Antenna / Amplifier Turn-on.
- Orange Line: Connect to Small Light Line.
- Pink Line: Connect to Brake Line.
- Brown Line: Connect to Backing Line (for reversing camera trigger).
- Speaker Wires: Connect to corresponding vehicle speakers (e.g., White/White-Black for Front Left, Gray/Gray-Black for Front Right, Green/Green-Black for Rear Left, Purple/Purple-Black for Rear Right).
- Steering Wheel Control (SWC) Wires: Connect to vehicle's steering wheel control lines (Brown/Black).
6. Operating Instructions
6.1 Basic Operations
- Power On/Off: Press the power button (usually the rotary knob) to turn the unit on or off.
- Volume Control: Rotate the knob to adjust the volume.
- Mode Selection: Press the "MODE" button to cycle through available sources (Radio, Bluetooth, USB, AUX).
- Touch Screen: Use the 4.1-inch capacitive touch screen for navigation and control.
6.2 Radio (FM/AM/RDS)
The unit features an FM/AM/RDS tuner for radio reception.

Figure 6.1: Radio interface on the car stereo display. The screen shows FM radio frequencies (87.50 MHz to 108.00 MHz) and AM frequencies (522 KHz to 1620 KHz), along with controls for station tuning and band selection.
- Select Radio Mode: Press the "MODE" button until "Radio" is selected.
- Band Selection: Press the "BAND" button to switch between FM1, FM2, FM3, AM1, AM2.
- Automatic Scan: Press the "AS" button (Auto Store) to automatically scan and save strong stations.
- Manual Tuning: Use the arrow buttons on the screen to manually tune frequencies.
- RDS Function: When available, RDS (Radio Data System) will display station information such as song titles or station names.
6.3 Bluetooth Connectivity
Connect your smartphone via Bluetooth for hands-free calls and audio streaming.

Figure 6.2: Overview of key features including Bluetooth call interface, Steering Wheel Control setup, Equalizer settings, and USB/AUX port locations. The Bluetooth section shows a phone call screen with a dial pad. The SWC section displays buttons for setting up steering wheel controls. The EQ section shows a graphic equalizer. The USB/AUX section highlights the physical ports on the unit.
- Enable Bluetooth: Select "Bluetooth" mode on the unit.
- Pairing: On your smartphone, search for Bluetooth devices and select "Inefala Car Stereo" (or similar name). Enter "0000" if a PIN is required.
- Hands-Free Calling: Once paired, you can make and receive calls directly from the unit's touch screen or via the external microphone.
- Audio Streaming: Play music from your smartphone, and the audio will stream to the car stereo.
6.4 Mirror Link (Android/iOS)
Mirror Link allows you to display your smartphone's screen on the car stereo's display.
- Connection: Connect your Android or iOS smartphone to the unit via a USB cable.
- Activation: Follow the on-screen prompts on the car stereo and your smartphone to activate Mirror Link. Specific steps may vary depending on your phone's operating system.
- Functionality: Once connected, your phone's screen will be mirrored, allowing you to control compatible apps from the car stereo's touch screen.
6.5 USB and AUX Playback
The unit supports media playback from USB devices and external audio sources via AUX.
- USB Playback: Insert a USB drive into one of the USB-A ports. The unit will automatically switch to USB mode and begin playing compatible audio/video files (MP3/AAC/OGG/FLAC/APE for audio; AVI/3GP/MP4/MOV/MPG/MKV/VOB/RMVB/RM for video).
- AUX Input: Connect an external audio device (e.g., MP3 player) to the 3.5mm AUX input jack using an audio cable. Select "AUX" mode to play audio from the connected device.
6.6 Reversing Camera
The included reversing camera provides a clear view of the area behind your vehicle when reversing.
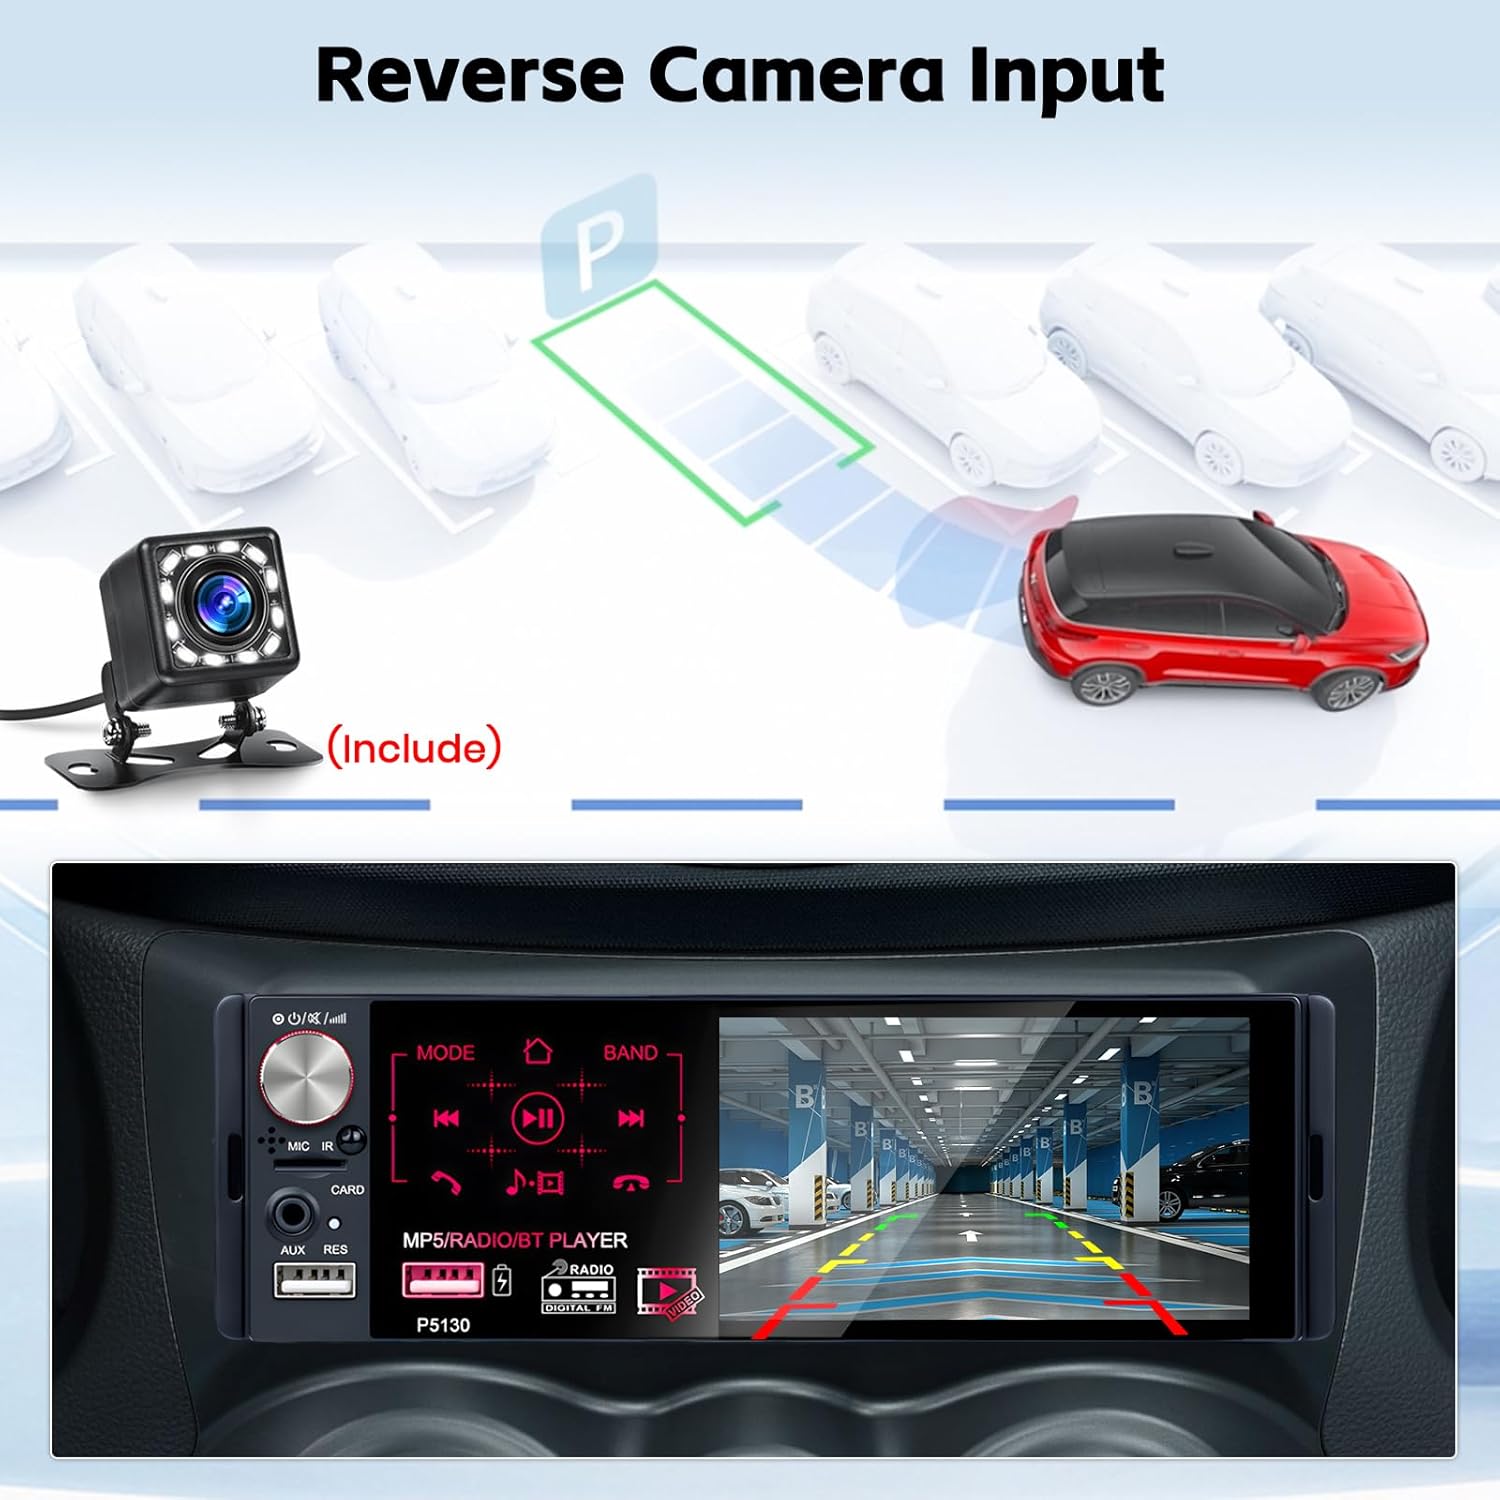
Figure 6.3: Reversing camera view on the car stereo display. The image shows a red car backing into a parking spot, with the camera feed displayed on the stereo screen, complete with parking guidelines.
- Automatic Activation: When the vehicle is shifted into reverse gear, the car stereo will automatically display the camera feed.
- Parking Guidelines: The camera display includes parking guidelines to assist with maneuvering.
6.7 Steering Wheel Control (SWC)
The unit supports connection to your vehicle's existing steering wheel controls for convenient operation.
- Setup: After connecting the SWC wires (refer to Section 5.2), access the SWC settings menu on the car stereo.
- Programming: Follow the on-screen instructions to program each steering wheel button to its corresponding function (e.g., volume up, track skip, mode change).
7. Maintenance
- Cleaning: Use a soft, dry cloth to clean the unit's screen and exterior. Do not use abrasive cleaners or solvents.
- Software Updates: Check the manufacturer's website for any available software updates.
- Avoid Liquids: Keep the unit away from liquids to prevent damage.
8. Troubleshooting
| Problem | Possible Cause | Solution |
|---|---|---|
| Unit does not power on. | Incorrect wiring; Blown fuse; Vehicle battery disconnected. | Check power connections (Yellow, Red, Black wires). Inspect vehicle fuses. Ensure battery is connected. |
| No sound. | Volume too low; Incorrect speaker wiring; Mute function active. | Increase volume. Verify speaker connections. Check if unit is muted. |
| Bluetooth not connecting. | Bluetooth not enabled; Device not in pairing mode; Interference. | Ensure Bluetooth is active on both devices. Put phone in pairing mode. Try pairing again. |
| Reversing camera not displaying. | Camera not connected; Reverse trigger wire (Brown) not connected. | Check camera video input and power connections. Verify Brown wire connection to reverse light trigger. |
| Steering Wheel Controls not working. | SWC wires not connected; Controls not programmed. | Check SWC wire connections. Program the controls via the unit's settings menu. |
9. Specifications
- System: WINCE
- Voltage: 12V
- Maximum Output Power: 4 x 45W
- Display: 4.1-inch Capacitive Touch Screen
- Mirror Link Support: Android/iPhone
- GPS: Not supported
- Wi-Fi: Not supported
- Button Backlight Color: Seven colors
- Audio Formats: MP3/AAC/OGG/FLAC/APE
- Video Formats: AVI/3GP/MP4/MOV/MPG/MKV/VOB/RMVB/RM
- OSD Language: English, Spanish, Portuguese, Russian, Italian, German, French, Polish, Turkish, Greek, Arabic, Hebrew, Czech
- Connectivity: Bluetooth, USB, AUX, RCA
- Special Features: FM Tuner, Touch Screen, Equalizer
- Compatible Devices: Smartphone
- Audio Output Mode: Stereo
- Surround Sound Channel Configuration: 2.0 or 2.1
10. Warranty and Support
For technical assistance or warranty inquiries, please refer to the following information:

Figure 10.1: Technical assistance contact details. The image outlines a two-step process for obtaining help: Step 1 instructs to click on "Inefala EU" (seller name) on the Amazon product page, and Step 2 provides an email address for direct contact: inefalatech@163.com. It also mentions 30-day returns and legal guarantees.
Technical Assistance:
- Step 1: For issues related to shipping, returns, or payment, please contact the seller "Inefala EU" directly through the Amazon platform.
- Step 2: For product-specific technical support or quality issues, you can contact Inefala directly via email: inefalatech@163.com.
Warranty: The product comes with standard legal guarantees. Please refer to your purchase documentation for specific warranty terms and conditions.


