1. Introduction
Welcome to the world of exceptional home espresso with your new Krups Precision Manual Espresso Machine with Grinder. This manual provides detailed instructions for setting up, operating, and maintaining your machine to ensure you enjoy perfectly balanced and aromatic coffee every time. With its integrated conical grinder, intuitive controls, and professional steam nozzle, you are equipped to craft a wide range of coffee beverages, from rich espressos to creamy lattes.
2. Important Safety Instructions
Please read all instructions carefully before using the appliance. Keep this manual for future reference.
- Always connect the appliance to a grounded electrical outlet.
- Do not immerse the appliance, power cord, or plug in water or any other liquid.
- Supervise children to ensure they do not play with the appliance.
- Unplug the appliance from the outlet when not in use, before cleaning, and during assembly or disassembly of parts.
- Do not operate any appliance with a damaged cord or plug, or after the appliance malfunctions or has been damaged in any manner.
- Avoid contact with hot surfaces. Use handles or knobs.
- Use only accessories recommended by the manufacturer.
- Do not use outdoors.
- Do not place on or near a hot gas or electric burner, or in a heated oven.
- Always ensure the water tank is filled to the appropriate level before brewing.
- Exercise extreme caution when using the steam wand as hot steam can cause burns.
3. Package Contents
Your Krups Precision Manual Espresso Machine XP801T10 comes with the following items:
- Krups Precision Manual Espresso Machine with Integrated Grinder
- Coffee Tamper
- Stainless Steel Milk Pitcher
- 58mm Portafilter
- 4 Pressurized Filters (single and double shot)
- Non-Pressurized Filters (single and double shot)
- Cup Support
- Dosing Ring/Funnel
- Filter Cartridge
- Cleaning Kit

Figure 3.1: A comprehensive display of the 10 included barista accessories: stainless steel milk pitcher, tamper, 58mm portafilter, filter cartridge, dosing ring, 4 pressurized filters, and cup support.
4. Product Overview
Familiarize yourself with the components of your espresso machine.

Figure 4.1: The Krups Precision Manual Espresso Machine, showcasing its sleek design and intuitive control panel.
Key Components:
- Integrated Conical Grinder: Located at the top, with 30 adjustable grind settings for optimal freshness.
- Bean Hopper: Holds up to 250g of coffee beans.
- Water Reservoir: Removable, with a capacity of 3.5 liters.
- Control Panel: Intuitive interface with buttons for power, cup selection, pre-infusion, temperature, and drink types (Espresso, Lungo, Americano, Hot Water, Steam).
- Pressure Gauge: Displays brewing pressure, indicating the 'Optimal Zone' for perfect extraction.
- 58mm Portafilter: Professional-grade portafilter for consistent results.
- Steam Wand: Professional-quality nozzle for frothing milk.
- Drip Tray: Removable for easy cleaning.

Figure 4.2: An illustration of the espresso machine with its key dimensions, indicating a 3.5L water reservoir and a 250g bean hopper.
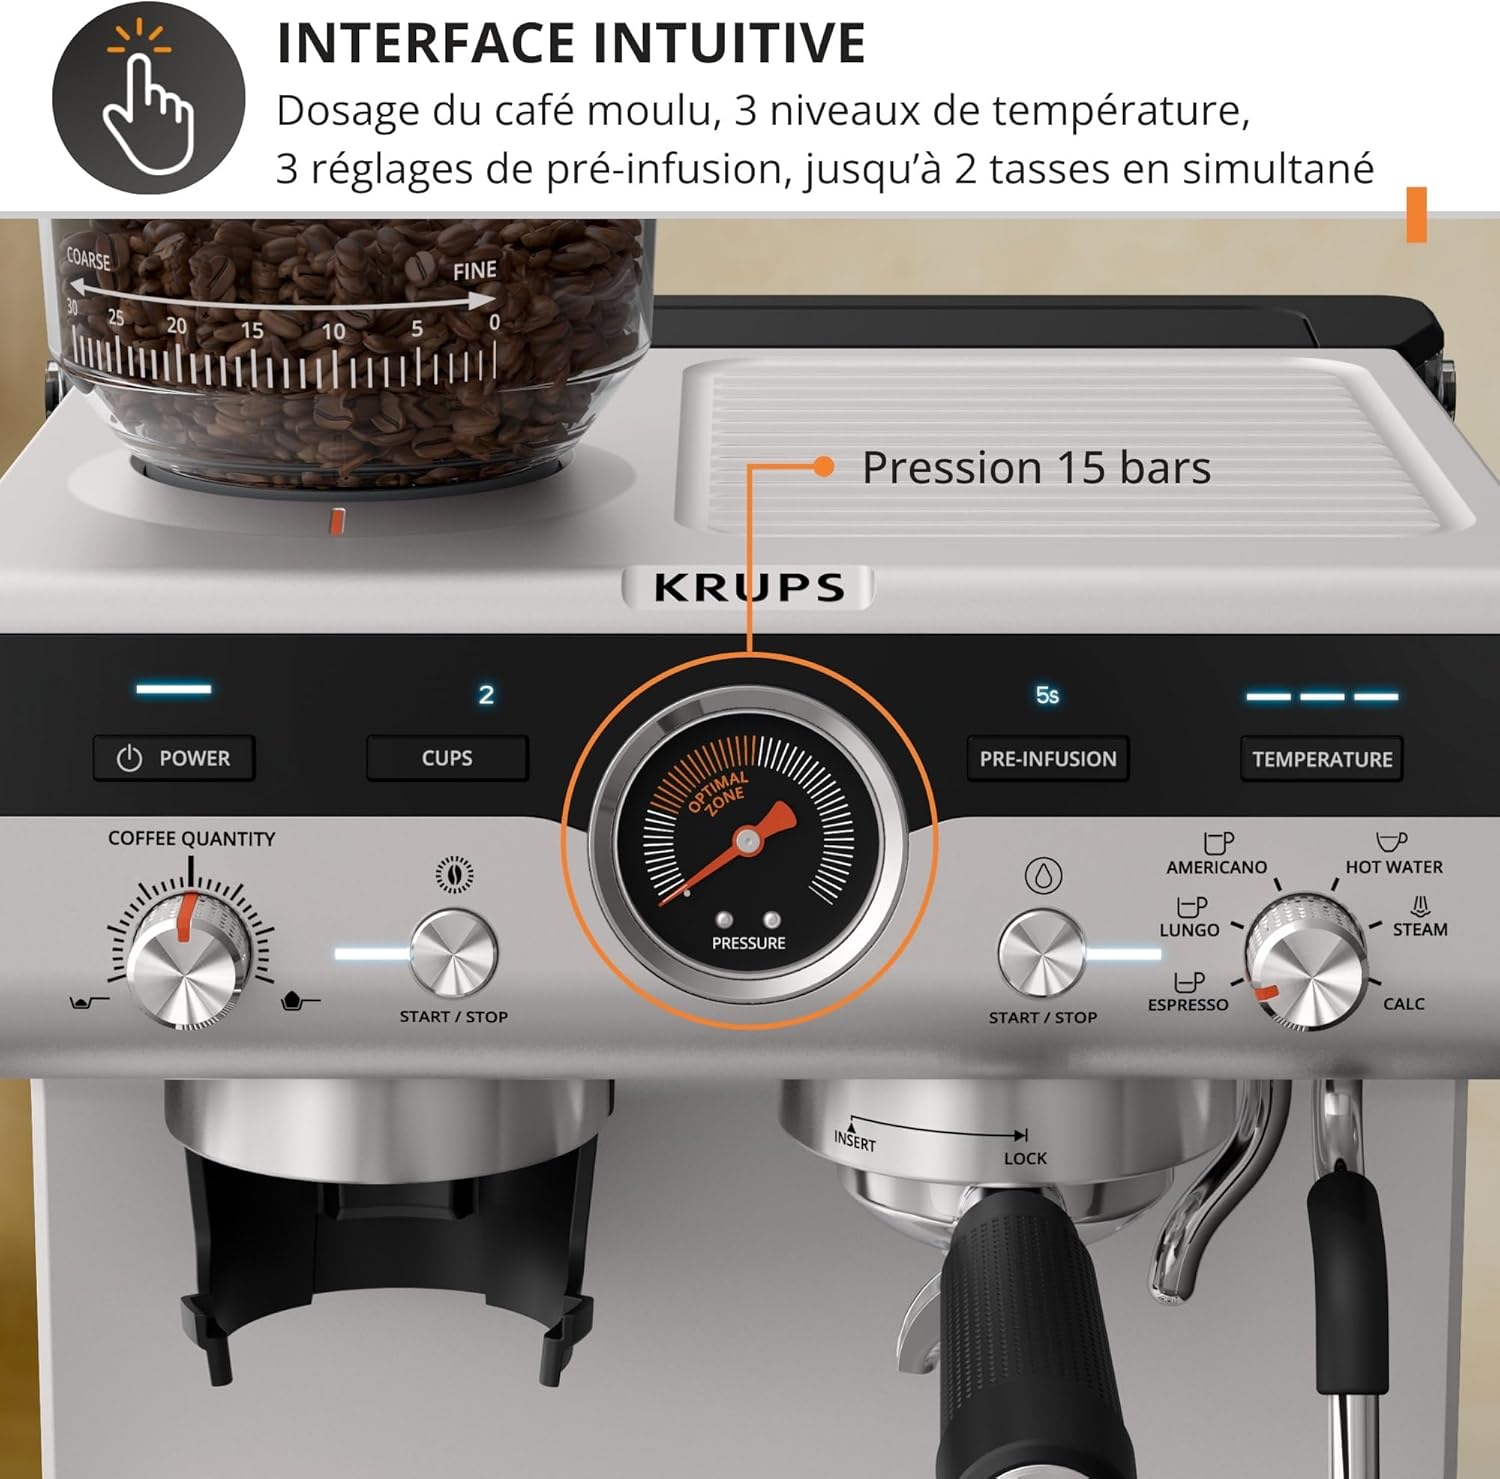
Figure 4.3: The intuitive control panel featuring a pressure gauge in the 'Optimal Zone', along with buttons for power, cups, pre-infusion, temperature, and drink selection.
5. Setup
5.1 Unpacking and Placement
- Carefully remove all packaging materials and accessories.
- Place the machine on a stable, flat, heat-resistant surface, away from water sources and heat.
- Ensure there is adequate space around the machine for ventilation and access to the water tank and bean hopper.
5.2 Initial Cleaning and Priming
- Wash the water tank, portafilter, filters, milk pitcher, and drip tray with warm soapy water, then rinse thoroughly.
- Fill the water tank with fresh, cold water and place it back into the machine.
- Plug the machine into a grounded electrical outlet.
- Turn on the machine using the Power button. The machine will begin to heat up.
- Run a few cycles of hot water through the portafilter (without coffee) and the steam wand to prime the system and rinse any manufacturing residues.
6. Operating Instructions
6.1 Grinding Coffee
- Ensure the bean hopper is filled with fresh coffee beans.
- Adjust the grind setting using the dial on the bean hopper. There are 30 precise settings, from coarse to fine. For espresso, a fine grind is typically recommended.
- Place the portafilter with the desired filter basket (single or double shot) under the grinder outlet.
- Press the grind button to dispense freshly ground coffee into the portafilter. Adjust the grinding time or quantity knob to achieve the desired dose.

Figure 6.1: Close-up of the integrated conical grinder, highlighting the 30 adjustable grind settings from coarse to fine, allowing precise customization of coffee intensity.
6.2 Tamping Coffee
- After grinding, use the included tamper to press the coffee grounds firmly and evenly into the portafilter. This creates a compact puck for optimal extraction.
- Wipe any excess coffee grounds from the rim of the portafilter.
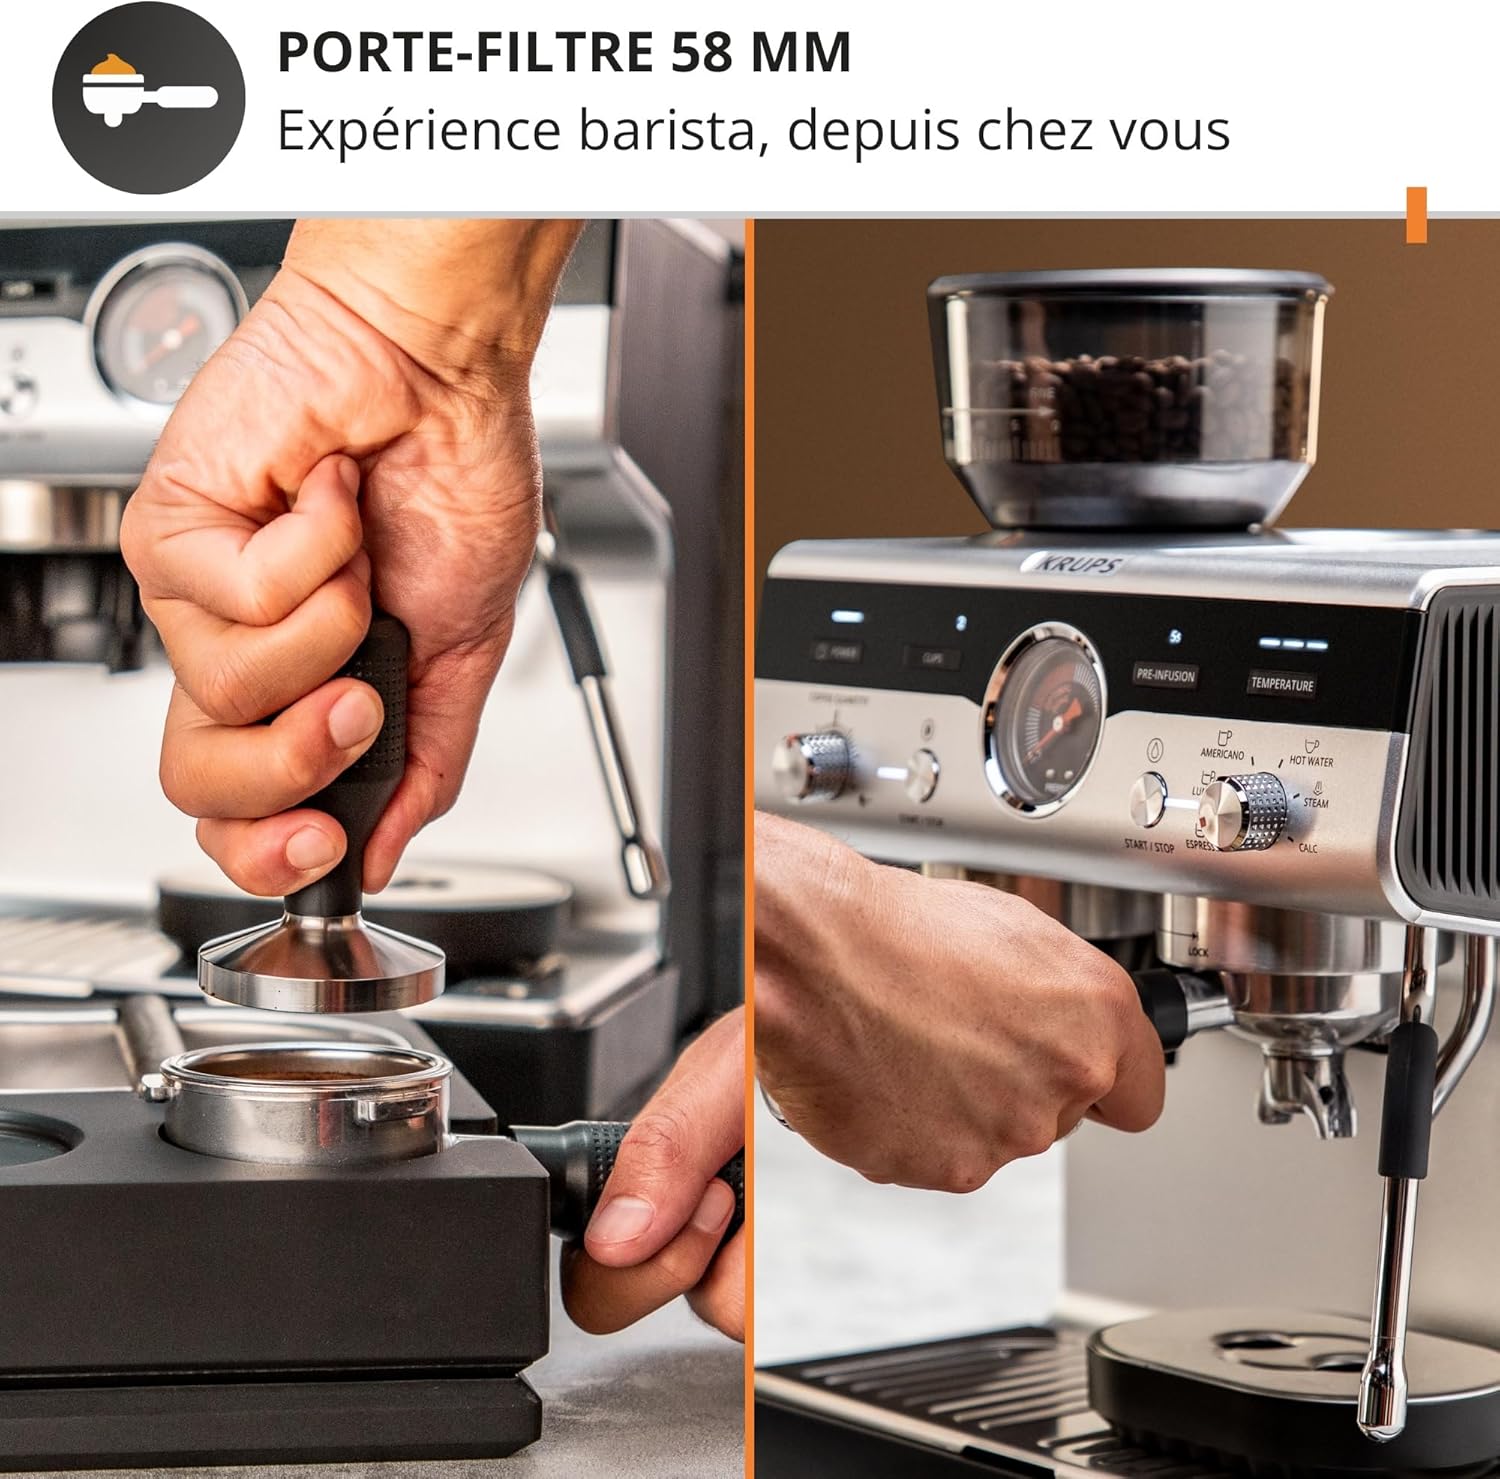
Figure 6.2: Demonstration of tamping freshly ground coffee into the 58mm portafilter and locking it into the machine, essential steps for barista-quality espresso.
6.3 Brewing Espresso and Other Drinks
- Insert the portafilter into the group head and lock it into place by turning it to the right.
- Place one or two cups on the drip tray beneath the portafilter spouts.
- Select your desired drink: Espresso, Lungo, or Americano. The machine offers three pre-infusion settings to enhance aroma and three temperature settings for optimal extraction.
- Press the Start/Stop button for the selected drink. The machine will begin brewing. Monitor the pressure gauge to ensure it stays within the 'Optimal Zone' for the best results.
- To dispense hot water for tea or other beverages, select the 'Hot Water' function.

Figure 6.3: Visual representation of the four pre-programmed drink options available: Espresso, Americano, Long Coffee, and Hot Water, catering to various preferences.
6.4 Steaming Milk
- Fill the stainless steel milk pitcher with cold milk (dairy or non-dairy).
- Position the steam wand over the drip tray and briefly open the steam valve to purge any condensed water. Close the valve.
- Immerse the tip of the steam wand just below the surface of the milk.
- Open the steam valve fully. Lower the pitcher slightly to introduce air for frothing, then raise it to heat the milk.
- Once the milk reaches the desired temperature and texture, close the steam valve and remove the pitcher.
- Immediately wipe the steam wand with a damp cloth to prevent milk residue from drying.

Figure 6.4: A user frothing milk using the professional steam wand, preparing milk for lattes and cappuccinos, demonstrating the machine's milk texturing capabilities.
7. Maintenance
7.1 Daily Cleaning
- Portafilter and Filter Baskets: After each use, remove the portafilter, discard the coffee puck, and rinse the portafilter and filter basket under hot water.
- Steam Wand: Immediately after steaming milk, wipe the steam wand with a damp cloth. Periodically, remove the tip and clean any milk residue with a small brush.
- Drip Tray: Empty and rinse the drip tray daily or when the indicator shows it is full.
- Exterior: Wipe the exterior of the machine with a soft, damp cloth. Do not use abrasive cleaners or scouring pads.
7.2 Descaling
The machine will indicate when descaling is required (CALC light). Descaling removes mineral buildup and ensures optimal performance and longevity of your machine.
- Refer to the specific descaling instructions in your full product manual or on the manufacturer's website for the recommended descaling solution and procedure.
- Typically, this involves mixing a descaling solution with water in the reservoir and running it through the machine's brew head and steam wand.
- Always follow with several rinses of fresh water to remove any descaling solution residue.
7.3 Filter Cartridge Replacement
The included filter cartridge helps reduce impurities in the water. Replace it regularly as indicated by the machine or every 2-3 months, depending on water hardness and usage.
8. Troubleshooting
| Problem | Possible Cause | Solution |
|---|---|---|
| No coffee dispenses. | Water tank empty; machine not primed; coffee too finely ground or tamped too hard; clogged filter. | Fill water tank; prime the machine; adjust grind setting or tamping pressure; clean filter. |
| Coffee is too weak or watery. | Coffee too coarsely ground; not enough coffee; insufficient tamping; water temperature too low. | Adjust grind to finer setting; increase coffee dose; tamp more firmly; check temperature settings. |
| Coffee is too bitter or burnt. | Coffee too finely ground; too much coffee; water temperature too high; over-extraction. | Adjust grind to coarser setting; reduce coffee dose; check temperature settings; shorten brew time. |
| Steam wand not producing steam. | Steam wand clogged; machine not heated to steam temperature. | Clean steam wand tip; wait for machine to reach steam temperature (indicator light). |
| Machine leaks water. | Water tank not properly seated; drip tray full; seals or gaskets worn. | Ensure water tank is correctly placed; empty drip tray; contact customer support if issue persists. |
9. Specifications
| Feature | Detail |
|---|---|
| Brand | KRUPS |
| Model Number | XP801T10 |
| Color | Black/Stainless Steel |
| Product Dimensions (L x W x H) | 31.2 x 33.4 x 41.3 cm |
| Weight | 10.5 Kilograms |
| Capacity (Water Tank) | 3.5 Litres |
| Voltage | 230V |
| Material | Stainless Steel |
| Special Features | Integrated Grinder, Milk Frother, Intuitive Control Surface, Thermoblock System, Accessories Included |
| Coffee Maker Type | Espresso Machine |
| Specific Uses for Product | Espresso, Lungo, Americano, Tea, Latte, Cappuccino |
10. Warranty and Support
Your Krups Precision Manual Espresso Machine XP801T10 is covered by a manufacturer's warranty. Please refer to the warranty card included in your product packaging for specific terms and conditions, including the warranty period and coverage details.
For technical support, spare parts, or service inquiries, please contact Krups customer service. Contact information can typically be found on the official Krups website or in your product documentation.
Before contacting support, please have your model number (XP801T10) and proof of purchase readily available.


