
Introduction
This manual provides detailed instructions for the installation, configuration, and operation of your Real HD 8 Port 10Gb SFP+ Web Managed Fiber Switch. This device is designed to enhance network performance with high-speed 10 Gigabit connectivity, offering advanced management features for optimal network efficiency. Please read this manual thoroughly before using the product to ensure proper setup and functionality.
Product Overview
Key Features
- 8 x 10Gb SFP+ Ports: Provides high-speed fiber connectivity for demanding network environments.
- 160Gbps Switching Capacity: Ensures high data throughput for efficient network operation.
- Multi-Gig Adaptive Ports: Default port rate is 10G/2.5G adaptive. Manual configuration for 1G devices is available via the management interface.
- Web Management Interface: Offers secure setup, access, and SNMP management for various configurations including VLAN, QoS, Jumbo Frame, Multicast, MAC Address, and Link Aggregation.
- Fanless Design: Operates silently and integrates discreetly into any environment, while also providing good heat dissipation.
- Durable Construction: Features a compact and sturdy metal housing with 6KV lightning protection.
- Wide Application: Compatible with various Ethernet devices such as 8K video systems, laptops with 10G adapters, WiFi 6 routers/APs, 10G gaming PCs, and 10G NAS systems.
Physical Components
The Real HD 8 Port 10Gb SFP+ Web Managed Fiber Switch features a robust metal casing designed for durability and efficient heat dissipation. Below is an illustration of the device's front and rear panels, highlighting key components.

Figure 1: Front Panel View. This image displays the front panel of the Real HD 8 Port 10Gb SFP+ Web Managed Fiber Switch, showing the eight SFP+ ports, LED indicators for link status (10G, 2.5G/1G), power (PWR), and system status (SYS), along with a reset button. The Real HD logo is visible on the left.
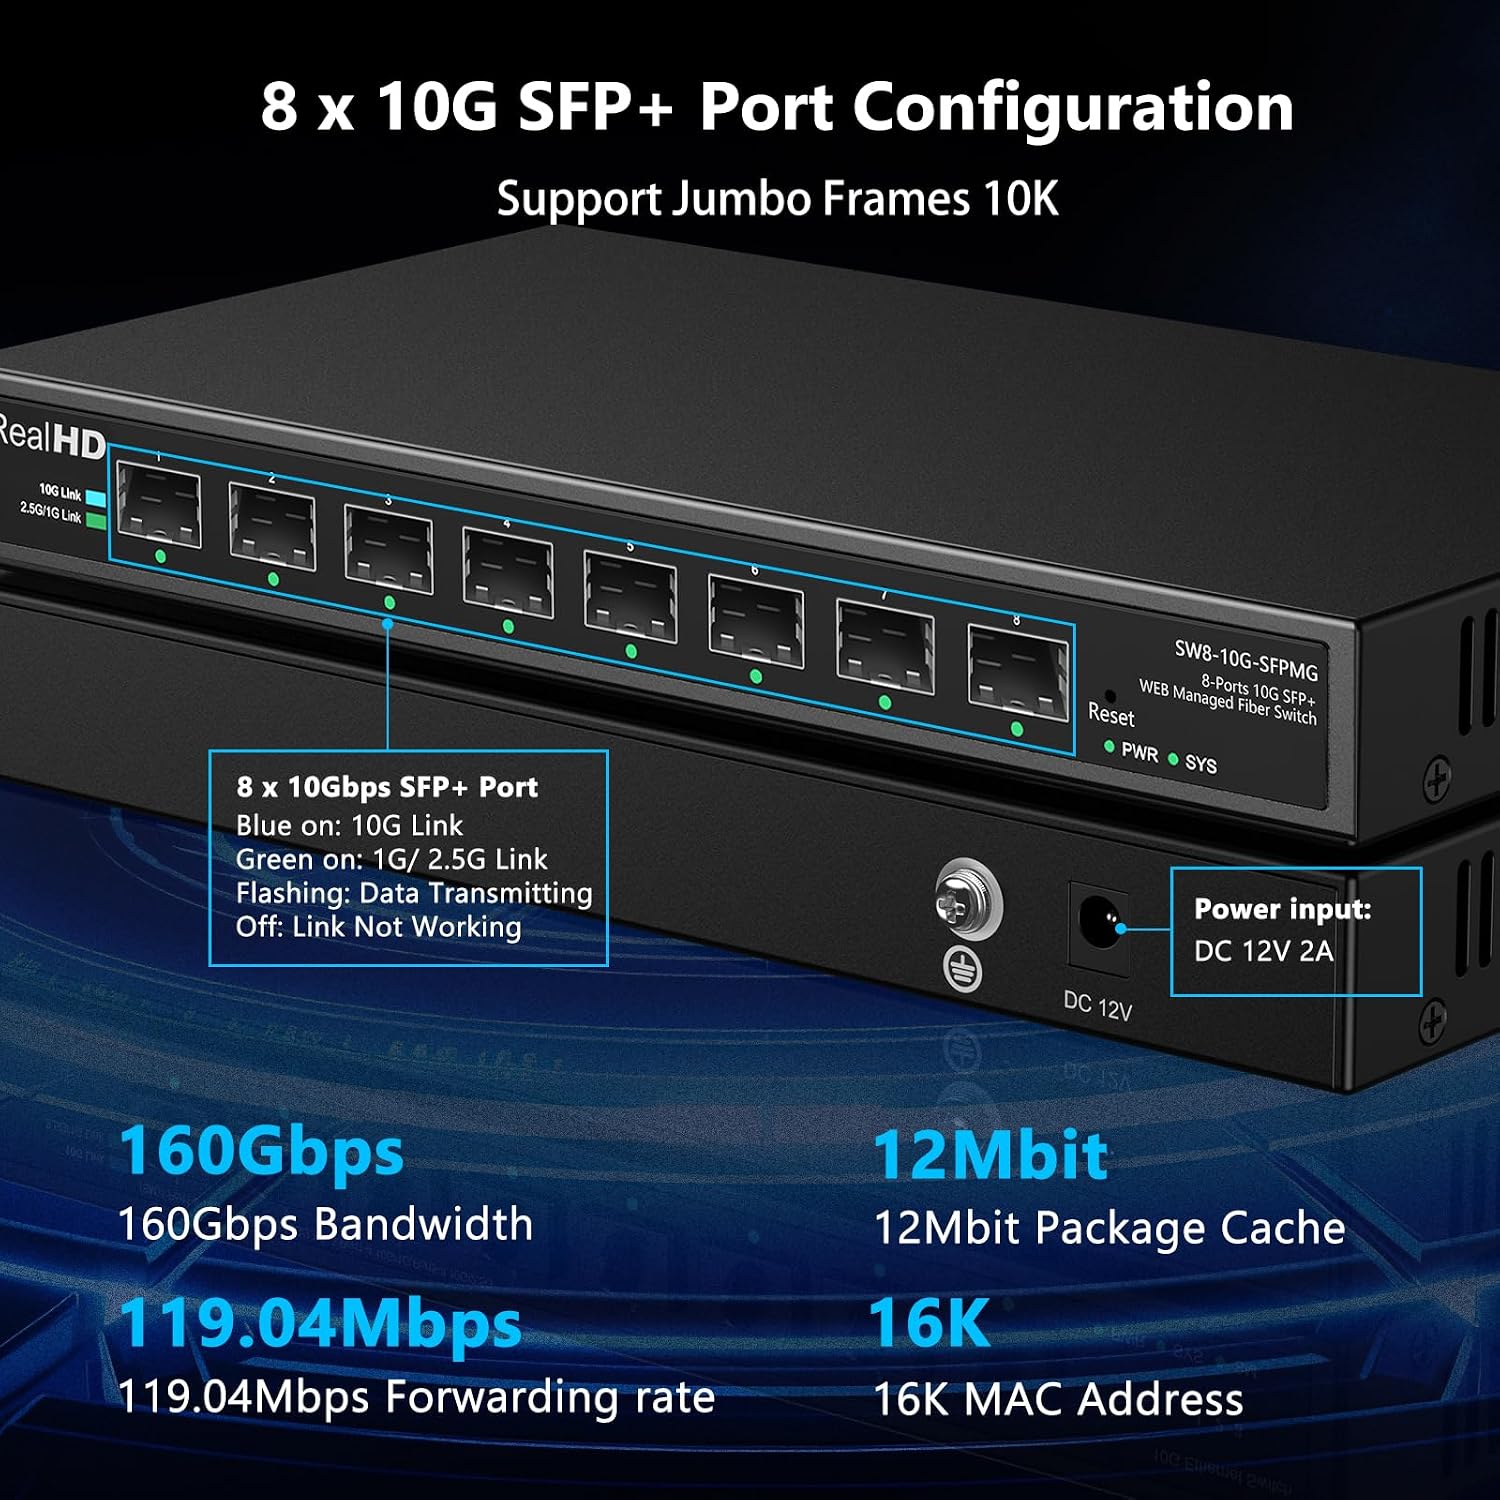
Figure 2: Front and Rear Panel Details. This image provides a closer look at both the front and rear panels. The front panel shows the 8 SFP+ ports with LED indicators: Blue for 10G Link, Green for 1G/2.5G Link, Flashing for Data Transmitting, and Off for Link Not Working. The rear panel shows the DC 12V 2A power input. Key specifications like 160Gbps Bandwidth, 12Mbit Package Cache, 119.04Mbps Forwarding rate, and 16K MAC Address are also highlighted.
Setup Instructions
1. Unpacking and Inspection
- Carefully remove the switch from its packaging.
- Inspect the device for any signs of damage during transit. If damage is found, contact your vendor immediately.
- Ensure all components listed in the packing list are present.
2. Physical Placement
- Place the switch on a stable, flat surface or mount it to a wall using appropriate brackets (if included).
- Ensure adequate ventilation around the device. Although fanless, proper airflow helps maintain optimal operating temperature.
- Avoid placing the switch near heat sources, direct sunlight, or areas with high humidity.
3. Power Connection
- Connect the provided power adapter to the DC 12V 2A power input port on the rear panel of the switch.
- Plug the power adapter into a standard electrical outlet.
- Verify that the PWR LED indicator on the front panel illuminates, indicating the switch is receiving power.
4. Network Connection
The switch features 8 SFP+ ports for fiber optic connections. SFP+ modules are not included and must be purchased separately.
- Insert compatible 10Gb SFP+ transceiver modules into the desired SFP+ ports. Note that only TP-Link 10Gb SFP+ Transceivers and Real HD 10Gb SFP+ to RJ45 Transceivers are officially compatible.
- Connect appropriate fiber optic cables (for SFP+ fiber modules) or CAT6a/above copper cables (for SFP+ to RJ45 modules) to the SFP+ transceivers.
- Connect the other end of the cable to your network devices (e.g., servers, workstations, routers).
- Observe the LED indicators on the front panel: Blue for 10G link, Green for 1G/2.5G link. A flashing LED indicates data transmission.

Figure 3: SFP+ Module Compatibility and Speed. This image illustrates the use of various SFP+ optical fiber modules (1Gbps, 2.5Gbps, 10Gbps) with the switch. It also visually compares the speed capabilities of 1G, 2.5G, and 10G networks, emphasizing the 10x faster performance of a 10G network over a regular 1G network. A note clarifies that the default port rate is 10G/2.5G adaptive, and manual setting to 10G/1G is required for 1G devices via the management interface.
Operating Instructions
1. Accessing the Web Management Interface
The Real HD 8 Port 10Gb SFP+ Web Managed Fiber Switch is configured and monitored via a web-based interface. Ensure your computer is connected to the switch (directly or through the network) and is on the same subnet.
- Open a web browser on a computer connected to the switch.
- Enter the default IP address of the switch: 192.168.2.1 in the address bar and press Enter.
- When prompted, enter the default login credentials:
- User Name: admin
- Password: admin
- Upon successful login, you will access the switch's management dashboard. It is highly recommended to change the default password for security reasons.

Figure 4: Basic Management Features. This image highlights the various management features available through the web interface, including VLAN, QoS, Jumbo Frame, Static Aggregation, LACP, Loop, and Spanning Tree Protocol. The default web address (192.168.2.1) and login credentials (User Name: admin, Password: admin) are also displayed.
2. Configuring Port Speed for 1G Devices
The default port rate for the SFP+ ports is 10G/2.5G adaptive. If you are connecting 1G devices, you must manually set the port speed to 10G/1G via the web management interface.
- Log in to the web management interface as described above.
- Navigate to the "Port Settings" or "Interface Configuration" section (exact menu names may vary).
- Select the specific SFP+ port connected to your 1G device.
- Change the speed setting from "Adaptive" or "Auto-negotiate" to "10G/1G" or a similar option that forces 1G operation.
- Save the changes and apply the configuration. The port will restart with the new setting.
3. Advanced Management Features
The web management interface provides access to advanced network configurations to optimize your network efficiency. These features include:
- VLAN (Virtual Local Area Network): Allows for logical segmentation of your network, improving security and performance. Supports configurable VLAN IDs from 1-4094 and up to 31 static VLAN groups.
- QoS (Quality of Service): Prioritizes network traffic to ensure critical applications receive sufficient bandwidth. Supports SP and WRR scheduling with up to 8 queues per port.
- Jumbo Frames: Supports Jumbo Frames up to 10K, which can improve throughput for large data transfers.
- Link Aggregation (LACP/Static): Combines multiple physical links into a single logical link for increased bandwidth and redundancy. Supports up to 2 groups with a maximum of 4 members per group.
- Multicast (IGMP Snooping): Optimizes multicast traffic delivery, preventing unnecessary flooding of multicast packets. Supports IGMP V1/V2 and Router Port configuration.
- MAC Address Management: Allows for dynamic and static MAC address configuration.
- Spanning Tree Protocol (STP/RSTP/MSTP): Prevents network loops and provides path redundancy.

Figure 5: Detailed Web Managed Features. This image presents a table summarizing the performance and web management features of the switch, including Bandwidth (160Gbps), Packet forwarding (119.04Mbps), Package cache (12Mbit), MAC address table (16K), Jumbo Frame support, QoS, Multicast, Link Aggregation, VLAN, and Spanning Tree Protocol.
Maintenance
- Cleaning: Use a soft, dry cloth to clean the exterior of the switch. Do not use liquid or aerosol cleaners.
- Ventilation: Ensure that the areas around the switch remain clear to allow for proper heat dissipation, even with its fanless design.
- Firmware Updates: Periodically check the manufacturer's website for firmware updates. Keeping the firmware updated can improve performance, add new features, and address security vulnerabilities.
- Environmental Conditions: Operate the switch within the recommended temperature range of -20 to 50°C.
Troubleshooting
| Problem | Possible Cause | Solution |
|---|---|---|
| No power (PWR LED off) | Power adapter not connected or faulty; power outlet not working. | Check power adapter connection. Try a different power outlet. Ensure the power adapter is the correct 12V 2A type. |
| No link light (SFP+ port LED off) | Incorrect SFP+ module; faulty cable; device not connected or powered on; incorrect port speed setting. | Ensure SFP+ module is compatible (TP-Link or Real HD 10Gb SFP+ to RJ45). Check cable integrity. Verify connected device is powered on. For 1G devices, manually set port speed to 10G/1G in web management. |
| Cannot access web management interface | Incorrect IP address; computer not on same subnet; firewall blocking access; incorrect login credentials. | Verify default IP 192.168.2.1. Ensure your computer's IP is in the 192.168.2.x range (e.g., 192.168.2.100). Temporarily disable computer firewall. Use default credentials (admin/admin). If still unable, perform a factory reset using the reset button. |
| Slow network speed | 1G device connected to adaptive port; incompatible SFP+ module; network congestion; cable issues. | Manually configure port speed for 1G devices. Ensure all devices in the 10G path are 10G capable for optimal performance. Check SFP+ module compatibility and cable quality. Review QoS settings if applicable. |
| Switch unresponsive (SYS LED off or solid) | System error; firmware issue. | Perform a soft reboot by unplugging and replugging the power. If the issue persists, perform a factory reset. If still unresponsive, contact technical support. |
Specifications
| Feature | Detail |
|---|---|
| Model Number | 8 Port 10GB Fiber Switch Web Managed |
| Brand | Real HD |
| Number of Ports | 8 |
| Interface Type | SFP+ |
| Data Transfer Rate | 160 Gigabits Per Second (Switching Capacity) |
| Forwarding Rate | 119.04 Mbps |
| Package Cache | 12 Mbit |
| MAC Address Table Size | 16K |
| Jumbo Frame Support | Yes (up to 10K) |
| Case Material | Metal |
| Cooling | Fanless |
| Operating Temperature | -20 to 50 Degrees Celsius |
| Lightning Protection | 6KV |
| Power Input | DC 12V 2A |
| Item Weight | 2.01 pounds (0.91 Kilograms) |
| Package Dimensions | 10.28 x 9.02 x 2.44 inches |
| Compatible Devices | Gaming Console, Laptop, Printer, 8K Video, WiFi 6 Router/AP, 10G Gaming PC, 10G NAS |
Warranty and Support
Real HD provides local technical support for its products. For assistance with installation, configuration, or troubleshooting, please contact our support team.
- Technical Support Hours: 9 AM - 5 PM CST (Central Standard Time)
- Contact: Please refer to the product packaging or the official Real HD website for the most current contact information.
For warranty information, please consult the documentation included with your purchase or visit the Real HD official website.