
1. Introduction
This manual provides essential information for the installation, maintenance, and troubleshooting of your RHYTHM TESTAMENT carburetor. This carburetor is specifically engineered to ensure efficient fuel delivery and optimal engine performance for the Garden Star 5020d Tiller equipped with a Briggs & Stratton engine.
2. Product Overview
The RHYTHM TESTAMENT carburetor is a precision-engineered component designed to mix air and fuel in the correct proportions for combustion in your tiller's engine. It is crafted from durable materials to ensure long-lasting performance and reliability.
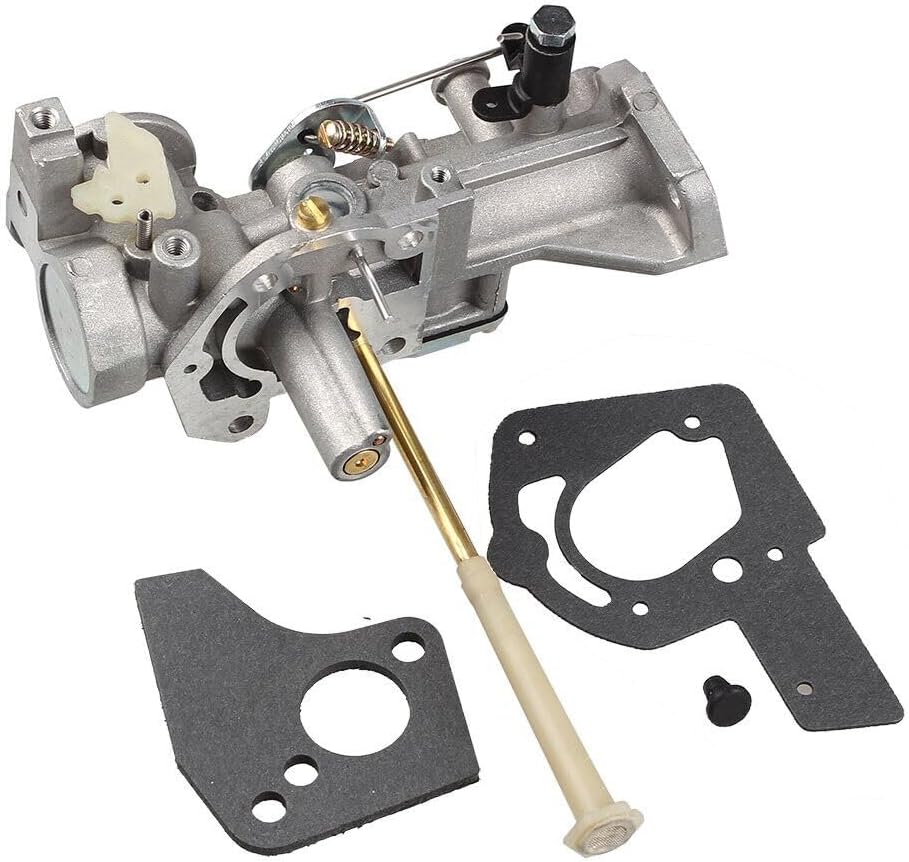
This image displays the RHYTHM TESTAMENT carburetor, including the main body, various linkages, and accompanying gaskets. It is designed for the Garden Star 5020d Tiller with a Briggs & Stratton engine.
Key Features:
- Designed for Garden Star 5020d Tiller.
- Compatible with Briggs & Stratton powered engines.
- Ensures efficient fuel for optimal engine performance.
- Constructed from durable materials for reliability.
3. Compatibility
This carburetor is specifically compatible with the Garden Star 5020d Tiller when powered by a Briggs & Stratton engine. It is also compatible with MPN 5021. Before installation, carefully compare the product photos with your existing carburetor to confirm compatibility and ensure it meets your specific requirements.
4. Installation
Carburetor replacement requires mechanical aptitude. If you are unsure about any step, it is recommended to consult a qualified technician. Always ensure the engine is cool and disconnected from its power source (e.g., spark plug wire removed) before beginning work.
General Installation Steps:
- Safety First: Disconnect the spark plug wire and ensure the engine is cool.
- Drain Fuel: Drain the fuel tank to prevent spills.
- Remove Air Filter: Carefully remove the air filter housing and air filter.
- Disconnect Linkages: Disconnect the throttle and choke linkages from the old carburetor. Note their positions for reassembly.
- Remove Fuel Line: Disconnect the fuel line from the carburetor. Be prepared for residual fuel.
- Unbolt Carburetor: Remove the mounting bolts that secure the carburetor to the engine.
- Remove Old Gaskets: Ensure all old gasket material is removed from the engine and intake manifold surfaces.
- Install New Gaskets: Place the new gaskets provided with the carburetor onto the mounting studs.
- Mount New Carburetor: Carefully position the new carburetor onto the mounting studs.
- Secure Carburetor: Reinstall the mounting bolts and tighten them evenly to the manufacturer's specifications.
- Reconnect Fuel Line: Attach the fuel line securely to the new carburetor.
- Reconnect Linkages: Reattach the throttle and choke linkages, ensuring they operate smoothly.
- Reinstall Air Filter: Reassemble the air filter and housing.
- Refill Fuel: Add fresh fuel to the tank.
- Test: Reconnect the spark plug wire and test the engine operation.
Warning: Always refer to your tiller's specific service manual for detailed, model-specific instructions and torque specifications.
5. Operation (Carburetor Function)
As an engine component, the carburetor's operation is integral to the engine's function. It precisely meters and atomizes fuel, mixing it with air before it enters the engine's combustion chamber. Proper carburetor function is critical for engine starting, smooth idling, and consistent power output under load. No direct user operation of the carburetor itself is required beyond its correct installation and maintenance.
6. Maintenance
Regular maintenance helps prolong the life of your carburetor and ensures optimal engine performance.
Maintenance Tips:
- Use Fresh Fuel: Always use fresh, clean fuel. Stale fuel can leave deposits that clog carburetor passages.
- Fuel Stabilizer: If storing the tiller for extended periods, use a fuel stabilizer or drain the fuel tank and run the engine until it stops.
- Clean Air Filter: Regularly inspect and clean or replace the air filter to prevent dirt and debris from entering the carburetor.
- Inspect Fuel Lines: Check fuel lines for cracks or leaks and replace as necessary.
- Carburetor Cleaning: If performance issues arise, a carburetor cleaning kit or professional service may be required to clear clogged jets or passages.
7. Troubleshooting
If your tiller's engine experiences issues after carburetor installation, consider the following common troubleshooting steps:
| Symptom | Possible Cause | Solution |
|---|---|---|
| Engine won't start | No fuel, clogged fuel filter, incorrect choke setting, spark plug issue | Check fuel level, replace fuel filter, adjust choke, inspect/replace spark plug. |
| Engine runs rough/stalls | Clogged carburetor jet, old fuel, air leak, incorrect idle adjustment | Clean carburetor, use fresh fuel, check for loose connections, adjust idle screw. |
| Engine lacks power | Clogged air filter, restricted fuel flow, carburetor out of adjustment | Clean/replace air filter, check fuel lines, adjust carburetor settings (if applicable). |
| Fuel leaks | Loose fuel line, damaged gasket, stuck float | Tighten connections, replace gaskets, inspect float and needle valve. |
If these steps do not resolve the issue, professional diagnosis and repair may be necessary.
8. Specifications
- Brand: RHYTHM TESTAMENT
- Manufacturer: RHYTHM TESTAMENT
- Compatible Tiller Model: Garden Star 5020d
- Compatible Engine: Briggs & Stratton Powered
- Carburetor MPN: 5021
- UPC: 670295898905
- ASIN: B0DW8VQ4HB
9. Warranty and Support
Specific warranty information for this RHYTHM TESTAMENT carburetor is not provided in the product details. For warranty claims, technical support, or further assistance, please contact the seller or manufacturer directly through your purchase platform. Always retain your proof of purchase for any warranty-related inquiries.