1. Introduction
This manual provides detailed instructions for the installation, operation, and maintenance of your Photon 3-Button Oval Type Remote Control System. Please read this manual thoroughly before attempting to install or operate the system to ensure proper function and safety. Keep this manual for future reference.
2. Product Overview
The Photon 3-Button Oval Type Remote Control System is designed to provide convenient remote access and control for various applications, typically central locking systems. The system includes a main control unit, a wiring harness for connection, and two remote key fobs for user interaction.
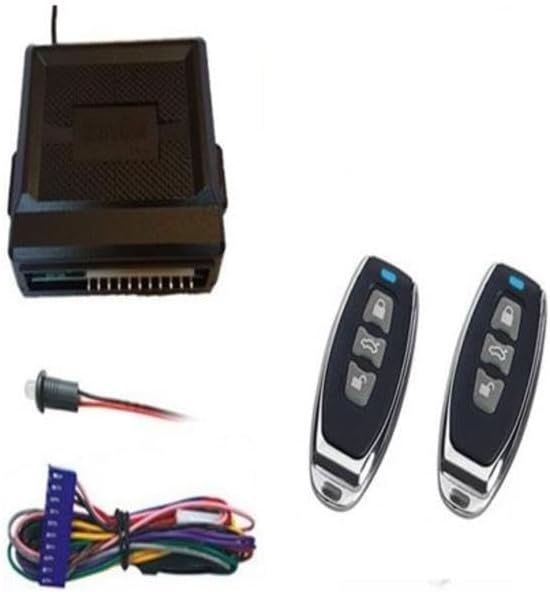
Figure 1: Components of the Photon 3-Button Oval Type Remote Control System. This image displays the complete system, featuring a black rectangular control module with a multi-pin connector, a wiring harness with various colored wires and a small push-button switch, and two identical oval-shaped remote key fobs, each with three grey buttons and a blue indicator light.
3. Setup and Installation
Installation of this remote control system requires technical knowledge and should ideally be performed by a qualified professional. Incorrect installation can lead to damage to the product or the vehicle/device it is connected to.
3.1. General Installation Guidelines
- Disconnect Power: Before beginning any installation, ensure that the power source to the vehicle or device is disconnected to prevent electrical shorts or damage.
- Mount the Control Unit: Select a secure, dry location for the main control unit, away from excessive heat, moisture, and direct sunlight. Ensure it is mounted firmly to prevent vibrations.
- Wiring Connections: Carefully follow the wiring diagram provided with your specific product packaging. Connect the wiring harness to the control unit and then to the appropriate circuits (e.g., power, ground, central locking actuators, auxiliary outputs). Pay close attention to wire colors and functions.
- Antenna Placement: Position the antenna wire (if applicable) in a location that maximizes signal reception, typically away from metal obstructions. Do not cut or coil the antenna wire.
- Test Functionality: After all connections are made, reconnect power and test all functions of the remote control system (lock, unlock, auxiliary functions) before reassembling any panels.
For detailed wiring instructions, refer to the specific wiring diagram included in your product packaging.
4. Operating Instructions
The Photon 3-Button Oval Type Remote Control System operates using the provided remote key fobs. Each remote typically has three buttons for various functions.
4.1. Remote Control Functions
- Lock Button (Typically Top Button): Press this button once to lock the connected system (e.g., vehicle doors). The system may provide an audible or visual confirmation.
- Unlock Button (Typically Middle Button): Press this button once to unlock the connected system. Confirmation will typically be provided.
- Auxiliary/Trunk Release Button (Typically Bottom Button): Press and hold this button for approximately 2-3 seconds to activate an auxiliary function, such as trunk release or another programmable output.
Ensure you are within the effective range of the system for reliable operation. Obstructions and environmental factors can affect remote range.
5. Maintenance
The Photon Remote Control System is designed for low maintenance. Regular care will ensure its longevity and reliable performance.
5.1. Remote Control Battery Replacement
If the remote control's range decreases significantly or the indicator light (if present) does not illuminate, the battery may need replacement.
- Carefully open the remote control casing using a small screwdriver or prying tool.
- Note the type and orientation of the existing battery (e.g., CR2032 coin cell).
- Remove the old battery and insert a new battery of the same type, ensuring correct polarity.
- Close the remote control casing securely.
- Test the remote control's functionality.
5.2. General Care
- Keep the control unit and remote controls dry and away from extreme temperatures.
- Avoid dropping the remote controls or subjecting them to strong impacts.
- Clean the remote controls with a soft, dry cloth. Do not use harsh chemicals or abrasive cleaners.
6. Troubleshooting
If you encounter issues with your Photon Remote Control System, refer to the following troubleshooting guide:
| Problem | Possible Cause | Solution |
|---|---|---|
| Remote control not working. | Dead battery in remote. Out of range. Remote not programmed. | Replace remote battery. Move closer to the vehicle/device. Refer to programming instructions (if applicable) or contact support. |
| Reduced remote range. | Weak remote battery. Interference. Antenna obstruction. | Replace remote battery. Avoid areas with strong radio interference. Check antenna placement. |
| System does not respond to any remote. | Main control unit power issue. Faulty wiring. | Check power connection to the control unit. Verify all wiring connections are secure. Consult a professional if necessary. |
7. Specifications
- Brand: Photon
- Manufacturer: PHOTON
- Model Number: 001-27-100
- Part Number: 001-27-100
- First Available Date: January 24, 2025
8. Warranty and Support
For warranty information or technical support regarding your Photon 3-Button Oval Type Remote Control System, please refer to the documentation included with your purchase or contact the manufacturer directly. Keep your proof of purchase for warranty claims.


