
1. Introduction
This manual provides comprehensive instructions for the installation, setup, operation, and maintenance of the Fanvil i60 IP Video Door Intercom System. Please read this manual thoroughly before using the device to ensure proper functionality and safety.
2. Safety Information
- Ensure all electrical connections comply with local regulations.
- Do not expose the device to extreme temperatures, humidity, or direct sunlight.
- Avoid disassembling the device. Refer servicing to qualified personnel.
- Use only the specified power supply or PoE (Power over Ethernet) equipment.
- Keep the device away from strong electromagnetic fields.
3. Package Contents
Verify that all items are present in the package:
- Fanvil i60 IP Video Door Intercom Unit
- Mounting Accessories (screws, anchors)
- Quick Installation Guide
Note: The included components may vary slightly based on region or specific product bundle.
4. Product Overview
The Fanvil i60 is a compact IP video door intercom system designed for secure access control and communication. It features a single call button, an infrared camera for night vision, and RFID support for card-based access.
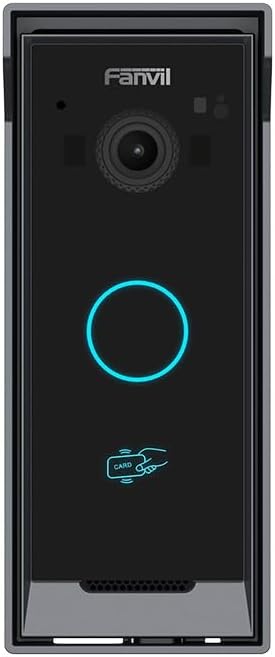
Figure 4.1: Front view of the Fanvil i60 IP Video Door Intercom. This image displays the device's sleek black faceplate, featuring the Fanvil logo at the top, a central camera lens, a prominent circular call button with a blue LED light ring, and an RFID card reader icon at the bottom. A speaker grille is visible at the very bottom.
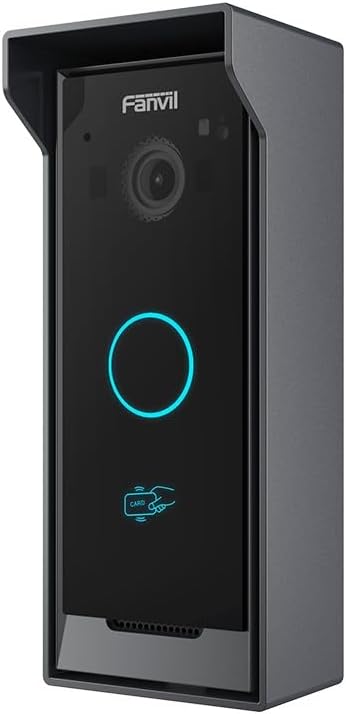
Figure 4.2: Angled view of the Fanvil i60 IP Video Door Intercom. This perspective highlights the device's slim side profile and the integrated protective cover at the top, designed to shield it from environmental elements like rain. The front panel elements (camera, call button, RFID icon) are also visible.

Figure 4.3: Packaging box for the Fanvil i60 IP Video Door Intercom. The label on the box clearly displays the model number 'i60', serial number 'THD1253000537', MAC address '0C383E777B1A', and various regulatory certifications such as CE, EAC, and FC. Manufacturer details and a barcode are also visible.
Key Features:
- Compact Design: Mini IP video door intercom suitable for various installations.
- LED Lighting: Call button with blue LED light ring for visibility in low light.
- Night Vision: Built-in infrared camera for clear imaging in dark conditions.
- PoE Support: Power over Ethernet for simplified installation with a single network cable.
- Access Control: Supports RFID tags and cards for secure entry management.
- Vandal Proof: Durable construction for enhanced security.
5. Installation
5.1 Mounting Location
Select a suitable location for mounting the intercom, typically near a door or gate. Ensure the camera has a clear view of the visitor area and that the device is protected from direct weather exposure if not rated for outdoor use (though this model is designed for outdoor security).
5.2 Wiring
- Network Connection: Connect a standard Ethernet cable from your PoE-enabled network switch or PoE injector to the RJ45 port on the Fanvil i60. This single cable provides both power and data connectivity.
- External Connections (Optional): If using external access control devices (e.g., door strike, exit button), refer to the detailed wiring diagram in the full technical manual for specific connections.
5.3 Physical Mounting
- Use the provided mounting template (if applicable) to mark drilling points on the wall.
- Drill holes and insert wall anchors if necessary.
- Secure the mounting bracket (if separate) to the wall.
- Attach the Fanvil i60 unit to the mounting bracket or directly to the wall using the supplied screws.
- Ensure the unit is securely fastened and level.
6. Initial Setup
6.1 Power On
Once connected to a PoE network, the device will power on automatically. The blue LED ring around the call button will illuminate, indicating power.
6.2 Network Configuration
- The Fanvil i60 typically obtains an IP address automatically via DHCP.
- To find the device's IP address, you may use a network scanner tool or consult your router's DHCP client list.
- Access the device's web interface by entering its IP address into a web browser.
- Log in using the default administrator credentials (refer to the Quick Installation Guide or Fanvil documentation for default username/password).
6.3 Basic Settings
Within the web interface, configure essential settings such as:
- SIP account registration (for video/audio calls)
- Date and Time settings
- Network settings (if static IP is required)
- Administrator password change (highly recommended for security)
7. Operation
7.1 Making a Call
To initiate a call, a visitor presses the illuminated call button on the front panel. The intercom will then dial the pre-configured extension or SIP address.
7.2 Receiving a Call
When the intercom calls, the designated internal device (e.g., IP phone, softphone, indoor monitor) will ring. Answer the call to establish two-way audio and video communication.
7.3 Door Opening
During an active call, the door can be opened remotely by entering a specific DTMF code on the receiving device. This code is configured in the intercom's web interface.
7.4 RFID Access
For authorized personnel, present a pre-registered RFID card or tag to the RFID reader area on the intercom. Upon successful verification, the door will unlock.
- Adding RFID Cards: RFID cards must be registered through the intercom's web interface under the access control settings.
- Card Types: Ensure compatibility with supported RFID card types (e.g., 13.56MHz Mifare).
8. Maintenance
8.1 Cleaning
Wipe the device's surface with a soft, damp cloth. Do not use abrasive cleaners or solvents, as these can damage the finish.
8.2 Firmware Updates
Periodically check the Fanvil official website for firmware updates. Keeping the firmware updated ensures optimal performance, security, and access to new features. Follow the instructions provided with the firmware update package carefully.
9. Troubleshooting
9.1 No Power
- Verify the Ethernet cable is securely connected.
- Ensure the PoE switch or injector is powered on and functioning correctly.
- Check the network cable for damage.
9.2 No Video/Audio During Call
- Check network connectivity and bandwidth.
- Verify SIP registration status in the web interface.
- Ensure firewall settings are not blocking SIP/RTP traffic.
9.3 RFID Card Not Working
- Confirm the RFID card is properly registered in the intercom's access control settings.
- Ensure the card type is compatible with the Fanvil i60.
- Try another known working RFID card.
9.4 Cannot Access Web Interface
- Verify the device's IP address.
- Ensure your computer is on the same network segment as the intercom.
- Temporarily disable any local firewall on your computer.
- If the password is forgotten, a factory reset may be required (consult Fanvil support for this procedure).
10. Specifications
| Feature | Detail |
|---|---|
| Brand | Fanvil |
| Model Number | I60 |
| Connectivity Technology | Wired (PoE) |
| Mounting Type | Doorbell Mount |
| Effective Still Resolution | 2 MP |
| Special Feature | Vandal Proof, Infrared Camera, RFID Reader |
| Indoor/Outdoor Usage | Indoor (Recommended for Outdoor Security) |
| Item Weight | 12.3 ounces |
| ASIN | B0DVLQ5PK3 |
| Manufacturer | Fanvil |
11. Warranty and Support
Fanvil products typically come with a limited manufacturer's warranty. For specific warranty terms and conditions, please refer to the warranty card included with your product or visit the official Fanvil website.
For technical support, troubleshooting assistance, or further inquiries, please contact Fanvil customer support through their official website or the contact information provided in your product documentation.
Manufacturer: Fanvil
Website: www.fanvil.com


