Introduction
This manual provides comprehensive instructions for the safe assembly, operation, and maintenance of your Evolution R10TS 10-inch Jobsite Table Saw. Please read all instructions carefully before initial use to ensure proper function and user safety. Retain this manual for future reference.

Image: The Evolution R10TS 10-inch Jobsite Table Saw, showcasing its compact design and key components.
General Safety Instructions
Always prioritize safety when operating power tools. Failure to follow these instructions may result in serious injury or property damage.
- Wear appropriate personal protective equipment (PPE), including safety glasses, hearing protection, and dust mask.
- Ensure the work area is clean, well-lit, and free from obstructions.
- Keep children and bystanders away from the operating area.
- Do not operate the saw in damp or wet conditions.
- Always unplug the saw before making adjustments, changing blades, or performing maintenance.
- Utilize the electronic blade brake, anti-kickback pawls, and quick-release riving knife for enhanced safety.
- Never reach over or around the saw blade while it is running.
- Use a push stick or push block when cutting small pieces of material.
Setup and Assembly
Careful assembly and initial setup are crucial for accurate and safe operation. Inspect all components upon unboxing for any damage. If a stand was purchased separately, refer to its specific assembly instructions, paying close attention to detail as some users have noted complexity in stand assembly.
1. Unpacking and Component Check
Carefully remove all components from the packaging. Verify that all parts listed in the packing list are present and undamaged. Report any missing or damaged parts to Evolution customer service immediately.
2. Blade Installation
- Ensure the saw is unplugged.
- Raise the blade to its maximum height.
- Remove the blade guard and throat plate.
- Use the provided wrenches to loosen the arbor nut and remove the outer blade flange.
- Place the 10-inch TCT blade onto the arbor, ensuring the teeth are pointing towards the front of the saw.
- Reinstall the outer blade flange and arbor nut, tightening securely.
- Replace the throat plate and blade guard.
3. Fence Alignment
The dual rack and pinion fence system allows for precise adjustments. Ensure the fence is parallel to the blade for accurate cuts.
- Loosen the fence locking mechanism.
- Adjust the fence position using the micro-adjustment knob until it is parallel to the blade.
- Lock the fence securely in place. Verify parallelism with a measuring tool.

Image: Close-up view of the dual rack and pinion fence system, highlighting the adjustment mechanism for precise alignment.
4. Riving Knife and Anti-Kickback Pawls
The quick-release riving knife and anti-kickback pawls are critical safety features. Ensure they are correctly installed and adjusted.
- The riving knife should be slightly below the top of the blade and aligned with the blade.
- Anti-kickback pawls should engage the workpiece to prevent kickback.
- Tool-free blade parallel alignment allows for easy adjustment of the riving knife.
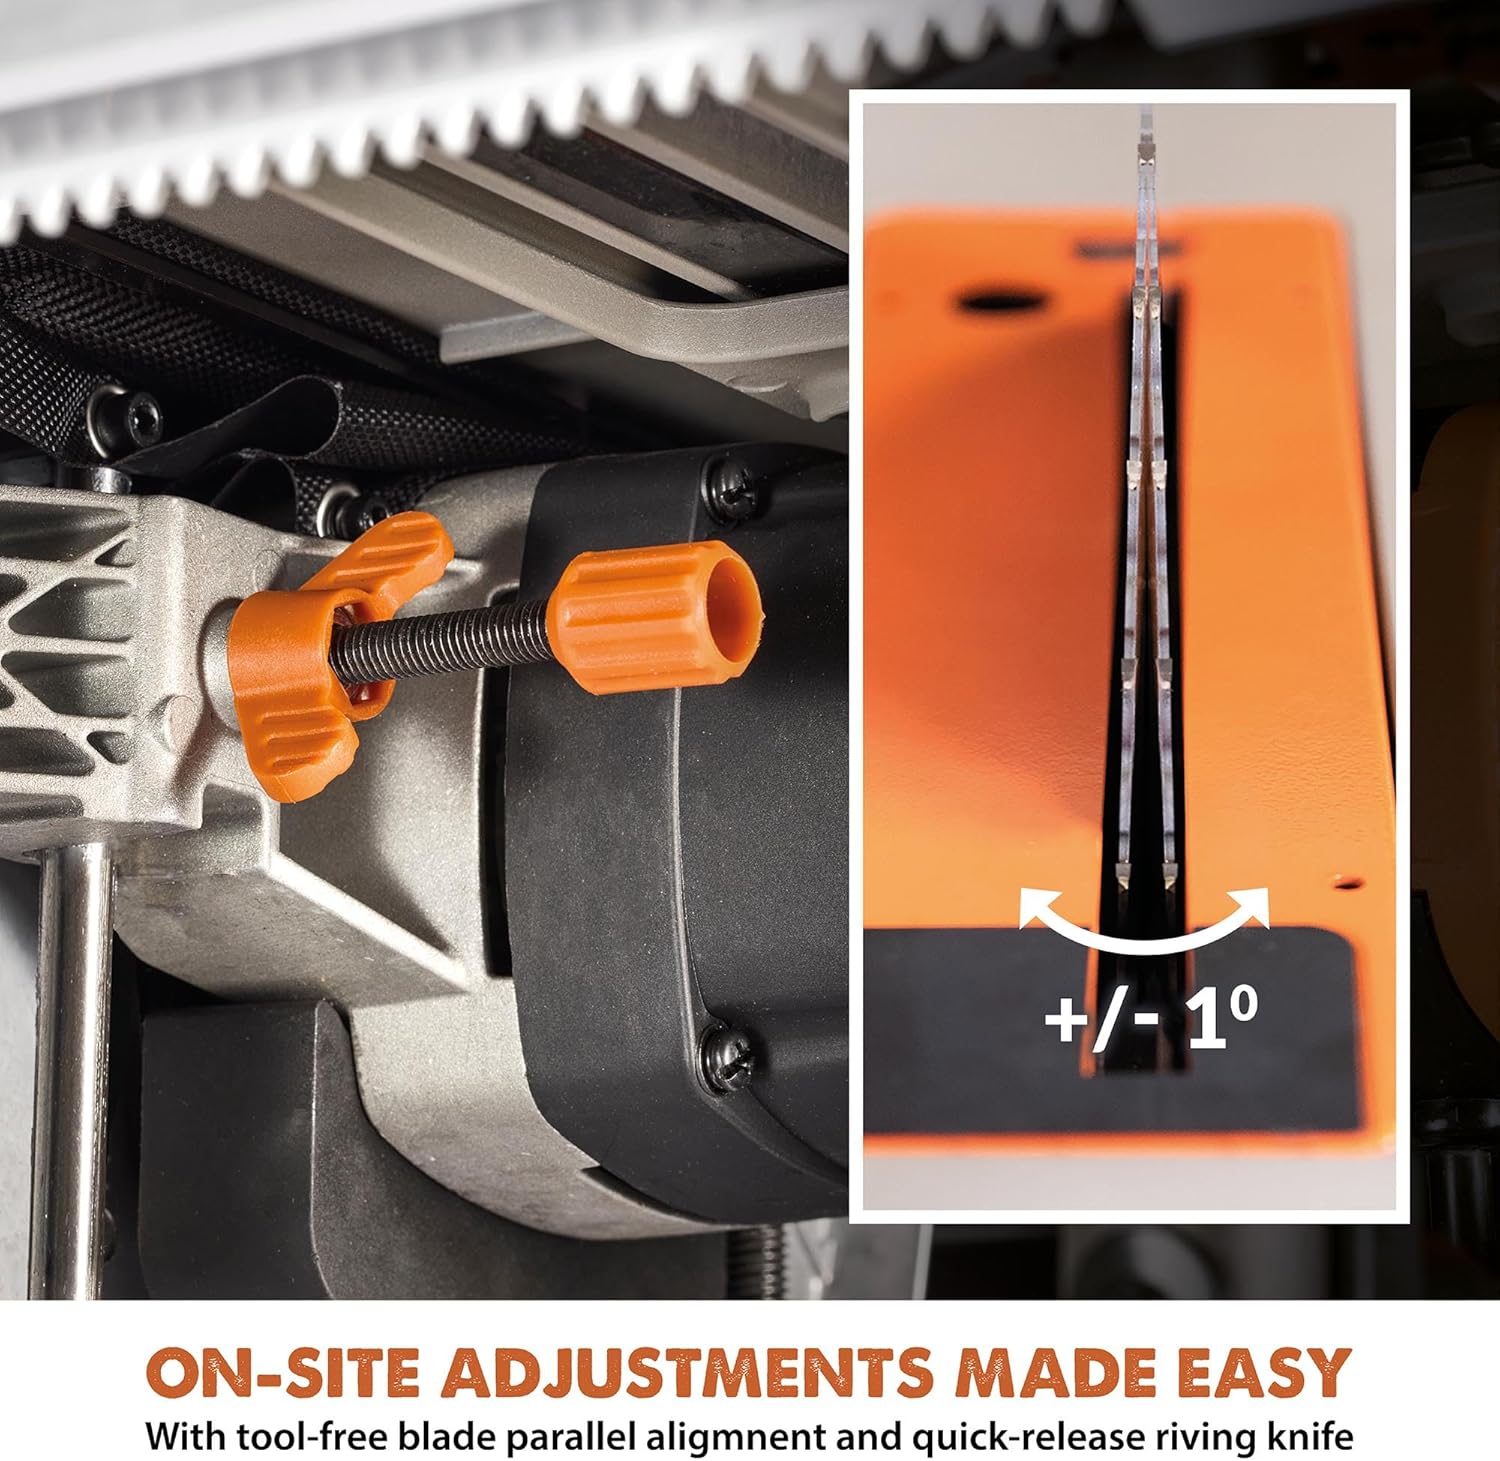
Image: Detail showing the tool-free adjustment for blade parallel alignment and the quick-release riving knife, indicating ease of on-site adjustments.
Operating Instructions
This section details the procedures for operating your Evolution R10TS table saw for various cutting tasks.
1. Powering On and Off
- Connect the saw to a suitable 120V power outlet.
- To start the saw, press the green "ON" button or lift the paddle switch. The 15A motor features a soft start for controlled power-up.
- To stop the saw, press the red "OFF" button or push down the large paddle switch for quick shutoff. The electronic blade brake will rapidly stop the blade.
2. Multi-Material Cutting
The saw is equipped with a powerful 15A high-torque motor, enabling efficient cutting across various materials. The blade guard is an essential safety component during operation.

Image: Close-up of the saw's powerful 15A high-torque motor area, featuring the blade and its protective guard.
The included 10-inch TCT blade is designed for cutting a variety of materials, including wood, mild steel, aluminum, and composites. Adjust cutting speed and feed rate based on the material type.

Image: Examples of the saw cutting various materials including wood, reclaimed material with nails, mild steel, and plastics/composites, demonstrating its multi-material cutting capability.
3. Rip Cutting
For rip cuts, set the rip fence to the desired width. The saw offers a 26-inch rip capacity. Ensure the workpiece is firmly against the fence and fed smoothly into the blade.

Image: Visual representation of the 3-3/8 inch cut depth and 26-inch rip capacity of the table saw.
4. Cross-Cutting with Integrated Sled
The integrated cross-cut sled provides stability and precision for cross-cutting operations. Place the workpiece on the sled and push it through the blade.

Image: The integrated cross-cut sled on the table saw, illustrating its use for stable and precise cross-cuts.
5. Bevel Cutting
Adjust the blade angle for bevel cuts from 0 to 45 degrees using the geared angle selector. Ensure the angle is locked before making a cut.
6. Using the Outfeed Support Bar
For longer workpieces, extend the outfeed support bar to provide additional stability and prevent material from tipping after the cut.

Image: The outfeed support bar extended from the table saw, providing additional support for long workpieces.
Maintenance
Regular maintenance ensures the longevity and safe operation of your table saw. Always unplug the saw before performing any maintenance.
- Cleaning: After each use, clear sawdust and debris from the table, fence, and motor housing. The saw features good dust collection, but manual cleaning is still necessary.
- Blade Inspection: Regularly inspect the blade for sharpness, damage, or missing teeth. Replace dull or damaged blades promptly.
- Component Check: Periodically check all nuts, bolts, and fasteners for tightness. Ensure the blade guard, riving knife, and anti-kickback pawls are functioning correctly.
- Table Flatness: While the table is generally robust, occasional checks for flatness can help maintain cutting accuracy.
Troubleshooting
This section addresses common issues you might encounter with your R10TS table saw.
| Problem | Possible Cause | Solution |
|---|---|---|
| Saw does not start. | No power, faulty switch, tripped circuit breaker. | Check power connection, wall outlet, and circuit breaker. Ensure the paddle switch is fully engaged. |
| Blade binds or cuts slowly. | Dull blade, incorrect blade for material, fence not parallel, material too thick. | Replace or sharpen blade. Use appropriate blade for material. Re-align fence. Do not exceed maximum cut depth. |
| Inaccurate cuts. | Fence not parallel, miter gauge play, blade not square to table. | Re-align fence. Check miter gauge for excessive play and adjust if possible. Ensure blade is square to the table at 90 degrees. |
| Excessive vibration. | Loose blade, damaged blade, unstable saw setup. | Check blade for tightness and damage. Ensure saw is on a stable, level surface. |
Technical Specifications
- Model: R10TS
- Brand: EVOLUTION
- Motor: 15 Amp (1800 Watts)
- Voltage: 120 Volts
- Blade Diameter: 10 inches
- Blade Type: TCT (Tungsten Carbide Tipped), 40 Teeth
- Max Rip Capacity: 26 inches
- Max Cut Depth: 3-3/8 inches
- Bevel Capacity: 0-45 degrees
- Product Dimensions (L x W x H): 29" x 29" x 15"
- Item Weight: 60 pounds
- Special Features: Multi-Material Cutting, Dual Rack and Pinion Fence, Portable Design, Advanced Safety Features (Electronic Blade Brake, Anti-Kickback Pawls, Quick-Release Riving Knife, Large Paddle Switch)
- Included Components: Blade
Warranty Information
The Evolution R10TS Table Saw is covered by a Limited Warranty. For specific terms, conditions, and duration of the warranty, please refer to the warranty card included with your product packaging or visit the official Evolution Power Tools website. Proof of purchase is typically required for warranty claims.
Customer Support
For technical assistance, spare parts, or any questions regarding your Evolution R10TS Table Saw, please contact Evolution Power Tools customer support. You can typically find contact information on the manufacturer's website or in the product packaging.
Online Resources: www.evolutionpowertools.com


