
DEWENWILS HWLS11Q
Contents
DEWENWILS Outdoor Wireless Light Switch and Receiver Kit Instruction Manual
Brand: DEWENWILS | Model: HWLS11Q
Introduction
This manual provides detailed instructions for the installation, operation, and maintenance of your DEWENWILS Outdoor Wireless Light Switch and Receiver Kit. This kit offers a convenient, wire-free solution for controlling lighting and other appliances, suitable for both indoor and outdoor environments due to its IP65 waterproof rating and strong RF signal.
What's in the Box
- Wireless Remote Control Switch (Transmitter)
- Wireless Receiver
- Mounting Hardware (screws, drywall anchors)
- Instruction Manual
Specifications
| Feature | Detail |
|---|---|
| Product Dimensions | 2.95 x 2.24 x 4.72 inches; 6.38 ounces |
| Item Model Number | HWLS11Q |
| Batteries | 1 CR2032 batteries required (included) |
| Operation Mode | ON-OFF |
| Current Rating | 15 Amps |
| Operating Voltage | 120 Volts |
| Contact Type | Normally Open |
| Connector Type | Plug In |
| Terminal | Through Hole |
| Circuit Type | 2-way |
| Contact Material | Polycarbonate (Pc) |
Setup and Installation
The DEWENWILS Wireless Light Switch Kit is designed for easy installation without the need for complex wiring. The receiver connects directly to your lighting fixture's power source, and the switch can be mounted anywhere or used as a portable remote.
1. Understanding the Components

Image: The wireless remote control switch (left) and the compact receiver (right) with its wiring leads.
The kit consists of two main parts: the Wireless Remote Control Switch (Transmitter) and the Wireless Receiver. The transmitter sends signals to the receiver, which then controls the power to your connected device.
2. Receiver Installation
The receiver is IP65 waterproof, making it suitable for both indoor and outdoor applications. It can be installed in various locations such as electrical junction boxes, switch boxes, or directly within the fixture's wiring compartment.
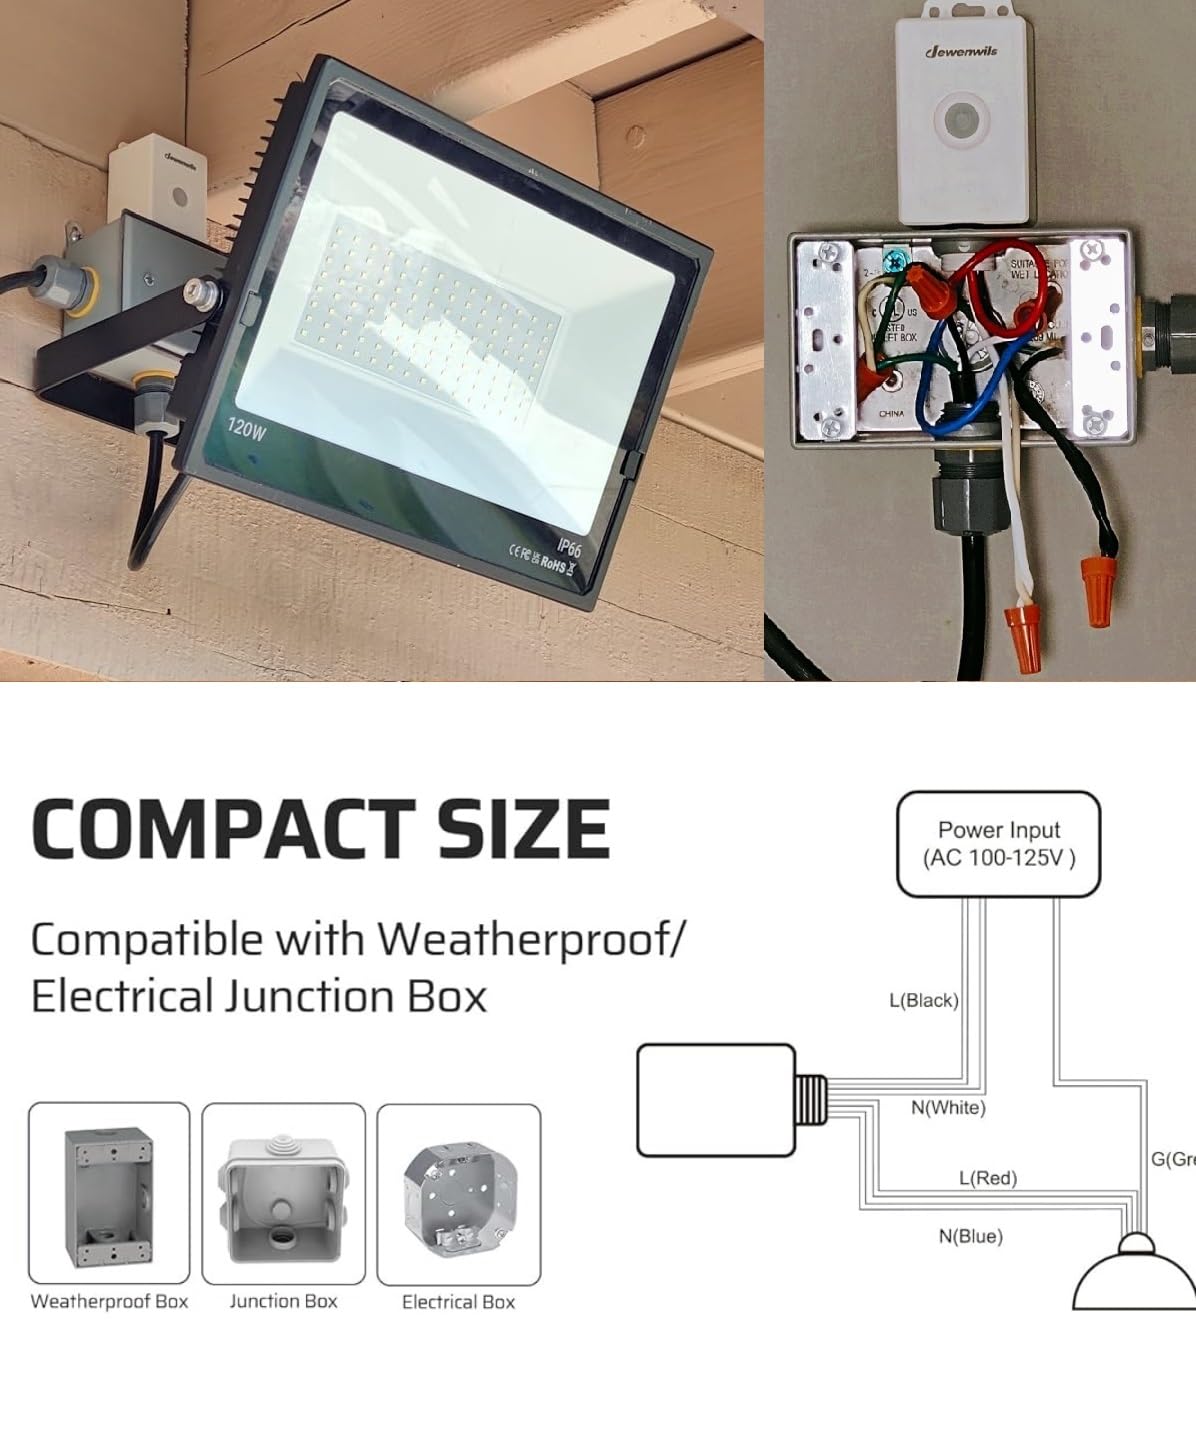
Image: A detailed wiring diagram showing connections for the receiver, along with examples of compatible weatherproof, junction, and electrical boxes.
- Safety First: Before beginning any electrical work, ensure the power to the circuit is turned OFF at the circuit breaker.
- Identify Wires: The receiver has input wires (Live and Neutral from power source) and output wires (Live and Neutral to the light fixture). Refer to the wiring diagram provided in the image above.
- Connect Wires:
- Connect the Live (black) wire from your power source to the Live input (black) wire of the receiver.
- Connect the Neutral (white) wire from your power source to the Neutral input (white) wire of the receiver.
- Connect the Live output (red) wire of the receiver to the Live wire of your light fixture.
- Connect the Neutral output (blue) wire of the receiver to the Neutral wire of your light fixture.
- Ensure all connections are secure using appropriate wire connectors.
- Secure Receiver: Place the receiver inside a suitable electrical box (weatherproof for outdoor use) and secure it. Ensure any outdoor connections are sealed with a waterproof connector.
- Restore Power: Once all connections are secure and the receiver is safely enclosed, restore power at the circuit breaker.
3. Switch Installation (Transmitter)
The wireless switch can be mounted on a wall or used as a portable remote. It features a magnetic design for flexible placement.
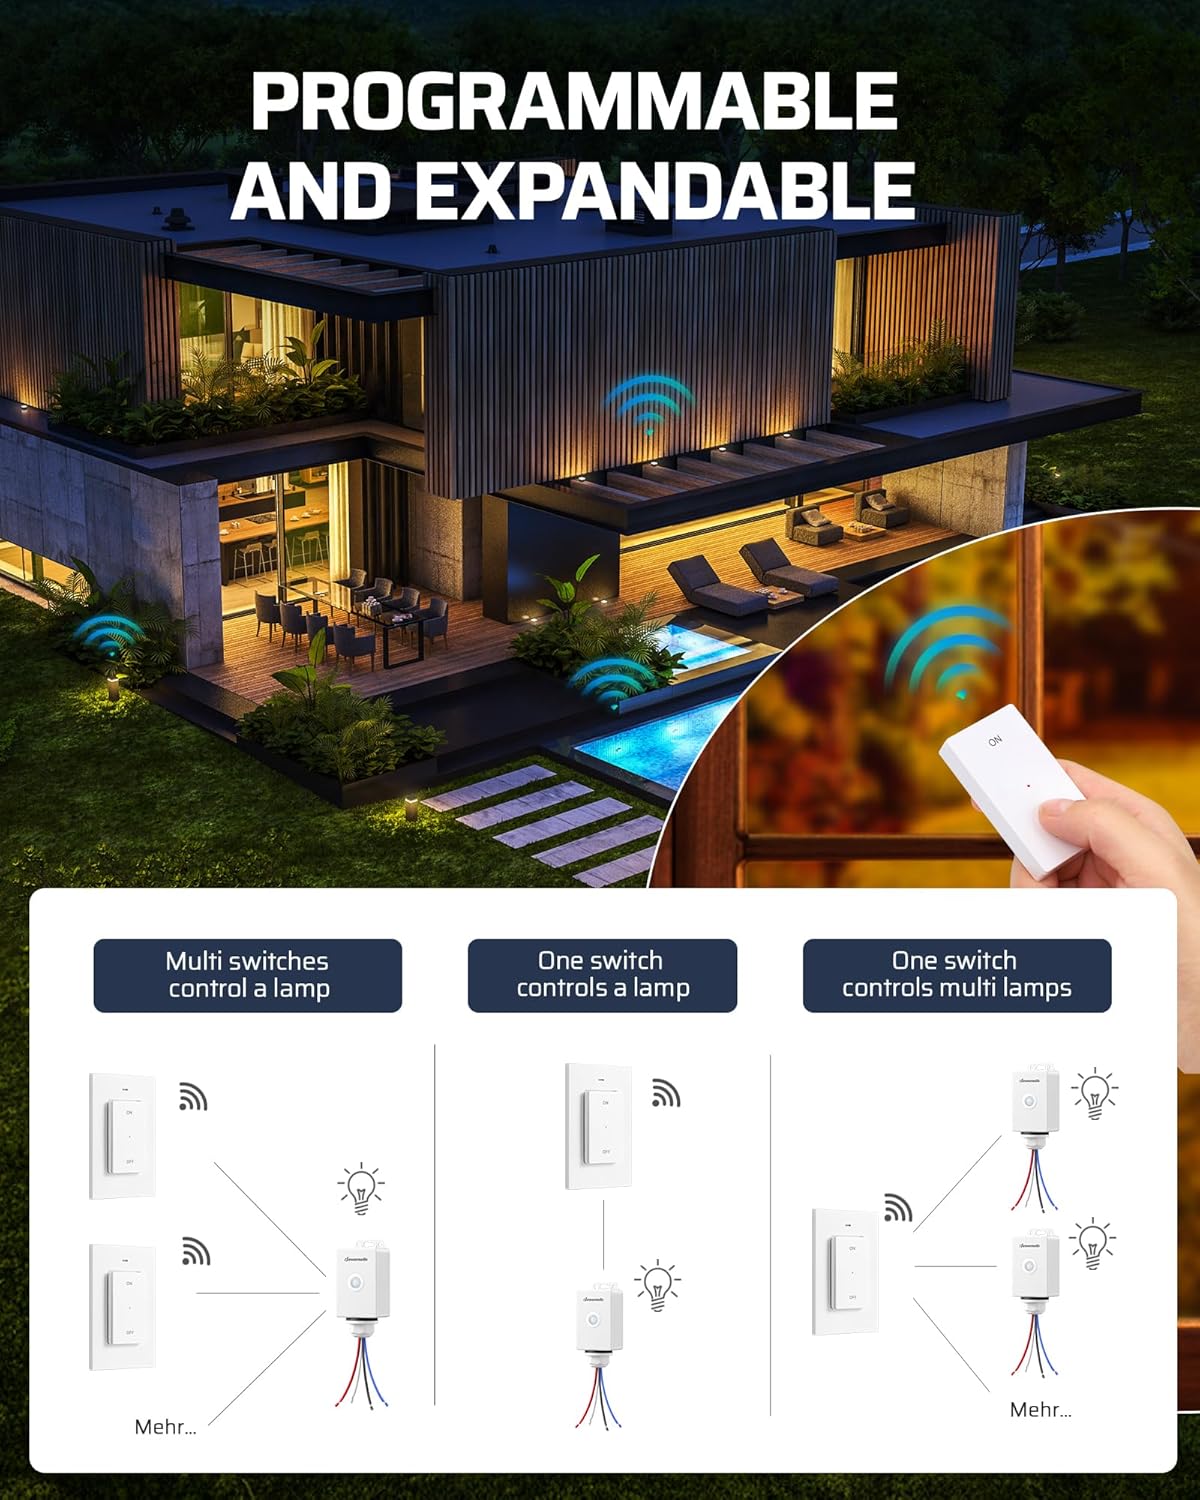
Image: The wireless switch detaching from its magnetic wall plate, demonstrating its portability and flexible mounting options.
- Wall Mounting: Use the provided screws and drywall anchors to secure the wall plate to your desired location. The switch unit then magnetically attaches to this plate.
- Portable Use: The switch can be removed from the wall plate and used as a handheld remote. Its magnetic back allows it to stick to metal surfaces like refrigerators or toolboxes.
Operating Instructions
The wireless switch offers simple ON/OFF control and convenient countdown timer functions.
Image: Close-up of the wireless switch showing the ON, OFF, and various countdown timer buttons (1 min, 5 min, 15 min, 30 min, 1 hour, 2 hour).
- Turn ON: Press the "ON" button to turn on the connected light or appliance.
- Turn OFF: Press the "OFF" button to turn off the connected light or appliance.
- Countdown Timer: Press any of the countdown timer buttons (1 min, 5 min, 15 min, 30 min, 1 hour, 2 hour) to set the connected device to automatically turn off after the selected duration. The light will turn on when a timer is activated.
The system is programmable and expandable, allowing multiple switches to control one receiver or one switch to control multiple receivers, enabling 3-way or 4-way switch setups.
Image: Visual representation of the system's flexibility, showing configurations where multiple switches control one lamp, one switch controls one lamp, and one switch controls multiple lamps.
Maintenance
- Cleaning: Wipe the switch and receiver with a soft, dry cloth. Do not use abrasive cleaners or solvents.
- Battery Replacement: The remote control switch uses a CR2032 battery. If the switch becomes unresponsive, replace the battery. Refer to the switch's back for battery compartment access.
- Waterproof Integrity: For outdoor installations, periodically inspect the receiver and its connections to ensure the IP65 waterproof seal remains intact and free from damage.
Troubleshooting
| Problem | Possible Cause | Solution |
|---|---|---|
| Light/Appliance does not turn ON/OFF. | No power to receiver; incorrect wiring; remote battery low/dead; remote not paired. |
|
| Limited range or intermittent control. | Obstructions (thick walls, metal); interference from other RF devices; receiver placed in a metal enclosure. |
|
| Timer function not working. | Incorrect button press; remote battery low. |
|
Warranty and Support
DEWENWILS products typically come with a manufacturer's warranty. For specific warranty details, product support, or to inquire about additional transmitters/receivers for expansion, please visit the official DEWENWILS website or contact their customer service. Keep your purchase receipt for warranty claims.
For more information, visit the DEWENWILS Store.
Ask a question about this manual
Ask about setup, troubleshooting, compatibility, parts, safety, or missing instructions. Manuals+ will review the question and use this page’s manual context to help answer it.