
1. Important Safety Information
Please read this manual carefully before installation and use. Keep this manual for future reference.
- Weight Capacity: Do not exceed the maximum weight capacity of 59.4 lbs (27 kg). Exceeding this limit may result in serious injury or product damage.
- Monitor Size: This arm is designed for monitors between 17 and 57 inches.
- VESA Compatibility: Ensure your monitor has VESA mounting patterns of 75x75mm or 100x100mm. If not, a VESA adapter (not included) will be required.
- Desk Thickness: For C-clamp or grommet installation, your desk thickness must be between 0.47" and 1.8" (12-45mm).
- Assembly: Assemble the product exactly as described in this manual. Improper assembly may lead to damage or injury.
- Gas Spring: Do not adjust the gas spring tension before the monitor is installed. The arm may spring up rapidly, causing injury.
- Maintenance: Regularly check that all screws and connections are secure.
2. Package Contents
Please verify that all components are present and undamaged before proceeding with installation. If any parts are missing or damaged, please contact customer support.
- Monitor Arm Assembly
- Desk Clamp (C-clamp)
- Grommet Base Components
- VESA Plate
- Hardware Kit (screws, washers, Allen keys)
- Cable Management Clips
3. Setup and Installation
This monitor arm supports two installation methods: C-clamp and Grommet mounting.
3.1 Pre-Installation Checks
- Check VESA Holes: Ensure your monitor has 75x75mm or 100x100mm VESA mounting holes. If not, a VESA adapter (not included) is required.
- Check Desk Compatibility: Your desk thickness must be between 0.47" and 1.8" (12-45mm). For C-clamp, the desk edge width should be at least 2.56" (65mm).

Figure 3.1: Desk compatibility for C-clamp and Grommet mounting.
3.2 C-Clamp Installation
- Attach the C-clamp base to the bottom of the main pole.
- Place the C-clamp onto the edge of your desk and tighten the screw until it is securely fastened.
- Insert the monitor arm into the top of the pole.
3.3 Grommet Installation
- If your desk has a grommet hole, insert the grommet base through the hole.
- Secure the grommet base from underneath the desk using the provided plate and nut.
- Insert the monitor arm into the top of the pole.
3.4 Attaching the Monitor
- Attach the VESA plate to the back of your monitor using the appropriate screws from the hardware kit. Ensure the screws are tightened securely.
- Carefully slide the monitor (with the attached VESA plate) onto the VESA head of the monitor arm until it clicks into place.
- Tighten the security screw on the VESA head to prevent accidental detachment.
Video 3.1: Desk Mount Single Monitor Arm Installation Guide. This video demonstrates the step-by-step process for installing the monitor arm to your desk and attaching the monitor.
Video 3.2: Single Monitor Arm Installation Guide. A concise guide showing the installation process for the monitor arm.
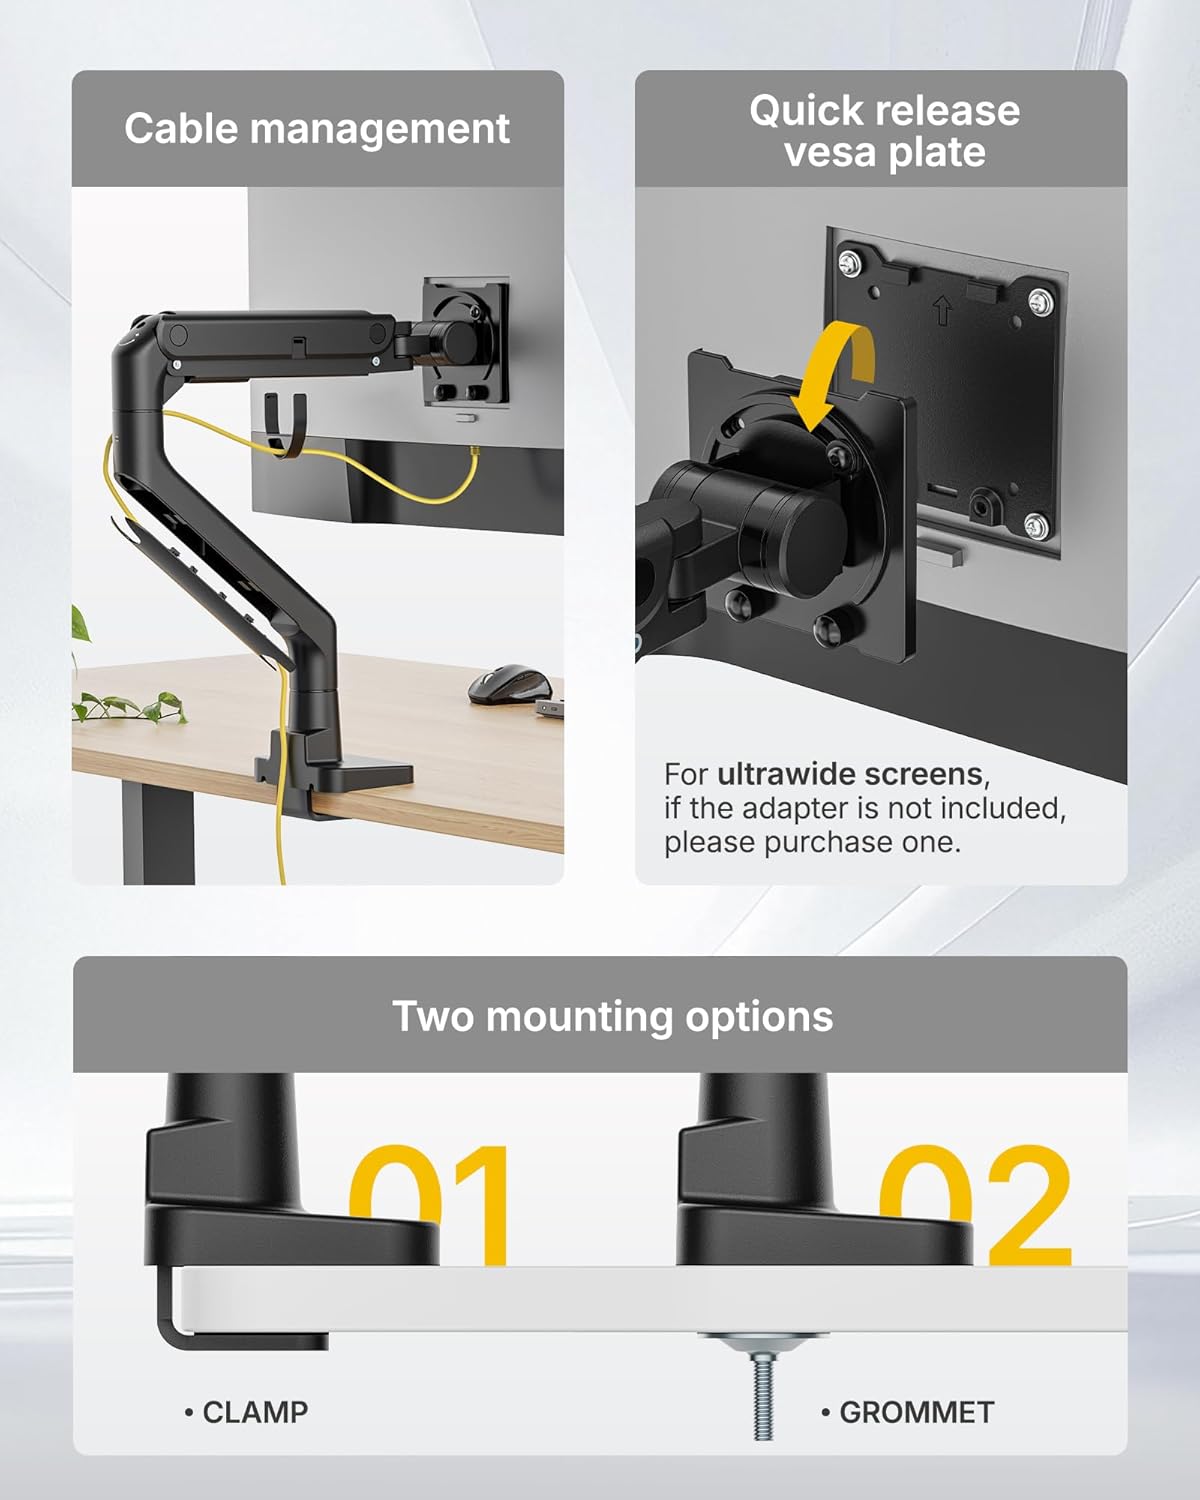
Figure 3.2: Cable management, quick-release VESA plate, and mounting options.
4. Operating and Adjustments
The monTEK Heavy Duty Monitor Arm offers full motion adjustability for optimal viewing comfort.
4.1 Gas Spring Tension Adjustment
Important: Do not adjust tension before the monitor is installed.
- Keep the monitor arm horizontal before adjusting the tension.
- If the arm drops, turn the adjustment screw in the + direction until it remains in a horizontal position.
- If the arm rises, turn the adjustment screw in the - direction until it remains in a horizontal position.
Video 4.1: How to Adjust the Gas Spring Tension. This video provides a visual guide on correctly adjusting the gas spring for your monitor's weight.

Figure 4.1: Gas spring tension adjustment instructions.
4.2 Tilt, Swivel, and Rotation
- Tilt: Adjust the monitor angle from +75° to -75° to reduce glare and find your preferred vertical viewing angle.
- Swivel: Rotate the monitor arm 180° (±90°) left or right to share your screen or adjust your horizontal viewing angle.
- Rotation: Rotate the screen ±90° for landscape or portrait mode.
Video 4.2: Tips for screen adjustment. This video demonstrates various ways to adjust your monitor for optimal viewing.

Figure 4.2: Flexible adjustment ranges for swivel, tilt, and rotation.
4.3 Height and Extension Adjustment
- Height: The arm offers a height range of 11.3" to 22" (28.7cm to 55.9cm). Gently push or pull the monitor up or down to your desired height.
- Extension: The arm extends up to 19.7" (50cm) from the pole, allowing you to position your monitor closer or further away.
4.4 Integrated Rotation Stop Function
This feature prevents the arm from rotating too far and hitting a wall or other objects.
Video 4.3: How to use the integrated rotation stop function? This video explains how to enable or disable the 180° rotation stop.
5. Maintenance
- Cleaning: Use a soft, damp cloth to clean the monitor arm. Avoid abrasive cleaners or solvents.
- Inspection: Periodically check all screws and connections to ensure they are tight and secure. Re-tighten if necessary.
- Gas Spring: The gas spring is designed for long-lasting performance and typically requires no maintenance. If you notice significant changes in its function, refer to the troubleshooting section or contact support.
6. Troubleshooting
| Problem | Possible Cause | Solution |
|---|---|---|
| Monitor sags or does not stay in position | Gas spring tension is too low for monitor weight. | Increase gas spring tension (turn screw towards '+'). Refer to Section 4.1. |
| Monitor springs up too easily | Gas spring tension is too high for monitor weight. | Decrease gas spring tension (turn screw towards '-'). Refer to Section 4.1. |
| Arm is wobbly or unstable | Desk clamp/grommet is not tight enough; VESA plate screws are loose. | Ensure desk clamp/grommet is securely tightened. Check and tighten all VESA plate screws. |
| Monitor cannot be tilted/swiveled | Tilt/swivel joint is too tight. | Loosen the corresponding adjustment screw on the tilt/swivel joint slightly with an Allen key. |
7. Specifications
| Feature | Detail |
|---|---|
| Model Number | MA1001BK |
| Brand | monTEK |
| Screen Size Compatibility | 17 - 57 inches |
| Weight Capacity | Up to 59.4 lbs (27 kg) |
| VESA Compatibility | 75x75mm, 100x100mm |
| Mounting Type | C-Clamp / Grommet |
| Desk Thickness (Clamp/Grommet) | 0.47" - 1.8" (12-45mm) |
| Tilt Range | +75° to -75° |
| Swivel Range | 180° (±90°) |
| Screen Rotation | ±90° |
| Height Adjustment Range | 11.3" - 22" (28.7cm - 55.9cm) |
| Extension Range | Up to 19.7" (50cm) |
| Material | Steel, Aluminum, Plastic |
| Color | Black |
| Item Weight | 7.5 pounds (3.4 kg) |
8. Warranty and Support
monTEK products are manufactured with quality and care. For warranty information, please refer to the product packaging or the official monTEK website.
If you have any questions, require assistance with installation, or encounter any issues with your monTEK Heavy Duty Monitor Arm, please contact our customer support team:
- Website: Visit the official monTEK website for support resources and contact information.
- Email: Refer to your purchase documentation for customer service email.