
1. Introduction
1.1 Product Overview
The GIGABYTE B760M D3HP is a high-performance motherboard designed to support Intel Core processors from the 14th, 13th, and 12th generations. It features a robust power delivery system, advanced memory support, and comprehensive connectivity options, making it suitable for various computing needs, from gaming to content creation.
1.2 Key Features
- Supports Intel Core processors of the 14th, 13th and 12th generation
- Unparalleled performance: Hybrid 4+1+1 phase digital VRM solution
- Dual Channel DDR5: 4 DIMMs XMP Memory Module Support
- Next generation memory: 2 PCIe 4.0 x4 M.2 slots
- Fast network connection: GbE LAN
- Extensive connectivity: Front USB-C 5Gb/s, DP, HDMI, D-Sub
- Smart Fan 6: features multiple temperature sensors, hybrid fan connections with FAN STOP
- Q-Flash Plus: BIOS update without installing the CPU, memory or graphics card

Figure 1.1: GIGABYTE B760M D3HP Motherboard and its retail packaging.
2. Setup and Installation
2.1 Before You Begin
Before installing your motherboard, ensure you have a clean, static-free workspace. Always wear an anti-static wrist strap or frequently touch a grounded metal object to discharge static electricity. Unplug your power supply unit from the wall outlet before handling any components.
2.2 Component Identification
Familiarize yourself with the various components and connectors on your motherboard. Refer to the diagram below for key areas.

Figure 2.1: Top-down view of the GIGABYTE B760M D3HP Motherboard, highlighting CPU socket, RAM slots, PCIe slots, and M.2 slots.
2.3 Installation Steps
- CPU Installation: Carefully open the CPU socket lever, align the triangular mark on the CPU with the mark on the socket, and gently place the CPU into the socket. Close the lever to secure the CPU.
- CPU Cooler Installation: Install your CPU cooler according to its manufacturer's instructions. Ensure proper thermal paste application and secure mounting.
- RAM (DDR5) Installation: Open the clips on the DIMM slots. Align the notch on the DDR5 memory module with the key in the slot. Press down firmly on both ends of the module until the clips snap into place. For dual-channel performance, install modules in matching colored slots.
- M.2 SSD Installation: Locate the M.2 slots. Remove the screw/standoff. Insert the M.2 SSD at an angle, then push it down and secure it with the screw.
- Graphics Card (PCIe) Installation: Open the retention clip on the PCIe x16 slot. Align your graphics card with the slot and press down firmly until it clicks into place. Secure the card with a screw to your PC case.
- Power Supply Connections: Connect the 24-pin ATX power connector and the 8-pin CPU power connector from your power supply to the motherboard. Connect power to other components as needed.
- Case Mounting: Install standoffs in your PC case that align with the screw holes on the motherboard. Carefully place the motherboard onto the standoffs and secure it with screws.
- Front Panel Connections: Connect the front panel headers (power button, reset button, USB, audio) to the corresponding pins on the motherboard. Refer to the motherboard manual for exact pin layouts.

Figure 2.2: Angled view of the GIGABYTE B760M D3HP Motherboard, showing installed components and connectors.
3. Operating Your Motherboard
3.1 BIOS/UEFI Setup
Upon first boot, or if you need to configure system settings, press the DEL key during startup to enter the BIOS/UEFI setup utility. Here you can configure boot order, enable/disable features, set fan curves, and more. Save and exit to apply changes.
3.2 Driver Installation
After installing your operating system, install the necessary drivers for your motherboard's components. These typically include chipset drivers, LAN drivers, audio drivers, and any other specific drivers for integrated peripherals. Drivers can be found on the GIGABYTE official website for your specific model.
3.3 First Boot and OS Installation
Ensure your bootable USB drive or optical disc with the operating system is connected. Power on your system. If the system does not automatically boot from your installation media, enter the BIOS/UEFI and adjust the boot order. Follow the on-screen instructions to install your operating system.
4. Maintenance
4.1 Cleaning
Regularly clean your PC to prevent dust buildup, which can lead to overheating and reduced performance. Use compressed air to clear dust from fans, heatsinks, and vents. Ensure the system is powered off and unplugged before cleaning.
4.2 BIOS Updates
GIGABYTE provides BIOS updates to improve stability, add support for new hardware, and fix bugs. The B760M D3HP features Q-Flash Plus, allowing you to update the BIOS without installing the CPU, memory, or graphics card. Download the latest BIOS from the GIGABYTE website, place it on a USB drive, and follow the Q-Flash Plus instructions in the full manual.
5. Troubleshooting
5.1 Common Issues and Solutions
- No Power: Check all power connections (24-pin ATX, 8-pin CPU, GPU power). Ensure the power supply is switched on. Test with a different power supply if possible.
- No Display/No POST: Ensure the monitor is connected to the graphics card (or integrated graphics if applicable). Reseat RAM modules. Check if the CPU is properly seated. Remove all but essential components to isolate the issue.
- System Instability/Crashes: Check CPU and GPU temperatures. Ensure drivers are up to date. Run memory diagnostic tools. Verify power supply wattage is sufficient for all components.
- Peripheral Not Detected: Ensure the device is properly connected. Install necessary drivers. Check BIOS settings to ensure the port/controller is enabled.
For more detailed troubleshooting, refer to the comprehensive manual available on the GIGABYTE support website or contact GIGABYTE technical support.
6. Technical Specifications
| Feature | Specification |
|---|---|
| Brand | GIGABYTE |
| Model Name | B760M D3HP |
| CPU Socket | LGA 1700 |
| Compatible Processors | Intel Core 14th, 13th, 12th Gen, Intel Pentium Gold, Celeron |
| Chipset Type | Intel B760 |
| RAM Memory Technology | DDR5 |
| Memory Clock Speed | Up to 5600 MHz (XMP) |
| M.2 Slots | 2 x PCIe 4.0 x4 |
| LAN | GbE LAN |
| USB Connectivity | Front USB-C 5Gb/s, USB 3.2 Gen 1 |
| Video Outputs | DP, HDMI, D-Sub |
| Product Dimensions | 9.61 x 9.61 x 1.38 inches |
| Item Weight | 1.59 pounds |
| Platform Support | Windows 11, Windows 10 |
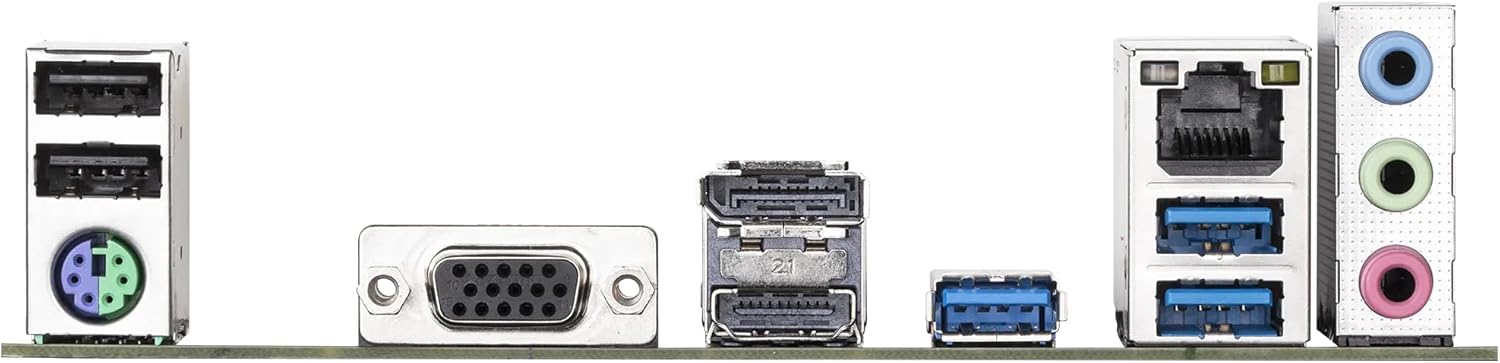
Figure 6.1: Rear I/O ports of the GIGABYTE B760M D3HP Motherboard, including USB, LAN, and video outputs.
7. Warranty and Support
7.1 Warranty Information
This GIGABYTE motherboard comes with a standard manufacturer's warranty. Please refer to the warranty card included with your product or visit the official GIGABYTE website for detailed warranty terms and conditions specific to your region.
7.2 Technical Support
For technical assistance, driver downloads, BIOS updates, or further inquiries, please visit the official GIGABYTE support website. You can find FAQs, troubleshooting guides, and contact information for customer service.
GIGABYTE Official Website: www.gigabyte.com