1. Introduction
This manual provides essential information for the safe and efficient installation, operation, and maintenance of your LEDVANCE 41W 4000K IP66 LED Floodlight, model 4099854305986. Please read this manual thoroughly before installation and retain it for future reference.
The LEDVANCE Floodlight is designed for outdoor use, offering powerful and energy-efficient illumination with a cool white light (4000 Kelvin) and a symmetrical beam distribution. Its IP66 rating ensures protection against dust and powerful water jets, making it suitable for various outdoor environments.
2. Safety Instructions
WARNING: Risk of electric shock. Installation must be performed by a qualified electrician in accordance with all local and national electrical codes.
- Disconnect power at the circuit breaker before installation, maintenance, or cleaning.
- Ensure the supply voltage matches the floodlight's requirements (220 Volts).
- Do not attempt to modify or repair the floodlight. There are no user-serviceable parts inside.
- Avoid direct eye exposure to the light source when the floodlight is operating.
- Ensure the mounting surface is capable of supporting the weight of the floodlight.
- Keep flammable materials away from the floodlight.
3. Package Contents
Verify that all components are present and undamaged upon opening the package:
- 1 x LEDVANCE 41W 4000K IP66 LED Floodlight
- Mounting bracket (pre-attached or separate)
- Instruction Manual
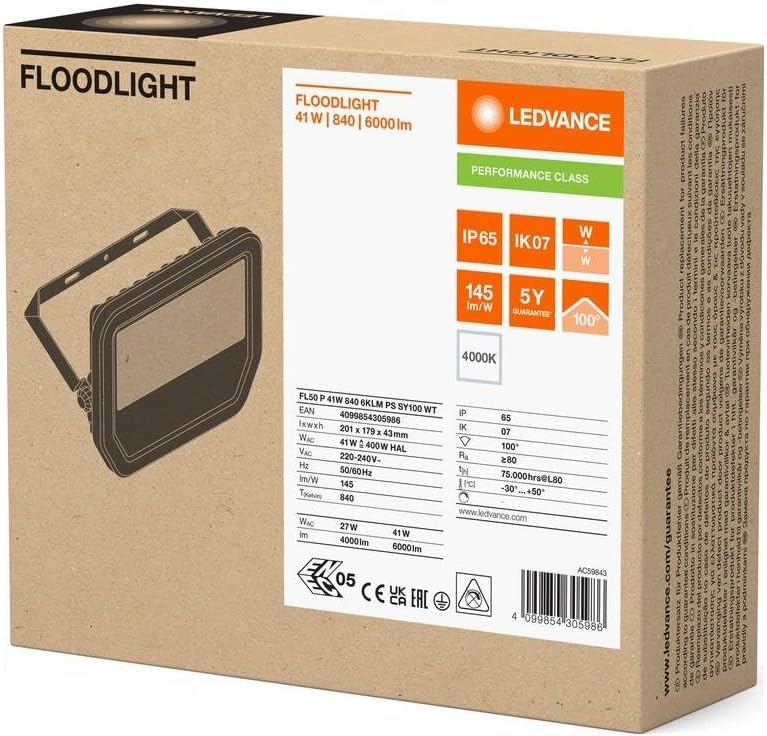
Figure 3.1: Packaging of the LEDVANCE Floodlight, showing product specifications and certifications.
4. Installation and Setup
Before beginning installation, ensure the power supply is disconnected.
4.1 Mounting the Floodlight
- Select Location: Choose a suitable outdoor location for mounting, ensuring it is a stable surface capable of supporting the floodlight's weight (830 g). Consider the desired light coverage area.
- Mark Drilling Points: Use the mounting bracket as a template to mark the drilling points on the wall or mounting surface.
- Drill Holes: Drill holes at the marked points. Insert appropriate wall plugs if necessary (not included).
- Secure Bracket: Attach the mounting bracket securely to the surface using suitable screws (not included).
- Attach Floodlight: Fasten the floodlight to the mounting bracket. Ensure all screws are tightened to prevent movement.

Figure 4.1: The LEDVANCE 41W 4000K IP66 LED Floodlight with its adjustable mounting bracket.
4.2 Electrical Connection
- Prepare Wiring: Carefully strip the insulation from the power supply cable and the floodlight's cable.
- Connect Wires: Connect the live (L), neutral (N), and earth (E) wires from the power supply to the corresponding terminals on the floodlight. Ensure connections are secure and properly insulated.
- Seal Connections: For outdoor installations, use appropriate waterproof connectors and junction boxes to maintain the IP66 rating and prevent water ingress.
4.3 Adjusting Light Direction
The floodlight features an adjustable bracket. Once mounted, you can loosen the screws on the side of the bracket, tilt the floodlight to the desired angle, and then securely tighten the screws to fix its position.
5. Operating Instructions
After successful installation and electrical connection, restore power at the circuit breaker. The floodlight will illuminate. This model is non-dimmable and operates as a simple on/off fixture, typically controlled by an external switch or sensor (not included).
6. Maintenance and Care
Regular maintenance ensures optimal performance and longevity of your floodlight.
- Cleaning: Disconnect power before cleaning. Use a soft, damp cloth to wipe the exterior of the floodlight. Do not use abrasive cleaners or solvents, as these can damage the finish or lens.
- Inspection: Periodically inspect the floodlight for any signs of damage, loose connections, or wear. Ensure the mounting is secure.
- LED Lifespan: The integrated LED module has an average durability of 100,000 hours and is not user-replaceable.
7. Troubleshooting
If you encounter issues with your floodlight, refer to the following common problems and solutions:
| Problem | Possible Cause | Solution |
|---|---|---|
| Floodlight does not turn on. | No power supply. Loose wiring connection. Faulty switch/sensor. | Check circuit breaker. Verify all electrical connections are secure (with power off). Test external switch/sensor. |
| Light flickers. | Unstable power supply. Loose wiring. | Consult an electrician to check power supply stability. Check wiring connections (with power off). |
| Reduced light output. | Dirty lens. End of product lifespan. | Clean the lens with a soft, damp cloth (with power off). Consider replacement if beyond average durability. |
If the problem persists after attempting these solutions, contact a qualified electrician or LEDVANCE customer support.
8. Technical Specifications
| Brand | LEDVANCE |
| Model Number | 4099854305986 |
| Electrical Power | 41 Watts |
| Voltage | 220 Volts |
| Color Temperature | 4000 Kelvin (Cool White) |
| Luminous Flux | 6000 lm |
| Beam Angle | 100D (Symmetrical) |
| IP Rating | IP66 |
| Material | Aluminum |
| Color | White |
| Product Dimensions (L x W x H) | 20.1 x 4.3 x 17.9 cm |
| Product Weight | 830 g |
| Average Durability | 100,000 Hours |
| Dimmable | No |
| Specific Uses | Garden, Outdoor Security |
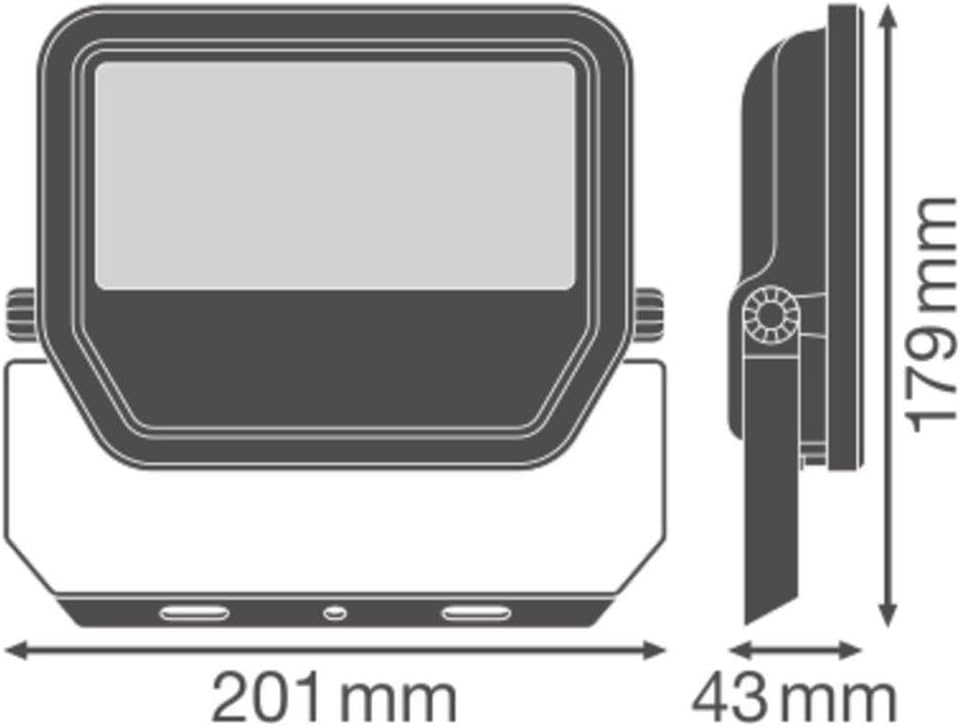
Figure 8.1: Dimensional drawing of the LEDVANCE Floodlight, showing length, width, and height.
9. Warranty and Support
This LEDVANCE Floodlight comes with a 5-year warranty from the date of purchase, covering defects in materials and workmanship under normal use. Please retain your proof of purchase for warranty claims.
For technical support, warranty claims, or further inquiries, please visit the official LEDVANCE website or contact their customer service department. Refer to the product packaging or the LEDVANCE website for specific contact details in your region.


