
1. Introduction
This manual provides detailed instructions for the safe and efficient operation of your Memorex MX-TT700 7-in-1 Nostalgic Wooden Music Center. Please read this manual thoroughly before using the device and retain it for future reference.
1.1 Product Overview
The Memorex MX-TT700 is a versatile audio system combining vintage aesthetics with modern functionality. It features a 3-speed turntable, CD/MP3 player, USB playback, Bluetooth streaming, AM/FM radio, and an AUX-in port. It also supports recording audio from various sources directly to a USB drive.
1.2 What's in the Box
- Memorex MX-TT700 Music Center
- AC Adapter
- 45 RPM Adapter
- Aux-in Cable
- Instruction Manual (IM)
2. Important Safety Information
Please observe the following safety precautions to prevent electric shock, fire, or damage to the unit.
- Power Source: Use only the specified AC adapter. Ensure the voltage matches your local power supply.
- Ventilation: Do not block ventilation openings. Allow adequate space around the unit for proper airflow.
- Water and Moisture: Do not expose the unit to rain, moisture, or dripping/splashing liquids. Keep objects filled with liquids, such as vases, away from the unit.
- Heat: Do not place the unit near heat sources such as radiators, heat registers, stoves, or other apparatus (including amplifiers) that produce heat.
- Cleaning: Unplug the unit from the wall outlet before cleaning. Use a dry cloth only.
- Servicing: Do not attempt to service this product yourself. Refer all servicing to qualified service personnel.
- Placement: Place the unit on a stable, flat surface. Avoid placing it in direct sunlight or areas with excessive dust or vibration.
3. Product Overview: Components and Controls
Familiarize yourself with the various parts and controls of your music center.
3.1 Front Panel Controls

Image: Front view of the Memorex MX-TT700, highlighting the control panel with LCD display, buttons, and knobs.
- LCD Display: Shows current mode, track information, radio frequency, etc.
- Power/Mode Knob: Turns the unit on/off and selects input mode (Phono, CD, USB, Bluetooth, AM, FM, AUX).
- Volume Knob: Adjusts the master volume level.
- USB Port: For USB playback and recording.
- CD Tray: For inserting audio CDs.
- Repeat/Random Button: Controls playback modes for CD/USB.
- Skip/Search Buttons (<< / >>): Navigates tracks/stations.
- Play/Pause Button: Controls playback.
- Stop Button: Stops playback.
- Open/Close Button: Opens and closes the CD tray.
- Record Button: Initiates recording to USB.
- Program/Memory Button: Programs CD tracks or saves radio presets.
- FM Antenna (Pigtail): For FM radio reception (located at the back).
- AUX-in Jack: Connect external audio devices.
- Headphone Jack: For private listening.
3.2 Turntable Components
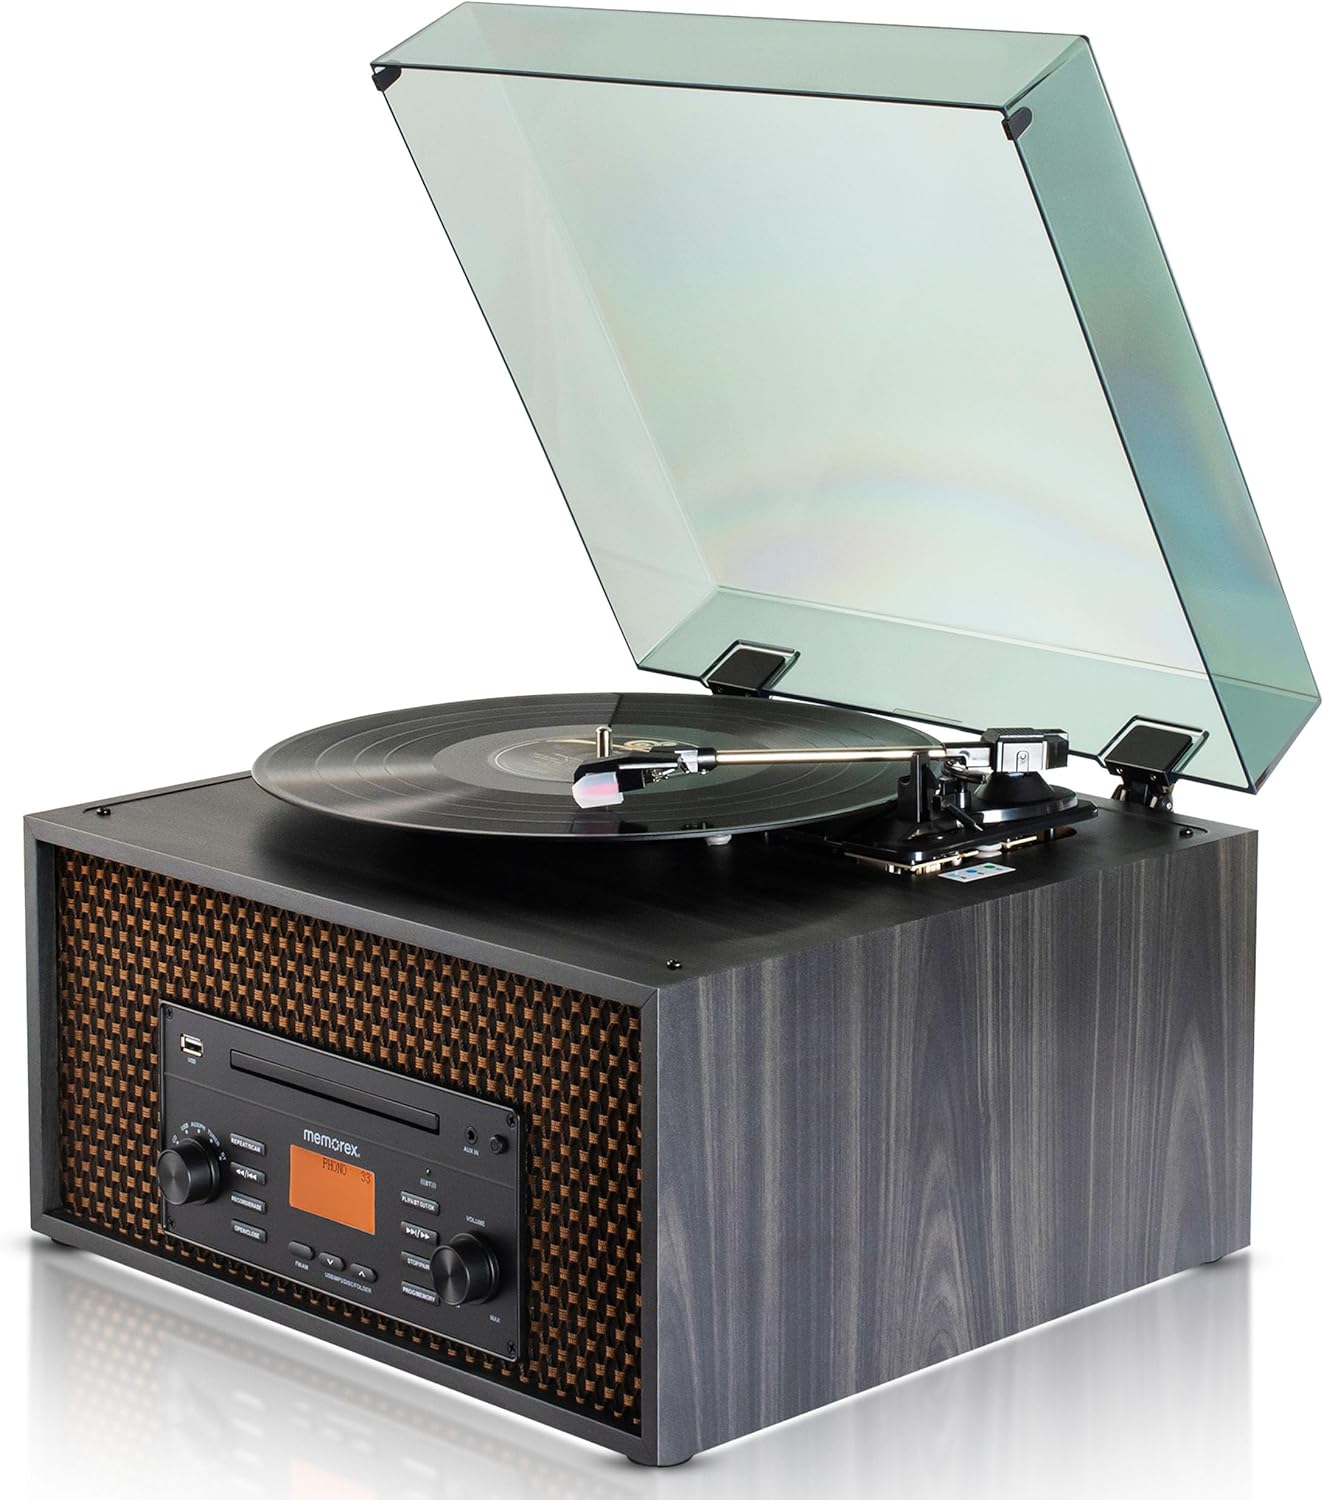
Image: Top view of the Memorex MX-TT700, showing the turntable platter, tonearm, stylus, and open dust cover.
- Turntable Platter: Where records are placed.
- Tonearm: Holds the stylus and tracks the record grooves.
- Stylus (Needle): Reads the record grooves.
- 45 RPM Adapter: Used for playing 7-inch records with large center holes.
- Speed Selector Switch: Adjusts turntable speed (33 1/3, 45, 78 RPM).
- Dust Cover: Protects the turntable from dust.
4. Setup Guide
4.1 Unpacking and Placement
- Carefully remove the unit from its packaging.
- Place the music center on a flat, stable surface, away from direct sunlight, heat sources, and excessive dust or vibration.
- Ensure there is adequate ventilation around the unit.
- Remove any protective materials from the turntable, including the stylus protector.
4.2 Power Connection
- Connect the supplied AC adapter to the DC IN jack on the back of the unit.
- Plug the AC adapter into a standard wall outlet.
4.3 Antenna Connection (FM)
Extend the FM pigtail antenna located at the back of the unit for optimal FM radio reception. Adjust its position if reception is poor.
5. Operation
Turn the Power/Mode knob to switch on the unit. The LCD display will illuminate. Rotate the knob to select your desired audio source.
5.1 Turntable Operation

Image: Detail of the turntable area, illustrating the 3-speed selector switch (33 1/3, 45, 78 RPM).
- Turn the Power/Mode knob to select "PHONO" mode.
- Lift the dust cover.
- Place a record on the turntable platter. If playing a 7-inch record with a large center hole, place the 45 RPM adapter on the spindle first.
- Set the speed selector switch to the correct speed for your record (33 1/3, 45, or 78 RPM).
- Gently lift the tonearm using the cueing lever and position the stylus over the desired track of the record.
- Lower the tonearm slowly onto the record using the cueing lever. The record will begin to play.
- Adjust the volume using the Volume knob.
- To stop playback, lift the tonearm, return it to the tonearm rest, and secure it.
5.2 CD/MP3 Playback
- Turn the Power/Mode knob to select "CD" mode.
- Press the "OPEN/CLOSE" button to open the CD tray.
- Place a CD (audio CD or MP3 CD) with the label side facing up into the tray.
- Press the "OPEN/CLOSE" button again to close the tray. The unit will read the disc.
- Press the "PLAY/PAUSE" button to start playback.
- Use the "<< / >>" buttons to skip tracks. Press and hold to fast forward/rewind.
- Press the "REPEAT/RANDOM" button to cycle through repeat modes (e.g., repeat one, repeat all, random).
- Press the "STOP" button to stop playback.
5.3 USB Playback

Image: The music center with a USB drive inserted, illustrating its capability for USB playback and recording.
- Insert a USB flash drive into the USB port.
- Turn the Power/Mode knob to select "USB" mode. The unit will automatically detect and begin playing compatible audio files (MP3).
- Use the "<< / >>" buttons to skip tracks. Press and hold to fast forward/rewind.
- Press the "REPEAT/RANDOM" button to cycle through repeat modes.
- Press the "STOP" button to stop playback.
5.4 Bluetooth Streaming

Image: The music center paired with a smartphone via Bluetooth, demonstrating wireless audio streaming.
- Turn the Power/Mode knob to select "BLUETOOTH" mode. The LCD display will show "BLUETOOTH" and flash, indicating it's in pairing mode.
- On your Bluetooth-enabled device (smartphone, tablet), enable Bluetooth and search for available devices.
- Select "MX-TT700" from the list of devices. Once paired, the display will stop flashing and show "BLUETOOTH".
- Start playing music on your connected device. The audio will stream through the music center.
- Adjust volume on both the music center and your connected device.
5.5 AM/FM Radio Operation

Image: The music center displaying various FM radio frequencies, indicating its radio capabilities.
- Turn the Power/Mode knob to select "AM" or "FM" mode.
- Use the "<< / >>" buttons to manually tune to a station. Press and hold to auto-scan for the next available station.
- To Save a Preset: When on a desired station, press the "PROGRAM/MEMORY" button. The preset number will flash. Use "<< / >>" to select a preset number (1-20), then press "PROGRAM/MEMORY" again to confirm.
- To Recall a Preset: In AM or FM mode, press the "PROGRAM/MEMORY" button repeatedly to cycle through saved presets.
- Adjust the FM pigtail antenna for best reception.
5.6 AUX-in Operation
- Connect an external audio device (e.g., smartphone, MP3 player) to the AUX-in jack on the front panel using the supplied 3.5mm aux-in cable.
- Turn the Power/Mode knob to select "AUX" mode.
- Start playing audio on your connected external device.
- Adjust the volume on both the music center and your external device.
5.7 Recording to USB
The MX-TT700 allows you to record audio from the Turntable, CD, or AUX-in directly to a USB flash drive in MP3 format.
- Insert a USB flash drive into the USB port. Ensure it has sufficient free space.
- Select the desired source you wish to record from (PHONO, CD, or AUX).
- Start playback on the source (e.g., begin playing a record, CD, or audio from an AUX-connected device).
- Press the "RECORD" button. The display will indicate recording is in progress.
- To stop recording, press the "RECORD" button again or the "STOP" button. The recorded file will be saved on the USB drive.
6. Maintenance
6.1 Cleaning the Unit
- Always unplug the unit before cleaning.
- Use a soft, dry cloth to wipe the exterior surfaces. Do not use abrasive cleaners, waxes, or solvents.
- For the dust cover, use a soft cloth and a mild detergent solution.
6.2 Turntable and Stylus Care
- Keep the dust cover closed when the turntable is not in use to prevent dust accumulation.
- Clean the stylus periodically using a soft brush, brushing gently from back to front.
- Replace the stylus when you notice a degradation in sound quality or visible wear.
6.3 CD/USB Care
- Handle CDs by their edges. Clean them with a soft, lint-free cloth, wiping from the center outwards.
- Ensure USB drives are free of dust and debris before insertion.
7. Troubleshooting
If you encounter issues with your music center, refer to the following table for common problems and solutions.
| Problem | Possible Cause | Solution |
|---|---|---|
| No power | AC adapter not connected properly; Power outlet not working. | Ensure AC adapter is securely plugged into the unit and a working wall outlet. |
| No sound | Volume too low; Incorrect mode selected; Headphones connected. | Increase volume. Select correct input mode. Disconnect headphones. |
| Turntable not spinning or playing | Incorrect speed selected; Stylus protector still on; Tonearm not lowered. | Set correct speed. Remove stylus protector. Lower tonearm onto record. |
| CD not playing | CD inserted incorrectly; Disc is dirty or scratched; Incorrect mode. | Insert CD label-side up. Clean or replace CD. Select "CD" mode. |
| Bluetooth pairing failed | Device too far; Bluetooth not enabled on external device; Unit not in pairing mode. | Ensure device is within 30 feet. Enable Bluetooth. Select "BLUETOOTH" mode on unit. |
| Poor radio reception | FM antenna not extended or positioned correctly. | Extend and adjust the FM pigtail antenna for better signal. |
| USB recording not working | USB drive full or incompatible; Source not playing. | Use a compatible USB drive with sufficient space. Ensure source audio is playing. |
8. Specifications
| Model | MX-TT700 |
| Power Source | AC Adapter (Input: 100-240V ~ 50/60Hz) |
| Turntable Speeds | 33 1/3, 45, 78 RPM |
| Bluetooth Version | (Not specified in JSON, assuming standard) |
| Bluetooth Range | Up to 30 feet (10 meters) |
| Radio Frequencies | AM / FM PLL Radio (20 preset stations) |
| Speaker Output | 2 x 2W (Total 4W) |
| USB Recording Format | MP3 |
| Product Dimensions (L x W x H) | 18.47" x 12.26" x 16.51" (46.91 cm x 31.14 cm x 41.94 cm) |
| Item Weight | 3 lbs (1.36 kg) |
| Material | Wood |
| Included Components | AC Adapter, 45 RPM Adapter, Aux-in Cable, Instruction Manual |
9. Warranty and Support
Memorex products are designed for reliability and performance. For warranty information or technical support, please refer to the warranty card included with your product or visit the official Memorex website.
Manufacturer: Memorex
Website: www.memorex.com (Note: This is a placeholder URL, please refer to your product documentation for the official support website.)
