Introduction
Thank you for choosing the Kienzle Model 14987 Digital Radio-Controlled Alarm Clock. This device combines precise timekeeping with practical features such as two adjustable alarms, a snooze function, and an indoor temperature display. Its radio-controlled (DCF) functionality ensures accurate time synchronization. This manual provides detailed instructions for setup, operation, and maintenance to ensure optimal performance of your alarm clock.
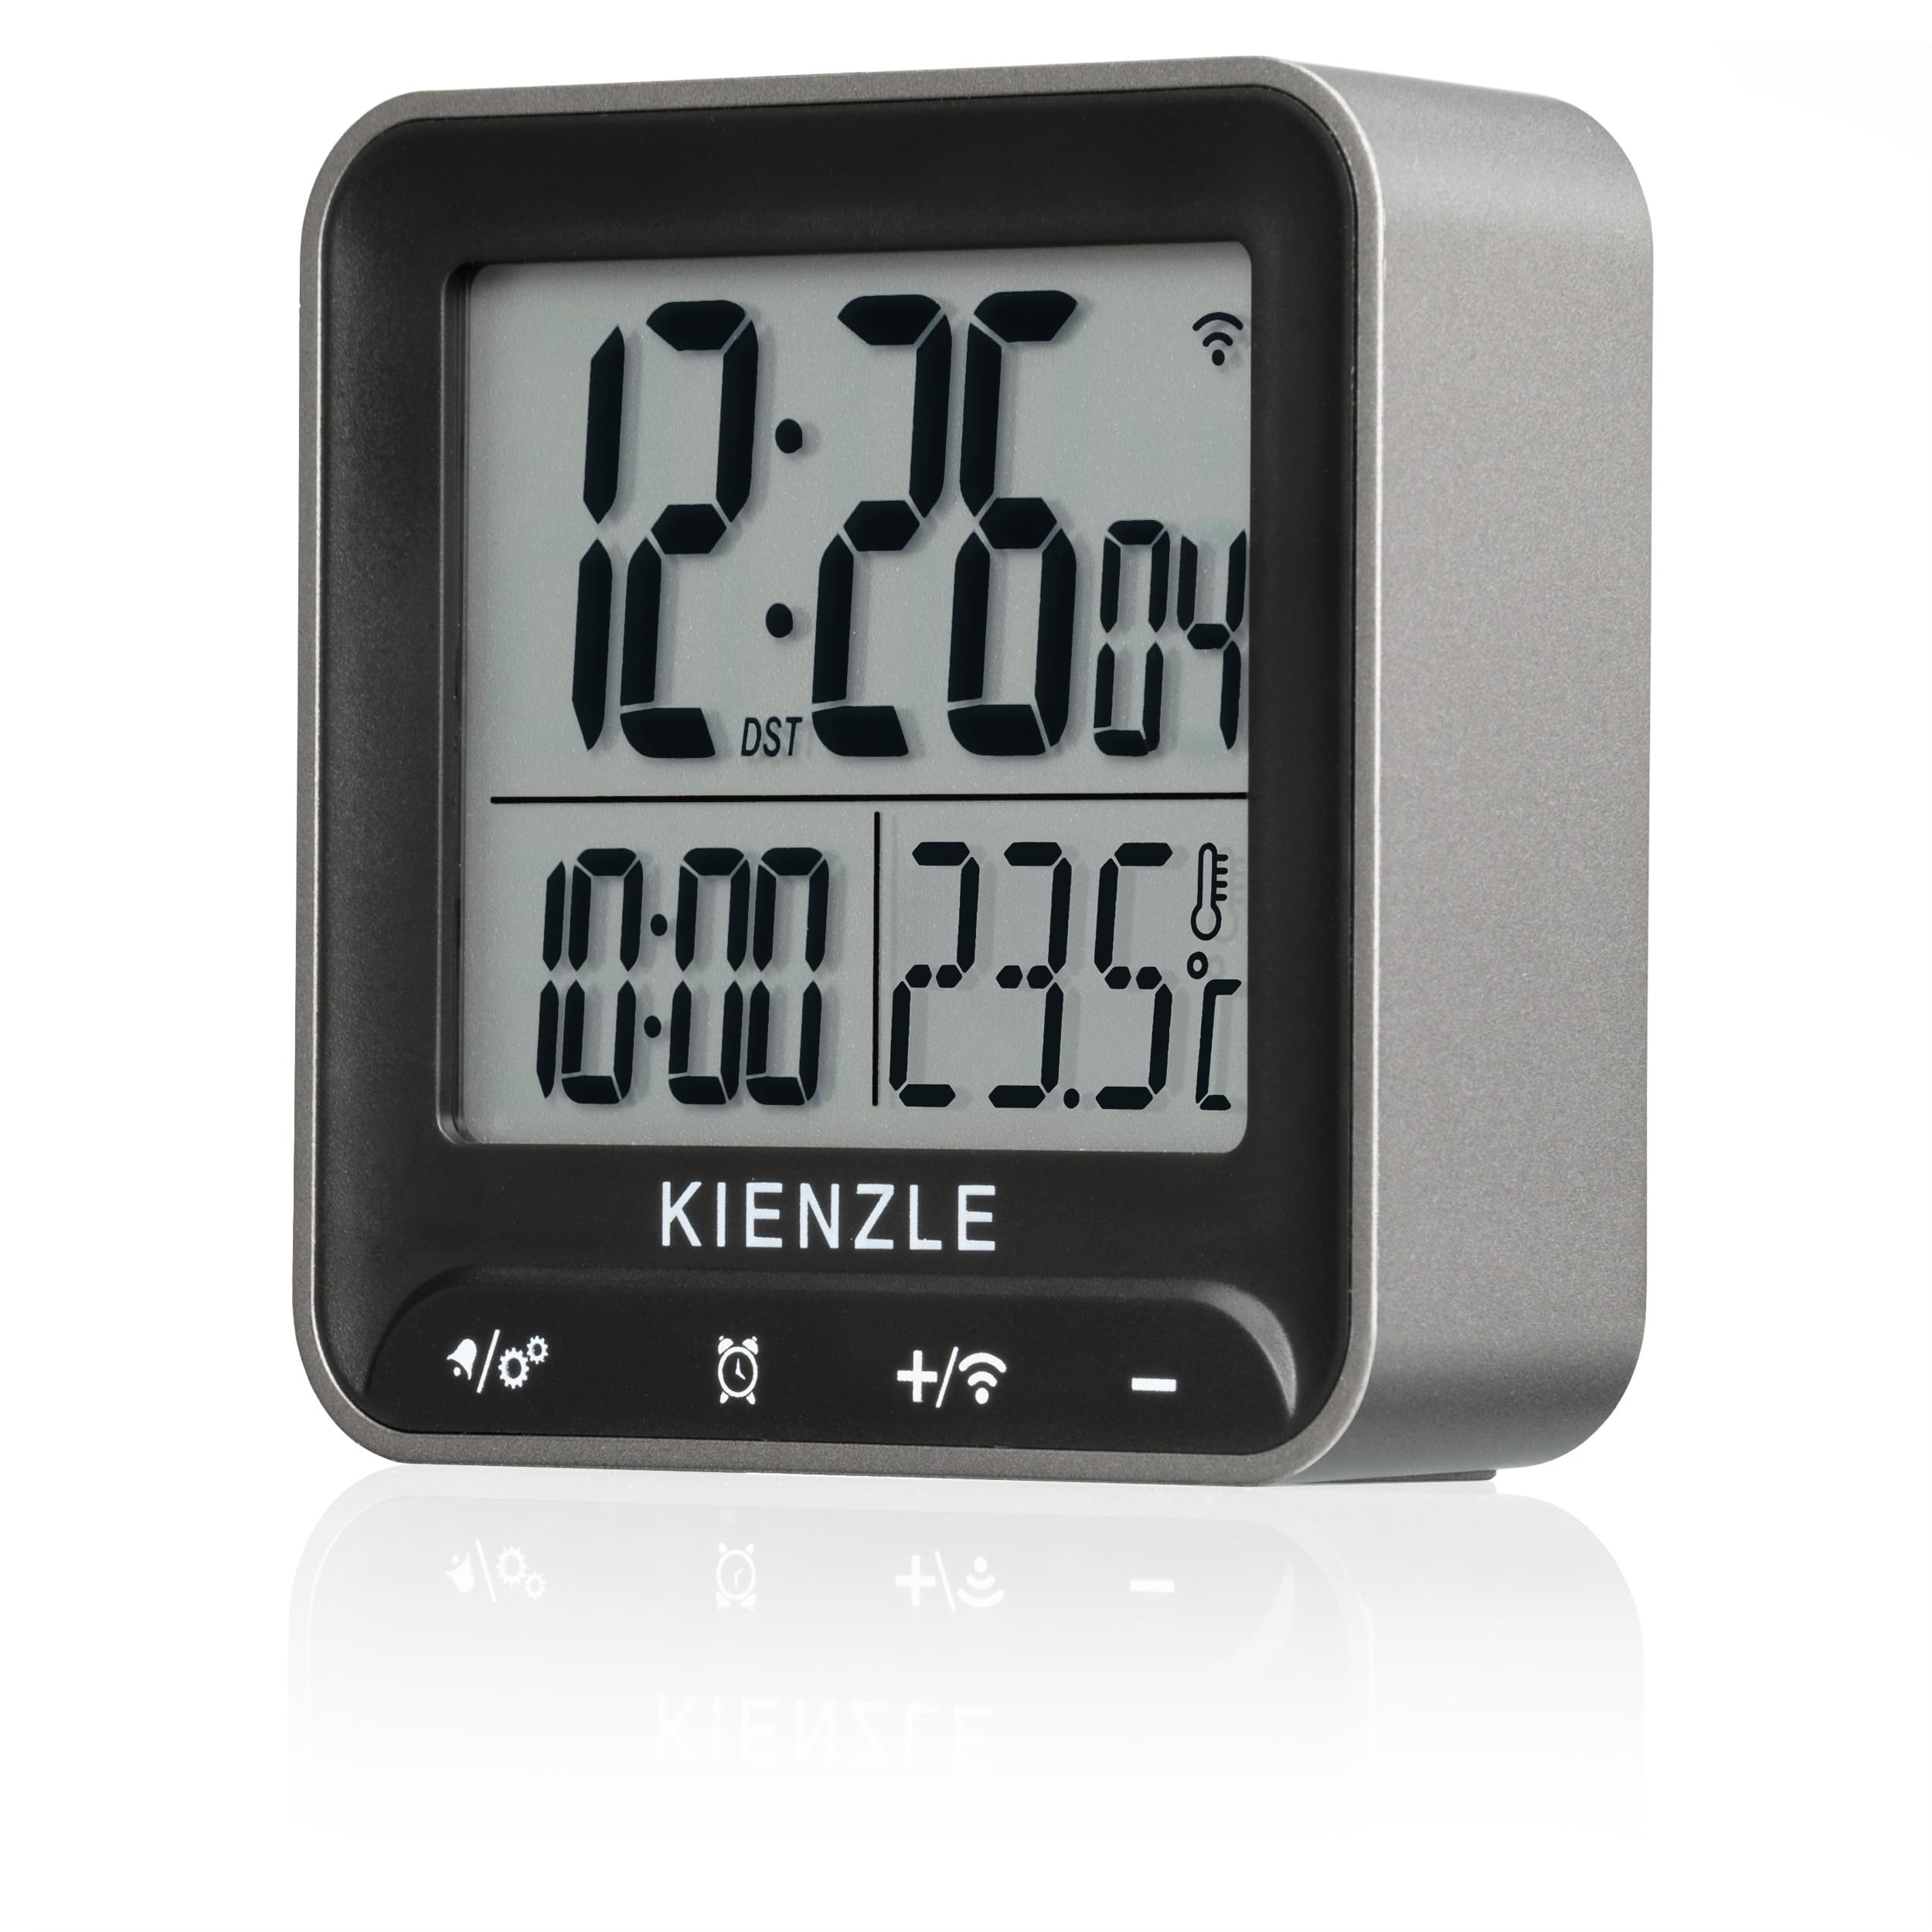
Figure 1: Kienzle Model 14987 Digital Radio-Controlled Alarm Clock in a living room setting.
Setup
1. Battery Installation
The alarm clock operates on two AAA/LR03 batteries (not included). Follow these steps to install them:
- Locate the battery compartment cover on the back of the unit.
- Slide the cover downwards to open the compartment.
- Insert two AAA/LR03 batteries, ensuring the correct polarity (+ and -) as indicated inside the compartment.
- Replace the battery compartment cover by sliding it back into place until it clicks securely.

Figure 2: Battery compartment with two AAA battery slots.
2. Initial Power-On and DCF Signal Reception
Upon battery installation, the clock will automatically power on and begin searching for the DCF radio signal. This process may take several minutes. During this time, a signal icon will typically flash on the display.
- Place the clock near a window for better signal reception, away from electronic devices that may cause interference.
- Once the signal is successfully received, the time will be automatically set, and the signal icon will appear steadily on the display.
- If the signal is not received within 10 minutes, the clock will proceed with default settings. You may need to manually set the time or try relocating the clock.

Figure 3: Front display of the alarm clock showing time and other information.
Operating Instructions
The Kienzle Model 14987 features four touch buttons for easy operation. These buttons are typically located on the front panel below the display.

Figure 4: Close-up of the alarm clock display and touch buttons.
1. Button Functions
- Leftmost Button (e.g., "/⚙️"): Typically used for settings mode or switching display information.
- Second Button (e.g., "⏰"): Used for alarm settings.
- Third Button (e.g., "+/📶"): Used to increase values during settings or manually initiate DCF signal search.
- Rightmost Button (e.g., "-"): Used to decrease values during settings.
2. Setting the Time (Manual)
While the DCF signal automatically sets the time, you can manually adjust it if needed or if the signal is unavailable.
- Press and hold the Leftmost Button (Settings/Mode) for a few seconds until the time display starts flashing.
- Use the "+" and "-" buttons to adjust the hour.
- Press the Leftmost Button again to move to minutes, then adjust with "+" and "-".
- Continue pressing the Leftmost Button to cycle through other settings like 12/24-hour format, year, month, and day.
- Press the Leftmost Button one last time or wait a few seconds for the settings to save and exit.
3. Setting Alarms
The clock features two independent alarms: one for weekdays (Monday-Friday) and one for weekends (Saturday-Sunday).
- Press the Alarm Button (⏰) once to view Alarm 1 (AL1) time.
- Press and hold the Alarm Button (⏰) for a few seconds until the AL1 time starts flashing.
- Use the "+" and "-" buttons to set the desired hour for Alarm 1.
- Press the Alarm Button (⏰) again to move to minutes, then adjust with "+" and "-".
- Press the Alarm Button (⏰) once more to confirm and activate Alarm 1. An alarm icon will appear on the display.
- Repeat the process for Alarm 2 (AL2) by pressing the Alarm Button (⏰) twice to view AL2, then press and hold to set.
To activate/deactivate an alarm, press the Alarm Button (⏰) repeatedly until the desired alarm (AL1 or AL2) is shown, then press the "+" button to toggle it on or off. An active alarm will show its respective icon (e.g., AL1, AL2) on the display.
4. Snooze Function
When an alarm sounds, touch the top bar of the clock or the designated snooze area (if applicable) to activate the snooze function. The alarm will temporarily stop and sound again after approximately 5-10 minutes (duration may vary). To fully turn off the alarm, press any other button on the front panel.
5. Temperature Display
The clock continuously measures and displays the indoor temperature. You can switch between Celsius (°C) and Fahrenheit (°F) by pressing the Leftmost Button (Settings/Mode) briefly when not in setting mode, or as indicated in the display cycle.
6. Backlight
The display features a backlight for improved visibility in low light conditions. To activate the backlight, briefly touch the top bar of the clock or the designated backlight/snooze area. The backlight will illuminate for a few seconds and then turn off automatically to conserve battery life.

Figure 5: Alarm clock display with activated backlight.
Maintenance
1. Cleaning
To clean the alarm clock, use a soft, dry cloth. Do not use abrasive cleaners, solvents, or chemical sprays, as these can damage the display or casing. Avoid getting moisture into the unit.
2. Battery Replacement
When the display becomes dim or the clock functions erratically, it is time to replace the batteries. Follow the battery installation steps outlined in the "Setup" section. Always replace both batteries at the same time with new AAA/LR03 batteries. Dispose of old batteries responsibly according to local regulations.
Troubleshooting
| Problem | Possible Cause | Solution |
|---|---|---|
| Display is blank or dim. | Low or depleted batteries. | Replace with fresh AAA/LR03 batteries. |
| Time is incorrect or not setting automatically. | Weak or no DCF radio signal reception. Interference from other electronics. | Relocate the clock closer to a window or away from electronic devices. Manually set the time if the signal cannot be received. |
| Alarm does not sound. | Alarm is not activated. Incorrect alarm time set. | Ensure the alarm icon (AL1/AL2) is visible on the display. Verify the alarm time is set correctly. |
| Buttons are unresponsive. | Low batteries. Temporary software glitch. | Replace batteries. Remove and reinsert batteries to reset the device. |
Specifications
- Brand: Kienzle
- Model: 14987
- Color: Silver/Black
- Dimensions: 6.6 x 3.81 x 2.2 cm (2.6 x 1.5 x 0.9 inches)
- Weight: 65 grams (2.3 ounces)
- Material: Plastic
- Display Type: Digital
- Power Source: 2 x AAA/LR03 batteries (not included)
- Special Features: DCF Radio-Controlled Time, 2 Alarms (Mon-Fri, Sat-Sun), Snooze Function, Indoor Temperature Display (°C/°F), Backlight, Touch Buttons, 12/24-hour format, Date and Day of Week display.
Warranty and Support
For warranty information and customer support, please refer to the documentation provided at the time of purchase or contact your retailer. Kienzle products are designed for reliability and precision. Should you encounter any issues not covered in this manual, please reach out to the authorized service center or your point of purchase for assistance.


