Introduction
This manual provides comprehensive instructions for the installation, operation, and maintenance of your VEVOR YMXT-XC39-5 Sliding Pocket Door Hardware Track Kit. Please read these instructions carefully before beginning installation to ensure proper function and safety. This 4.73 ft sliding door hardware and track kit is designed for door thicknesses from 1" to 1 3/4" and door widths from 24" to 30", supporting a maximum weight capacity of 220 lbs. It is constructed from commercial-grade precision aluminum for durability and smooth operation.
Safety Information
- Always wear appropriate safety gear, including gloves and eye protection, during installation.
- Ensure the wall structure is capable of supporting the weight of the door and hardware.
- Verify all measurements and alignments before drilling or permanent installation.
- Keep children and pets away from the work area during installation.
- Do not exceed the maximum weight capacity of 220 lbs (100 kg).
- Use appropriate tools for each step as specified.
Package Contents
Verify that all components are present before beginning installation:
- 1 x User Manual
- 1 x Track (4.73 ft / 1441.7 mm)
- 2 x Wheel Assemblies
- 2 x Stoppers
- 1 x Floor Knob
- 1 x Wrench
- 1 x Installation Screw Kit

Image: All components included in the VEVOR Pocket Door Hardware Kit, including the track, wheel assemblies, stoppers, floor knob, wrench, and screws.
Specifications
| Item Model Number | YMXT-XC39-5 |
| Track Material | Aluminum Alloy |
| Track Size | 4.73 ft / 1441.7 mm |
| Max Weight Capacity | 220 lbs / 100 kg |
| Compatible Door Width | 24-30 inches / 610-762 mm |
| Compatible Door Thickness | 1-1 3/4 inches / 25-45 mm |
| Product Weight | 2.25 lbs / 1.02 kg |
| Product Dimensions (L x W x Thickness) | 56.73 x 1.77 x 1.22 inches / 1441 x 44.9 x 31 mm |

Image: Diagram illustrating the key dimensions and specifications of the VEVOR Pocket Door Hardware Kit, including track length, compatible door width, door thickness, and weight capacity.
Installation Instructions
Follow these steps carefully for proper installation of your VEVOR Sliding Pocket Door Hardware Track Kit. For a visual guide, please refer to the installation video below.
Video: Detailed installation guide for the VEVOR Bypass Sliding Door Hardware Kit, demonstrating each step from preparation to final assembly.
Step 1: Prepare the Door Opening
Ensure the door opening is properly framed and level. The video demonstrates the initial framing structure for a pocket door installation.
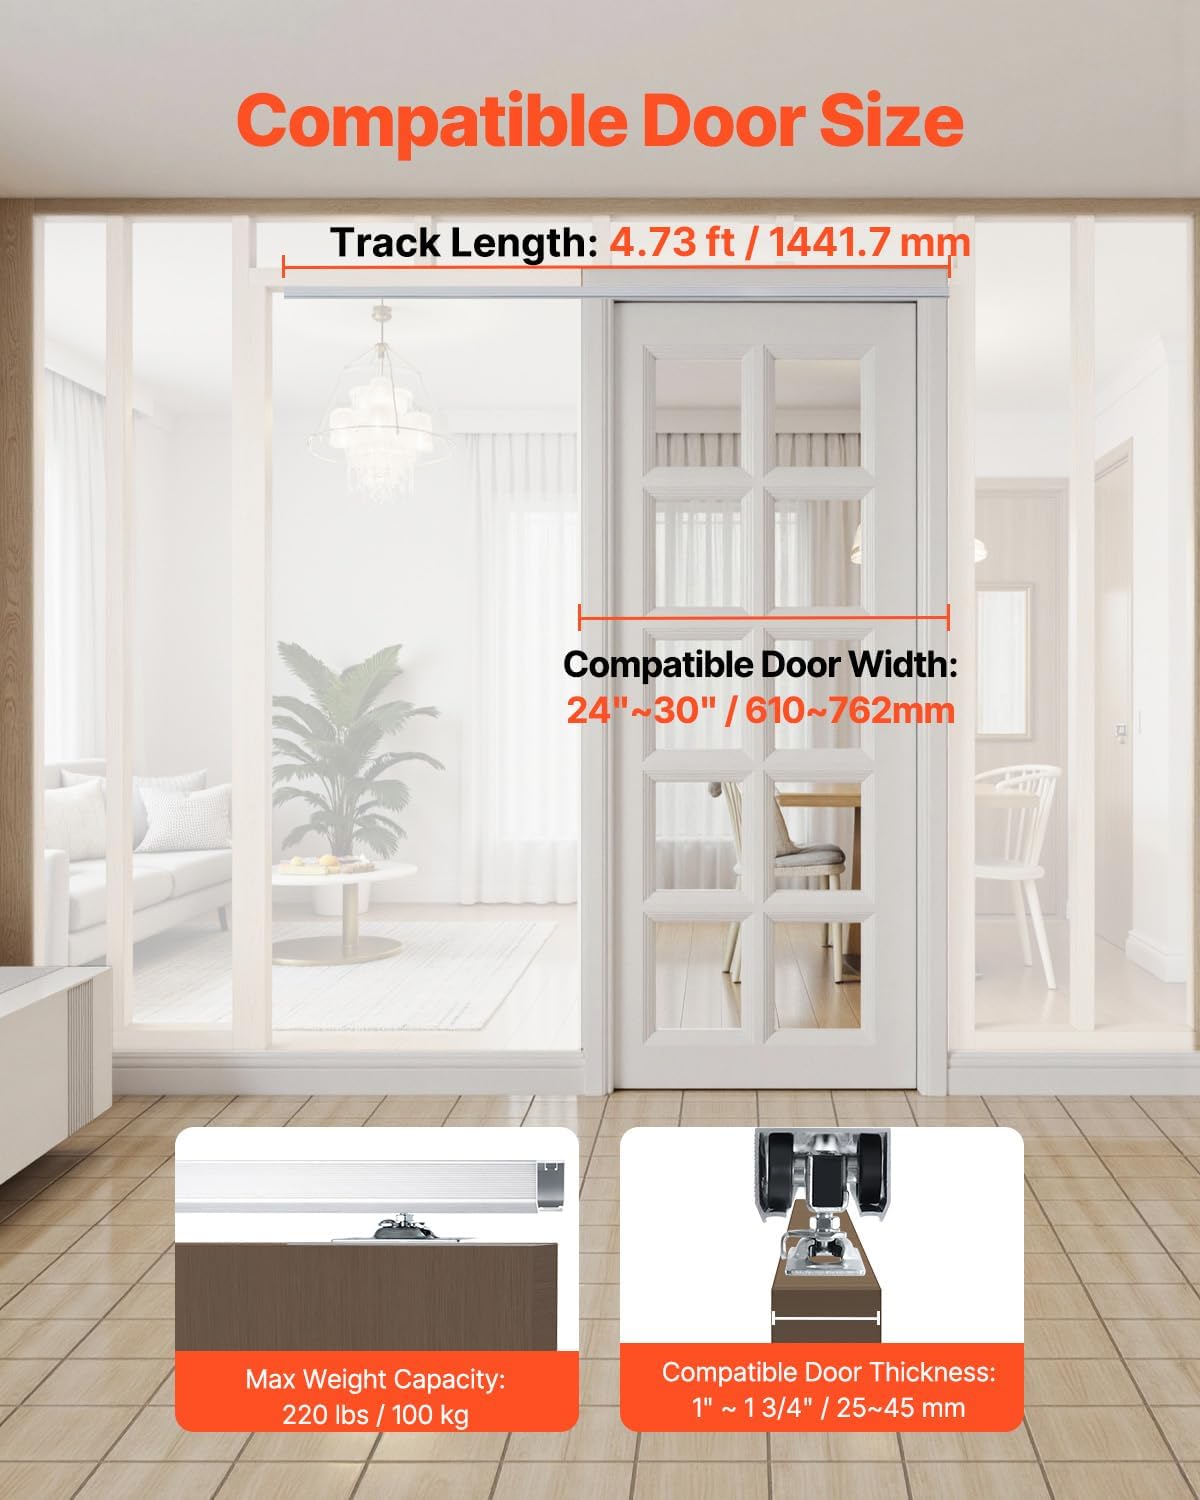
Image: An illustration showing the wooden framing structure required for a pocket door, highlighting the opening where the door will slide.
Step 2: Determine Track Height
Measure the door height and add 2-41/64 inches (67mm) to determine the correct height for the top of the track. Mark this height on the framing.
Step 3: Ensure Proper Clearance
Ensure a 2-3/4 inch (70mm) space is available when instructing the rail. This clearance is crucial for the door to slide freely within the pocket.
Step 4: Position the Track
Place the track into the prepared opening, aligning it with the marked height and ensuring the 70mm clearance. The track should be level.
Step 5: Mark Drilling Points for Track
Using a pencil, mark the drilling points through the pre-drilled holes in the track onto the header framing.
Step 6: Secure the Track
Drill pilot holes and then secure the track to the header using the provided screws. Ensure the track is firmly attached and level.
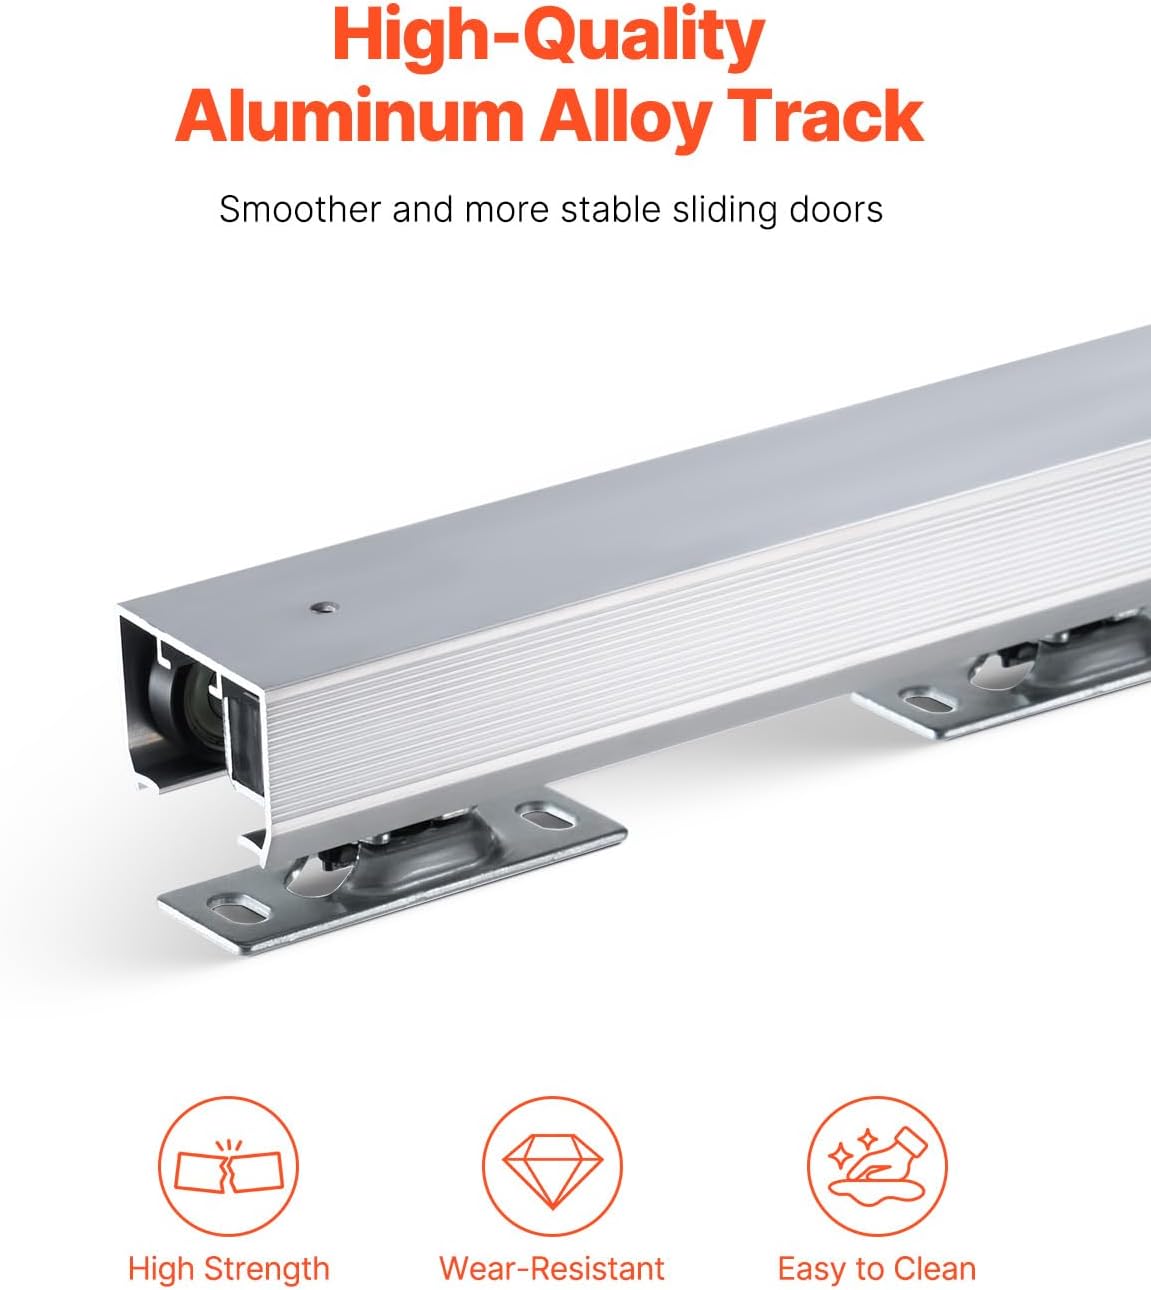
Image: A close-up view of the aluminum track being installed into the door frame, showing the screws securing it in place.
Step 7: Install Wheel Assemblies on Door
Attach the wheel assemblies to the top edge of the door. Ensure the flat side of the hanger faces inward towards the door, and the outward side faces away from the door. The video demonstrates the correct orientation and attachment process.

Image: A detailed view of the three-wheel hanger and heavy-duty ball bearings, designed for quiet and smooth sliding operation.
Step 8: Install Door Bumpers
Fasten the bumper on the back edge of the door, approximately 39-3/8 inches (1000mm) from the bottom edge. Repeat for the other side if applicable. This prevents the door from fully retracting into the wall.
Step 9: Hang the Door
Carefully lift the door and engage the wheel assemblies into the track. Adjust the hangers to ensure the door hangs level and slides smoothly. Use a plumb line to verify vertical alignment.
Step 10: Install Finish Trim and Floor Guide
Install the finish trim around the door opening. Use self-tapping 1-5/8" (41mm) screws for the finish trim (not included). Ensure a 3/16" (5mm) gap between the door and the trim on both sides. Finally, install the floor guide to keep the bottom of the door aligned.

Image: A visual guide showing three key installation steps: installing the track, attaching hangers to the door, and installing the stoppers.
Operating Instructions
To operate the VEVOR Sliding Pocket Door, simply push or pull the door panel along the track. The heavy-duty ball bearings ensure a quiet and smooth gliding motion. Avoid forcing the door if it encounters resistance. Ensure the floor guide keeps the door aligned at the bottom.
Maintenance
- Cleaning: Regularly wipe the track and wheel assemblies with a clean, dry cloth to remove dust and debris. Avoid using abrasive cleaners that could damage the aluminum finish.
- Lubrication: Periodically apply a silicone-based lubricant to the track and wheel bearings to maintain smooth operation. Do not use oil-based lubricants as they can attract dust.
- Inspection: Periodically check all screws and fasteners to ensure they are tight. Inspect the track for any signs of wear or damage. Address any issues promptly to prevent further damage.
Troubleshooting
- Door is difficult to slide: Check the track for debris and clean it thoroughly. Apply lubricant to the track and wheel bearings. Ensure the door is properly aligned in the floor guide.
- Door is noisy: Lubricate the wheel bearings and track. Check for any loose components or obstructions in the track.
- Door is not level: Adjust the height of the wheel assemblies on the door. Refer to the installation instructions for proper adjustment.
- Door comes off track: Ensure all fasteners are securely tightened. Verify that the floor guide is correctly installed and functioning. Check for any damage to the track or wheel assemblies.
Warranty Information
Warranty information for the VEVOR YMXT-XC39-5 Sliding Pocket Door Hardware Track Kit is not explicitly provided in the product details. Please refer to the manufacturer's official website or contact VEVOR customer service for detailed warranty terms and conditions.
Customer Support
For further assistance, technical support, or inquiries regarding your VEVOR product, please visit the official VEVOR website or contact their customer service department. Contact details are typically available on the product packaging or the manufacturer's website.
You can visit the VEVOR Store at: VEVOR Store on Amazon


