1. Introduction
This manual provides detailed instructions for the safe and effective operation, maintenance, and troubleshooting of the COXO C-smart-1 Pro Rotary Tool Kit. Please read this manual thoroughly before using the device to ensure proper handling and to prevent potential hazards. Retain this manual for future reference.
2. Safety Information
Adherence to the following safety guidelines is crucial for user safety and optimal device performance:
- Always wear appropriate personal protective equipment (PPE), including safety glasses, during operation.
- Ensure the device is fully charged before use to avoid interruptions during procedures.
- Do not immerse the device in water or other liquids. Avoid using the device in wet environments.
- Keep the device away from heat sources, direct sunlight, and flammable materials.
- Only use accessories and parts approved by COXO. Use of unauthorized components may void the warranty and pose safety risks.
- Refer to local regulations for proper disposal of batteries and electronic components at the end of their service life.
3. Package Contents
Upon opening the package, verify that all the following items are present and in good condition:
- COXO C-smart-1 Pro Main Unit
- 16:1 Lighted Rotary Tip
- Power Adapter / Charging Cable
- User Manual
- Test Wire (if included)
- Lip Hook Wire (if included)
- Motor Handpiece (if included separately)
If any items are missing or damaged, please contact your supplier immediately.
4. Product Overview
The COXO C-smart-1 Pro is an advanced rotary tool kit designed for precision dental procedures. It features multiple working modes, adjustable speed and torque settings, and integrated LED lighting for enhanced visibility.

Figure 4.1: COXO C-smart-1 Pro Main Unit. This image shows the compact design of the device with its central display screen and control buttons.
4.1 Component Identification
Familiarize yourself with the various parts and controls of the C-smart-1 Pro unit for efficient operation.

Figure 4.2: Labeled Components of the C-smart-1 Pro. This diagram highlights key functional parts such as the power button, charging socket, motor handpiece socket, and various control buttons for navigation and settings.
- Power Button: Located on the top left of the unit, used to turn the device on or off.
- Charging Socket & Test Wire Socket: Located on the side, for connecting the power adapter for charging and the test wire.
- Lip Hook Wire Socket: Located on the side, for connecting the lip hook wire for specific functions.
- Motor Handpiece Socket: Located on the side, for securely attaching the rotary motor handpiece.
- Increase / Volume Button: Used to increase numerical values or adjust audio volume.
- Mode / Setup State Button: Toggles between different working modes or enters the setup menu.
- Decrease / Screen Brightness Button: Used to decrease numerical values or adjust the screen brightness.
- Change File & File System Buttons: Navigates through available file systems and settings.
5. Setup
5.1 Initial Charging
- Connect the power adapter to the charging socket on the side of the device.
- Plug the adapter into a suitable electrical outlet.
- Allow the device to charge fully before its first use. The battery indicator on the screen will display the charging status.
5.2 Attaching the Rotary Tip
- Ensure the device is powered off before attaching any components.
- Carefully insert the 16:1 lighted rotary tip into the motor handpiece socket until it clicks securely into place.
- Verify that the tip is firmly attached and stable before powering on the device.
5.3 Connecting Accessories
- If required for your procedure, connect the test wire or lip hook wire to their respective sockets on the device.
6. Operation
6.1 Powering On/Off
To power the device on or off, press and hold the Power Button (located on the top left) for a few seconds until the screen activates or deactivates.
6.2 Working Modes
The C-smart-1 Pro features three distinct working modes (M1, M2, M3) designed to accommodate various procedural requirements. Use the Mode / Setup State Button to cycle through these modes.

Figure 6.1: Three Work Modes (M1, M2, M3). This image illustrates the different display configurations for each working mode, showing variations in speed, torque, and file system selection.
6.3 System Selection and Adjustments
The device comes with various mainstream file systems pre-programmed for convenience.
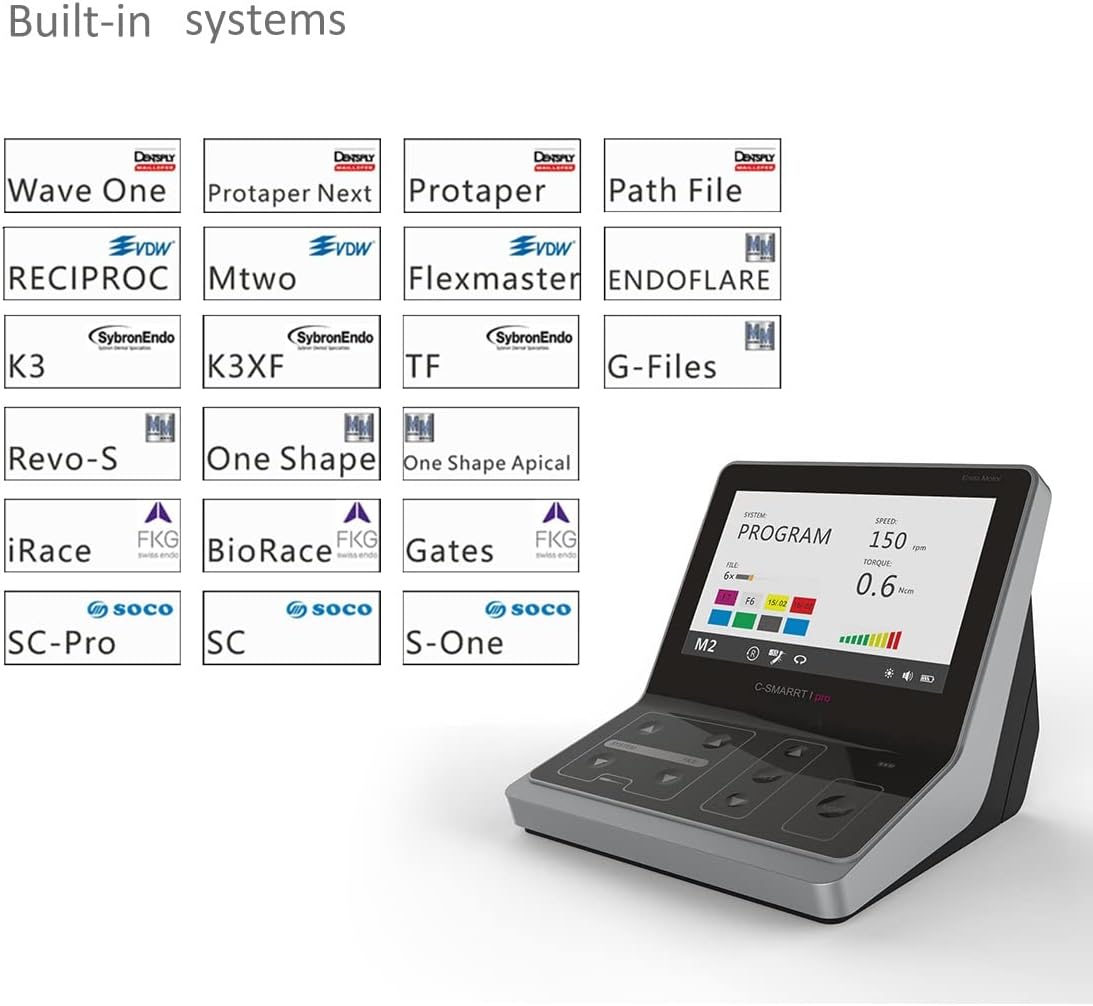
Figure 6.2: Built-in File Systems. This image displays the extensive list of pre-programmed dental file systems, allowing users to select the appropriate system for their procedure without manual setup.
- Use the Change File & File System Buttons (labeled SYSTEM/FILE) to navigate through the available file systems (e.g., DS, VDW, FKG, Micro Mege, Kerr, Komet, etc.).
- Once a system is selected, use the Increase / Volume and Decrease / Screen Brightness Buttons to adjust parameters such as speed (RPM) and torque (Ncm) as needed for the specific procedure and file.
- The 16:1 rotary tip allows for precise adjustment of speed and torque settings.
6.4 LED Lighting
The integrated LED light illuminates the working area, providing clear visibility. Use the Decrease / Screen Brightness Button (often combined with a 'SET' button or similar) to adjust the brightness level to your preference.
7. Maintenance
7.1 Cleaning
- After each use, disconnect the rotary tip and wipe down the main unit with a soft, damp cloth.
- Use a mild disinfectant solution if necessary, ensuring no liquid enters the device openings or screen.
- Do not use abrasive cleaners, solvents, or harsh chemicals, as these can damage the device's surface or internal components.
7.2 Battery Care
The device is equipped with a Lithium Ion battery. To prolong battery life and maintain performance:
- Avoid fully discharging the battery frequently. Recharge when the battery indicator shows low power.
- Store the device in a cool, dry place when not in use for extended periods.
- Recharge the battery regularly, even if the device is not in active use, to prevent deep discharge.
7.3 Storage
Store the COXO C-smart-1 Pro in its original packaging or a protective case in a clean, dry environment, away from extreme temperatures, humidity, and direct sunlight.
8. Troubleshooting
This section addresses common issues you might encounter. If a problem persists after attempting these solutions, please contact customer support.
| Problem | Possible Cause | Solution |
|---|---|---|
| Device does not power on | Low battery; Power button not pressed correctly | Charge the device fully; Press and hold the power button firmly for a few seconds. |
| Rotary tip not rotating | Tip not securely attached; Incorrect mode/settings selected | Ensure the tip is fully inserted and locked; Check the selected working mode and adjust speed/torque settings. |
| LED light not working | Brightness set to minimum; Malfunction | Increase brightness using the dedicated button; If issue persists, contact support. |
| Screen display issues (e.g., flickering, no image) | Low battery; Software glitch; Physical damage | Recharge the device; Power cycle the device (turn off and on); If damage is suspected, contact support. |
9. Specifications
- Model: C-smart-1 Pro (Model Number: 132)
- Manufacturer: COXO
- Power Source: Battery Powered
- Battery Type: Lithium Ion (1 A battery included)
- Special Features: Integrated LED Light, 16:1 Rotary Tip, Built-in Mainstream File Systems
- Included Components: Motor, 16:1 Rotary Tip, Power Adapter, User Manual (may vary)
- Item Weight: Approximately 2 Kilograms (4.4 pounds)
- Package Dimensions: Approximately 10 x 10 x 5 inches
10. Warranty and Support
For detailed warranty information, technical support, or service inquiries, please refer to the official COXO website or contact your authorized dealer. It is recommended to keep your purchase receipt as proof of purchase for warranty claims.
For additional product resources and information, you may visit the PROTECTOR Store on Amazon: PROTECTOR Store
11. Anti-Fake Label Information
To verify the authenticity of your COXO C-smart-1 Pro product, locate the anti-fake label on the product packaging.

Figure 11.1: Anti-Fake Label. This image shows the anti-fake label on the product box, which can be used to verify the product's authenticity by visiting the specified website and entering the code.
Follow the instructions provided on the label, which typically involve visiting a designated website (e.g., www.coxotec.com) and entering a unique verification code found by scratching off a protective coating.


