Introduction
This manual provides essential information for the safe and effective operation, maintenance, and troubleshooting of your VEVOR Pressure Washer Telescoping Wand, Model QD-SSG02. Please read this manual thoroughly before initial use and retain it for future reference.
Safety Information
Always observe basic safety precautions to reduce the risk of fire, electric shock, and personal injury when using this product. Pressure washers and their accessories can generate high-pressure streams that can cause serious injury if not handled properly.
- Read all instructions: Familiarize yourself with the controls and proper use of the equipment.
- Wear appropriate safety gear: Always wear eye protection, gloves, and protective clothing.
- Maintain a firm grip: The high-pressure spray can cause kickback. Use the support harness to distribute weight and maintain control.
- Never point the spray gun at people or animals: The high-pressure stream can cause severe injury.
- Ensure stable footing: When working at heights, ensure you have stable ground and are aware of your surroundings.
- Check connections: Before each use, ensure all hoses and connections are secure to prevent leaks and accidental disconnections.
- Do not exceed maximum pressure: This telescoping wand is rated for a maximum of 4000 PSI. Do not use with pressure washers exceeding this rating.
Package Contents
Verify that all items are present and undamaged upon unpacking. If any parts are missing or damaged, contact VEVOR customer service.
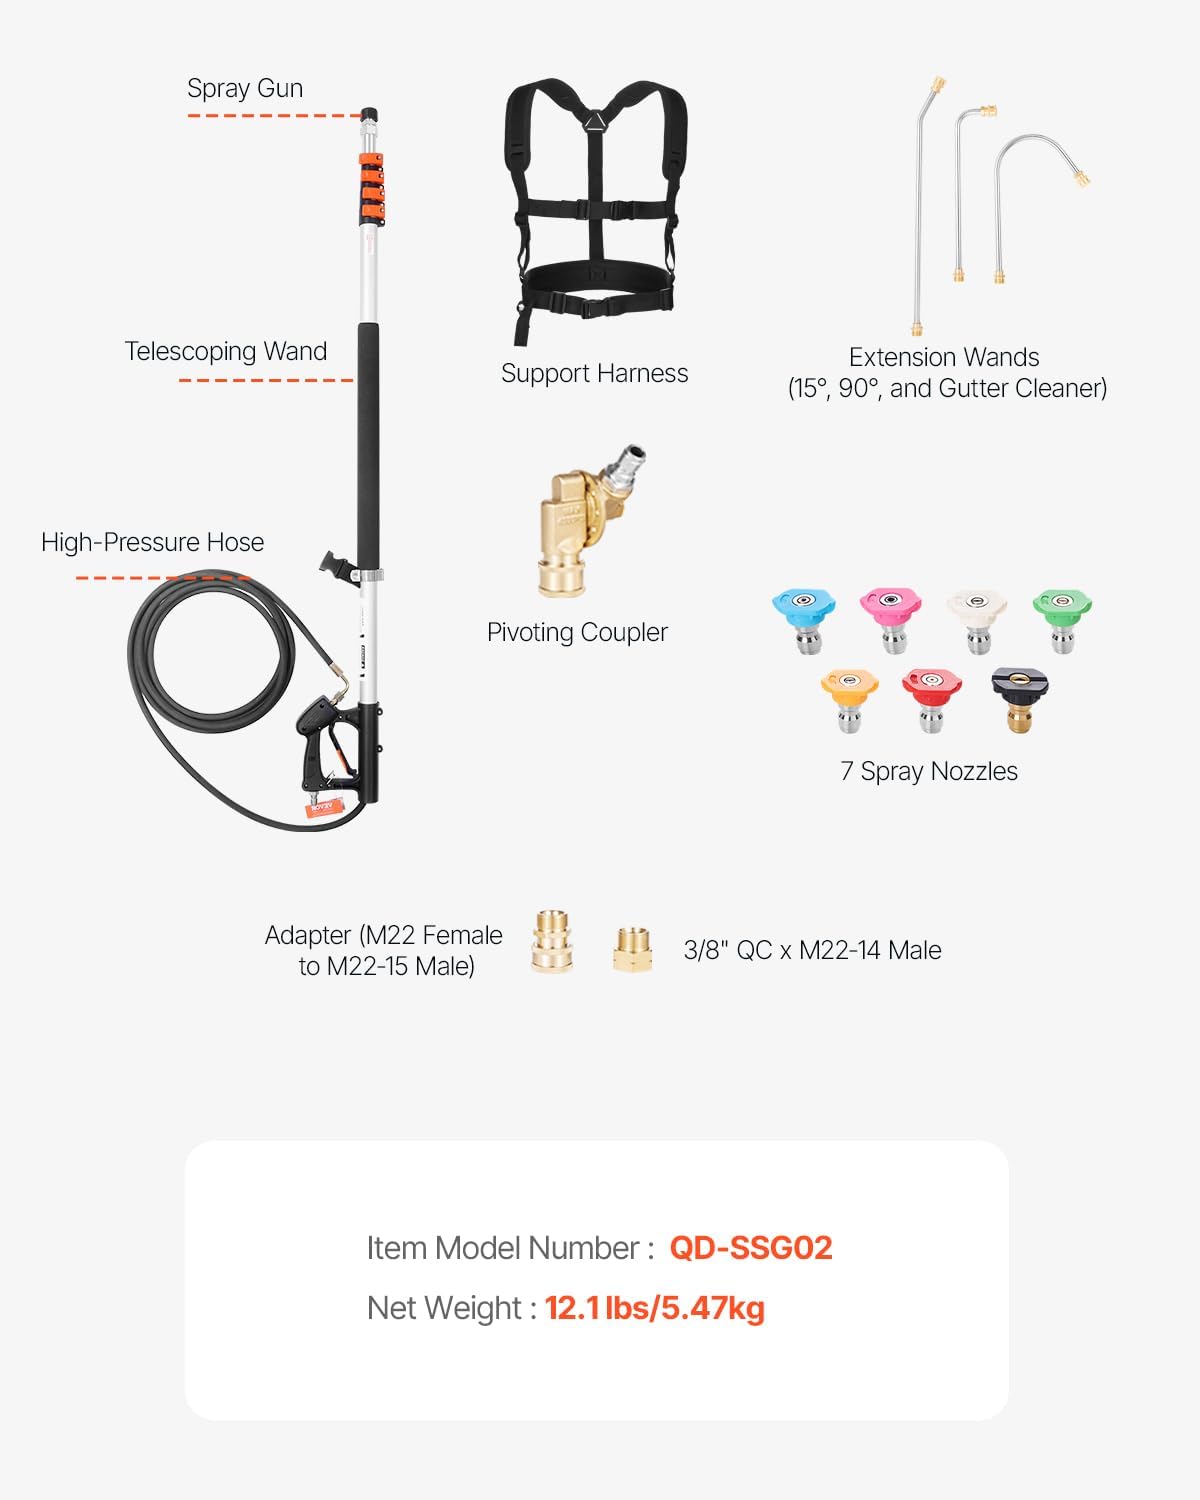
Figure 1: Included Components
- Telescoping Wand (5-24 ft adjustable)
- Spray Gun
- High-Pressure Hose
- Support Harness
- Pivoting Coupler
- Extension Wands (15°, 90°, Gutter Cleaner) - 3 pieces
- Spray Nozzles (0°, 15°, 25°, 40°, Foam Nozzle, and additional 0° nozzles) - 7 pieces total
- Adapters (M22 Female to M22-15 Male, 3/8" QC x M22-14 Male)
Setup
1. Assembling the Wand
- Attach the Spray Gun: Connect the spray gun to the base of the telescoping wand. Ensure a tight and secure connection.
- Connect High-Pressure Hose: Attach your pressure washer's high-pressure hose to the inlet on the spray gun. Use the appropriate adapter if necessary (3/8'' quick plug inlet or M22 adapters provided).
- Select and Attach Nozzle/Extension: Choose the desired spray nozzle or extension wand (15°, 90°, or gutter cleaner) and attach it to the quick-connect fitting at the end of the telescoping wand. Pull back the collar on the quick-connect fitting, insert the nozzle/extension, and release the collar to lock it in place.
2. Adjusting the Telescoping Wand Length
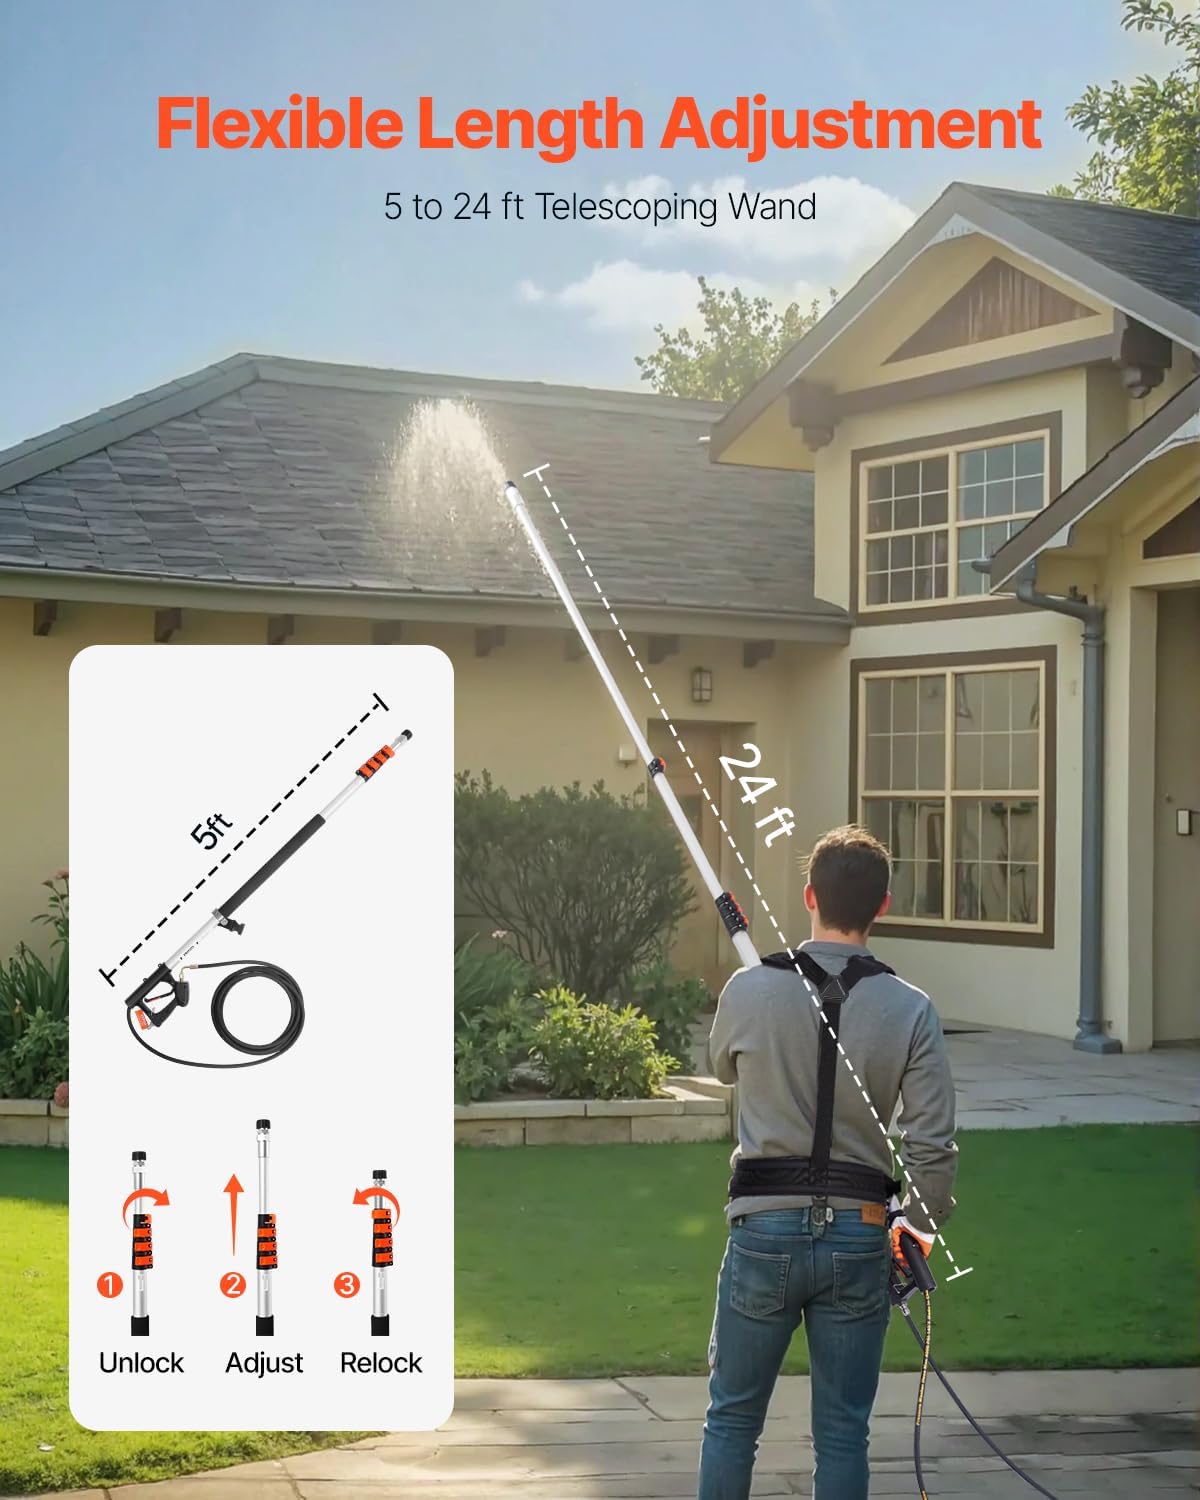
Figure 2: Flexible Length Adjustment
- Unlock: Rotate the telescopic adjustment locks counter-clockwise to loosen the wand sections.
- Adjust: Extend or retract the wand sections to achieve the desired length (from 5 ft to 24 ft).
- Relock: Rotate the telescopic adjustment locks clockwise to securely fasten the wand sections at the chosen length. Ensure all locks are tight before operating.
3. Wearing the Support Harness

Figure 3: Support Harness Details
The adjustable support harness is designed to distribute the weight of the extended wand and reduce fatigue. Put on the harness and adjust the shoulder straps, waist belt, and chest strap for a snug and comfortable fit. Attach the wand to the harness hook for support during operation.
Operating Instructions
1. Connecting to a Pressure Washer

Figure 4: Compatible with Most Pressure Washers
Ensure your pressure washer is turned off and disconnected from its power source. Connect the high-pressure hose from your pressure washer to the inlet on the telescoping wand's spray gun. Use the provided adapters if your pressure washer connection differs from the 3/8'' quick plug inlet. This wand is compatible with pressure washers up to 4000 PSI.
2. Selecting Spray Nozzles

Figure 5: 7 Spray Nozzles for Various Surfaces
The kit includes 7 spray nozzles for different cleaning tasks:
- 0° (Red/Pink): For intense spot cleaning or hard-to-reach areas. Use with extreme caution.
- 15° (Yellow): For aggressive cleaning of tough stains on hard surfaces.
- 25° (Green): For general cleaning of most surfaces.
- 40° (White): For gentle cleaning of delicate surfaces.
- Foam Nozzle (Black): For applying detergent or soap.
Always test the spray pattern on an inconspicuous area first to avoid damaging the surface.
3. Cleaning Procedure

Figure 6: Cleaning High Places with Ease
- Ensure all connections are secure and the wand is adjusted to the desired length.
- Turn on your pressure washer according to its manufacturer's instructions.
- Engage the trigger on the spray gun to begin spraying. Maintain a safe distance from the surface being cleaned, especially with higher pressure nozzles.
- Use the pivoting coupler and extension wands (15°, 90°, gutter cleaner) to reach awkward angles and areas like gutters, eaves, and undersides of structures.
- When finished, release the trigger, turn off the pressure washer, and relieve any remaining pressure in the system before disconnecting.
Maintenance
Regular maintenance ensures the longevity and optimal performance of your telescoping wand.
- Clean Nozzles: Periodically clean spray nozzles to remove any blockages. A clogged nozzle can cause pressure fluctuations and damage to your pressure washer.
- Inspect Connections: Regularly check all quick-connect fittings and threaded connections for wear, damage, or leaks. Replace O-rings or fittings as needed.
- Store Properly: After each use, drain all water from the wand and store it in a dry, protected area away from direct sunlight and freezing temperatures.
- Lubricate: Apply a small amount of silicone grease to O-rings and quick-connect fittings to ensure smooth operation and prevent wear.
Troubleshooting
| Problem | Possible Cause | Solution |
|---|---|---|
| No water flow or low pressure | Clogged nozzle Kinked hose Insufficient water supply to pressure washer | Clean or replace nozzle Straighten hose Ensure adequate water supply to pressure washer |
| Water leaking from connections | Loose connection Worn O-ring Damaged fitting | Tighten connections Replace O-ring Replace damaged fitting |
| Wand sections not locking securely | Adjustment locks not tightened Debris in locking mechanism | Ensure locks are fully tightened clockwise Clean locking mechanism |
| Difficulty controlling wand at full extension | Improper harness adjustment Lack of physical support | Adjust harness for better support and weight distribution Use caution and take breaks; consider a shorter length if control is an issue |
Specifications
| Feature | Specification |
|---|---|
| Model Number | QD-SSG02 |
| Adjustable Length | 5 to 24 feet |
| Maximum Pressure | 4000 PSI |
| Inlet Connection | 3/8'' Quick Plug, M22 Adapters |
| Item Weight | 12.06 pounds (5.47 kg) |
| Product Dimensions | 6.89 x 1.77 x 54.84 inches (collapsed) |
| Material | Lightweight Aluminum |
Warranty and Support
For warranty information or technical support, please refer to the official VEVOR website or contact VEVOR customer service directly. Keep your purchase receipt as proof of purchase.
VEVOR Official Website: www.vevor.com