1. Introduction
The Panasonic Lumix S9 is a compact and lightweight full-frame mirrorless camera designed for high-resolution photo and video capture. It features a 24.2MP full-frame sensor, offering professional image quality even in challenging lighting conditions. This camera integrates seamlessly with the Lumix Lab app for efficient file transfers and introduces Real-Time LUT functionality for in-camera creative control. This manual provides essential information for setting up, operating, and maintaining your Lumix S9 camera.

Figure 1.1: Panasonic Lumix S9 Mirrorless Camera and included accessories.
2. Package Contents
Verify that all the following items are included in your package:
- Panasonic Lumix S9 Mirrorless Camera (Red)
- Panasonic S 35mm f/1.8 Lens
- 2x 64 GB Memory Card
- 2x Rechargeable Battery
- 3-Piece Filter Kit
- Battery Charger
- Battery Pack
- Studio Software (Download Voucher/Key)
- Camera Case
- Lens Caps
- Hand Strap
- Adapter
- Cleaning Kit
- Flexible Tripod
- Card Reader
- Card Wallet
3. Camera Overview
Familiarize yourself with the main components of your Lumix S9 camera.
3.1 Front View
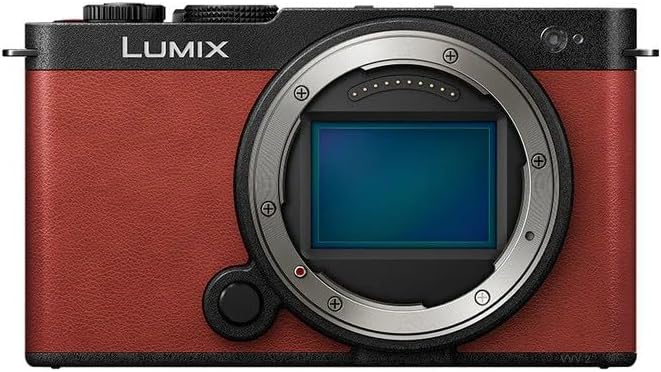
Figure 3.1: Front view of the Lumix S9 camera body, showing the L-mount lens mount and grip.
- Lens Mount: L-Mount for interchangeable lenses.
- Grip: Textured surface for secure handling.
- Focus Assist Lamp: Emits light to aid autofocus in low light.
3.2 Rear View
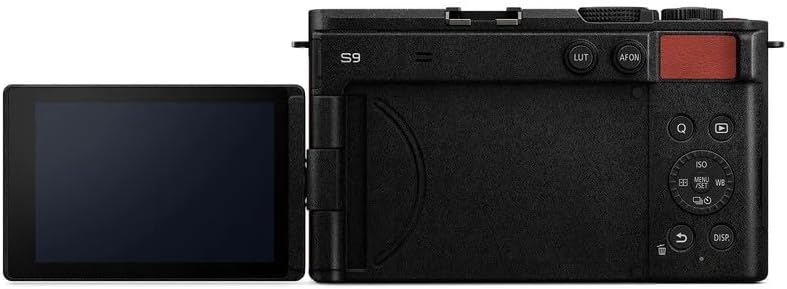
Figure 3.2: Rear view of the Lumix S9 camera, displaying the articulated LCD screen and control buttons.
- LCD Monitor: Articulated touchscreen for viewing and menu navigation.
- Control Dial: For adjusting settings.
- Buttons: Access to menu, playback, display, and custom functions.
- LUT Button: Dedicated button for Real-Time LUT application.
3.3 Side Views

Figure 3.3: Side view of the Lumix S9 camera, highlighting the HDMI and USB-C ports.

Figure 3.4: Opposite side view of the Lumix S9 camera, showing the memory card slot cover.
- HDMI Port: For connecting to external displays.
- USB-C Port: For charging, data transfer, and external device connection.
- Memory Card Slot: For inserting SD cards.
4. Setup
4.1 Charging the Battery
- Insert the rechargeable battery into the provided battery charger.
- Connect the charger to a power outlet. The charging indicator will illuminate.
- Charging is complete when the indicator light changes or turns off (refer to charger instructions for specific behavior).
4.2 Inserting the Battery and Memory Card
- Open the battery/memory card compartment cover on the camera.
- Insert the charged battery into the battery slot, ensuring correct orientation.
- Insert a 64 GB memory card (or other compatible SD card) into the memory card slot until it clicks into place.
- Close the compartment cover securely.
4.3 Attaching the Lens
- Remove the body cap from the camera and the rear lens cap from the Panasonic S 35mm f/1.8 lens.
- Align the white index mark on the lens with the white index mark on the camera's lens mount.
- Rotate the lens clockwise until it clicks into place.
- Remove the front lens cap.
5. Operating the Camera
5.1 Power On/Off
Press the power button located on the top of the camera to turn it on or off.
5.2 Basic Shooting
- Shooting Mode: Rotate the mode dial (if present, or access via menu) to select your desired shooting mode (e.g., Program AE, Aperture Priority, Shutter Priority, Manual).
- Focusing: The camera features subject detection autofocus. Half-press the shutter button to focus on your subject.
- Taking a Photo: Fully press the shutter button to capture an image.
5.3 Video Recording
To start video recording, press the dedicated video record button. Press it again to stop recording. The Lumix S9 supports MP4Lite video for fast uploads.
5.4 Lumix Lab App Connectivity
The Lumix S9 offers seamless connectivity with the Lumix Lab app on your smartphone for effortless file transfers and remote control.
- Download and install the Lumix Lab app on your smartphone.
- Enable Wi-Fi/Bluetooth on your camera and smartphone.
- Follow the in-app instructions to pair your camera with your smartphone.
- Once connected, you can transfer photos and videos or control the camera remotely.
5.5 Real-Time LUT Functionality
The camera allows you to apply custom Look Up Tables (LUTs) directly during shooting, providing a polished look without extensive post-processing.
- Create or import LUTs using the Lumix Lab app on your smartphone.
- Transfer the desired LUTs to your camera via the app.
- Press the dedicated LUT button on the camera to cycle through available LUTs or select one from the menu.
5.6 Creative Zoom Features
Utilize the S9's crop zoom and hybrid zoom features to extend focal lengths while maintaining image quality. These functions can be accessed and configured through the camera's menu system.
6. Advanced Features
- 24.2MP Full-Frame Sensor: Captures high-resolution images and videos with excellent detail and low-light performance.
- L-Mount Lens Compatibility: Compatible with over 80 L-mount lenses, offering extensive creative flexibility.
- 30 fps Pre-Burst Shooting: Captures images before and after the shutter is fully pressed, ideal for fast-moving subjects.
- Subject Detection Autofocus: Advanced autofocus system for accurate tracking of various subjects.
- Time-Lapse and Stop-Motion Animation: Built-in modes for creating dynamic visual content.
7. Maintenance
7.1 Cleaning the Camera Body
Wipe the camera body with a soft, dry cloth. For stubborn dirt, use a cloth lightly dampened with water and then dry thoroughly. Avoid using organic solvents or strong cleaning agents.
7.2 Cleaning the Lens
Use a lens blower to remove dust from the lens surface. For smudges, use a specialized lens cleaning solution and a microfiber lens cloth. Avoid touching the lens surface with your fingers.
7.3 Sensor Cleaning
If dust spots appear on your images, the camera sensor may need cleaning. It is recommended to have this service performed by an authorized Panasonic service center to prevent damage.
8. Troubleshooting
If you encounter issues with your camera, refer to the following common solutions:
- Camera does not power on: Ensure the battery is fully charged and correctly inserted.
- Cannot take photos: Check if a memory card is inserted and has sufficient free space. Ensure the lens is properly attached.
- Images are blurry: Verify that the lens is clean and properly focused. Check your shooting mode and shutter speed settings.
- Connectivity issues with Lumix Lab app: Ensure Wi-Fi/Bluetooth is enabled on both devices and that the app is updated to the latest version.
For more detailed troubleshooting or persistent issues, please consult the official Panasonic support website or contact customer service.
9. Specifications
| Product Dimensions | 1.8 x 5 x 2.9 inches |
| Item Weight | 5.94 pounds |
| Model Number | DC-S9GD-R |
| Manufacturer | Panasonic |
| Sensor Type | 24.2MP Full-Frame |
| Lens Mount | L-Mount |
| Connectivity | Lumix Lab App (Wi-Fi/Bluetooth) |
10. Warranty and Support
For information regarding your product's warranty, please refer to the warranty card included in your package or visit the official Panasonic website. For technical support, software updates, or service inquiries, please contact Panasonic customer support directly or visit their support portal online.
Panasonic Official Website: www.panasonic.com


