
CME U6MIDI Pro
CME U6MIDI Pro User Manual
Model: U6MIDI Pro
Brand: CME
Introduction
The CME U6MIDI Pro is an advanced 3-in-3-out MIDI interface designed for comprehensive MIDI routing, mapping, and filtering. This device, bundled with four 3-foot low-profile 5-pin DIN MIDI cables, offers seamless connectivity for a wide range of MIDI instruments and devices, including keyboards, synthesizers, controllers, and guitar pedals. It provides a robust solution for managing complex MIDI setups in both studio and live environments.
The U6MIDI Pro connects via a single USB-C port and is compatible with major operating systems, ensuring plug-and-play functionality. Its accompanying software tool allows for detailed configuration of MIDI messages, enabling users to customize their workflow with precision.
Package Contents
- 1 x CME U6MIDI Pro MIDI Interface
- 4 x 3-FT (90cm) 5-pin DIN Low-Profile MIDI Cables
- 1 x USB-C to USB-A Cable
- User Manual (this document)

Image: The CME U6MIDI Pro MIDI interface shown with the included four 3-foot MIDI cables.
Product Overview
The U6MIDI Pro features a compact design with multiple MIDI input and output ports, along with a USB-C connection for power and data transfer. Indicator lights on the device provide visual feedback on MIDI activity.

Image: A top-down, angled view of the CME U6MIDI Pro, highlighting its USB port, MIDI In (IN 1, IN 2, IN 3) and MIDI Out (OUT 1, OUT 2, OUT 3) ports, and status indicators.
Key Features:
- 3-in-3-out MIDI Interface: Provides three MIDI input and three MIDI output ports for versatile connectivity.
- MIDI Router, Mapper & Filter: Advanced capabilities for managing MIDI data flow.
- USB-C Connectivity: Single cable for power and data, compatible with USB-A via included adapter.
- Wide OS Compatibility: Supports macOS, iOS, Windows, Android, Linux, and Chrome OS.
- Plug-and-Play: No drivers typically required for basic functionality.
- UxMIDI Tools Software: Free software for advanced configuration (Windows/Mac).
Setup
1. Connecting the U6MIDI Pro
- Connect the provided USB-C to USB-A cable to the USB-C port on the U6MIDI Pro.
- Plug the USB-A end of the cable into an available USB port on your computer (PC, Mac, Linux) or compatible mobile device (iOS, Android, Chrome OS).
- Connect your MIDI instruments and devices to the U6MIDI Pro using the 5-pin DIN MIDI cables.
- Connect MIDI OUT from your instrument to a MIDI IN port (IN 1, IN 2, or IN 3) on the U6MIDI Pro.
- Connect MIDI IN on your instrument to a MIDI OUT port (OUT 1, OUT 2, or OUT 3) on the U6MIDI Pro.
- The U6MIDI Pro also features a MIDI THRU port for direct signal pass-through.

Image: A close-up showing the 5-pin DIN MIDI In, Thru, and Out ports, indicating compatibility with standard MIDI connections.
2. System Compatibility
The U6MIDI Pro is designed for broad compatibility and operates as a class-compliant USB MIDI device. This means it generally does not require specific drivers to be installed on most modern operating systems.
- Supported Operating Systems: macOS, iOS, Windows, Android, Linux, Chrome OS.
- Ensure your operating system is up-to-date for optimal performance.

Image: Visual representation of the U6MIDI Pro's compatibility across different operating systems and device types, including laptops, tablets, and desktops running music production software.
3. Software Installation (UxMIDI Tools)
For advanced MIDI routing, filtering, and mapping functionalities, download and install the free UxMIDI Tools software. This software is available for Windows and macOS.
- Visit the official CME website to download the latest version of UxMIDI Tools.
- Follow the on-screen instructions to complete the installation.
- Once installed, launch the UxMIDI Tools application to configure your U6MIDI Pro.

Image: A graphic illustrating the availability and features of the UxMIDI Tools software, emphasizing free download and its capabilities for MIDI routing and filtering on macOS and Windows.
Operating Instructions
1. MIDI Routing (Thru / Split / Merge)
The UxMIDI Tools software provides a graphical interface to configure MIDI routing. You can easily set up MIDI Thru, Split, or Merge configurations to direct MIDI data as needed.
- Open the UxMIDI Tools application.
- Navigate to the "MIDI Routing" tab.
- Drag and drop connections between MIDI inputs and outputs to create your desired routing paths.
- The software allows for complex routing scenarios, including sending one input to multiple outputs (split) or combining multiple inputs to one output (merge).
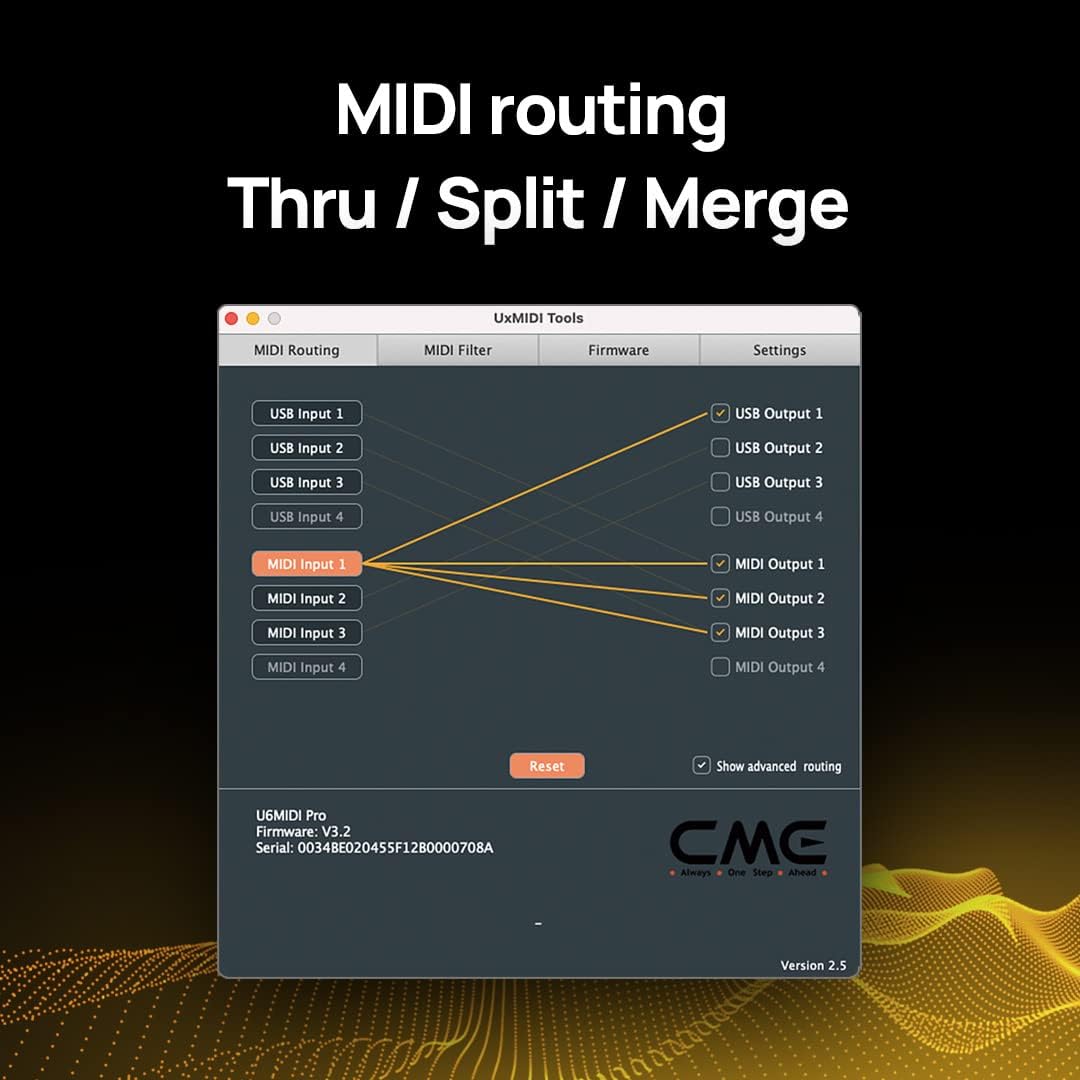
Image: A screenshot of the UxMIDI Tools software interface, specifically the MIDI Routing section, demonstrating how MIDI inputs can be routed to various USB and MIDI outputs for Thru, Split, or Merge operations.
2. MIDI Filtering
The MIDI Filter function in UxMIDI Tools allows you to block or pass specific MIDI messages. This is useful for preventing unwanted data from reaching certain devices or for optimizing MIDI traffic.
- In UxMIDI Tools, go to the "MIDI Filter" tab.
- Select the MIDI input you wish to filter.
- Check or uncheck the boxes next to different MIDI message types (e.g., Note Off, Note On, Control Change, Pitch Bend, Clock, Start, Stop) to enable or disable them.
- You can filter messages by channel or common/realtime types.

Image: A screenshot of the UxMIDI Tools software interface, specifically the MIDI Filter section, showing options to enable or disable various MIDI messages like Note On/Off, Control Change, Clock, and System Reset for a selected MIDI input.
Specifications
| Feature | Description |
|---|---|
| Model | U6MIDI Pro |
| MIDI Ports | 3 x MIDI In, 3 x MIDI Out (5-pin DIN) |
| Connectivity | USB-C (USB-A compatible via included cable) |
| Operating System Compatibility | macOS, iOS, Windows, Android, Linux, Chrome OS |
| Included Cables | 4 x 3-FT (90cm) 5-pin DIN MIDI Cables, 1 x USB-C to USB-A Cable |
| Functions | MIDI Router, Mapper, Filter |
| Software | UxMIDI Tools (Free download for Windows/Mac) |
| Compatible Devices | Keyboards, Synthesizers, Controllers, Guitar Pedals, Personal Computers |
Troubleshooting
Common Issues and Solutions:
- No MIDI Signal Detected:
- Ensure the U6MIDI Pro is properly connected to your computer via USB and powered on.
- Verify that MIDI cables are correctly connected (MIDI OUT to MIDI IN, and MIDI IN to MIDI OUT).
- Check your DAW or music software settings to ensure the U6MIDI Pro is selected as a MIDI input/output device.
- If using UxMIDI Tools, ensure no filters are blocking the desired MIDI messages.
- Intermittent MIDI Connection:
- Try a different USB port on your computer.
- Ensure the USB cable is securely connected and not damaged.
- Avoid connecting the U6MIDI Pro through unpowered USB hubs.
- UxMIDI Tools Software Not Recognizing Device:
- Close and reopen the UxMIDI Tools application.
- Disconnect and reconnect the U6MIDI Pro from your computer.
- Ensure you have the latest version of UxMIDI Tools installed from the official CME website.
- Restart your computer.
- MIDI Latency Issues:
- Reduce the audio buffer size in your DAW settings (if applicable).
- Ensure your computer meets the minimum system requirements for your music software.
- Close unnecessary background applications.
Maintenance
- Cleaning: Use a soft, dry cloth to clean the exterior of the U6MIDI Pro. Do not use liquid cleaners or abrasive materials.
- Storage: Store the device in a cool, dry place away from direct sunlight and extreme temperatures.
- Handling: Avoid dropping the device or subjecting it to strong impacts. Do not attempt to disassemble the unit, as this will void the warranty.
- Cable Care: Handle MIDI and USB cables by the connectors, not the cable itself, to prevent damage. Avoid sharp bends or kinks in the cables.
Warranty and Support
CME products are designed for reliability and performance. For specific warranty terms and conditions, please refer to the warranty information provided with your purchase or visit the official CME website.
Customer Support:
If you encounter any issues or have questions regarding your CME U6MIDI Pro, please contact CME customer support. Support information can typically be found on the official CME website or within your product packaging.
- Online Resources: Check the CME website for FAQs, software updates, and additional documentation.
- Contact Information: Refer to the "Contact Us" section on the CME website for email or phone support options.
Please have your product model (U6MIDI Pro) and purchase details ready when contacting support.
Related documentsU6MIDI Pro


Ask a question about this manual
Ask about setup, troubleshooting, compatibility, parts, safety, or missing instructions. Manuals+ will review the question and use this page’s manual context to help answer it.