
1. Introduction
This manual provides essential instructions for the installation, operation, and maintenance of your AZZUNO U-Groove Wire Feed Drive Roller Rolls. These drive rolls are specifically designed for feeding aluminum MIG welding wire in compatible AZZUNO MIG welders. Proper installation and maintenance ensure optimal performance and longevity of your welding equipment.
2. Package Contents
Verify that all items are present in the package:
- One (1) U-Groove Wire Feed Drive Roll: .035"/.040" (0.9mm/1.0mm)
- One (1) U-Groove Wire Feed Drive Roll: .040"/.047" (1.0mm/1.2mm)
Note: The package includes two drive rolls with different groove sizes to accommodate various aluminum wire diameters.
3. Compatibility
These U-Groove drive rolls are compatible with the following AZZUNO MIG welding machines:
- AZZUNO MIG-200PRO
- AZZUNO MIG-250F
- AZZUNO MF-200PRO
- AZZUNO MIG-200L
- AZZUNO MF-200L
- And other compatible AZZUNO models.
These rolls are specifically designed for feeding aluminum MIG welding wire due to their U-groove design, which prevents deformation of softer aluminum wire.
4. Specifications
| Feature | Detail |
|---|---|
| Material | Premium-grade Steel |
| Outer Diameter (OD) | 30 mm (1.2 inches) |
| Inner Diameter (ID) | 10 mm (0.4 inches) |
| Roller Thickness | 10 mm (0.4 inches) |
| Groove Sizes | .035"/.040" (0.9mm/1.0mm) U-Groove and .040"/.047" (1.0mm/1.2mm) U-Groove |
| Wire Type | Aluminum MIG Welding Wire |
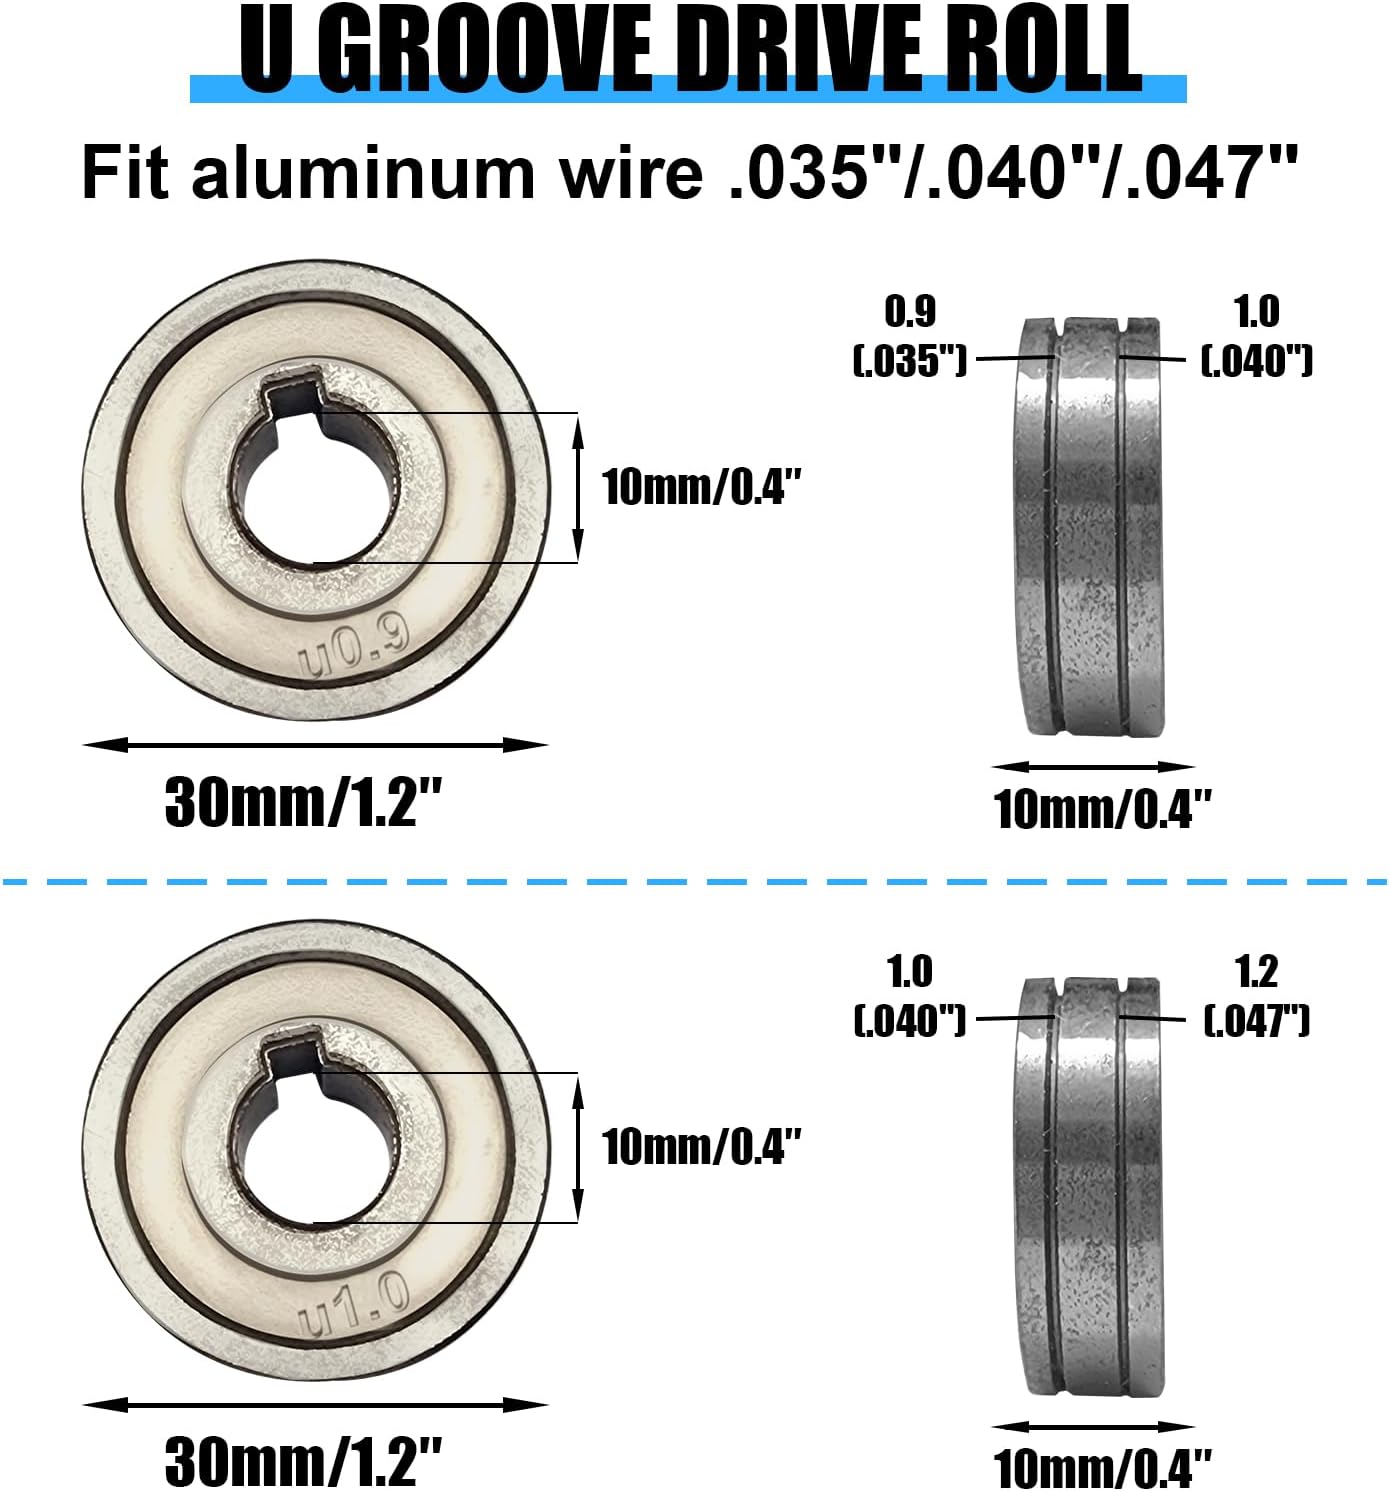
Figure 1: Detailed dimensions of the U-Groove drive rolls, showing 30mm OD, 10mm ID, and groove sizes for 0.9mm/1.0mm and 1.0mm/1.2mm wire.
5. Setup and Installation
Always ensure the welding machine is powered off and unplugged before performing any maintenance or component changes. Refer to your specific AZZUNO welder's manual for detailed safety precautions and wire feeder assembly instructions.
Replacing the Drive Roll:
- Power Off: Disconnect the welding machine from the power supply.
- Access Wire Feeder: Open the wire feeder compartment door on your welding machine.
- Release Tension: Loosen the tension arm or mechanism that holds the drive roll in place. This will allow the existing drive roll to be removed.
- Remove Old Roll: Carefully slide the old drive roll off its shaft. Note its orientation for reference.
- Select New Roll: Choose the appropriate U-Groove drive roll from the package based on the diameter of your aluminum welding wire. The groove size is typically marked on the side of the roll (e.g., U0.9/1.0 for .035"/.040" wire, U1.0/1.2 for .040"/.047" wire).
- Install New Roll: Slide the selected U-Groove drive roll onto the shaft, ensuring the correct groove size faces the wire path. The keyway on the drive roll should align with the key on the shaft.
- Adjust Tension: Re-engage the tension arm and adjust the tension. For aluminum wire, use minimal tension to prevent wire deformation, but enough to ensure consistent feeding. Too much tension can crush the soft aluminum wire.
- Close Compartment: Close the wire feeder compartment door.

Figure 2: The two U-Groove drive rolls included in the package, ready for installation into a compatible AZZUNO MIG welder's wire feeder.
6. Operating Instructions
Once the U-Groove drive roll is installed, ensure the following for optimal aluminum wire feeding:
- Wire Selection: Always use the correct diameter aluminum welding wire that matches the selected groove on your drive roll.
- Tension Setting: Set the wire feeder tension to the lowest possible setting that still allows for consistent wire feeding without slipping. Excessive tension can deform aluminum wire, leading to feeding issues.
- Liner Type: For aluminum wire, it is highly recommended to use a Teflon or nylon liner in your MIG gun to reduce friction and prevent wire shaving.
- Contact Tip: Use an aluminum-specific contact tip that is slightly oversized for the wire diameter to prevent sticking and ensure smooth feeding.
7. Maintenance
Regular maintenance of your drive rolls will extend their lifespan and ensure consistent wire feeding performance.
- Inspection: Periodically inspect the U-grooves for wear, debris, or damage. Worn grooves can lead to inconsistent wire feeding.
- Cleaning: Use a stiff brush or compressed air to remove any accumulated wire shavings, dust, or debris from the grooves and the drive roll assembly. Ensure the welding machine is unplugged before cleaning.
- Replacement: Replace drive rolls if they show significant wear, pitting, or damage that affects wire feeding.
8. Troubleshooting
If you experience issues with wire feeding, consider the following common problems and solutions:
| Problem | Possible Cause | Solution |
|---|---|---|
| Inconsistent Wire Feed | Incorrect drive roll tension (too loose or too tight), worn drive roll grooves, incorrect groove size for wire, dirty drive rolls, incorrect liner. | Adjust tension, inspect/clean/replace drive rolls, ensure correct groove size, check/replace liner. |
| Wire Birdnesting/Tangling | Excessive drive roll tension, worn contact tip, kinked liner, spool brake too loose. | Reduce drive roll tension, replace contact tip, inspect/replace liner, adjust spool brake. |
| Wire Shaving/Deformation | Excessive drive roll tension, incorrect drive roll type (e.g., V-groove for aluminum), dirty grooves. | Reduce drive roll tension, ensure U-groove rolls are used for aluminum, clean grooves. |
9. Warranty and Support
For specific warranty information regarding your AZZUNO Mig Welder Wire Feed Drive Roller Rolls, please refer to the documentation provided with your original welding machine or contact AZZUNO customer support directly.
If you require further assistance or have questions not covered in this manual, please visit the official AZZUNO website or contact their customer service department. When contacting support, please have your product model information ready.
AZZUNO Customer Support: Visit AZZUNO Store on Amazon


