Introduction
The Godox V100N is a high-performance TTL Li-ion round head camera flash designed for Nikon cameras. It offers advanced features such as 100Ws power output, high-speed sync up to 1/8000s, a responsive touchscreen interface, and a detachable sub-flash for versatile lighting control. This manual provides detailed instructions for setup, operation, and maintenance to ensure optimal performance and longevity of your flash unit.

Image: The Godox V100N flash highlighting its 100Ws power capability.
Key Features
- 100Ws Power Output: Delivers robust flash power with adjustable steps from 1/1 to 1/256 or 2.0 to 10.
- High-Speed Sync (HSS): Supports shutter speeds up to 1/8000s for versatile shooting scenarios.
- Intuitive Touchscreen Control: Features a 2.3-inch full-color, high-sensitivity touchscreen for easy adjustments.
- Detachable Sub-Flash (SU-1): Enables dual-light setups for enhanced creative lighting.
- Built-in 2.4G Wireless X System: Functions as both a master and receiver unit for seamless multi-flash setups.
- LED Modeling Lamp: Integrated 2W LED modeling lamp with 10 adjustable levels for previewing light effects.
- High-Performance Lithium Battery: Provides up to 400 full-power flashes with Type-C charging.
- Removable Red Plastic Ring: Allows for customization with standard universal iron or magnetic rings (sold separately).
What's in the Box

Image: All components included in the Godox V100N package.
- 1x V100 NU Flash Body
- 1x Storage Bag
- 1x Lithium Battery
- 1x Adapter
- 1x Mini Stand
- 1x USB-C Charging Cable
- 1x LETWING Cloth
Setup
1. Installing the Flash on Your Camera
- Press the hot shoe lock button on the flash.
- Slide the flash into your camera's hot shoe.
- Rotate the lock mechanism to the right to secure the flash in place.
Video: A short installation guide for the Godox V100 flash. Note: This is a 7-second preview video.
2. Battery Installation and Charging
- Insert the provided lithium battery into the battery compartment according to the indicated direction until it clicks into place.
- Charge the battery using the supplied USB-C charging cable or the optional VC26T charger.
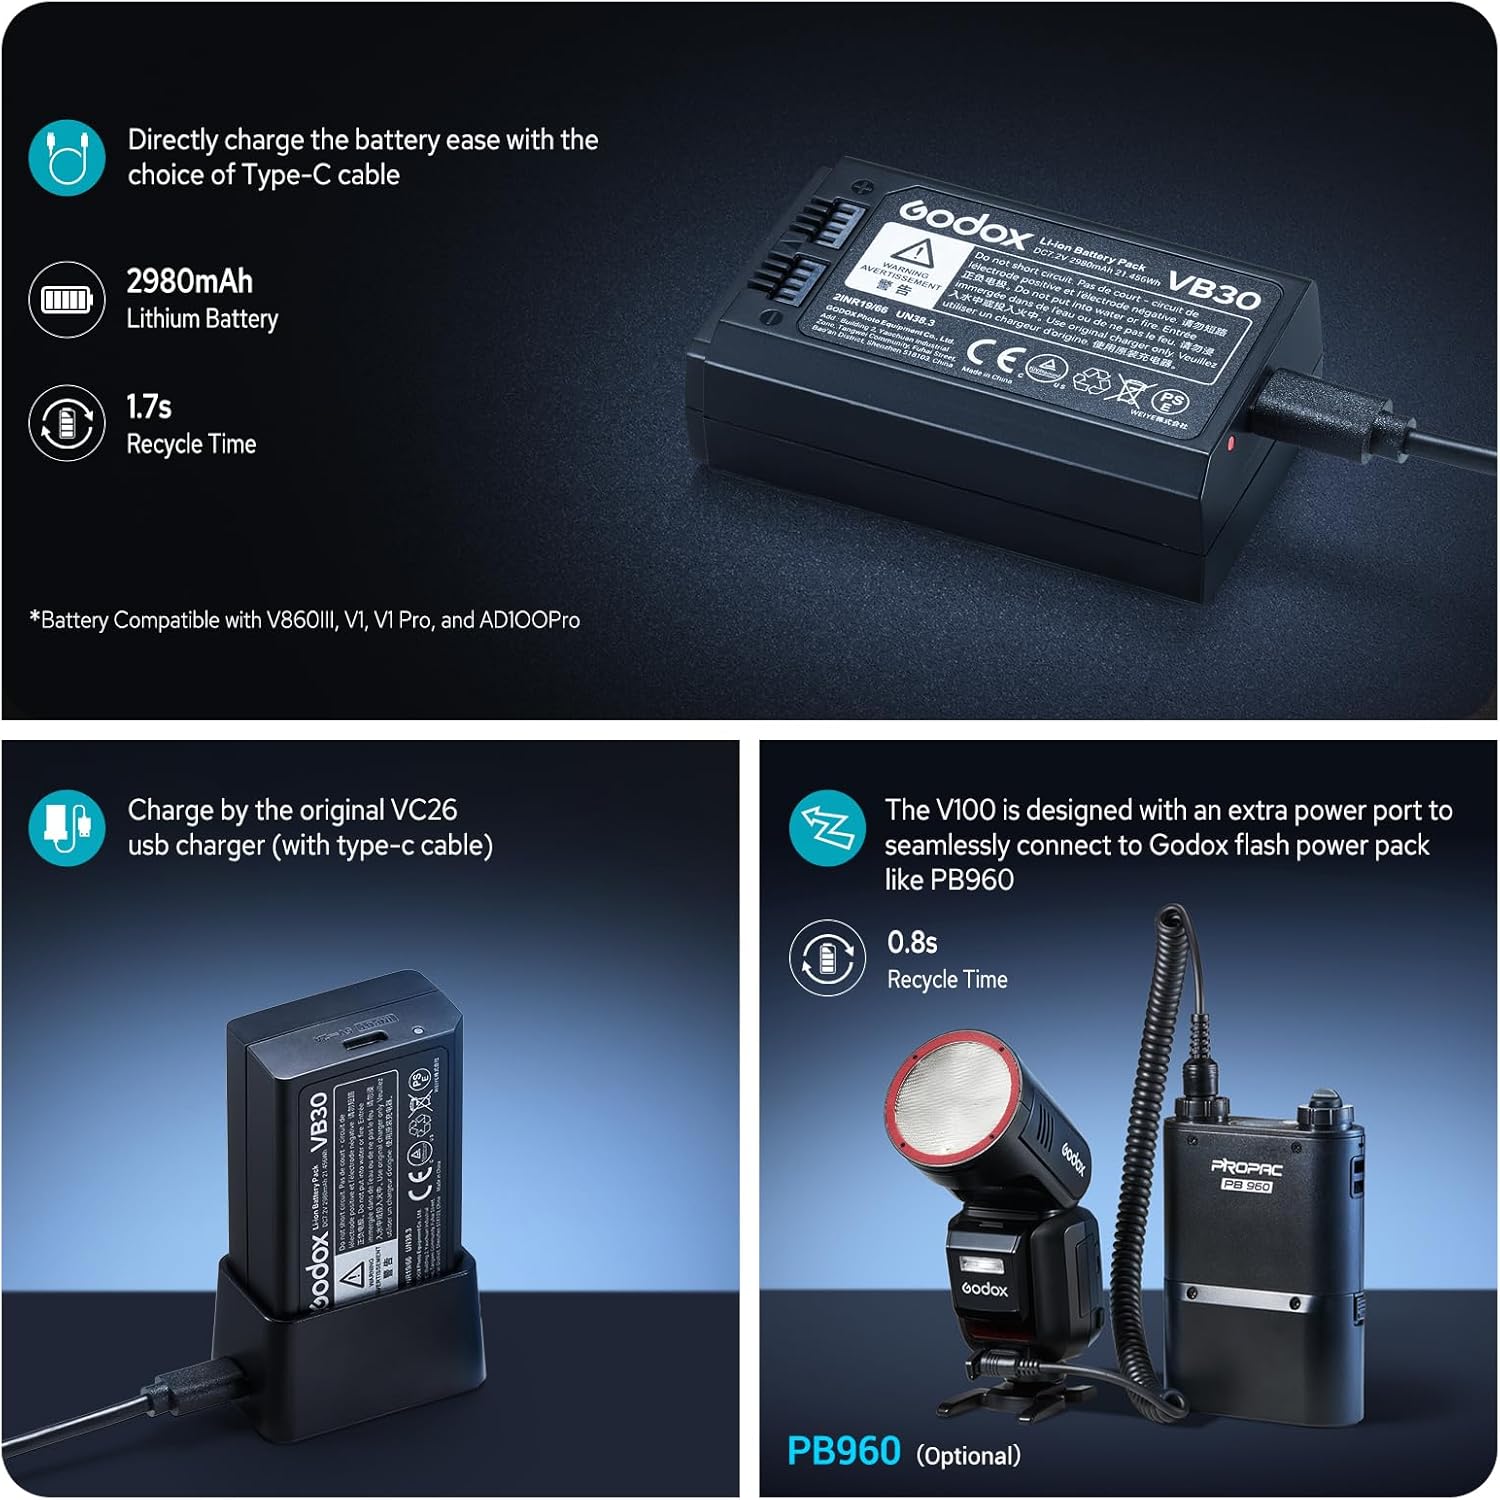
Image: The V100N's high-performance lithium battery and charging methods.
3. Attaching the Detachable Sub-Flash (SU-1)
Align the detachable sub-flash with the designated slot on the main flash unit and press it firmly until it clicks into place. This enables dual-light setups for enhanced creative control.

Image: Demonstrates the use of the detachable sub-flash for bounce lighting.
Operating the Flash
1. Power On and Basic Controls
- Press and hold the power button until the screen illuminates.
- Rotate the dial clockwise to unlock the screen and access the main interface.
- The 2.3-inch full-color touchscreen allows for intuitive navigation. Swipe right for mode selection and left to return. Swipe down for additional functions and up to return.

Image: Close-up of the Godox V100N's intuitive touchscreen for effortless control.
2. Flash Modes and Adjustments
- TTL Mode: For automatic exposure. Adjust exposure compensation by tapping the +/- icons or pulling the progress bar.
- Manual Mode (M): Adjust flash power from 1/1 to 1/256. Tap the +/- icons or pull the progress bar for precise adjustments. The dial can also be used for quick power changes.
- Multi-Flash Mode: For stroboscopic effects.
Video: Detailed operation tutorial for the Godox V100 flash, covering various modes and settings.
3. Wireless Control (2.4G Wireless X System)
The V100N can function as both a master (sender) and receiver unit. Its one-tap pairing capability seamlessly integrates with the X3 trigger or other Godox flash units.
- Sender Mode: Set the flash as a master to control other Godox flashes. Adjust group settings (A, B, C, D, E) and flash modes (M/TTL/OFF).
- Receiver Mode: Set the flash as a slave unit to be triggered by a master flash or X3 trigger.
- Channel and ID: Ensure the master and receiver units are set to the same channel and ID for proper communication.

Image: Diagram illustrating the Godox 2.4G Wireless X System for multi-flash setups.
4. Modeling Lamp
The built-in 2W LED modeling lamp has 10 adjustable levels. It can be set to continuous mode (stays on) or interrupt mode (turns off when flash fires).

Image: Demonstrates the i-TTL auto flash function and the 10-level adjustable LED modeling lamp.
5. Zoom Function
The flash zoom can be adjusted manually or automatically based on the lens focal length. The flash head can also be rotated vertically (-7° to 120°) and horizontally (0° to 330°) for bounce and creative lighting.

Image: Illustrates the vertical and horizontal rotation capabilities of the flash head, along with global shutter sync examples.
Maintenance
- Keep the device dry. Do not handle with wet hands or immerse in water.
- Clean the flash regularly with a soft, dry cloth. Avoid using harsh chemicals or abrasive cleaners.
- Store the flash in a cool, dry place away from direct sunlight and extreme temperatures.
- When replacing parts, ensure they meet relevant quality standards to maintain functionality and safety.
Troubleshooting
Flash Not Firing
- Check battery level and ensure it is properly inserted and charged.
- Verify the flash is securely mounted on the camera's hot shoe.
- Ensure the flash is powered on and not in standby mode.
- If using wireless mode, confirm that the master and receiver units are on the same channel and ID.
Incorrect Exposure
- In TTL mode, adjust the exposure compensation.
- In Manual mode, adjust the flash power output.
- Check the flash focal length setting to ensure it matches your lens.
Resetting to Factory Defaults
If you encounter persistent issues, you can reset the flash parameters to default settings. Long-press the second and third buttons simultaneously until "RESET" appears on the display.
Specifications
| Feature | Detail |
|---|---|
| Brand | GODOX |
| Model Number | V100NU for Nikon |
| Power Output | 100Ws (1/1 output) |
| Flash Sync Speed | 1/8000s (HSS) |
| Battery Type | Lithium Battery (12V, included) |
| Full Power Flashes | Approx. 400 |
| Recycle Time | 1.7s |
| Display | 2.3" Full-color Touchscreen |
| Wireless System | Godox 2.4G Wireless X System |
| Modeling Lamp | 2W LED with 10 adjustable levels |
| Item Weight | 2.51 pounds |
| Package Dimensions | 9.49 x 8.15 x 4.06 inches |
Warranty and Support
For warranty information and technical support, please refer to the official Godox website or contact your authorized dealer. Keep your purchase receipt as proof of purchase for any warranty claims.
Online Resources:
- Visit the GODOX Store on Amazon for product information and accessories.


