1. Introduction
The Metravi PRO 475 is a versatile 4-in-1 instrument combining a True RMS Clamp Meter, Multimeter, Oscilloscope, and Datalogger. This device is designed for comprehensive electrical measurement and analysis, offering real-time waveform visualization and data recording capabilities. It is suitable for various applications including industrial maintenance, automotive systems, and renewable energy.
This manual provides essential information for the safe and effective operation, setup, and maintenance of your Metravi PRO 475 instrument.
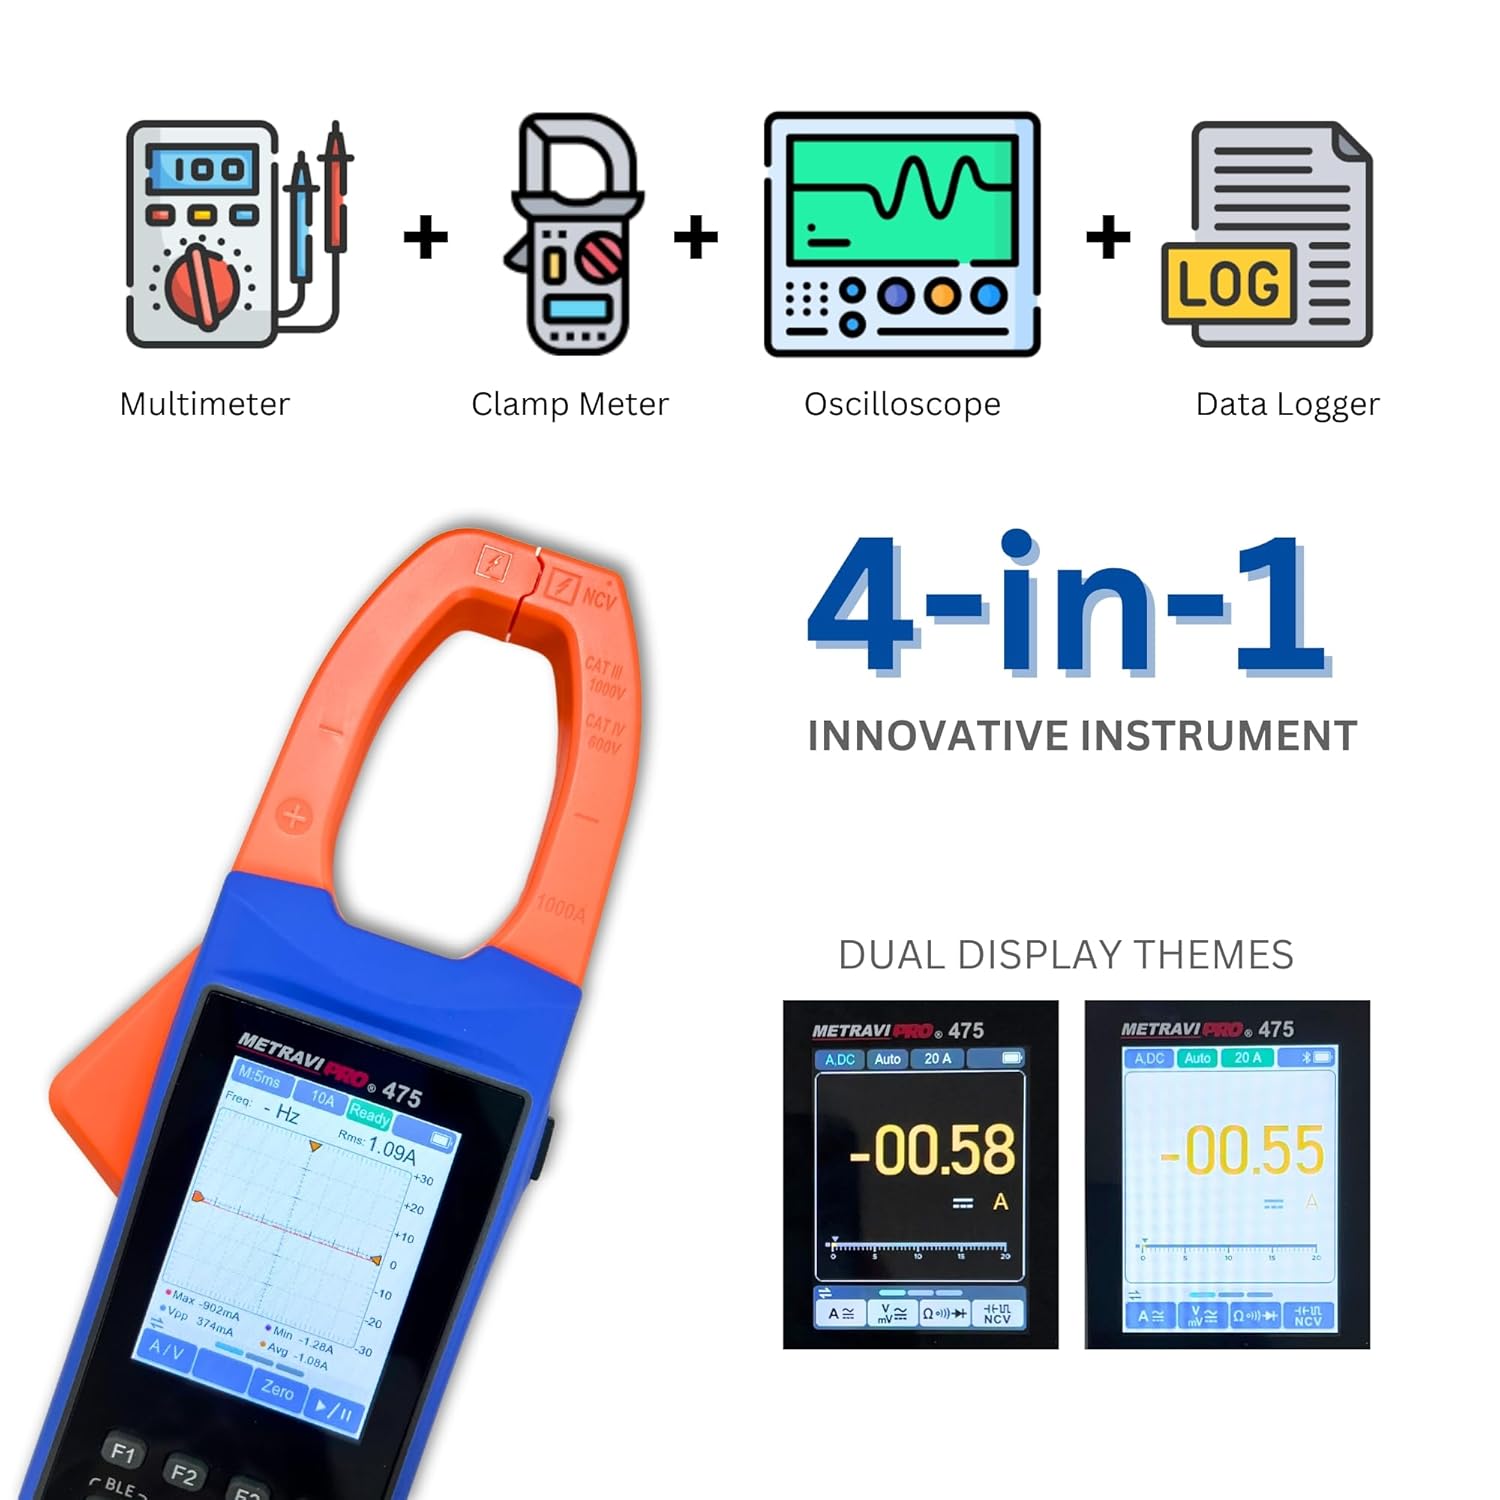
Image 1.1: The Metravi PRO 475 combines four essential electrical testing functions into one device.
2. Safety Information
Always adhere to safety precautions when using electrical testing equipment. Failure to do so may result in injury or damage to the instrument.
- CAT III 1000V, CAT IV 600V: This instrument is rated for CAT III 1000V and CAT IV 600V. Ensure the measurement category and voltage rating are appropriate for the circuit being tested.
- Do not use the meter if it appears damaged or if the test leads are compromised.
- Do not apply more than the rated voltage between terminals or between any terminal and earth ground.
- Use caution when working with voltages above 30V AC RMS, 42V peak, or 60V DC. These voltages pose a shock hazard.
- Always disconnect the test leads from the circuit before changing functions or ranges.
- Ensure the battery compartment is securely closed before operation.
- Do not operate the meter in explosive gas, vapor, or dust environments.
3. Package Contents
Verify that all items are present in the package upon unboxing:
- Metravi PRO 475 Clamp Meter
- Test Leads (Red and Black)
- User Manual
- Rechargeable Battery (pre-installed or separate)
- Carrying Case
- USB Cable
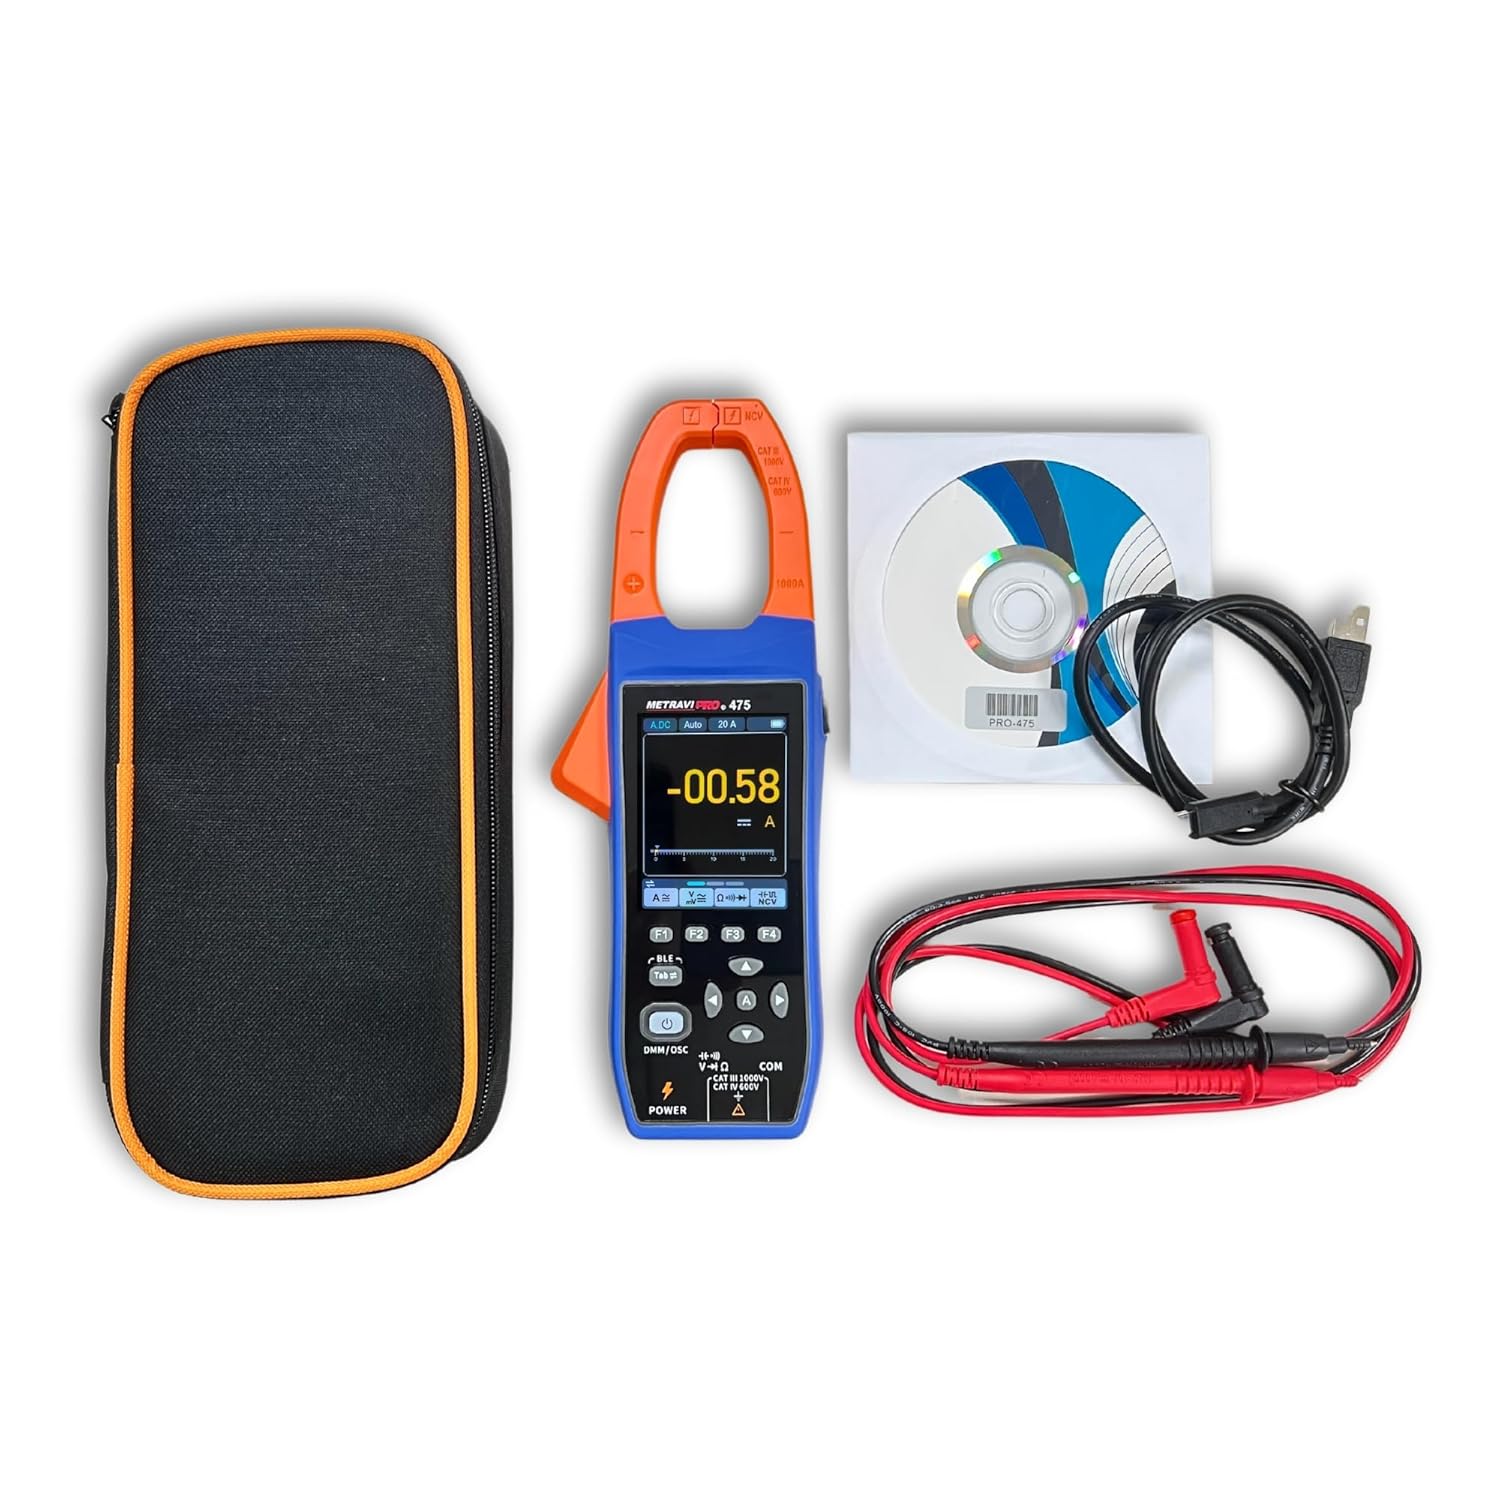
Image 3.1: Included components with the Metravi PRO 475.
4. Product Features and Design
The Metravi PRO 475 is engineered with user convenience and robust performance in mind.
- Multi-functional Usage: Combines TRMS Clamp Meter, Multimeter, Oscilloscope, and Data Recorder functions.
- High Accuracy: Ensures precise readings across various measurements.
- Easy-to-Read Display: Features a 2.8-inch color IPS LCD with dual themes and backlight for clear viewing of results and waveforms.
- Narrow-edge Jaw Opening: A 38mm elongated jaw opening design facilitates measurements in confined spaces and on large wire diameters.
- Robust Input Protection: Comprehensive protection for device and user safety.
- User-Friendly Interface: Intuitive design with simple button layout.
- Bluetooth & Smartphone App: Enables automatic recording, trend visualization, and data sharing in CSV format.
- Rechargeable Battery: Powered by a 3.7V rechargeable Li-ion battery for long-term operation.
- Durable Construction: Full membrane silicone buttons and ABS rubber coating design provide comfortable feel, anti-slip grip, and drop resistance.

Image 4.1: Design features including rechargeable battery, silicone buttons, and durable ABS coating.

Image 4.2: The 38mm jaw opening for versatile measurements.
5. Setup
5.1 Battery Installation and Charging
The Metravi PRO 475 uses a 3.7V rechargeable Li-ion battery. Ensure the battery is charged before first use.
- Locate the battery compartment on the rear of the device.
- If not pre-installed, insert the rechargeable Li-ion battery, observing correct polarity.
- Close the battery compartment securely.
- Connect the provided USB cable to the meter's charging port and to a suitable USB power adapter (not included) or computer USB port to charge the battery. The charging indicator will show the charging status.
5.2 Connecting Test Leads
For Multimeter and Oscilloscope voltage measurements, connect the test leads.
- Insert the black test lead into the 'COM' (common) input jack.
- Insert the red test lead into the 'V-Ω-Hz' input jack for voltage, resistance, frequency, capacitance, diode, and continuity measurements.
6. Operating Instructions
6.1 Power On/Off and Mode Switching

Image 6.1: Key operating controls of the Metravi PRO 475.
- Power On: Short press the POWER button (labeled DMM/OSC).
- Power Off: Long press the POWER button.
- Switch Modes: After turning on, short press the POWER button to switch between Multimeter (DMM) and Oscilloscope (OSC) modes.
6.2 Multimeter (DMM) Mode Operations
In DMM mode, the device functions as a traditional multimeter.
- Function Selection: Use the function buttons (F1, F2, F3, F4) and the navigation buttons (up/down/left/right) to select desired measurement parameters (e.g., AC/DC Voltage, Resistance, Capacitance, Frequency, Diode, Continuity).
- Auto-Ranging: Press the A button to restore auto-ranging if manual ranging was selected.
- Data Hold: Press the HOLD button to freeze the current reading on the display. Press again to release.
- Zero Function: Use the ZERO button to zero out readings, particularly useful for resistance or capacitance measurements to compensate for lead resistance.
- NCV (Non-Contact Voltage) Detection: Activate the NCV function and bring the top of the clamp meter near an AC voltage source. The meter will indicate the presence of AC voltage without direct contact.
6.3 Oscilloscope (OSC) Mode Operations
In OSC mode, the device displays real-time waveforms.

Image 6.2: Waveform analysis in Oscilloscope mode.
- Waveform Display: The screen will show the real-time waveform of the measured signal.
- Auto Setup: Press the A button for automatic setup of the oscilloscope display parameters.
- Run/Stop: Press the HOLD button to pause or resume waveform acquisition.
- Trigger Mode: Select trigger modes (Auto, Normal, Single) and trigger types (Rise, Fall) using the function buttons to stabilize the waveform display.
- Measurement Values: The display provides key waveform parameters such as RMS, Frequency, Max, Min, Peak-to-Peak (PK-PK), and Average values.
6.4 Clamp Meter Operations (Current Measurement)
Use the clamp jaw for non-contact current measurements.
- Select the appropriate AC or DC current range.
- Open the clamp jaw by pressing the trigger.
- Encircle a single conductor with the clamp jaw. Ensure the jaw is fully closed.
- Read the current value on the display.
- Inrush Current: The meter can measure inrush current. Select the inrush function and clamp around the conductor of the equipment being started.

Image 6.3: Performing a current measurement with the clamp jaw.
6.5 Datalogger Function and Bluetooth Connectivity
The built-in datalogger allows for recording and analysis of measurement data.

Image 6.4: The recorder function and smartphone app interface.
- Bluetooth Pairing: Enable Bluetooth on your smartphone and on the Metravi PRO 475. Open the dedicated smartphone app (available for download) and follow the app's instructions to pair with the device.
- Record Function: Use the app to initiate and manage data recording. The meter will automatically record measurement values.
- Trend Analysis: The app displays recorded data in graphs, allowing for visualization of trends over time.
- Data Sharing: Recorded data can be shared in CSV format for further analysis on a computer.
- Recall Function: The meter also has an internal recall function to review previously recorded data directly on the device.
7. Maintenance
7.1 Cleaning
- Wipe the meter with a damp cloth and mild detergent. Do not use abrasives or solvents.
- Ensure the meter is completely dry before use.
7.2 Battery Care
- Recharge the battery when the low battery indicator appears.
- For long-term storage, charge the battery to approximately 50% and store the device in a cool, dry place.
7.3 Storage
- Store the meter in its carrying case when not in use to protect it from dust and physical damage.
- Avoid storing the meter in areas of high temperature, humidity, or direct sunlight.
8. Troubleshooting
If you encounter issues with your Metravi PRO 475, refer to the following common problems and solutions:
| Problem | Possible Cause | Solution |
|---|---|---|
| Meter does not power on. | Low or discharged battery. | Charge the battery using the USB cable. |
| Incorrect readings in DMM mode. | Incorrect function/range selected; poor test lead connection. | Verify function and range. Ensure test leads are securely connected and making good contact with the circuit. |
| No waveform displayed in OSC mode. | No signal input; incorrect trigger settings; waveform too small/large. | Ensure signal is present. Use 'Auto Setup' button. Adjust sensitivity (V/div) and time base (s/div) settings. Check trigger level. |
| Bluetooth connection issues. | Bluetooth not enabled on meter/phone; app not running; interference. | Ensure Bluetooth is active on both devices. Restart the app and meter. Move closer to the meter. |
| Clamp jaw not closing properly. | Obstruction in the jaw mechanism. | Inspect the jaw for any debris and clear it. Do not force the jaw. |
If the problem persists, contact customer support.
9. Specifications
| Parameter | Specification |
|---|---|
| Display | 2.8 inch Colour IPS LCD with Dual Theme, Backlight |
| Readings | 2,000 / 20,000 Counts (3 1/2 & 4 1/2 digits) |
| Jaw Opening | 38mm |
| DC Current Range | 0-20.00A / 200.0A / 1000A (Accuracy: ± (2.0% + 5 dig)) |
| AC Current Range | 0-20.00A / 200.0A / 1000A (Accuracy: ± (2.5% + 5 dig)) |
| DC Voltage Range | 0-20.000mV / 200.00mV / 2.0000V / 20.000V / 200.00V / 1000V (Accuracy: ± (0.1% + 5 dig)) |
| AC Voltage Range | 0-200.00mV / 2.0000V / 20.000V / 200.00V / 1000V (Accuracy: ± (0.6% + 10 dig)) |
| Inrush Current Range | 20.00A / 200.0A / 1000A (Accuracy: ± (10.0% + 10 dig)) |
| Resistance Range | 0-200.00Ω / 2.0000kΩ / 20.000kΩ / 200.00kΩ / 2.0000MΩ / 20.000MΩ / 100.00MΩ (Accuracy: ± (0.3% + 10 dig)) |
| Capacitance Range | 0-2.000nF / 20.00nF / 200.0nF / 2.000µF / 20.00µF / 200.0µF / 2.000mF / 20.00mF (Accuracy: ± (3.0% + 10 dig)) |
| Frequency Range | 0-200.00Hz / 2.0000kHz / 20.000kHz / 200.00kHz / 2.0000MHz / 20.000MHz (Accuracy: ± (0.1% + 5 dig)) |
| Oscilloscope Bandwidth | Voltage 1MHz, Current 1kHz |
| Sampling Rate | 5.0 MSa/s (Real-time) |
| Interface | Bluetooth |
| Power Source | 3.7V Rechargeable Li-ion Battery |
| Safety Compliance | CAT III 1000V, CAT IV 600V, IEC 61010-1, CE, RoHS |
| Dimensions (L x W x H) | 24.8 x 9.4 x 3.8 Centimeters |
| Item Weight | 350 Grams |
10. Warranty and Support
10.1 Warranty Information
The Metravi PRO 475 comes with a 1-year warranty against manufacturing defects from the date of purchase. This warranty covers defects in materials and workmanship under normal use. It does not cover damage caused by misuse, accident, unauthorized modification, or neglect.
10.2 Customer Support
For technical assistance, warranty claims, or service inquiries, please contact Metravi Instruments Pvt. Ltd. customer support.
- Email: servicing@metravi.com
Please have your product model number (PRO 475) and purchase details ready when contacting support.


