1. Introduction and Important Safety Information
Thank you for choosing the Oxseryn Portable Inverter Generator. This manual provides essential information for the safe and efficient operation, maintenance, and troubleshooting of your generator. Please read this manual thoroughly before operating the generator and keep it for future reference.
1.1 General Safety Warnings
- Carbon Monoxide Hazard: Generators produce carbon monoxide (CO), an odorless, colorless, and poisonous gas. Operating a generator indoors or in poorly ventilated areas can cause serious injury or death. ALWAYS operate the generator outdoors in a well-ventilated area, far away from windows, doors, and vents. The built-in CO sensor will automatically shut down the generator if CO levels become too high.
- Fire Hazard: Gasoline is highly flammable. Always refuel in a well-ventilated area with the engine off and cool. Do not smoke or allow open flames near the generator.
- Electrical Shock Hazard: Do not operate the generator in wet conditions. Ensure all electrical connections are secure and dry.
- Hot Surfaces: The generator's engine and muffler become very hot during operation and remain hot for some time after shutdown. Avoid contact with hot surfaces.
- Children and Pets: Keep children and pets away from the generator at all times.
2. Product Components and Features
Your Oxseryn EDOG01 generator comes with the following components:
- Oxseryn Portable Inverter Generator (Model EDOG01)
- Maintenance Tools
- Oil Funnel
- User Manual (this document)
2.1 Key Features Overview
The EDOG01 is designed for versatility and reliability, offering:
- Powerful Output: 2500 Peak Watts / 1800 Running Watts.
- Clean Power: Less than 3% Total Harmonic Distortion (THD), safe for sensitive electronics.
- Quiet Operation: Under 58 dBA from 23 feet away.
- Extended Runtime: Up to 10 hours at 25% load with a 1.1-gallon fuel tank.
- Safety Features: Integrated CO Sensor, Low Oil Shutdown, Overload Protection.
- Portability: Lightweight at only 40 lbs with a compact design and built-in handle.
- Parallel Ready: Allows connection of two EDOG01 units for increased power output.
2.2 Control Panel and Ports
Familiarize yourself with the generator's control panel for proper operation.

Figure 1: Control Panel Layout
- AC 120V Ports (x2): Standard household outlets for powering appliances.
- Indicator Lights: Include CO sensor status, low oil, overload, and running indicators.
- ECO Switch: Engages Eco-mode for fuel efficiency and reduced noise under light loads.
- USB Port (x1): For charging USB-powered devices.
- Type-C Port (x1): For charging Type-C compatible devices.
- DC 12V Port (x1): For charging 12V batteries or powering 12V devices.
- Parallel Socket: Used to connect two EDOG01 generators for increased power output.

Figure 2: Generator Features
3. Initial Setup
Before first use, the generator requires oil and fuel. Ensure the generator is on a level surface.
3.1 Adding Engine Oil
The engine is shipped without oil. Failure to add oil will prevent the engine from starting due to the low oil shutdown feature.
- Place the generator on a firm, level surface.
- Locate the oil fill cap/dipstick.
- Using the provided oil funnel, slowly add approximately 0.4 quarts (16 oz) of 10W-30 engine oil. Do not overfill.
- Check the oil level using the dipstick. The oil should be at the upper limit of the dipstick.
- Securely replace the oil fill cap.
Note: It is recommended to change the oil frequently during the first few hours of operation (break-in period) to remove any manufacturing debris. Refer to the Maintenance section for details.
3.2 Adding Fuel
Use only fresh, unleaded gasoline with an octane rating of 87 or higher. Do not use E85 or mixed fuels.
- Ensure the generator is turned OFF and cool.
- Move the generator to a well-ventilated outdoor area for fueling.
- Unscrew the fuel cap.
- Carefully pour gasoline into the fuel tank (capacity 1.1 gallons), avoiding overfilling. Leave a small air gap to allow for fuel expansion.
- Securely replace the fuel cap. Wipe up any spilled fuel immediately.
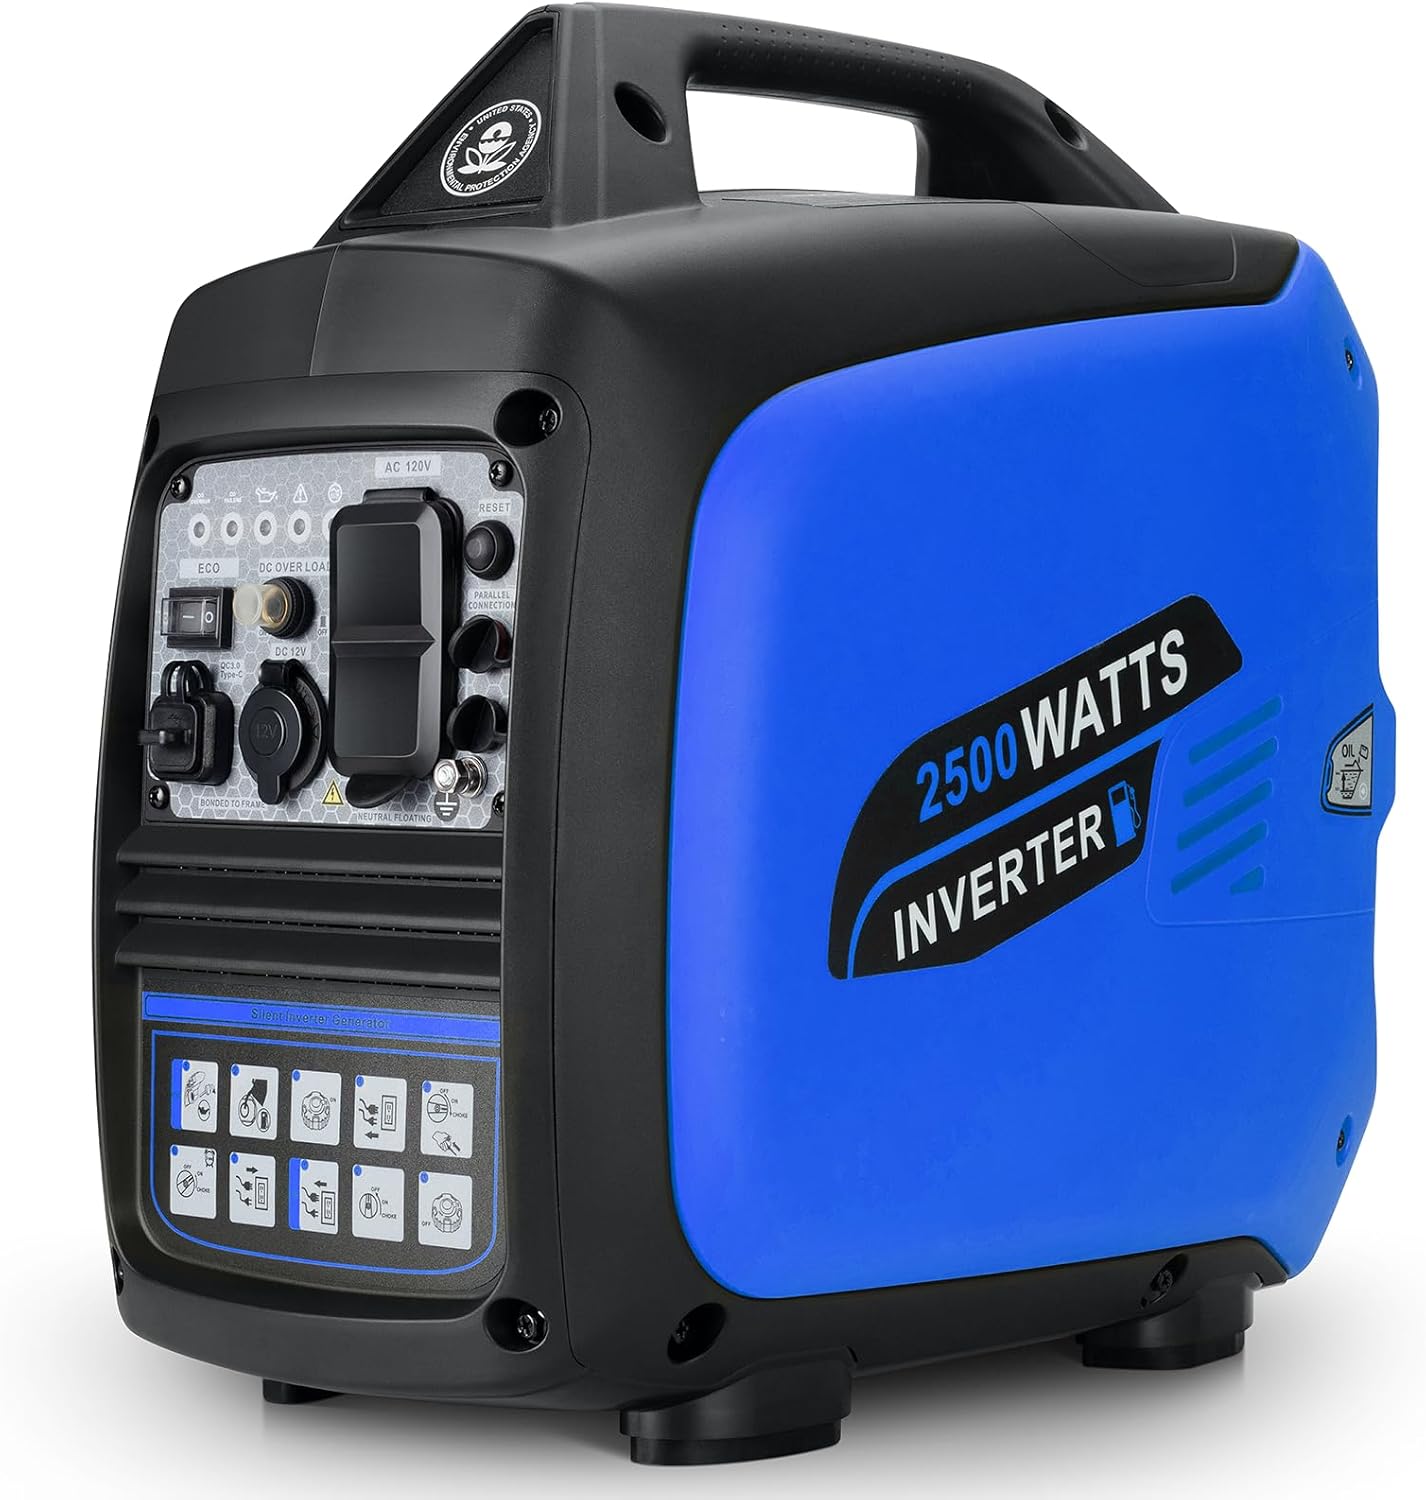
Figure 3: Oxseryn EDOG01 Generator
4. Operating the Generator
4.1 Starting the Generator
Follow these steps to start your Oxseryn EDOG01 generator:
- Ensure the generator is placed outdoors in a well-ventilated area.
- Turn the fuel valve to the "ON" position.
- Move the engine switch to the "ON" position.
- Pull the choke lever to the "CHOKE" position (if the engine is cold).
- Firmly pull the recoil starter handle until the engine starts.
- Once the engine starts, slowly push the choke lever back to the "RUN" position.
Watch this video for a visual guide on starting the generator:
Video: How to start the generator?
This video demonstrates the pull-start procedure for the generator, showing the steps to engage the choke, pull the cord, and disengage the choke once the engine is running.
4.2 Stopping the Generator
- Disconnect all electrical loads from the generator.
- Allow the engine to run for a few minutes without load to cool down.
- Turn the engine switch to the "OFF" position.
- Turn the fuel valve to the "OFF" position.
4.3 Connecting Electrical Devices
Once the generator is running, you can connect your devices to the available outlets. Ensure the total wattage of connected devices does not exceed the generator's running wattage (1800W).
- Plug your 120V AC devices into the AC outlets.
- Connect USB devices to the USB port.
- Connect Type-C devices to the Type-C port.
- For 12V DC charging, connect your device to the 12V DC port.

Figure 4: Clean Power for Sensitive Electronics
4.4 Eco-Mode Operation
The Eco-mode switch allows the generator to automatically adjust engine speed to match the load, improving fuel efficiency and reducing noise levels. This is ideal for light loads or when minimal power is required.
- To activate Eco-mode, slide the ECO switch to the "ON" position.
- For full power output or when starting high-demand appliances, slide the ECO switch to the "OFF" position.
4.5 Parallel Operation (Optional)
The EDOG01 generator is parallel ready, allowing you to connect two identical units for nearly double the power output. A parallel kit (sold separately) is required for this function.

Figure 5: Parallel Ready Setup
Refer to the parallel kit's instruction manual for detailed connection and operation procedures.
5. Maintenance
Regular maintenance ensures the longevity and optimal performance of your generator. Always turn off the engine and allow it to cool before performing any maintenance.
5.1 Maintenance Schedule
| Item | Before Each Use | First 20 Hours / 1 Month | Every 50 Hours / 3 Months | Every 100 Hours / 6 Months |
|---|---|---|---|---|
| Check Engine Oil Level | ✓ | |||
| Change Engine Oil | ✓ | ✓ | ||
| Check/Clean Air Filter | ✓ | |||
| Check Spark Plug | ✓ |
5.2 Oil Change Procedure
To change the engine oil:
- Run the engine for a few minutes to warm the oil, then turn it off.
- Place a suitable container under the oil drain plug.
- Remove the oil fill cap/dipstick and the oil drain plug.
- Allow all the old oil to drain completely.
- Reinstall the oil drain plug securely.
- Add new 10W-30 engine oil (approx. 0.4 quarts) using the oil funnel.
- Check the oil level and replace the oil fill cap.
- Dispose of used oil responsibly.
5.3 Storage
For long-term storage (more than 30 days):
- Drain the fuel tank and carburetor. Run the engine until it stops from lack of fuel.
- Change the engine oil.
- Remove the spark plug and pour a tablespoon of engine oil into the cylinder. Pull the recoil starter a few times to distribute the oil, then reinstall the spark plug.
- Clean the exterior of the generator.
- Store in a clean, dry, well-ventilated area, away from direct sunlight and extreme temperatures.
6. Troubleshooting
This section provides solutions to common operational issues. If the problem persists, contact customer support.
| Problem | Possible Cause | Solution |
|---|---|---|
| Engine will not start | No fuel / Low oil level / Engine switch OFF / Fuel valve OFF / Choke not set correctly / Spark plug issue | Add fuel / Add oil / Turn engine switch ON / Turn fuel valve ON / Adjust choke / Check/replace spark plug |
| No power output | Overload / Circuit breaker tripped / ECO mode engaged with high load | Reduce load, reset circuit breaker / Turn ECO mode OFF for heavy loads |
| Engine stops during operation | Out of fuel / Low oil level / Overload / CO sensor activated | Refuel / Add oil / Reduce load / Move generator to well-ventilated area, allow to cool, then restart |
| Excessive noise | Operating at high load without ECO mode / Loose components | Engage ECO mode for light loads / Check for loose parts and tighten |
7. Technical Specifications
| Specification | Detail |
|---|---|
| Brand | Oxseryn |
| Model Name | EDOG01 |
| Peak Wattage | 2500 Watts |
| Running Wattage | 1800 Watts |
| Voltage | 120 Volts |
| Engine Type | 79.8CC 4-stroke OHV |
| Fuel Type | Gasoline |
| Fuel Tank Capacity | 1.1 Gallons |
| Runtime (25% Load) | Up to 10 hours |
| Noise Level (23FT) | Under 58 dBA |
| Item Weight | 40 Pounds |
| Product Dimensions (L x W x H) | 18" x 11" x 18" |
| Special Features | CO Sensor, Cold Start Technology, Fuel Gauge, Low Oil Shutdown, Overload Protection |
| Included Components | Generator, Maintenance Tools, Oil Funnel, User Manual |
8. Warranty and Support
8.1 Warranty Information
The Oxseryn EDOG01 Portable Inverter Generator comes with a 1-Year Limited Warranty from the date of purchase. This warranty covers defects in materials and workmanship under normal use. It does not cover damage resulting from misuse, abuse, neglect, unauthorized repairs, or normal wear and tear.
Please retain your proof of purchase for warranty claims.
8.2 Customer Support
For technical assistance, warranty claims, or to order replacement parts, please contact Oxseryn customer support. Refer to the contact information provided on the product packaging or the official Oxseryn website.
When contacting support, please have your generator's model number (EDOG01) and serial number (if applicable) ready.
