
1. Introduction
This manual provides detailed instructions for the installation, operation, and maintenance of your Adapter-Universe 7-inch Car Radio with CD/DVD Player. Please read this manual thoroughly before using the product to ensure proper function and safety. This car stereo is designed to enhance your driving experience with features such as a CD/DVD player, Apple CarPlay, Android Auto, Bluetooth connectivity, GPS, and FM/AM radio.
2. Compatible Models and Years
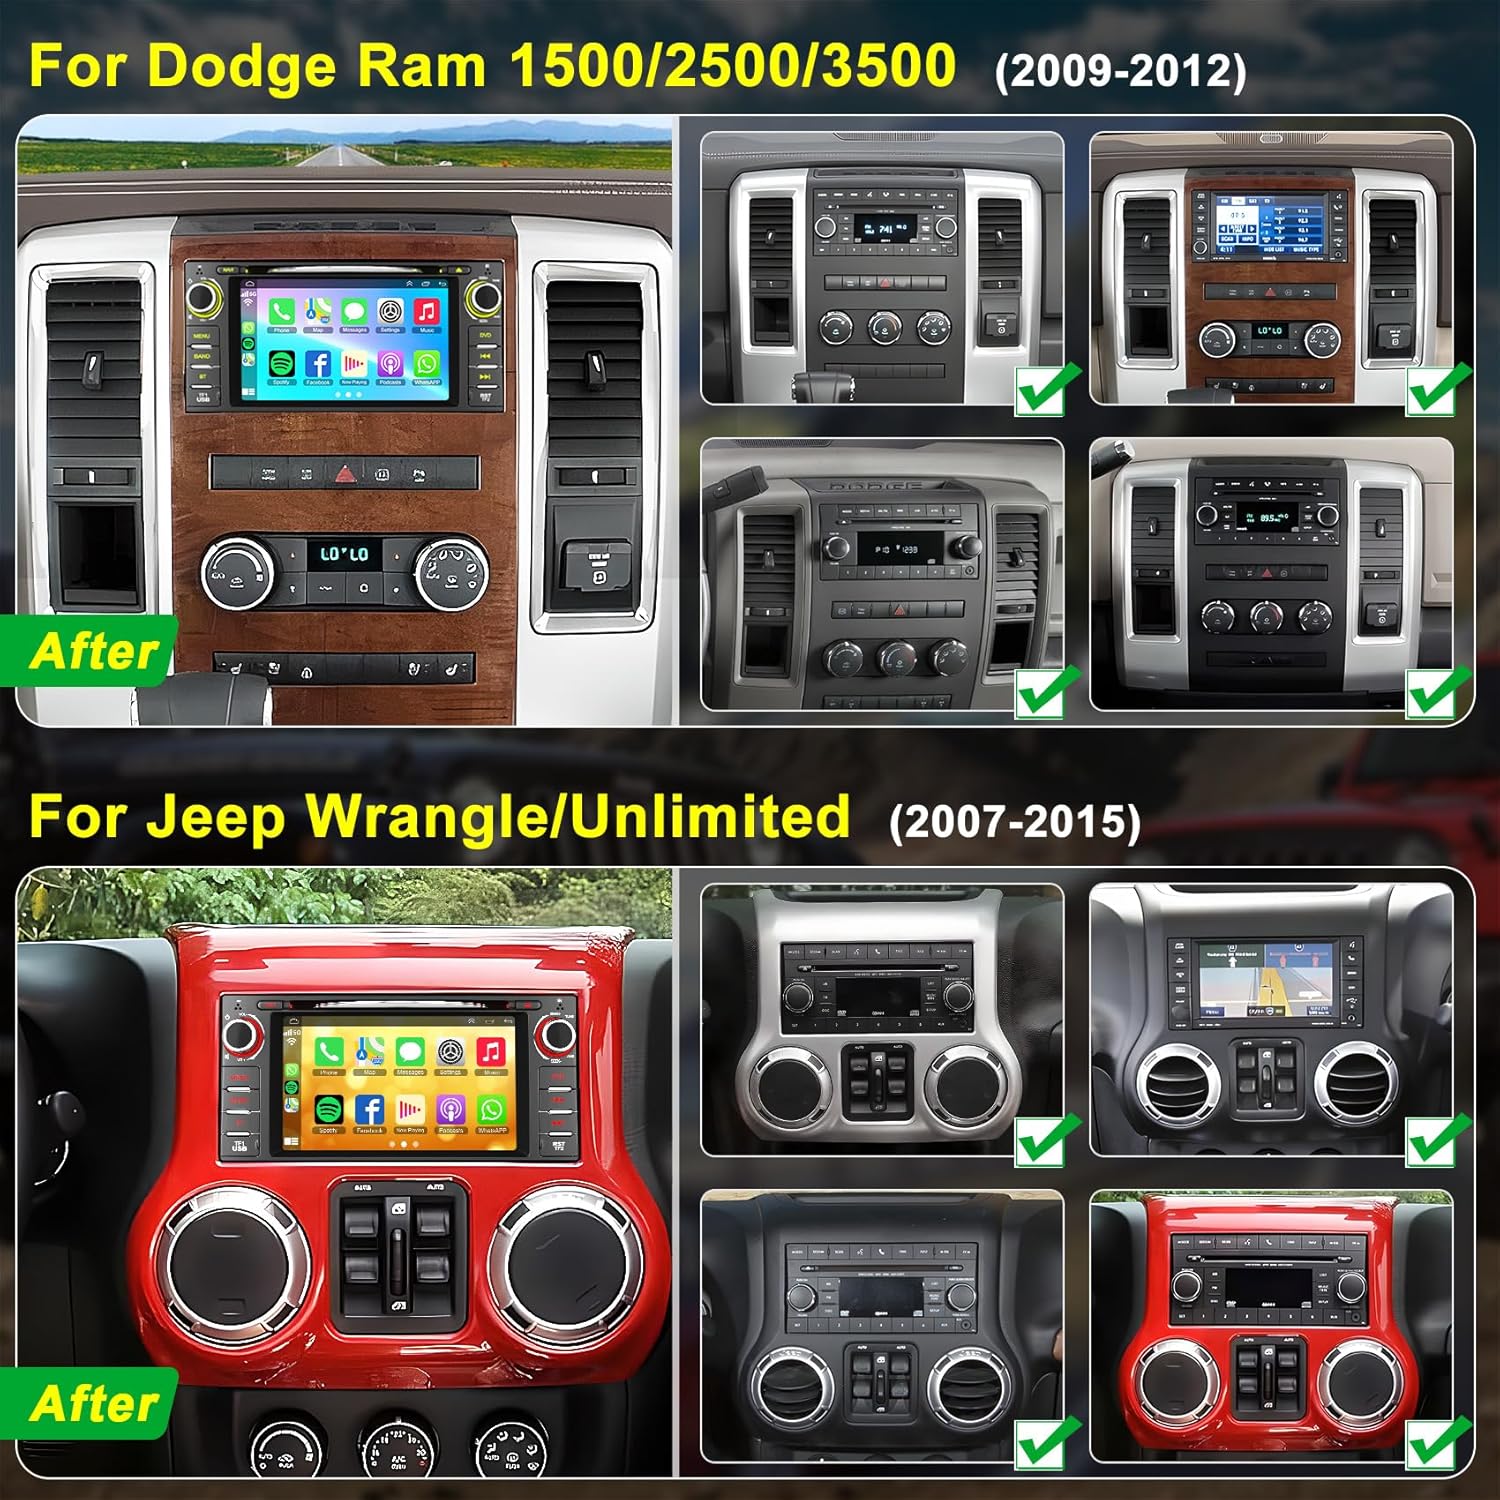
This car radio with DVD player is compatible with the following vehicle models:
- Dodge RAM: 1500, 2500, 3500 (Model Years: 2009, 2010, 2011, 2012)
- Jeep Wrangler/Unlimited: (Model Years: 2007, 2008, 2009, 2010, 2011, 2012, 2013, 2014, 2015)
If you are uncertain about compatibility, please provide a picture of your car model and its center console to the manufacturer for confirmation.
3. What's in the Box
The package includes the following components:
- Car Radio Head Unit
- Power Cable
- Microphone Cable
- Back-up Camera & Camera Cable
- CANBUS Box (if applicable for your vehicle)
- USB Cable
- Radio Signal Cable
- Disassembly Tool
- Mounting Brackets
- Screws
- User Manual
4. Setup and Installation
Installation of the car radio requires careful attention to wiring and mounting. It is recommended that installation be performed by a qualified professional. Ensure the vehicle's battery is disconnected before beginning installation.
4.1. Pre-Installation Check
- Verify all components listed in "What's in the Box" are present.
- Familiarize yourself with your vehicle's dashboard disassembly process.
4.2. Connecting the Unit
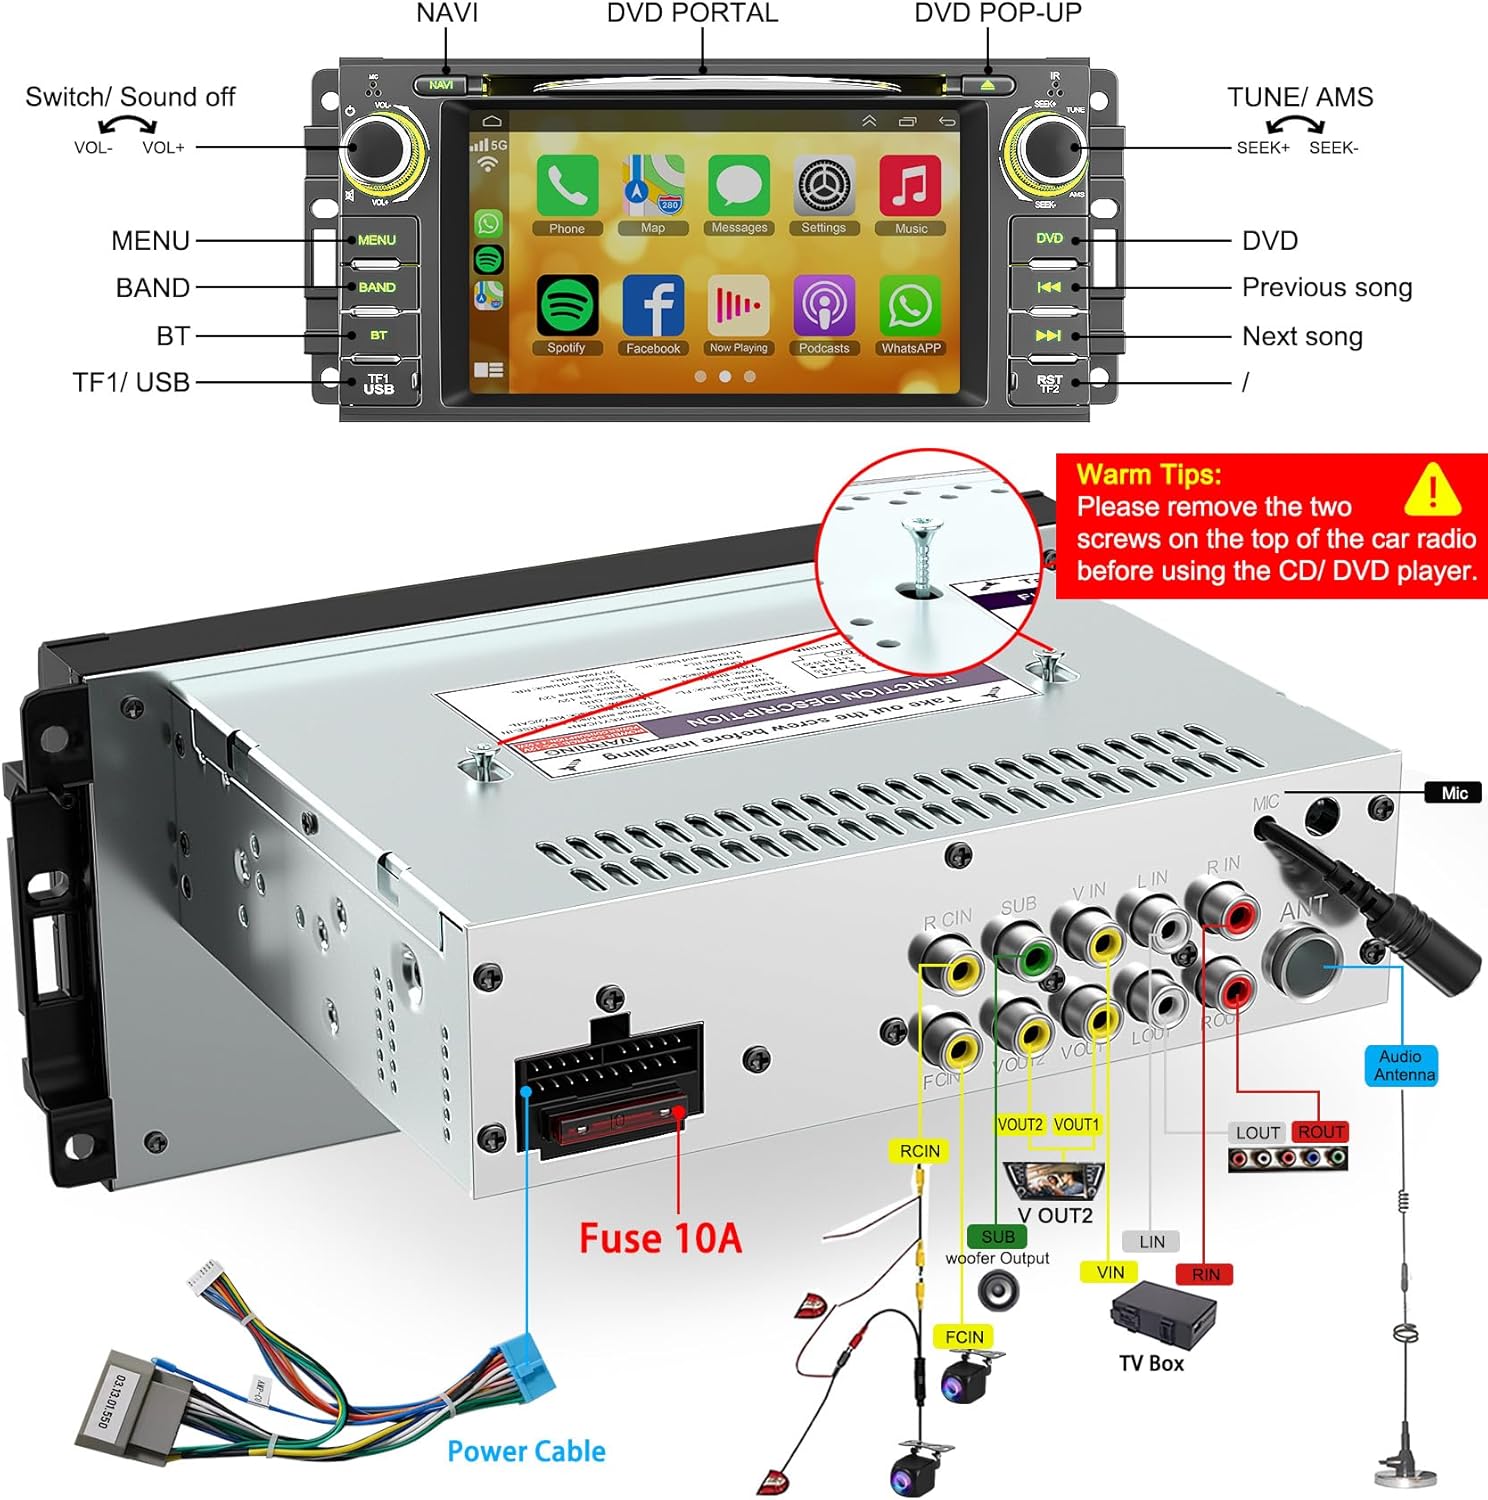
Refer to the wiring diagram below for proper connections. The power cable, microphone cable, and backup camera cable should be connected to their respective ports on the rear of the head unit. Ensure the 10A fuse is correctly installed.
4.3. CD/DVD Player Preparation
Important: Before inserting any CD or DVD, you must remove the two transit screws located on the top of the car radio unit. Failure to do so may damage the CD/DVD mechanism.
5. Operating Instructions
5.1. CD/DVD Playback
After removing the transit screws, insert a CD or DVD into the slot. The unit will automatically detect the disc and begin playback. Use the on-screen controls or physical buttons (DVD, Previous song, Next song) to manage playback.

5.2. Apple CarPlay & Android Auto
Connect your iPhone or Android smartphone to the car stereo via a USB cable to activate Apple CarPlay or Android Auto. This allows you to access phone functions, music, maps, messages, and other compatible apps directly on the 7-inch touch screen. Voice controls via Siri or Google Assistant are supported.

5.3. Mirror Link Function
The Mirror Link function allows you to sync your smartphone screen (both iOS and Android) to the car stereo's 7-inch display. Connect your smartphone using an original USB cable to mirror content such as videos or navigation. For safety, it is not recommended to use this feature for video playback while driving.

5.4. Bluetooth Connectivity
The unit features Bluetooth 5.2 for hands-free calling and wireless audio streaming. Pair your smartphone to answer/make calls, download your phonebook, and play music from apps like Spotify or Pandora. The included external microphone ensures clear voice pickup.

5.5. FM/AM Radio
Access the FM/AM radio function to listen to your favorite stations. The unit provides stable radio signal reception. Use the touch screen or physical controls to tune frequencies and save presets.

5.6. Backup Camera Function
When the vehicle is shifted into reverse gear, the car stereo automatically displays the image from the included HD night vision rear view camera. This feature provides a 170° ultra-wide viewing angle and is fully waterproof, assisting in safer parking maneuvers.

5.7. Steering Wheel Control
The unit supports existing steering wheel controls, allowing you to manage various functions such as volume, track skipping, and answering calls without taking your hands off the wheel. This provides a more convenient and safer driving experience.
5.8. Equalizer (EQ) Settings
Customize your audio experience using the built-in equalizer settings. This multimedia system offers various EQ options and sound effects to tailor the audio output to your preferences, providing a superior music listening experience.
6. Maintenance
- Screen Cleaning: Use a soft, lint-free cloth to clean the touch screen. Do not use abrasive cleaners or solvents.
- General Cleaning: Keep the unit free from dust and debris. Use a dry cloth for exterior cleaning.
- CD/DVD Care: Handle discs by their edges to avoid fingerprints and scratches. Store discs in protective cases.
- Software Updates: Periodically check the manufacturer's website for any available software updates to ensure optimal performance and access to new features.
7. Troubleshooting
| Problem | Possible Cause | Solution |
|---|---|---|
| Unit does not power on. | Loose power connection, blown fuse, vehicle battery issue. | Check power cable connections. Inspect the 10A fuse on the unit's rear. Verify vehicle battery is charged. |
| CD/DVD does not play or eject. | Transit screws not removed, disc inserted incorrectly, damaged disc. | Ensure the two transit screws on top of the unit are removed. Re-insert disc correctly. Try a different disc. |
| Backup camera not displaying automatically. | Incorrect wiring, camera not enabled in settings, signal issue. | Verify camera wiring is correct. Check the unit's settings to ensure the reverse camera input is selected. Some units require manual selection of the reverse camera input. |
| Poor sound quality or no audio. | Loose speaker connections, incorrect EQ settings, source issue. | Check all speaker wire connections. Adjust EQ settings. Ensure the audio source (radio, CD, Bluetooth) is functioning correctly. If using Android Auto/CarPlay, ensure all speaker wires are connected in the harness. |
| Bluetooth connectivity issues. | Pairing failure, device out of range, interference. | Ensure Bluetooth is enabled on both the unit and your phone. Delete previous pairings and re-pair. Move phone closer to the unit. |
| CarPlay/Android Auto not connecting. | Faulty USB cable, phone software issue, incorrect settings. | Use an original, high-quality USB cable. Restart your phone and the car stereo. Check phone settings for CarPlay/Android Auto permissions. |
8. Specifications
| Feature | Detail |
|---|---|
| Brand | Adapter-Universe |
| Media Type | DVD, CD |
| Screen Size | 7 Inches |
| Display Type | Capacitive Touchscreen |
| Native Resolution | 1024x600 |
| Connectivity Technology | Bluetooth |
| Compatible Devices | Smartphone |
| Power Source | Vehicle's electrical system |
| Audio Output Mode | Stereo |
| Item Dimensions (L x W x H) | 7" x 7" x 7" |
9. Warranty and Support
9.1. Warranty Information
This Adapter-Universe car radio comes with a 2-Year Warranty from the date of purchase. This warranty covers manufacturing defects and malfunctions under normal use. Please retain your proof of purchase for warranty claims.
9.2. Customer Support
For technical assistance, troubleshooting, or warranty inquiries, please contact Adapter-Universe customer support. Refer to the contact information provided with your product packaging or visit the official Adapter-Universe website for support resources.