
Introduction
Thank you for choosing the Giftsfaloy 2 Gallon Battery Powered Garden Sprayer. This electric sprayer is designed to simplify your gardening tasks with its convenient USB-rechargeable handle, adjustable nozzles, and retractable wand. This manual provides essential information for safe and efficient operation, setup, maintenance, and troubleshooting.
Important Safety Information
Do not use with flammable, corrosive, or acidic chemicals. This sprayer is intended for use with water-based garden solutions only.
Package Contents
Please ensure all items are present before assembly:
- 2 Gallon Sprayer Tank
- Electric Handle with USB Charging Port and Battery Indicator
- Telescopic Wand
- Hose with Filter Head
- 3 Mist Nozzles (Sector, Cone, Six-Hole)
- Adjustable Shoulder Strap
- USB Charging Cable
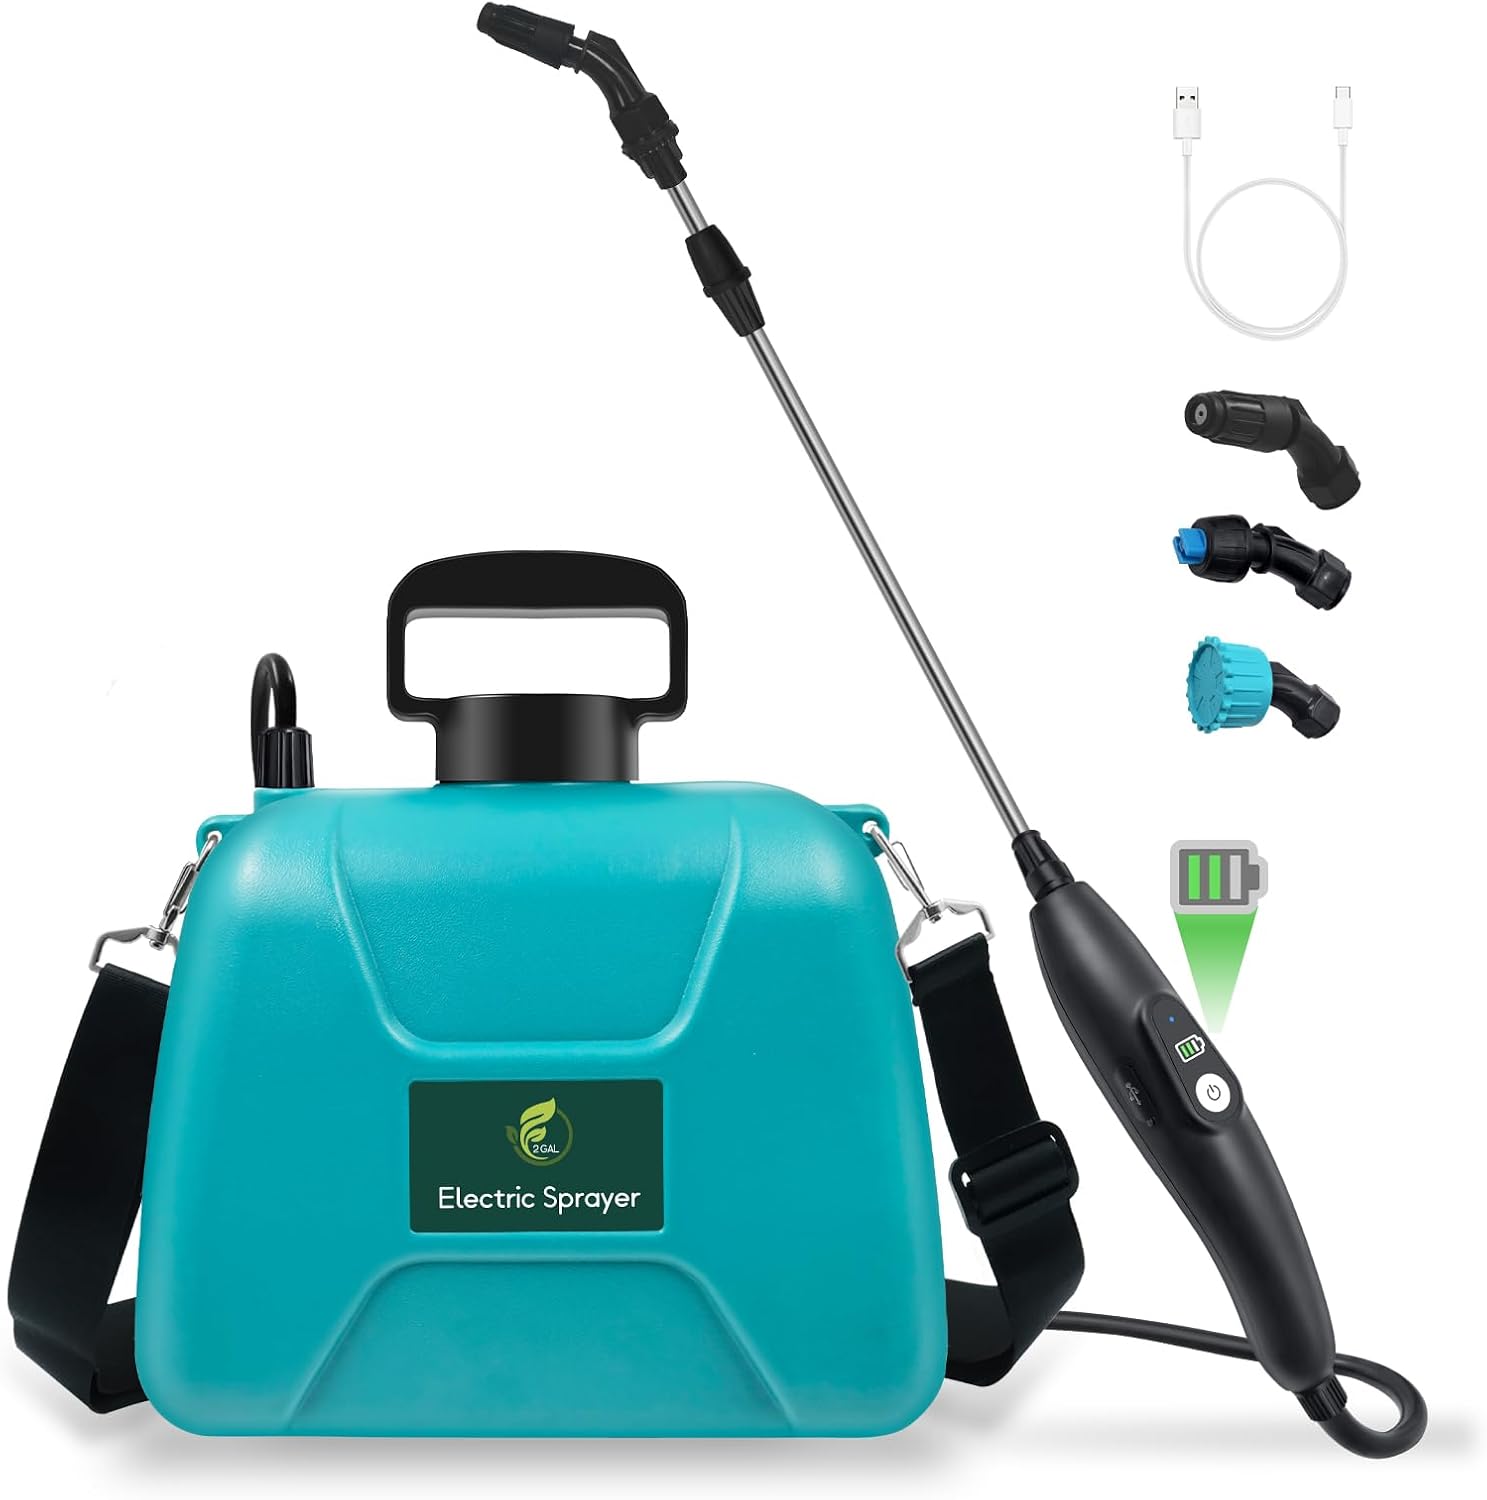
Setup Guide
Follow these steps to assemble your sprayer:
- Attach Sprinkler Nozzle to Telescopic Rod: Screw the desired nozzle onto the end of the telescopic rod.
- Connect Telescopic Rod to Electric Handle: Attach the telescopic rod to the electric handle and tighten securely.
- Connect Hose: Attach one end of the hose to the electric handle and the other end to the sprayer tank's outlet. Ensure both connections are tight to prevent leaks.
- Insert Suction Pipe: Insert the suction pipe into the water tank and tighten the nut.
- Screw on the Lid: Place the lid onto the tank and screw it on tightly.
- Attach Adjustable Shoulder Strap: Fasten the mental buckles of the shoulder strap to the designated eyelet holes on the sprayer tank.

Charging the Battery
The sprayer features a 2200mAh built-in battery in the electric handle. Fully charge the battery before first use. The USB-C charging port is located on the handle, and an indicator light tracks battery power. A full charge typically takes 3.5 hours and provides 2.5-3 hours of continuous spraying.

Filling the Sprayer
The sprayer has a 2-gallon capacity. To fill, unscrew the lid and pour your water-based solution into the wide opening. The scaled water tank allows you to monitor the remaining solution for better work planning.

Operating Instructions
Once assembled and filled, simply press the power button on the electric handle to begin spraying automatically. No manual pumping is required.
Adjusting Spray Modes
The sprayer comes with three interchangeable nozzles, offering five different spray modes to suit various needs:
- Sector Nozzle: Provides a wide, flat spray pattern, ideal for covering larger areas like lawns.
- Cone Nozzle: Delivers a conical mist, suitable for delicate plants or general coverage.
- Six-Hole Nozzle: Offers a gentle, shower-like spray, perfect for watering hanging baskets or sensitive foliage.
To adjust the intensity or pattern of the spray, twist the tightness of the nozzle head. This allows you to switch between fine mist and powerful stream settings.


Telescopic Wand
The telescopic rod can extend up to 23.62 inches, allowing you to easily reach and spray hard-to-access areas without excessive bending or stretching. To adjust the length, loosen the nut, extend the wand to the desired length, and then tighten the nut to secure it.

Carrying Options
The sprayer is designed for portability during long-term outdoor work. It can be carried by hand using the integrated handle on the lid or worn over the shoulder using the adjustable shoulder strap for hands-free operation.

Maintenance and Care
- After each use, rinse the sprayer thoroughly with clean water and drain completely to prevent residue buildup and blockages.
- When storing the sprayer for extended periods, ensure the battery is fully charged. Recharge the battery every two months to maintain its health.
- Do not use fast charging methods; if the battery is completely depleted, charge slowly first.
- Store the sprayer in a cool, dry place away from direct sunlight and extreme temperatures.

Troubleshooting
If you encounter issues with your sprayer, consider the following:
- No Spray/Weak Spray: Check if the battery is charged. Ensure all connections (hose, nozzle) are tight. Verify the filter head is not blocked.
- Leaking: Confirm all nuts and connections are securely tightened. Check for any damage to the hose or seals.
- Battery Not Charging: Ensure the USB cable is properly connected to both the handle and a power source. Try a different USB-C cable or power adapter.
Product Specifications
| Feature | Specification |
|---|---|
| Brand | Giftsfaloy |
| Model Name | 8L |
| Tank Volume | 2 Gallons |
| Color | Blue-green |
| Power Source | Battery Powered (2200mAh) |
| Working Time | 2.5-3 hours (continuous) |
| Charging Time | Approx. 3.5 hours |
| Nozzles Included | 3 (Sector, Cone, Six-Hole) |
| Telescopic Rod Length | Up to 23.62 inches |
| Material | Acrylonitrile Butadiene Styrene (ABS), High Density Polyethylene (HDPE) |
| Item Weight | 1.21 Pounds |
| Product Dimensions | 6.3"W x 12"H |
Warranty and Support
For warranty information or technical support, please refer to the product packaging or contact Giftsfaloy customer service directly. Keep your purchase receipt for any warranty claims.