1. Introduction
This manual provides detailed instructions for the setup, operation, maintenance, and troubleshooting of your Keychron Q6 HE QMK Wireless Custom Mechanical Keyboard. Please read this guide thoroughly to ensure optimal performance and longevity of your device.
The Keychron Q6 HE is a full-size layout wireless QMK custom keyboard featuring Hall Effect Gateron 2.0 magnetic switches, offering advanced customization and a premium typing experience.
2. Package Contents
Verify that all items are present in your package:
- Keychron Q6 HE Keyboard
- Keyboard PCB
- Case
- Aluminum Plate
- Keycaps (Mac & Windows compatible)
- USB-C to USB-C Cable
- USB-A to USB-C Adapter
- Switch Puller
- Keycap Puller
- User Manual

Image: Keychron Q6 HE keyboard with included accessories, showcasing the full package contents.
3. Setup
3.1 Initial Connection
The Keychron Q6 HE supports three connection modes: 2.4 GHz Wireless, Bluetooth 5.1, and Wired (USB-C).
3.1.1 Wired Connection
- Connect the provided USB-C cable to the keyboard's USB-C port.
- Connect the other end of the cable to your computer's USB port.
- Ensure the mode switch on the back of the keyboard is set to 'Cable' mode.
- The keyboard will be recognized automatically by your operating system.
3.1.2 2.4 GHz Wireless Connection
- Locate the 2.4 GHz receiver (dongle) included with your keyboard.
- Plug the 2.4 GHz receiver into an available USB port on your computer.
- Set the mode switch on the back of the keyboard to '2.4G' mode.
- The keyboard should automatically connect to the receiver. If not, press and hold the 'Fn' + '4' keys for 4 seconds to initiate pairing.
3.1.3 Bluetooth Connection
- Set the mode switch on the back of the keyboard to 'Bluetooth' mode.
- To enter pairing mode, press and hold 'Fn' + '1' (for device 1), 'Fn' + '2' (for device 2), or 'Fn' + '3' (for device 3) for 4 seconds until the indicator light flashes rapidly.
- On your computer, smartphone, or tablet, enable Bluetooth and search for 'Keychron Q6 HE'.
- Select the keyboard to pair. The indicator light will stop flashing once connected.
- You can switch between paired Bluetooth devices by pressing 'Fn' + '1', 'Fn' + '2', or 'Fn' + '3' briefly.
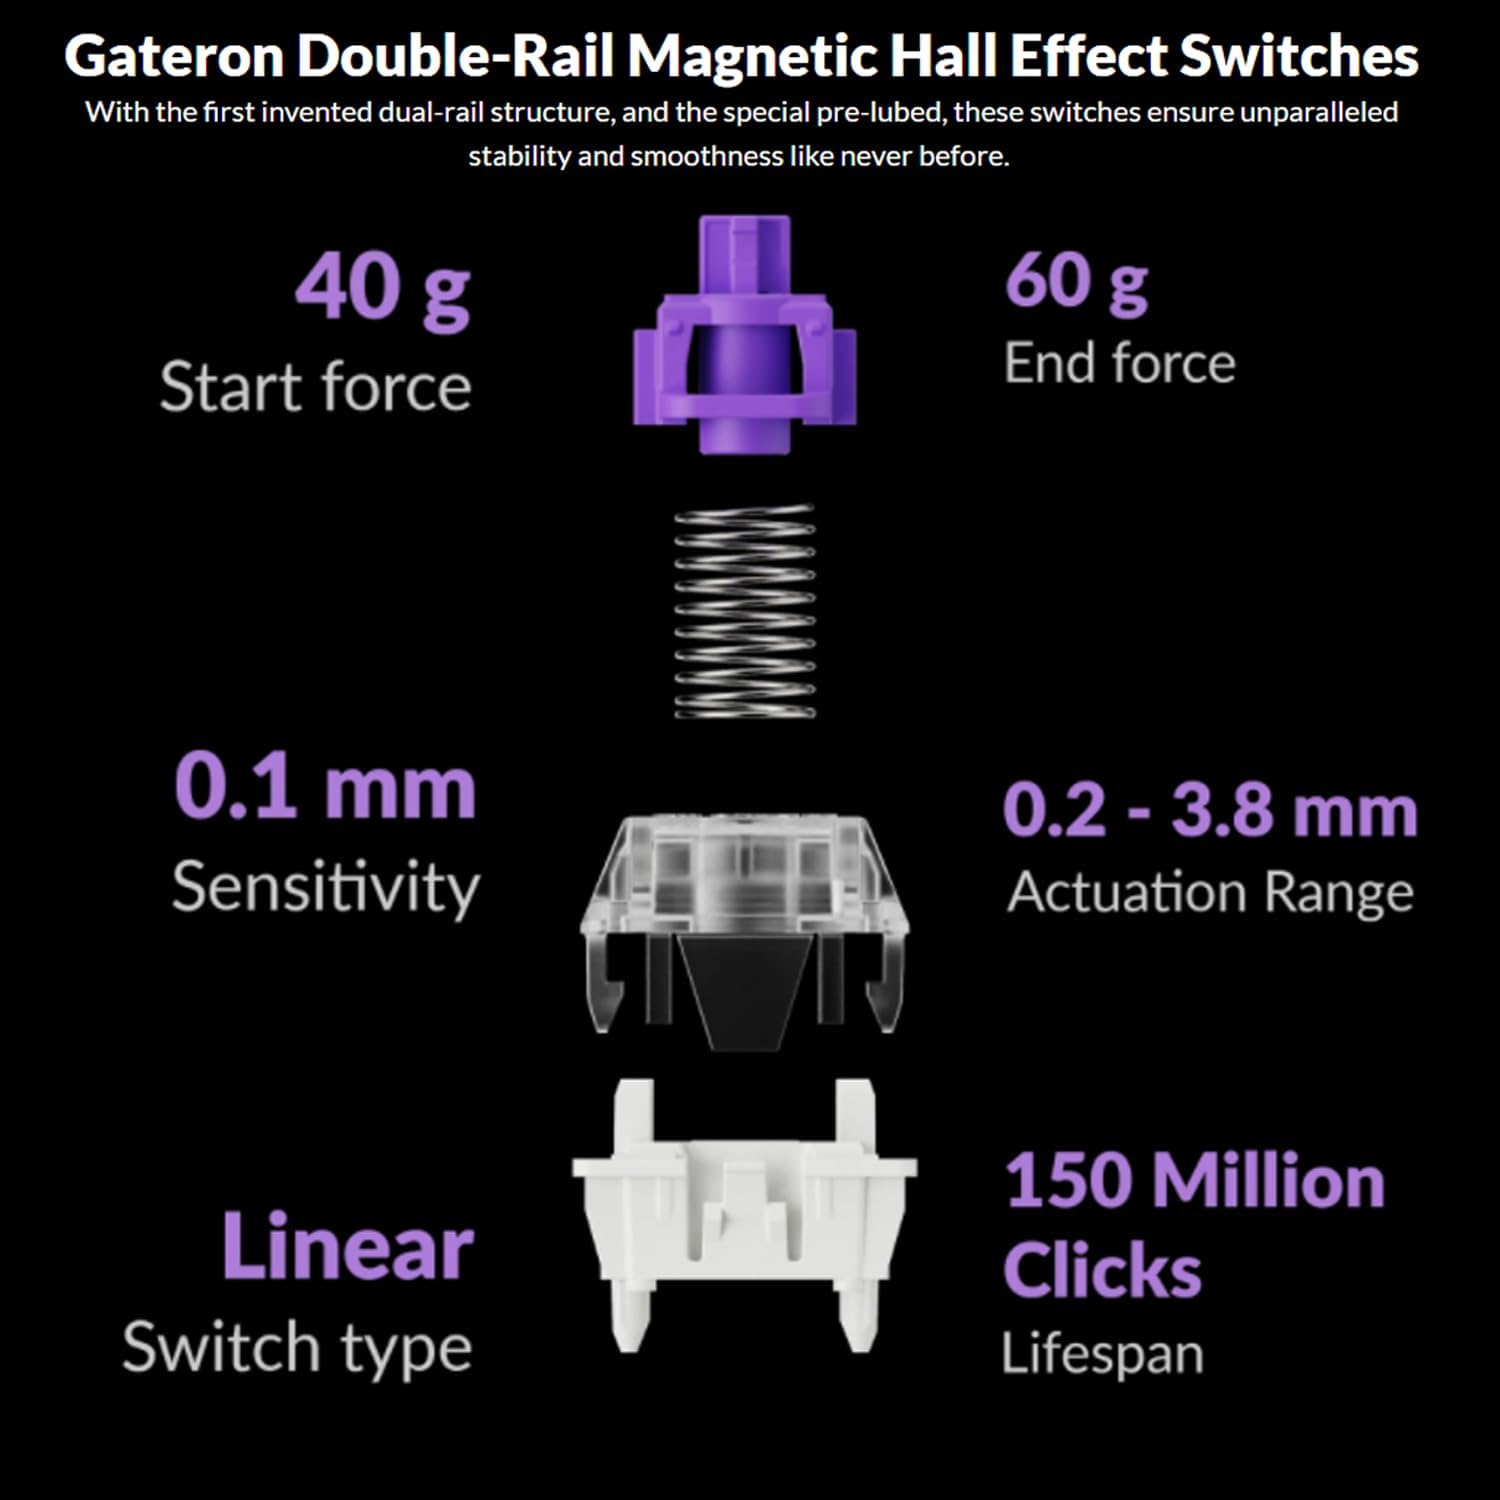
Image: The Keychron Q6 HE keyboard connected to a computer and a tablet, demonstrating its multi-device connectivity.
3.2 Operating System Switch
The keyboard has a switch to toggle between Mac and Windows layouts. Ensure this switch, located on the back of the keyboard, is set to your current operating system for correct key mapping.
3.3 Charging the Battery
The keyboard is equipped with a 4000 mAh Lithium Ion battery. Connect the USB-C cable to the keyboard and a power source (computer USB port or USB wall adapter) to charge. The charging indicator light will show the charging status.
4. Operating Instructions
4.1 Basic Key Functions
The Q6 HE features a standard 100% layout. All keys function as labeled. Use the 'Fn' key in combination with other keys for secondary functions (e.g., media controls, backlight adjustments).
4.2 Programmable Knob
The rotary knob on the top right of the keyboard is programmable. By default, it controls volume (rotate) and media play/pause (press). Its functions can be customized using the Keychron Launcher web app.
4.3 Gateron Magnetic Hall Effect Switches
The Q6 HE utilizes Gateron Double-Rail Magnetic Hall Effect Switches, which allow for dynamic customization of key behavior.

Image: Diagram illustrating the adjustable actuation points of the magnetic switches, ranging from 0.5mm to 3.5mm.
4.3.1 Adjustable Actuation Points
The actuation point (the distance a key needs to travel to register a press) can be adjusted from 0.1 mm to 3.8 mm using the Keychron Launcher web app. This allows for personalized typing and gaming sensitivity.
4.3.2 Rapid Trigger
Rapid Trigger functionality allows a key to reactivate instantly upon reset, without needing to return to its original position. This feature is highly beneficial for competitive gaming and can be configured via the Keychron Launcher.

Image: Detailed breakdown of Gateron Double-Rail Magnetic Hall Effect Switches, showing components and specifications like start force, end force, sensitivity, actuation range, switch type, and lifespan.
4.4 RGB Backlighting
The keyboard features south-facing RGB LED lights. You can cycle through various lighting effects and adjust brightness using 'Fn' key combinations or through the Keychron Launcher web app.
4.5 Keychron Launcher Web App
The Keychron Launcher is a web-based application for advanced customization. It allows you to:
- Remap keys
- Adjust actuation points for magnetic switches
- Create personalized macro commands
- Set shortcuts and key combinations
- Customize RGB lighting effects

Image: Screenshot of the Keychron Launcher web app interface, showing options for key remapping, actuation point adjustment, and macro creation.
5. Maintenance
5.1 Cleaning the Keyboard
To clean your keyboard:
- Disconnect the keyboard from all power sources and devices.
- Use a soft, lint-free cloth slightly dampened with water or a mild cleaning solution to wipe the keycaps and case.
- For deeper cleaning, use the provided keycap puller to remove keycaps and clean underneath with compressed air or a small brush.
- Avoid spraying liquids directly onto the keyboard.
5.2 Hot-Swappable Switches
The Q6 HE features hot-swappable magnetic switches, allowing you to replace individual switches without soldering.

Image: Close-up view of the Keychron Q6 HE keyboard with several keycaps and switches removed, highlighting the hot-swappable magnetic switch design.
5.2.1 Replacing Switches
- Use the switch puller to carefully remove the desired switch. Grip the switch firmly and pull straight up.
- Align the pins of the new switch with the holes on the PCB.
- Gently press the new switch into place until it clicks. Ensure it is seated correctly and not bent.
5.3 Battery Care
To prolong battery life:
- Avoid fully discharging the battery frequently.
- Store the keyboard in a cool, dry place when not in use for extended periods.
- Do not expose the keyboard to extreme temperatures.
6. Troubleshooting
6.1 Keyboard Not Responding
- Wired Mode: Ensure the USB-C cable is securely connected to both the keyboard and the computer. Try a different USB port or cable.
- 2.4 GHz Mode: Verify the 2.4 GHz receiver is plugged in and the keyboard is set to '2.4G' mode. Re-pair by holding 'Fn' + '4' for 4 seconds.
- Bluetooth Mode: Check if Bluetooth is enabled on your device and the keyboard is paired. Re-pair if necessary by holding 'Fn' + '1/2/3' for 4 seconds.
- Battery: Ensure the keyboard battery is charged. Connect it to a power source.
6.2 Keys Not Registering or Double Typing
- Actuation Point: Adjust the actuation point for the affected keys using the Keychron Launcher. A higher actuation point (e.g., 2.0mm or 3.0mm) can help prevent accidental presses or double typing.
- Switch Issue: If a specific key consistently malfunctions, the magnetic switch might be faulty. Consider replacing the hot-swappable switch.
- Firmware: Ensure your keyboard firmware is up to date via the Keychron Launcher.
6.3 RGB Backlight Issues
- Brightness: Adjust backlight brightness using 'Fn' key combinations.
- Effects: Cycle through different RGB effects using 'Fn' key combinations.
- Software: Use the Keychron Launcher to customize and troubleshoot RGB settings.
7. Specifications
| Model Number | Q6H-P1 |
| Brand | Keychron |
| Connectivity Technology | 2.4 GHz Wireless, Bluetooth 5.1, USB-C Wired |
| Keyboard Description | Full-size, Ergonomic |
| Special Features | Hall Effect Magnetic Switches, Programmable Knob, Large Battery Capacity, Hot-Swappable |
| Compatible Devices | PC, Mac, Smartphone, Tablet, Gaming Console |
| Keyboard Backlighting | RGB (South-facing) |
| Material | 6063 Aluminum (Case) |
| Battery | 4000 mAh Lithium Ion (included) |
| Item Weight | 6.49 pounds (approx. 2.94 kg) |
| Package Dimensions | 19 x 8.5 x 3 inches |

Image: An exploded diagram showing the internal layers and components of the Keychron Q6 HE keyboard, including keycaps, knob, magnetic switches, top case, sound absorbing foam, gaskets, plate, PCB, latex bottom pad, bottom case PET film, bottom case acoustic foam, battery, and silicone gaskets.
8. Warranty Information
Keychron products typically come with a limited manufacturer's warranty. For specific warranty terms, conditions, and duration, please refer to the official Keychron website or the warranty card included with your product. Keep your proof of purchase for warranty claims.
9. Support
For further assistance, technical support, or to download the latest firmware and software, please visit the official Keychron website:
You can also visit the Keychron store on Amazon for product information and customer service:


