
1. Introduction
The Thermal Dynamics® Cutmaster® 70+ is a powerful and portable plasma cutting machine designed for hand-held operations. It features a user-friendly 10.9 cm (4.3 in.) TFT LCD screen and enhanced functionalities, providing precise control and flexibility for cutting materials up to 30 mm thick. This unit, combined with the SL60 1Torch, offers a comprehensive plasma cutting solution.

Figure 1: The Cutmaster 70+ plasma cutter, showing the main unit, SL60 1Torch, ground clamp, and a kit of consumables.
2. Safety Information
Always read and understand all safety warnings and instructions before operating the Cutmaster 70+. Plasma cutting involves high voltage, intense light, heat, and fumes. Ensure proper ventilation, wear appropriate personal protective equipment (PPE) including welding helmet, gloves, and protective clothing. Disconnect power before performing any maintenance or changing consumables.
3. Setup and Installation
Proper setup is crucial for safe and efficient operation.
- Unpacking: Carefully remove the plasma cutter and all accessories from the packaging. Inspect for any shipping damage.
- Power Connection: Connect the power supply cord to an appropriate AC power source as specified in the electrical requirements section.
- Air Supply: Connect a clean, dry compressed air supply to the unit's air inlet. Ensure the air pressure meets the recommended specifications for optimal performance. A regional 1/4" air fitting is included.
- Torch Connection: Securely connect the SL60 1Torch to the front panel of the Cutmaster 70+.
- Work Lead Connection: Attach the 3 m (10 ft) work lead with the 10 mm² (4 AWG) ground clamp to the workpiece. Ensure a good electrical connection.
- Consumables Installation: Install the appropriate cutting consumables (electrodes, nozzles, shield cups) into the SL60 1Torch. A consumables kit is included.
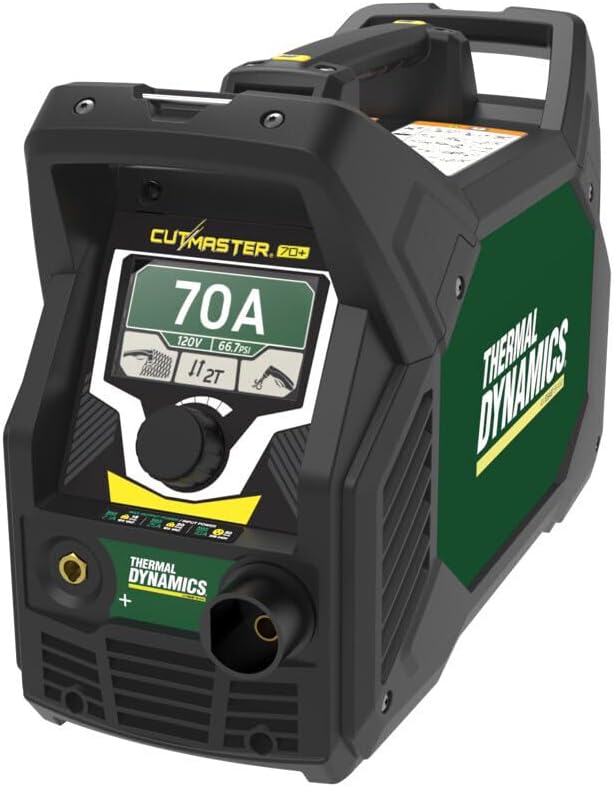
Figure 2: Front panel of the Cutmaster 70+ showing connections for the torch and ground clamp, along with the digital display and control knob.
4. Operating Instructions
Follow these steps for effective plasma cutting:
- Power On: Turn on the main power switch. The 10.9 cm (4.3 in.) TFT LCD display will illuminate.
- Settings Adjustment: Use the glove-friendly adjustment knob to navigate the display and set the desired cutting amperage and air pressure. The display simplifies use and provides greater control.
- Cutting Modes: Switch between normal and grate cutting modes as required for your application.
- Torch Operation: The SL60 1Torch features 2T/4T function for trigger control. Use the safety trigger lock to prevent accidental activation. The double-tap trigger function helps conserve bottled air.
- Cutting Process: Position the torch nozzle appropriately over the workpiece. Activate the torch and begin cutting. Maintain a consistent travel speed for clean cuts.
- Post-Cut Air Purge: The unit performs a post-cut air purge to extend consumable life.

Figure 3: Close-up of the Cutmaster 70+ digital display, showing current settings and user interaction with the control knob.

Figure 4: The Cutmaster 70+ in operation, demonstrating its capability to cut thick metal, with a user wearing appropriate safety gear.
5. Maintenance
Regular maintenance ensures longevity and optimal performance:
- Consumable Inspection: Regularly inspect and replace worn-out torch consumables (nozzles, electrodes, shield cups). The post-cut air purge feature helps extend their life.
- Air Filter: Check and clean or replace the air filter as needed to ensure a clean air supply to the unit.
- General Cleaning: Keep the unit clean and free from dust and debris. Use a dry cloth for cleaning.
- Cable Inspection: Periodically inspect all cables and connections for damage or wear.
6. Troubleshooting
This section provides solutions to common issues. For problems not listed, contact customer support.
| Problem | Possible Cause | Solution |
|---|---|---|
| No arc/No power | Power cord disconnected, circuit breaker tripped, unit fault. | Check power connection, reset breaker, consult manual for fault codes or contact support. |
| Poor cut quality | Worn consumables, incorrect air pressure, improper travel speed. | Replace consumables, adjust air pressure, optimize cutting speed. |
| Air flow but no arc | Torch not properly connected, faulty torch, ground clamp not secure. | Ensure torch is fully connected, check ground clamp, inspect torch for damage. |
7. Specifications
Key technical specifications for the Cutmaster 70+:
- Model Number: 1-7000-1
- Item Weight: 50 pounds
- Power Source: AC
- Display: 10.9 cm (4.3 in.) TFT LCD
- Cutting Capacity: Up to 30 mm (1.18 inches)
- Torch: SL60 1Torch (5 m / 16 ft lead)
- Work Lead: 3 m (10 ft) with 10 mm² (4 AWG) ground clamp
- Connectivity: Pre-installed 14 pin CPC receptacle and voltage divider for CNC functionality (Start/Stop, OK to Move, Divided arc voltage: 20:1, 30:1, 40:1, 50:1, 80:1 ratios).
- Included Components: Cutmaster 70+ power supply, SL60 1Torch with lead, work lead with ground clamp, consumables kit, regional 1/4" air fitting.

Figure 5: The Cutmaster 70+ demonstrating its portability with its integrated handles, highlighting its lightweight and durable design.
8. Warranty and Support
The Thermal Dynamics® Cutmaster® 70+ comes with an industry-leading warranty:
- Power Supply: 3-year warranty
- Torch and Leads: 1-year warranty
For technical support, service, or warranty claims, please contact Thermal Dynamics customer service. Refer to the official Thermal Dynamics website or your purchase documentation for contact details.