1. Introduction and Overview
This manual provides detailed instructions for the installation, operation, and maintenance of your Dfuorty Car Stereo Upgrade, Model QA1755X. This unit is specifically designed for Kia Picanto Morning models from 2016 to 2019, featuring an Android 13 system with wireless CarPlay and Android Auto compatibility, a 9-inch touchscreen, GPS navigation, WiFi, and Bluetooth connectivity.
The system is equipped with a 4-core processor, 2GB RAM, and 32GB ROM, ensuring smooth performance and ample storage for applications. It supports online firmware updates for continuous improvement.
2. Product Components
Please verify that all components listed below are included in your package:
- 1 x Car Stereo Player
- 2 x Power Cables
- 1 x GPS Antenna
- 1 x Rear Camera Input Cable
- 1 x RCA Cable
- 2 x USB Cables
- 1 x AHD Camera
- 1 x Microphone
- 1 x Radio Adapter
- 1 x Instruction Manual (this document)

Figure 2.1: Included Product Components
This image displays all the parts you should find in the product box, including the main car stereo unit, various cables for power and connectivity, a GPS antenna, a rear camera, and the user manual.
3. Setup and Installation
Professional installation is highly recommended for this car stereo system to ensure proper functionality and avoid damage to your vehicle or the unit. The following sections provide general guidance on connecting key features.
3.1. Initial Power-On and Interface Overview
Upon successful installation and power connection, the unit will boot up to the main interface. This interface provides access to various functions such as navigation, music, radio, and applications.

Figure 3.1: Main User Interface
This image shows the primary screen of the car stereo, displaying various application icons for common functions like phone calls, music playback, navigation, and messaging.
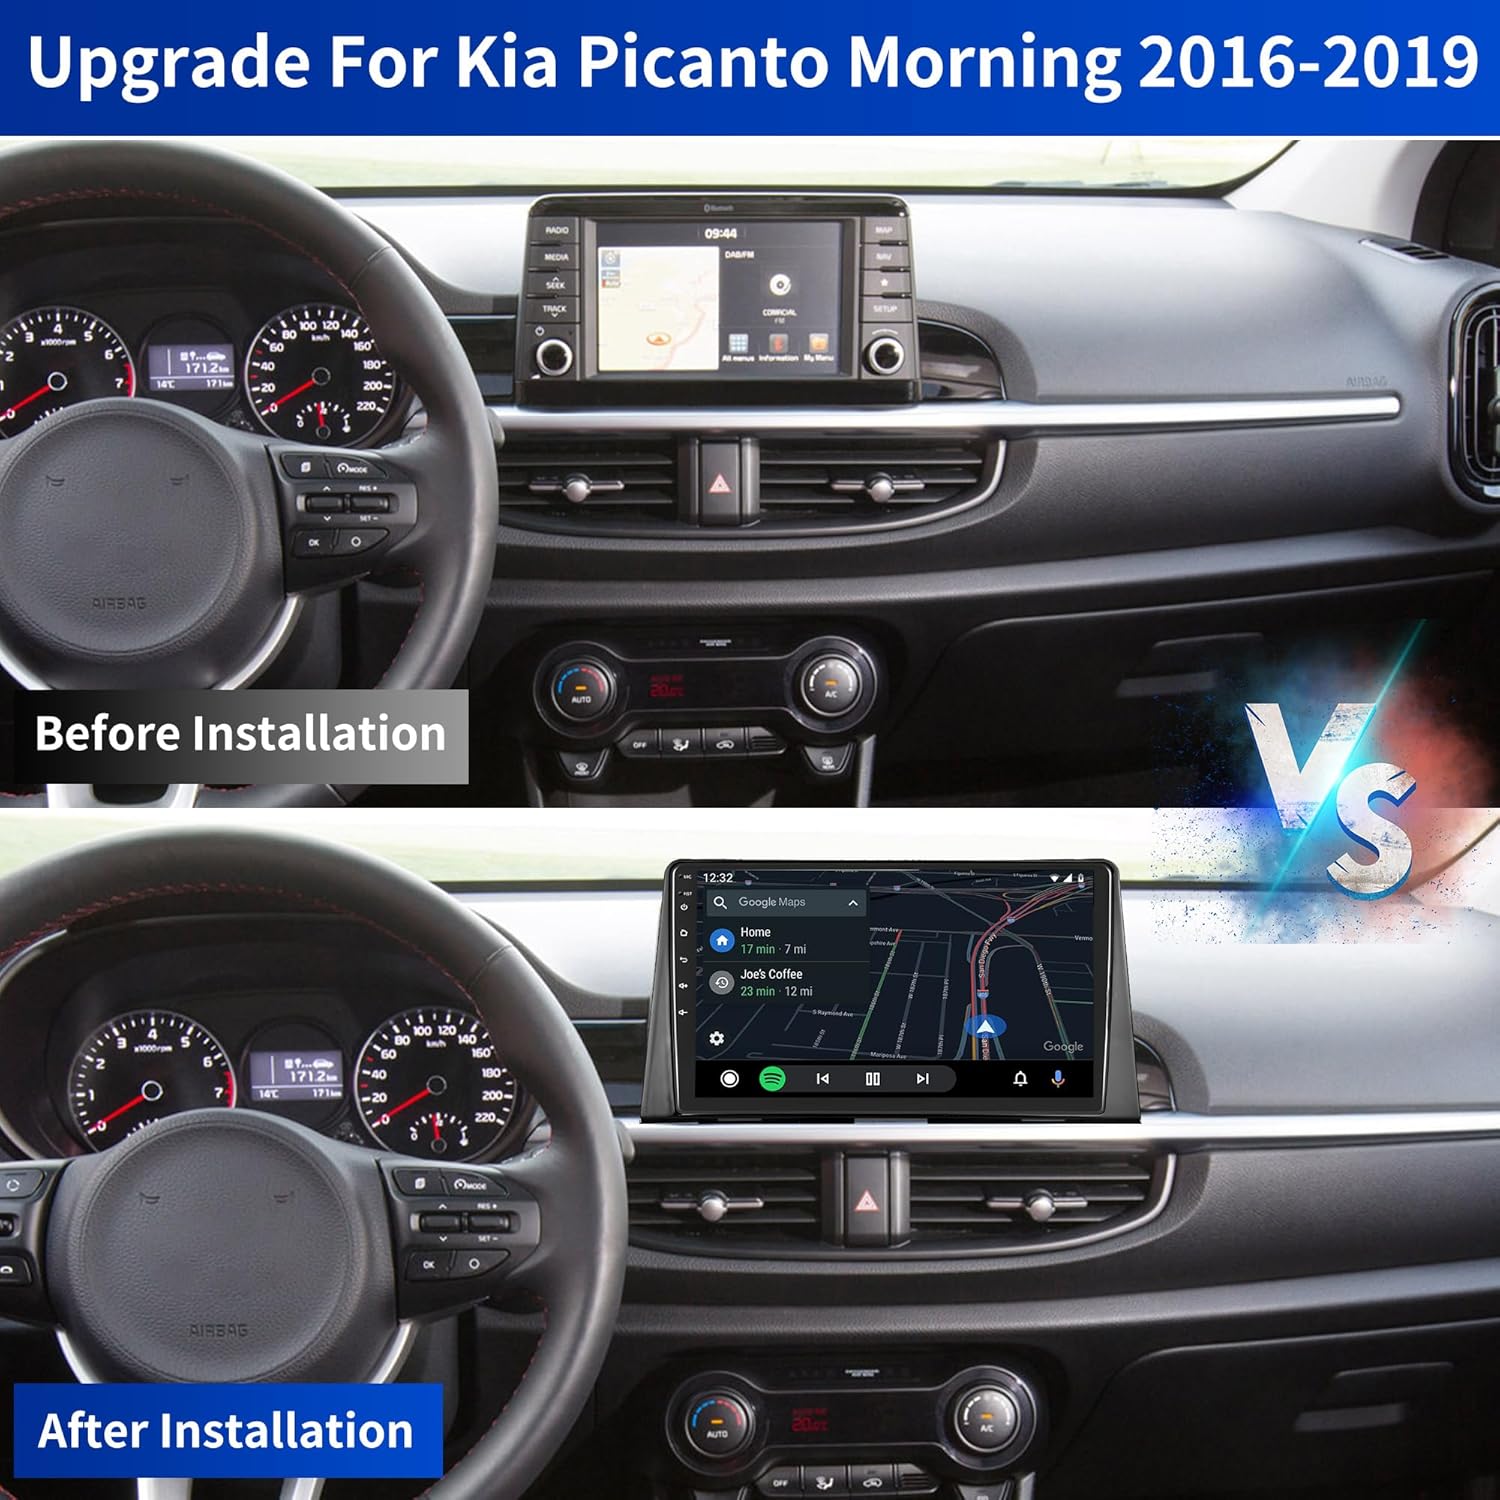
Figure 3.2: Before and After Installation
This image illustrates the visual upgrade provided by the Dfuorty car stereo, showing the original dashboard setup compared to the new 9-inch touchscreen installed.
3.2. Bluetooth Connection
To enable hands-free calling and audio streaming, connect your mobile device via Bluetooth:
- On the car stereo, navigate to the Bluetooth settings.
- Ensure Bluetooth is enabled on your mobile device.
- Search for available devices on your mobile device and select "CarBT".
- Enter the PIN "0000" if prompted.
- Once connected, "Phone audio, music audio" will be displayed, indicating a successful connection. If not, restart Bluetooth on both devices.
Video 3.1: Bluetooth and ZLINK Connection Guide
This video demonstrates the process of connecting your mobile phone to the car stereo via Bluetooth and establishing a ZLINK connection for CarPlay and Android Auto functionality. It also covers troubleshooting steps for connection issues, including manual WiFi setup.
3.3. ZLINK (Wireless CarPlay & Android Auto) Connection
The ZLINK application enables wireless CarPlay and Android Auto for seamless smartphone integration:
- Ensure your phone's Bluetooth is connected to the car stereo (refer to Section 3.2).
- Open the "ZLINK" application on the car stereo.
- The system will attempt to connect to your phone. Follow any prompts on your phone to allow CarPlay or Android Auto.
- If the connection is not successful, manually connect to the car stereo's WiFi hotspot (see Section 3.4). After connecting to WiFi, delete the history record in the ZLINK app and try connecting again.
- For subsequent connections, simply connecting via Bluetooth should automatically establish the ZLINK connection.

Figure 3.3: Wireless CarPlay & Android Auto Interface
This image shows the car stereo's capability to display both Apple CarPlay and Android Auto interfaces, highlighting its compatibility with both major smartphone integration systems.

Figure 3.4: Wired & Wireless CarPlay/Android Auto Support
This diagram visually explains how both wired and wireless connections for CarPlay and Android Auto are supported, along with the integration of voice assistants like Siri and Google Assistant.
3.4. WiFi Hotspot Connection
To access online features like real-time navigation and app downloads, connect the stereo to a WiFi hotspot (e.g., from your mobile phone):
- On the car stereo, go to "Settings" then "Android Settings".
- Select "Network & Internet" and then "Hotspot & tethering".
- Enable "Wi-Fi hotspot". Note the network name (e.g., AndroidAP_B442) and password.
- On your mobile phone, enable "Personal Hotspot" (for iOS) or "Wi-Fi hotspot" (for Android).
- Connect your phone to the car stereo's hotspot network using the noted network name and password.
- Once connected, your phone's name will appear under "Connected users" on the car stereo's hotspot settings.
4. Operating Instructions
4.1. GPS Navigation
The unit features a built-in GPS module supporting both offline and online navigation. With a WiFi connection, you can use real-time navigation apps like Google Maps, Apple Maps, Waze, and Sygic.

Figure 4.1: GPS Navigation and WiFi Hotspot
This image illustrates the simultaneous use of the radio and GPS navigation on the split screen, emphasizing the unit's WiFi hotspot connectivity for online map services.

Figure 4.2: GPS Navigation Options
This image highlights the diverse GPS navigation options available on the car stereo, including popular mapping applications and a full-view navigation mode.
4.2. Bluetooth Hands-free & DSP
The integrated Bluetooth allows for hands-free calls and direct music streaming from your smartphone. The Digital Sound Processor (DSP) with EQ equalizer offers customizable audio settings, including Vbass, balance, loudness, and filter adjustments, for a high-quality sound experience.

Figure 4.3: Bluetooth and DSP Features
This image illustrates the Bluetooth functionality for hands-free calls and music streaming, alongside the DSP features for audio customization, including a 32-band equalizer and surround sound options.

Figure 4.4: Bluetooth Functionality
This image depicts the Bluetooth function in use, showing the car stereo's interface for music playback and phone calls, enhancing driving safety and convenience.
4.3. Steering Wheel Control
The unit supports steering wheel control (SWC) functionality. By connecting the vehicle's SWC cable, you can directly manage calls, adjust volume, or change songs using your steering wheel buttons, promoting safer driving.

Figure 4.5: Steering Wheel Control Setup
This image shows the interface for setting up and customizing steering wheel controls, allowing users to quickly switch functions without taking their hands off the wheel.
4.4. Screen Mirroring
The screen mirroring feature allows you to display your smartphone's screen directly onto the car stereo's 9-inch capacitive IPS HD touchscreen. This is useful for viewing content or applications not natively supported by the stereo interface.

Figure 4.6: 9-inch Large Touchscreen with Screen Mirroring
This image showcases the large 9-inch capacitive IPS HD touchscreen and its screen mirroring capability, allowing content from a smartphone to be displayed on the car stereo.
4.5. FM/RDS Radio
The unit includes an FM/RDS radio tuner. RDS (Radio Data System) provides additional information such as station name, song title, and traffic announcements where available. It also supports DAB (Digital Audio Broadcasting) with an optional DAB+ Subwoofer.

Figure 4.7: FM/RDS Radio Interface
This image displays the radio interface, showing frequency tuning and equalizer settings, confirming support for FM/RDS and DAB radio functionalities.
4.6. Camera Input
The system supports both front and backup camera inputs. This enhances safety by providing a clear view of your surroundings when parking or maneuvering. The included AHD camera offers a 120° rear viewing angle and reverse assistance lines.

Figure 4.8: Rear/Front Camera Input
This image demonstrates the car stereo's support for rear and front camera inputs, showing a clear parking assist view with guidelines and highlighting features like night vision and waterproofing.
5. Maintenance
- Screen Cleaning: Use a soft, lint-free cloth to gently wipe the touchscreen. For stubborn smudges, slightly dampen the cloth with water or a screen-safe cleaner. Avoid abrasive materials or harsh chemicals.
- Software Updates: The unit supports convenient online firmware updates. Periodically check for updates in the system settings to ensure optimal performance and access to new features.
- General Care: Keep the unit free from dust and debris. Avoid exposing it to extreme temperatures or direct sunlight for prolonged periods. Ensure all connections are secure.
6. Troubleshooting
If you encounter issues with your Dfuorty Car Stereo, refer to the following common troubleshooting steps:
- No Power:
- Check all power connections to ensure they are securely fastened.
- Verify the vehicle's fuse related to the stereo is not blown.
- No Sound:
- Check speaker connections.
- Ensure the volume is not muted or set too low.
- Verify audio output settings in the system menu.
- Bluetooth/CarPlay/Android Auto Connection Issues:
- Ensure Bluetooth is enabled on both the stereo and your phone.
- Try restarting Bluetooth on both devices.
- For ZLINK, ensure the car stereo is connected to a WiFi hotspot (refer to Section 3.4) and clear any history records in the ZLINK app before attempting to reconnect.
- Refer to Video 3.1 for detailed connection troubleshooting.
- GPS Signal Loss:
- Ensure the GPS antenna is properly installed and has a clear view of the sky.
- Check GPS settings in the system menu.
- Touchscreen Unresponsive:
- Try restarting the unit.
- Ensure the screen is clean and free from debris.
For persistent issues not covered here, please contact customer support.
7. Specifications
| Feature | Detail |
|---|---|
| Model Number | QA1755X |
| Operating System | Android 13 |
| CPU | 4 Cores, 1.3Ghz |
| RAM | 2GB |
| ROM | 32GB |
| Screen Size | 9 Inches |
| Display Resolution | 1280*720 IPS HD |
| CarPlay/Android Auto | Wireless & Wired Support |
| GPS Navigation | Built-in Module, Online/Offline Maps |
| Connectivity | Bluetooth, USB, Wi-Fi |
| Audio Output | 4x45W, HiFi, 18-band EQ, DSP |
| Camera Input | Front & Backup Camera Support |
| Steering Wheel Control | Supported |
| Product Dimensions | 14.2 x 8.7 x 4.7 inches |
| Item Weight | 3.5 pounds |
8. Warranty and Support
Your Dfuorty Car Stereo Upgrade is covered by a comprehensive warranty and dedicated customer support.
- Warranty: The product comes with a 1-Year Warranty from the date of purchase.
- Returns/Exchanges: You are eligible for a 30-Day Exchange or Return from the date of purchase.
- Customer Service: We offer 24/7 Customer Service to assist you with any inquiries or issues.
- Customer Support Email: For direct assistance, please contact us at Bongagho126.com.

Figure 8.1: Warranty and Service Information
This image summarizes the warranty and support terms, including return policy, warranty duration, and customer service availability with contact email.