Introduction
The hygger Intelligent Wave Maker is designed to simulate natural ocean currents within your aquarium, promoting a healthy environment for fish and corals. This device helps circulate water, remove debris, enhance filtration, and increase oxygen levels. This manual provides detailed instructions for the safe and efficient operation of your wave maker.
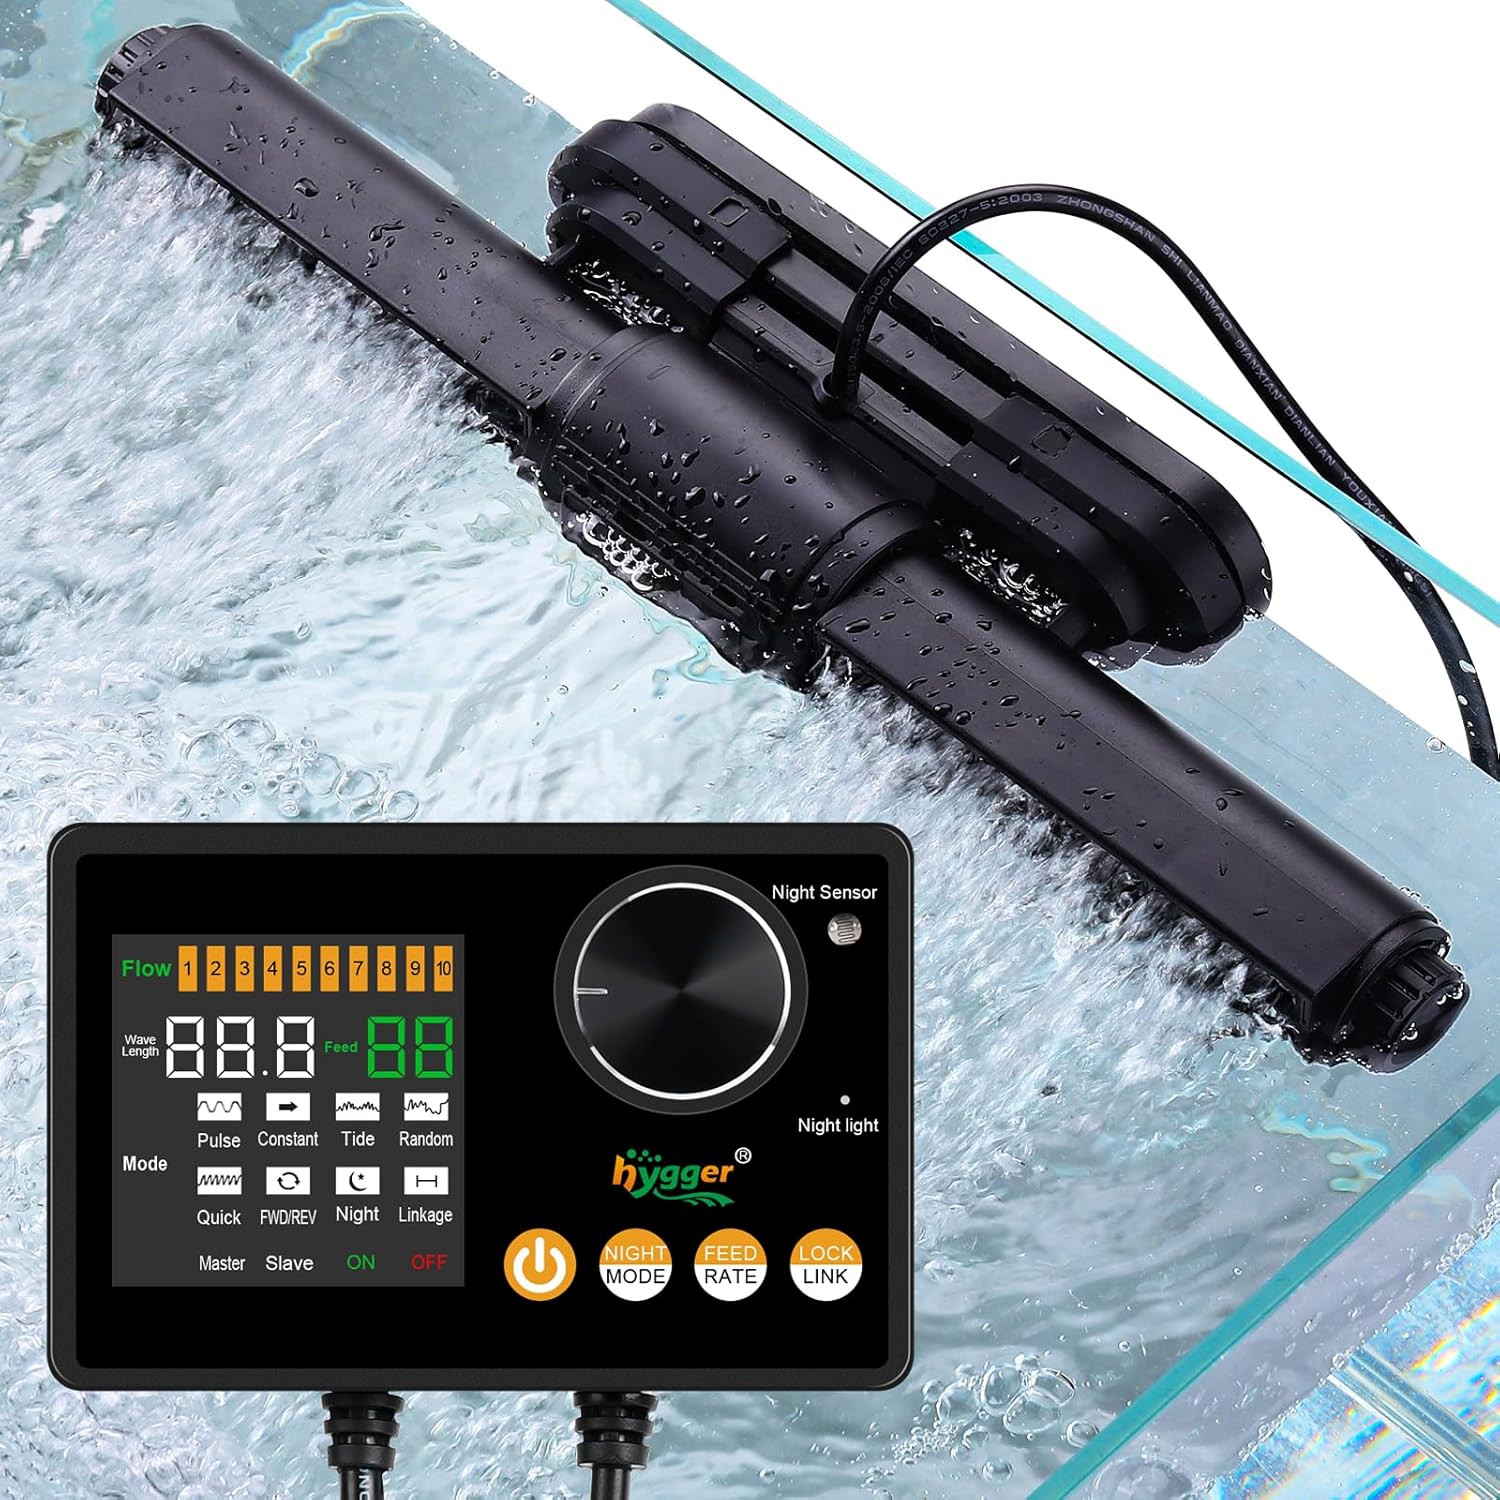
Image: The hygger Intelligent Wave Maker and its external controller, shown installed and operating in an aquarium.
Safety Instructions
- Always disconnect power before performing any maintenance or installation.
- Ensure the wave maker is fully submerged in water during operation.
- Do not operate the device if the power cord or plug is damaged.
- Keep the controller dry and away from water splashes.
- This product is designed for aquarium use only.
- Ensure the magnetic holder is securely attached to the aquarium glass.
Package Contents
Verify that all components are present:
- Hygger Wave Maker Pump
- External Controller with Digital Display
- Power Adapter
- Magnetic Holder
- User Manual (this document)
Product Overview
The hygger Intelligent Wave Maker features a robust design with a rotatable wide wave outlet and an intuitive external controller.
Components
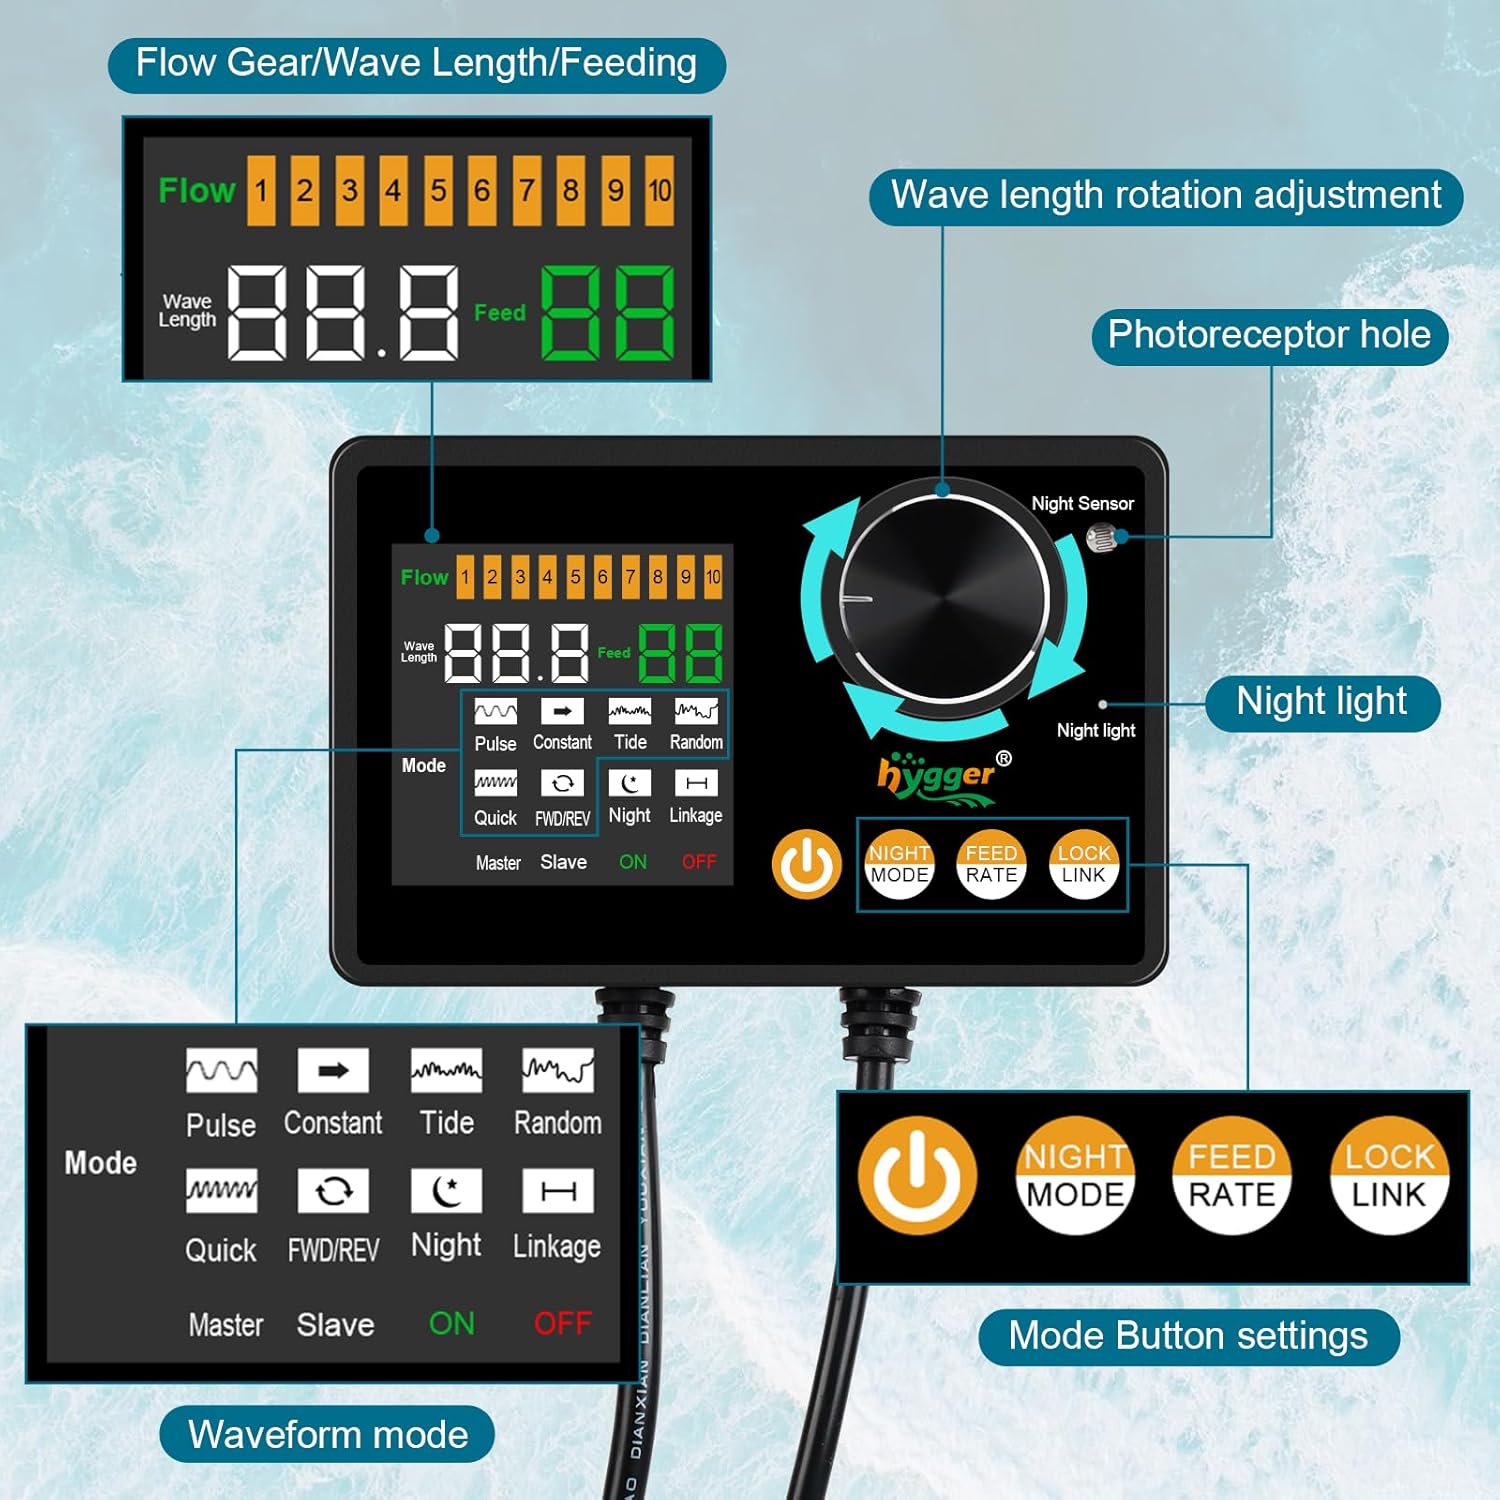
Image: Detailed diagram of the wave maker controller, highlighting its various buttons, display areas, and sensor.
- Wave Maker Pump: Submersible unit that generates water flow. Features a rotatable outlet for directional adjustment.
- External Controller: Digital display with buttons for mode selection, flow adjustment, and special functions. Includes a night sensor.
- Magnetic Holder: Secures the wave maker to the aquarium glass. Designed with a silicone sleeve to reduce noise and prevent scratches.
Dimensions and Compatibility
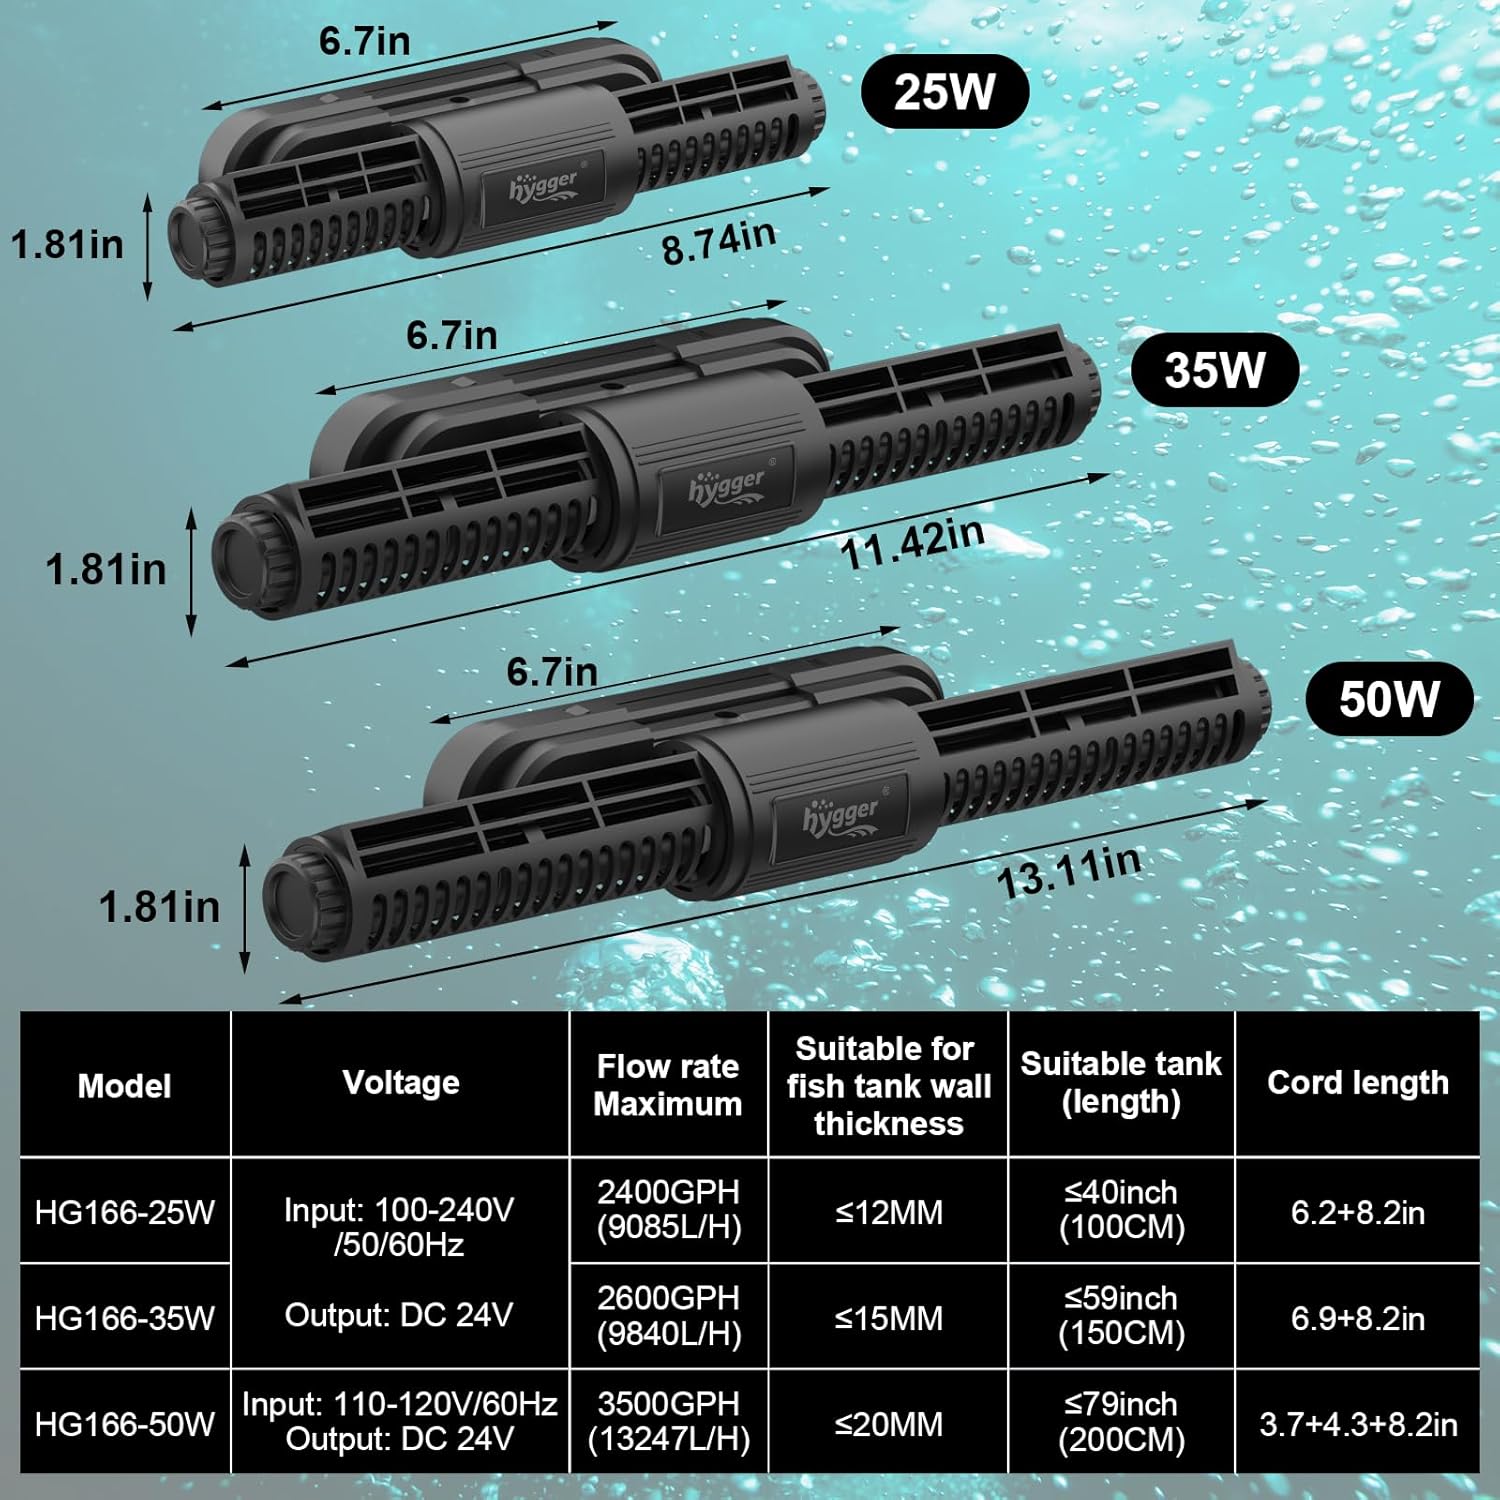
Image: Comparison of wave maker dimensions for 25W, 35W, and 50W models, including a specification table for each.
The 50W model (HG166) is suitable for tank wall thickness up to 20mm (0.79 inches) and tank lengths up to 200cm (79 inches).
Setup
- Positioning the Wave Maker:
Place the wave maker pump inside the aquarium, ensuring it is fully submerged. Attach the magnetic holder to the outside of the aquarium glass, aligning it with the internal pump unit. Adjust the position and angle of the pump's rotatable outlet to direct water flow as desired. The wider outlet design helps distribute water flow evenly.

Image: Examples of optimal water flow patterns in an aquarium using the wave maker.
- Connecting the Controller:
Connect the wave maker pump to the external controller. Then, connect the power adapter to the controller and plug it into a power outlet. Ensure all connections are secure.

Image: Connection diagram for the wave maker pump, controller, and power adapter.
- Initial Power On:
Once powered, the controller display will illuminate. You can now select your desired operating mode and flow rate.
Operating Modes
The hygger Intelligent Wave Maker offers six distinct wave modes to suit various aquarium needs. Use the "Mode" button on the controller to cycle through these options.
Wave Mode Descriptions:

Image: Visual representation of Constant, Pulse, and Tide wave modes.
- Constant Mode: Provides a continuous, fixed waveform output water flow.
- Pulse Mode: The motor quickly pushes out a wave at maximum power, then drops to minimum power, repeating the cycle.
- Tide Mode: The motor slowly increases to maximum speed and then slowly decreases, simulating natural tidal movements.

Image: Visual representation of Random, Quick, and FWD/REV wave modes.
- Random Mode: The flow rate varies without a standard rhythm, creating turbulent water movement.
- Quick Mode: The motor runs at a fast, constant speed, providing a strong, continuous water flow.
- FWD/REV Mode: The waveform operates alternately in forward and reverse directions.
Adjust the flow rate using the dial on the controller to fine-tune the intensity of the chosen wave mode.

Image: The wave maker and controller demonstrating adjustable waveform and flow rate.
Day/Night Mode
The wave maker features a Day/Night mode to provide a natural resting period for your aquatic inhabitants. The external controller is equipped with a light sensor.
- When the room light dims, the light sensor activates, and the wave pump automatically switches to the lowest flow rate (1st speed) of the currently selected mode.
- When the light brightens, the pump returns to the normal mode and flow rate settings previously configured.
- This mode can be manually turned off if not desired.

Image: Graph demonstrating the Nighttime Low Flow Mode, with a visual of the magnetic base holder.
Feeding Mode
To facilitate feeding, the wave maker includes a dedicated feeding mode:
- Press the "Feed" button on the controller.
- The wave pump will temporarily stop running for ten minutes, allowing fish to feed without strong water circulation.
- After ten minutes, the wave pump will automatically resume its previous operating mode.

Image: The feeding mode in action, alongside diagrams for low water protection and wireless connection.
Wireless Connection Mode
For aquariums requiring multiple wave makers, units can be wirelessly connected to operate alternately and share a master controller setting.
- Designate one controller as the "Master" and others as "Slave" units.
- Use the "Link" button on the controller to establish the wireless connection.
- The Master controller will synchronize the operation of all linked Slave units, allowing for complex flow patterns.
Refer to the controller diagram in the "Product Overview" section for the "Master/Slave" and "Link" indicators.
Maintenance
Regular maintenance ensures optimal performance and longevity of your wave maker.
- Cleaning the Pump: Periodically remove the wave maker from the aquarium and disassemble it for cleaning. Use a soft brush to remove algae and debris from the impeller and housing. Rinse thoroughly with clean water.
- Controller Care: Keep the external controller clean and dry. Avoid exposing it to water or extreme temperatures.
- Cord Inspection: Regularly inspect the power cord and connections for any signs of damage or wear.
Troubleshooting
| Problem | Possible Cause | Solution |
|---|---|---|
| Wave maker not operating. | No power; loose connection; pump clogged. | Check power supply and connections. Clean the pump impeller. |
| Weak water flow. | Impeller dirty; flow rate set too low. | Clean the impeller. Increase the flow rate on the controller. |
| Unusual noise from pump. | Debris in impeller; improper installation. | Disconnect power, remove debris, and re-install securely. Ensure silicone sleeve is correctly positioned. |
| Controller display not working. | Power issue; controller damage. | Check power connection. If problem persists, contact support. |
| Low water level protection activated. | Water level in tank is too low. | Add water to the aquarium until the pump is fully submerged. |
Specifications (Model HG166 - 50W)
| Feature | Detail |
|---|---|
| Model Name | HG166 |
| Power | 50W |
| Input Voltage | 110-120V/60Hz |
| Output Voltage | DC 24V |
| Maximum Flow Rate | 3500 GPH (13247 L/H) |
| Suitable Tank Wall Thickness | ≤20mm (0.79 inches) |
| Suitable Tank Length | ≤79 inches (200 cm) |
| Item Weight | 3.05 pounds |
| Item Package Dimensions | 15.04 x 5.87 x 3.7 inches |
| Cord Length | 3.7 + 4.3 + 8.2 inches (total length of power cord, controller cord, and pump cord) |
Warranty
This hygger product comes with a 1-year warranty from the date of purchase. The warranty covers defects in materials and workmanship under normal use. Please retain your proof of purchase for warranty claims. The warranty does not cover damage caused by misuse, neglect, improper installation, or unauthorized modifications.
Support
For further assistance, technical support, or warranty inquiries, please contact hygger customer service. You can find contact information on the official hygger website or through your retailer.
Visit the hygger Store on Amazon for more products and information.


