1. Product Overview
The VORGUT A6804 is a comprehensive wired security camera system designed for reliable surveillance. It includes a 4-channel 5MP Lite AHD DVR with a pre-installed 500GB hard drive and four 3MP wired CCTV cameras. This system offers stable performance for both indoor and outdoor monitoring, featuring human detection and infrared night vision.

Image 1.1: Overview of the VORGUT A6804 security camera system components, including the DVR, four cameras, 500GB hard drive, cables, and a smartphone displaying the app interface.
Key Features:
- Plug and Play Setup: Simple connection of cameras to DVR and DVR to display.
- 3MP HD & Infrared Night Vision: Clear video resolution with automatic night vision up to 80 feet.
- Smart Motion Detection: Human detection reduces false alarms and sends instant notifications.
- Pre-Installed 500GB HDD: Local storage for 24/7 recording without monthly fees.
- Remote Access: View live and recorded footage via a free mobile application.
- IP67 Weatherproof Cameras: Durable metal shell cameras suitable for outdoor use in various weather conditions.
2. What's in the Box
Before beginning installation, please verify that all components listed below are present in your package.
- 1x AHD DVR (with pre-installed 500GB HDD)
- 4x 3MP Wired CCTV Cameras
- 4x 60ft BNC Cables
- 2x DC12V/2A Power Adapters
- 1x 1 to 4 Power Splitter
- 1x USB Mouse
- 1x Screw Pack
- 1x Quick Start Guide

Image 2.1: Visual representation of all items included in the VORGUT A6804 security system package.
3. Setup Instructions
Follow these steps to set up your VORGUT A6804 security camera system.
3.1 Hardware Connection
- Connect Cameras: Use the provided BNC cables to connect each 3MP camera to the corresponding video input ports (VIDEO IN) on the back of the DVR.
- Power Cameras: Connect the camera power cables to the 1-to-4 power splitter, then connect the splitter to one of the DC12V/2A power adapters. Plug the adapter into a power outlet.
- Connect DVR to Display: Connect the DVR to a TV or monitor using an HDMI or VGA cable. Ensure the display input source is set correctly.
- Power DVR: Connect the second DC12V/2A power adapter to the DVR's power input and plug it into a power outlet.
- Connect USB Mouse: Plug the USB mouse into one of the USB ports on the DVR for navigation.

Image 3.1: Step-by-step diagram illustrating the physical connections for the cameras, DVR, and monitor for a plug-and-play setup.
3.2 Remote Access Setup
To enable remote viewing on your mobile devices:
- Connect DVR to Router: Use an Ethernet cable to connect the DVR's LAN port to your internet router.
- Download Mobile App: Download the free VORGUT mobile application from your device's app store.
- Add Device: Follow the in-app instructions to add your DVR system. This typically involves scanning a QR code or manually entering device details.
- Configure Settings: Adjust any necessary network or notification settings within the app.

Image 3.2: Illustration showing the DVR's ability to function with or without an internet connection for local viewing, and requiring internet for remote access.
4. Operating Instructions
4.1 Local Viewing and Recording
Once the system is powered on and connected to a monitor, you can view live footage directly. The pre-installed 500GB HDD supports continuous 24/7 recording. You can access playback options through the DVR's on-screen menu using the USB mouse.

Image 4.1: Illustration depicting a house with cameras installed, highlighting the 24/7 recording capability and the pre-installed 500GB HDD in the DVR.
4.2 Smart Motion Detection and Alerts
The system features intelligent human detection to minimize false alarms. When motion is detected, the system can send instant notifications to your mobile device via the app or email.
- Configure Detection Zones: Use the DVR interface to define specific areas for motion detection, reducing alerts from irrelevant zones.
- Customize Alerts: Set up preferred notification methods (app push, email) within the mobile application.
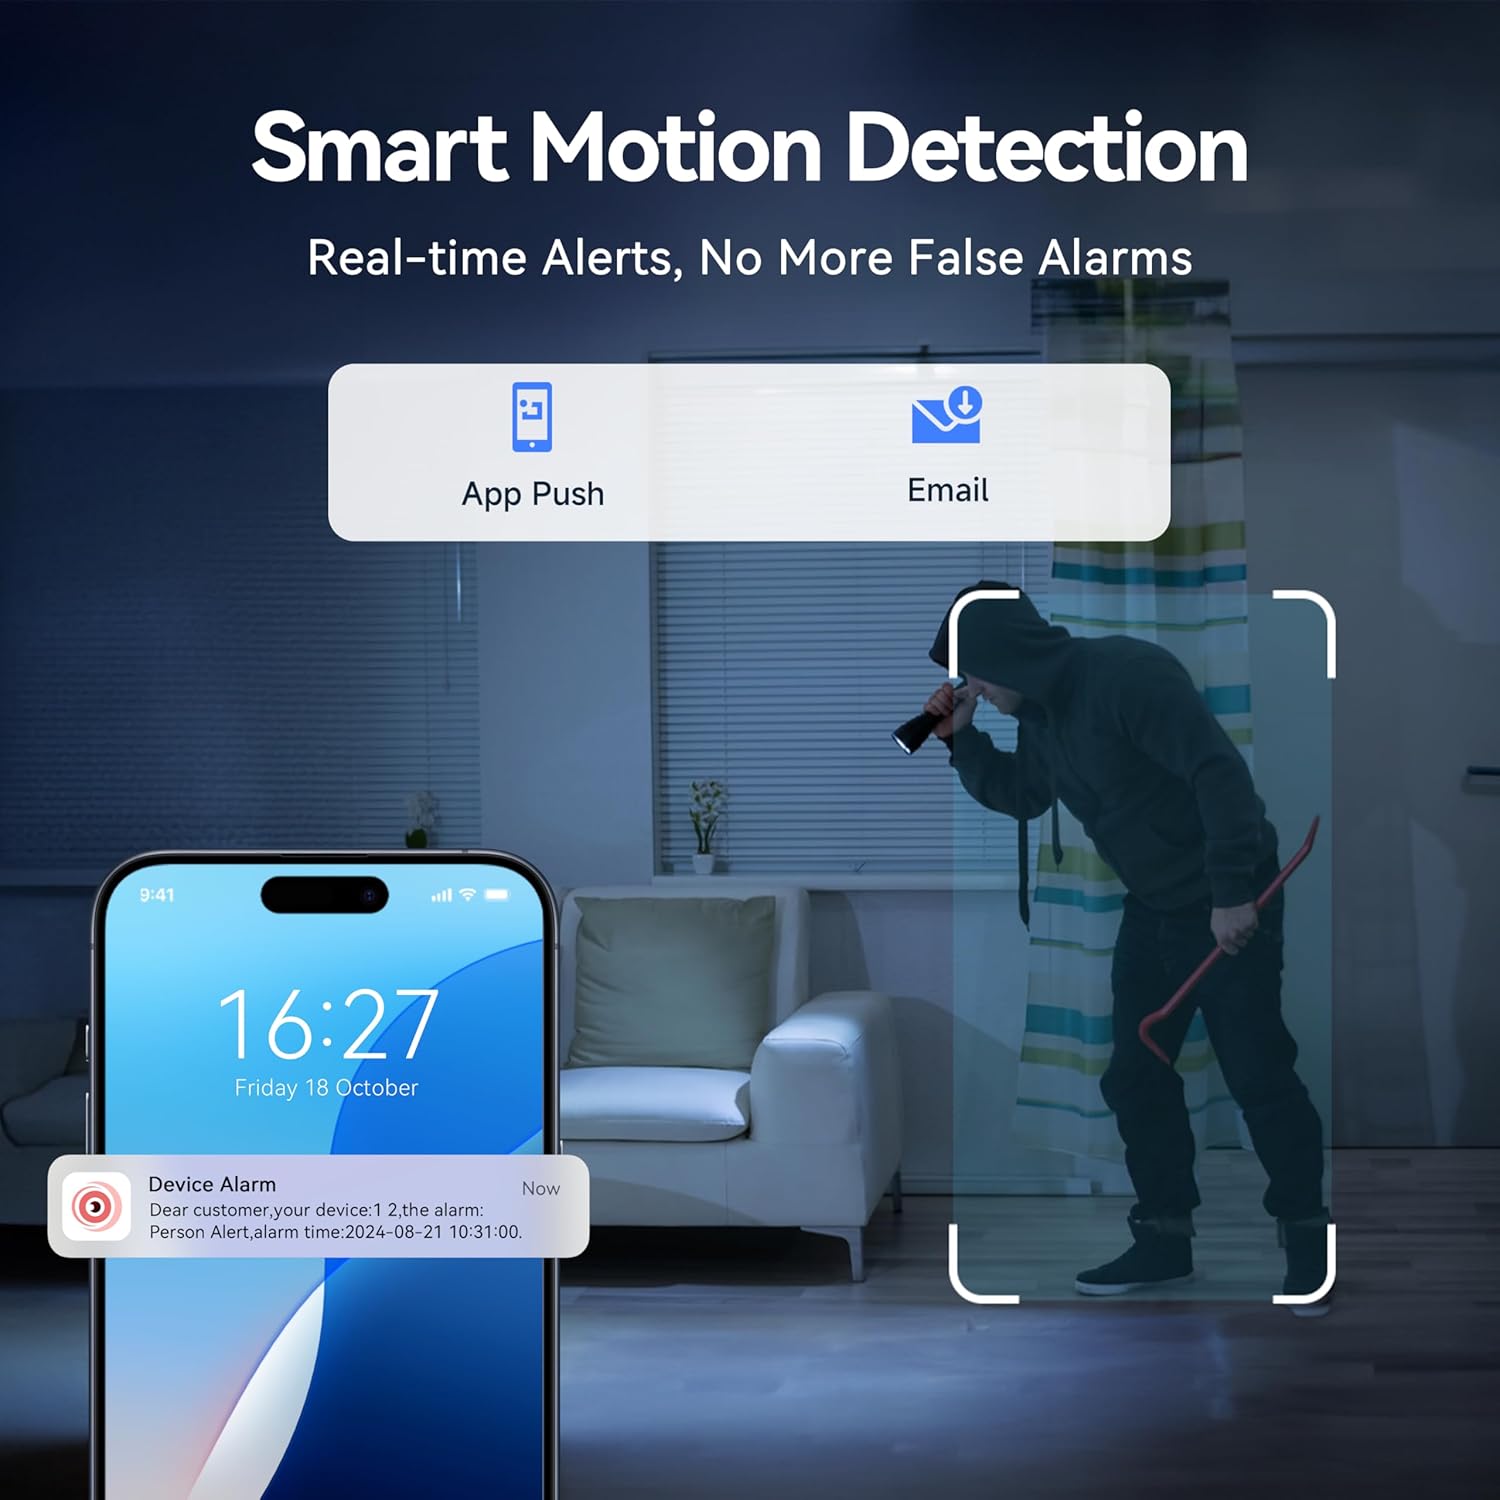
Image 4.2: A smartphone screen showing an alert notification for human detection, with a person highlighted in the background.

Image 4.3: An example of setting up a specific motion detection zone (highlighted in red) within a larger surveillance area.
4.3 Remote Viewing and Playback
With the mobile app, you can view live camera feeds and review recorded footage from anywhere with an internet connection.
- Live View: Access real-time video streams from all connected cameras.
- Playback: Browse recorded footage by date and time, and play back specific events.
- Multi-Device Support: The system supports viewing on smartphones, tablets, and personal computers.

Image 4.4: Various devices (monitor, laptop, smartphone, tablet) simultaneously displaying live camera feeds from the security system.
5. Maintenance
Proper maintenance ensures the longevity and optimal performance of your security system.
- Camera Cleaning: Periodically clean the camera lenses with a soft, damp cloth to remove dust and dirt, ensuring clear image quality.
- Cable Inspection: Regularly check all BNC and power cables for any signs of wear, damage, or loose connections.
- DVR Placement: Ensure the DVR is placed in a well-ventilated area, away from direct sunlight, heat sources, and moisture, to prevent overheating.
- Firmware Updates: Check the manufacturer's website or app for any available firmware updates for the DVR to ensure optimal performance and security.
- Weather Resistance: The cameras are IP67 weatherproof, designed to withstand temperatures from -40°C to 60°C. However, avoid directing high-pressure water jets directly at the cameras.

Image 5.1: A VORGUT security camera mounted outdoors, demonstrating its IP67 weatherproof rating during rainfall.

Image 5.2: Graphic illustrating the wide operating temperature range (-10°C/14°F to 55°C/131°F) for the VORGUT outdoor cameras.
6. Troubleshooting
This section addresses common issues you might encounter with your VORGUT security system.
6.1 No Video Signal / Black Screen
- Check Power: Ensure both the DVR and all cameras are properly powered on and their power adapters are securely plugged into working outlets.
- Verify Cable Connections: Confirm that all BNC cables are securely connected between the cameras and the DVR, and the HDMI/VGA cable is firmly connected between the DVR and the monitor.
- Monitor Input: Ensure your monitor's input source is correctly selected (e.g., HDMI1, VGA).
- Test Individual Camera: If only one camera has no signal, try swapping its cable or power adapter with a working camera to isolate the issue.
6.2 Poor Image Quality
- Clean Lens: Gently clean the camera lens with a soft cloth to remove any smudges, dust, or dirt.
- Check Cable Integrity: Damaged or kinked BNC cables can affect video quality. Inspect cables for any visible damage.
- Lighting Conditions: Ensure adequate lighting during the day. At night, verify that the infrared LEDs are activating (a faint red glow might be visible).
- Resolution Settings: Check the DVR's video output settings to ensure they are configured for 3MP resolution.

Image 6.1: A visual comparison demonstrating the clear 3MP HD image quality during the day and the infrared night vision capabilities of the cameras.
6.3 Remote Access Issues
- Internet Connection: Ensure the DVR is connected to a stable internet connection via Ethernet cable and your router is functioning correctly.
- App Login: Double-check your login credentials for the mobile app.
- Device Added: Confirm that your DVR device has been successfully added to the mobile application.
- Router Settings: If issues persist, check your router's firewall or port forwarding settings. Consult your router's manual or ISP for assistance.
7. Specifications
| Feature | Specification |
|---|---|
| Brand | VORGUT |
| Model Number | A6804 |
| Connectivity Technology | Wired |
| Video Capture Resolution | 3MP (Cameras) |
| DVR Resolution Support | 5MP Lite AHD |
| Special Features | App Control, Human Detection, Night Vision, Smart Playback, Weatherproof |
| Number of Channels | 4 |
| Memory Storage Capacity | 500 GB (Pre-installed HDD) |
| Power Source | Corded Electric |
| Item Dimensions (DVR) | 8 x 5 x 10 inches |
| Compatible Devices | Monitor, Personal Computers, Smartphones, TV |
| Night Vision Range | Up to 80 feet |
| Frame Rate | 30 fps |
| Recording Mode | Continuous, Motion Detection |
| Hardware Interface | Ethernet, BNC, HDMI, VGA, USB |
| Lens Type | Zoom |
| Operating Temperature | -40°C to 60°C (-40°F to 140°F) for cameras |
| Item Weight | 8.75 pounds (Total system) |

Image 7.1: Detailed view of the camera and DVR, including their dimensions and available ports for connectivity.
8. Warranty and Support
VORGUT is committed to providing reliable products and customer satisfaction.
- Technical Assistance: VORGUT offers lifetime technical assistance for its products.
- Customer Service: For any questions, issues, or support needs, please refer to the contact information provided in your Quick Start Guide or visit the official VORGUT website.

Image 8.1: VORGUT's commitment to customer support, including after-sale support, fast response, a needs-based approach, and lifetime technical assistance.