1. Introduction
This manual provides detailed instructions for the installation, operation, and maintenance of your KERDE Automatic Touchless Toilet Flusher Kit, Model CN08C. This device is designed to enhance hygiene and convenience by providing an automatic, touch-free flushing experience for compatible toilets.
Please read this manual thoroughly before installation and use to ensure proper function and longevity of the product.
2. Product Features
- Advanced Optical Sensor Technology: Features an optical sensor with an approximate range of 11.81 inches (30 cm) for automatic detection of user presence and absence, enabling touchless flushing. This promotes improved hygiene by minimizing contact with surfaces.
- Dual Flushing Modes: Offers both motion-activated automatic flushing and a manual remote flush option. The remote control has an approximate range of 120 inches (300 cm), providing flexible control.
- Easy DIY Installation: Designed for quick and straightforward installation without the need for professional assistance. The battery-powered design eliminates the requirement for electrical wiring or power outlets.
- Wide Compatibility: Compatible with most standard home toilets that utilize chain-operated flush mechanisms.
3. Package Contents
Verify that all components are present in the package:
- Automatic Flusher Unit
- Motion Sensor (Remote)
- Mounting Hardware
- User Manual (this document)
- AA Batteries (4 pcs)
4. Compatibility
The KERDE Automatic Touchless Toilet Flusher Kit is designed for use with standard home toilets featuring a chain-operated flush mechanism. It is not compatible with push-button flush toilets.

Image: Illustrates compatible toilet types (side-pull flush) and suitable drain valve mechanisms. Incompatible push-button toilets are also shown.
Refer to the image above to confirm your toilet's compatibility. The system works with common drain valve types that use a chain to lift the flapper.
5. Installation
Follow these steps for proper installation of the automatic toilet flusher kit. For visual guidance, please refer to the installation video provided below.
5.1. Flusher Unit Installation
- Turn off the water supply to the toilet.
- Flush the toilet to empty the tank.
- Place the flusher unit into the toilet tank, securing it with the provided metal buckle onto the tank rim.
- Attach the chain from the flusher unit to the existing chain of the toilet's drain valve. Ensure the chain has slight slack but is not excessively loose.
- Connect the power cord from the flusher unit to the battery compartment.
- Insert 4 AA batteries into the battery compartment.
- Replace the toilet tank lid.

Image: Step-by-step visual guide for installing the flusher unit inside the toilet tank and connecting the sensor.
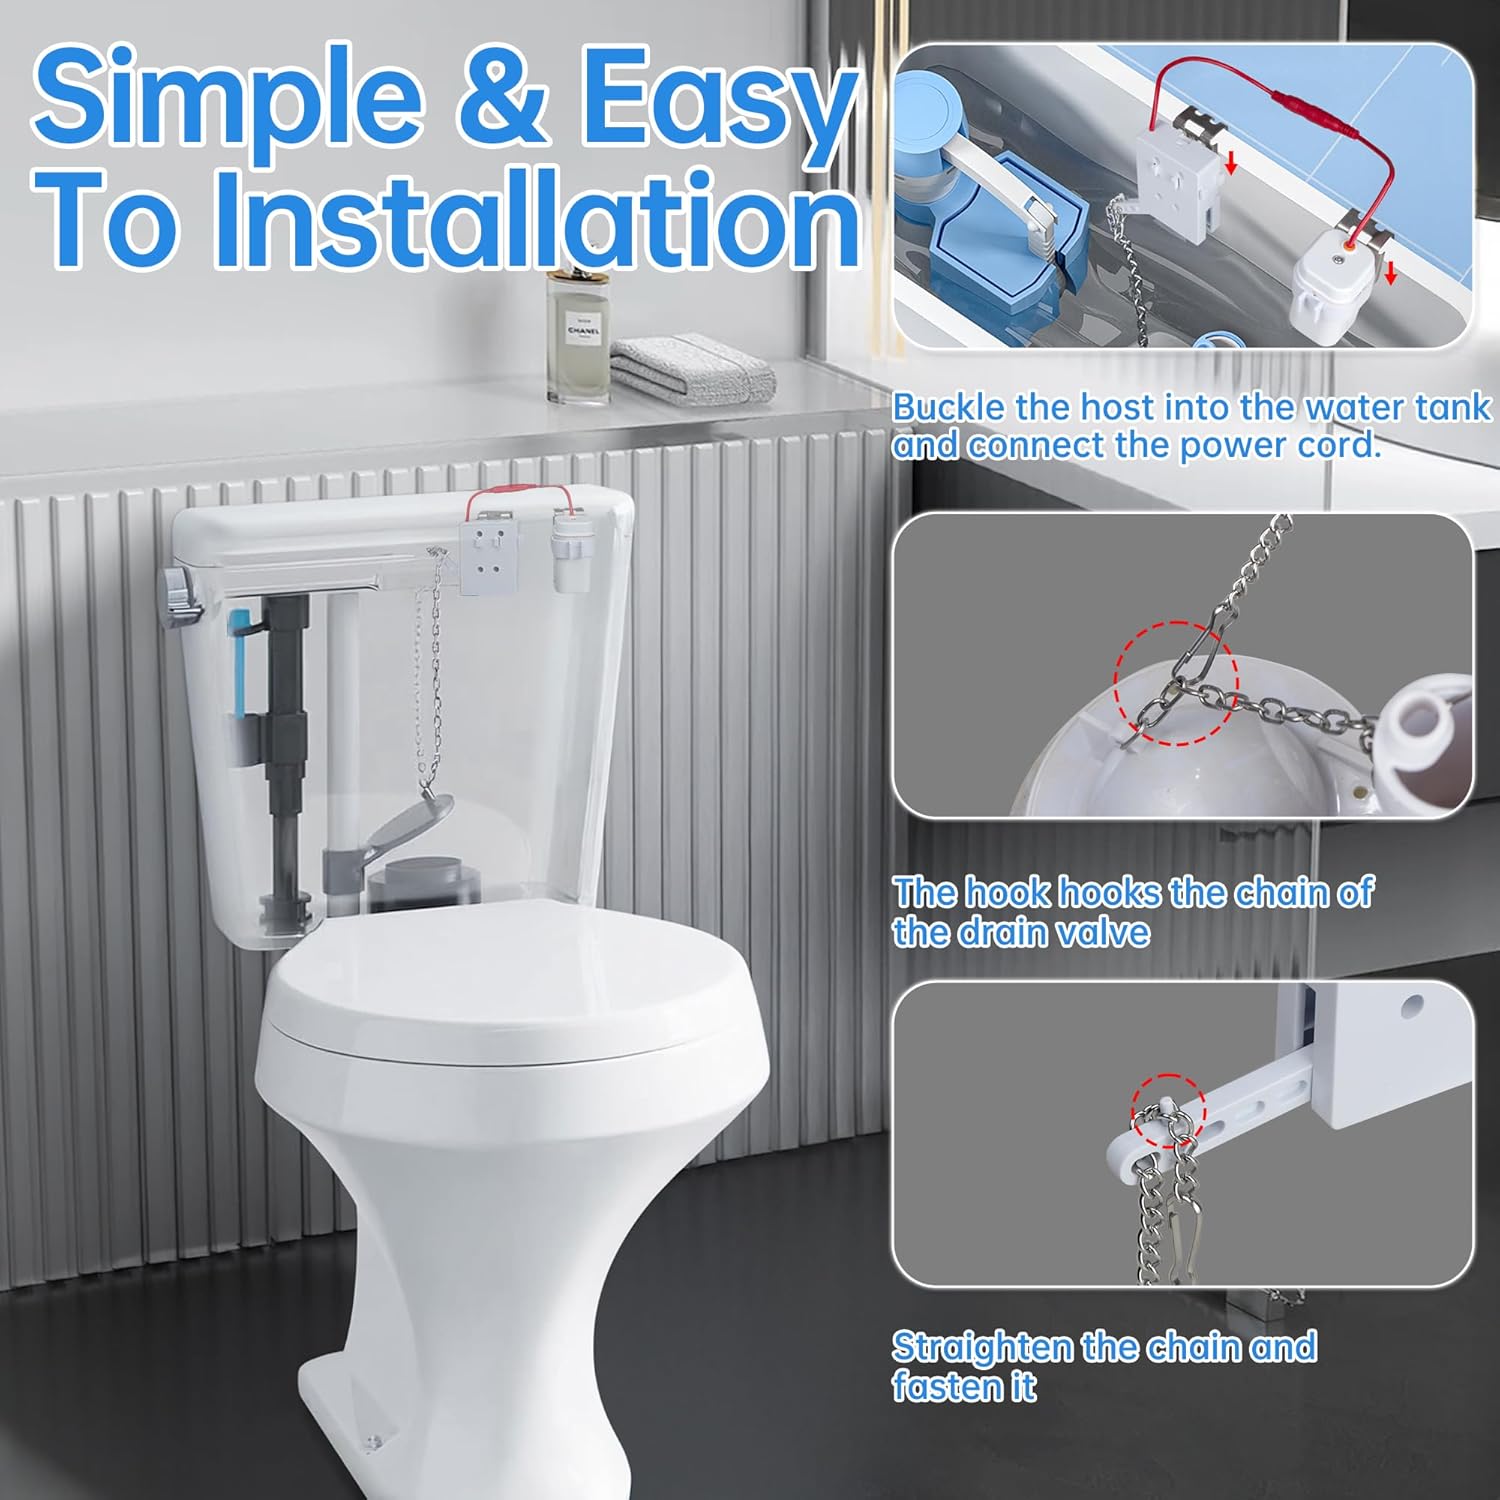
Image: Illustrates how to buckle the host into the water tank, connect the power cord, hook the chain to the drain valve, and straighten the chain.
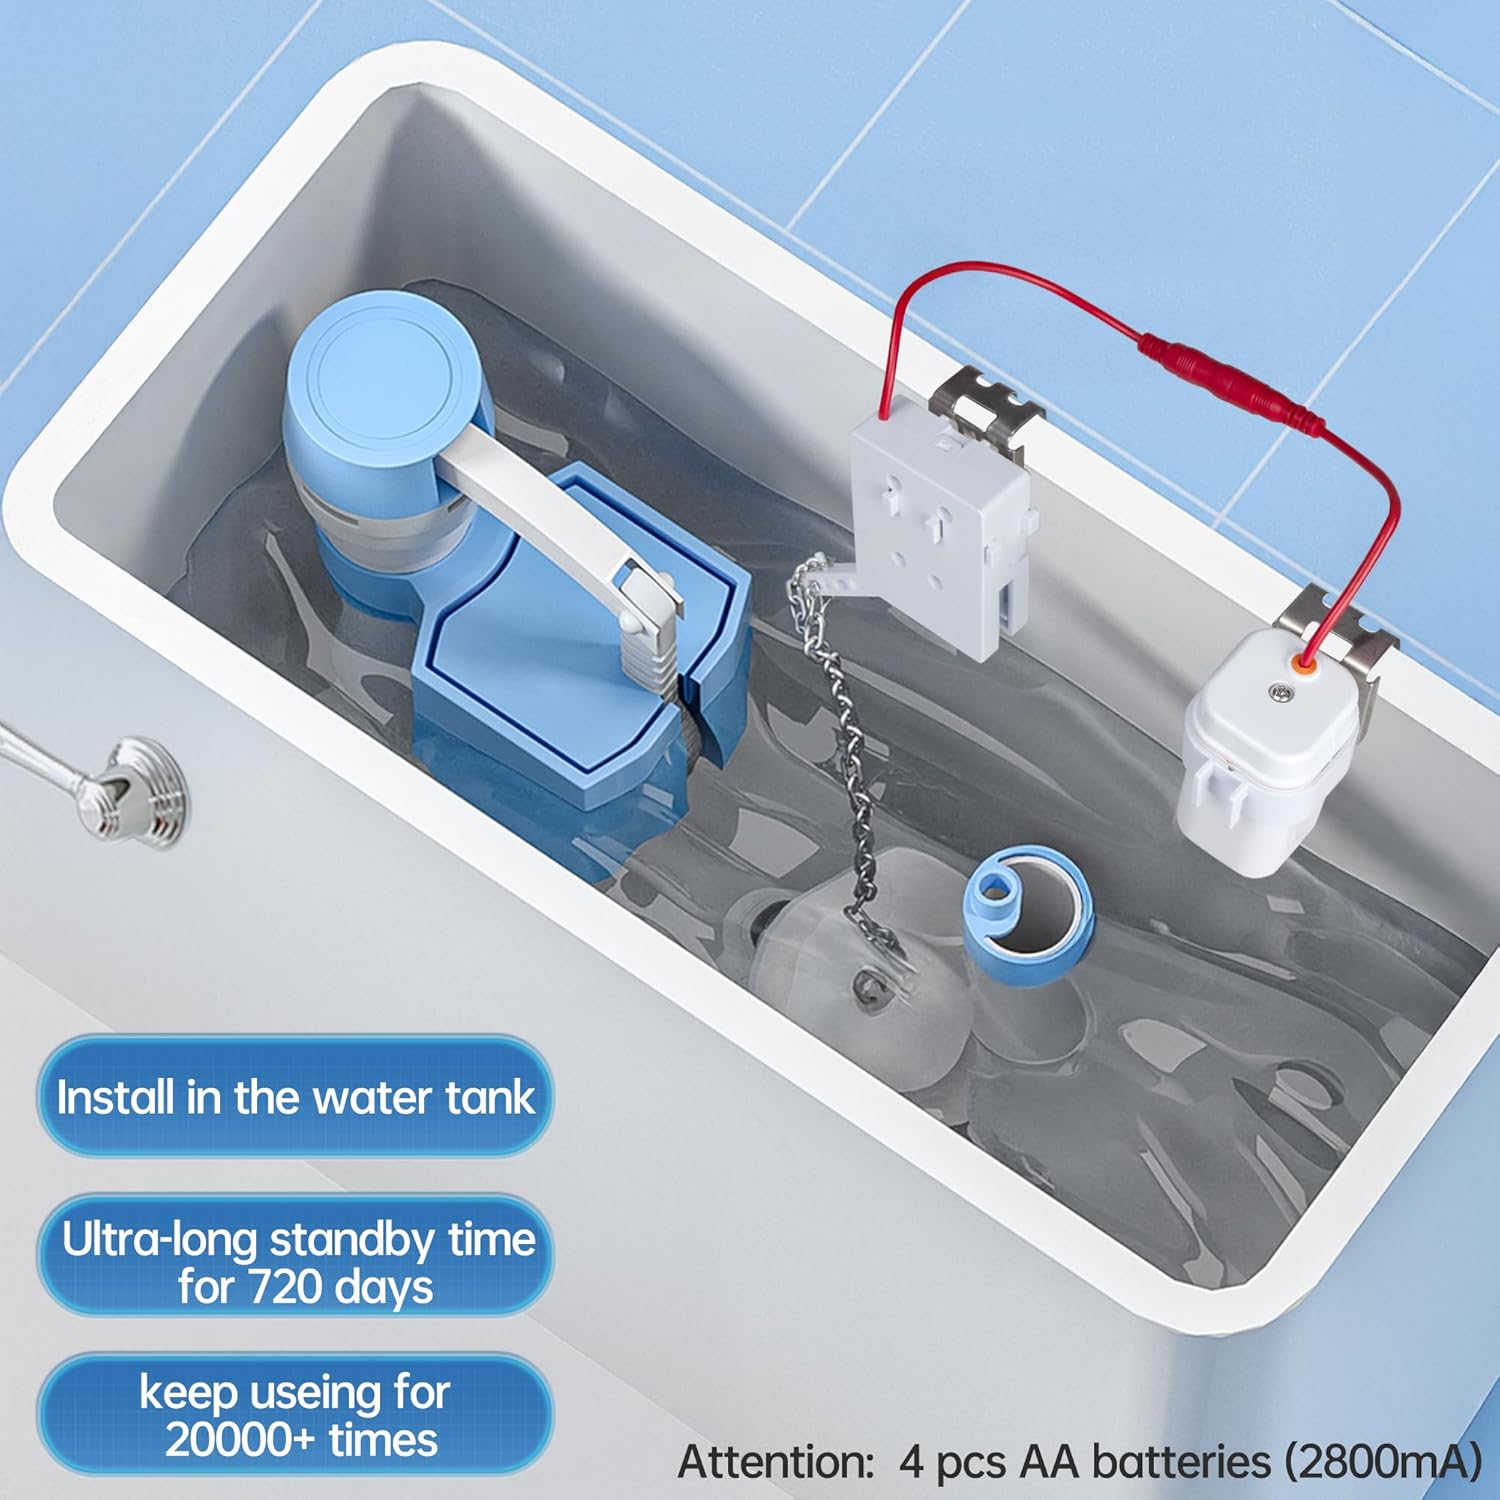
Image: Shows the flusher unit installed inside the toilet tank, highlighting the battery compartment and suggesting 4 AA batteries (2800mA) for extended use.
5.2. Sensor Placement
The motion sensor can be placed in various locations around the toilet. Ensure the sensor has a clear line of sight to detect movement and is not obstructed by objects or direct sunlight.
- Recommended Placement: On the toilet tank, toilet cover, or side wall of the toilet.
- Important: Be careful not to drop the sensor into the toilet bowl.

Image: Demonstrates different suitable locations for the motion sensor, such as on the toilet tank, toilet cover, or adjacent wall.

Image: Explains that the sensor detects objects, human bodies, walls, clothes, and pets within 12 inches. It stays on for 6 seconds after sensing a human body, then flushes after leaving the sensing area. Advises not to block the sensor or expose it to direct sunlight.
5.3. Installation Video
Watch this video for a comprehensive guide on the installation and usage of your KERDE Automatic Touchless Toilet Flusher Kit.
Video: Official KERDE installation and usage guide for the automatic toilet flusher kit.
6. Operation
The KERDE Automatic Touchless Toilet Flusher Kit offers two primary modes of operation:
6.1. Automatic Sensor Flush
The optical sensor detects your presence and absence. When a user leaves the sensing area (approximately 11.81 inches or 30 cm range), the toilet will automatically flush after a brief delay. This ensures a hands-free and hygienic experience.
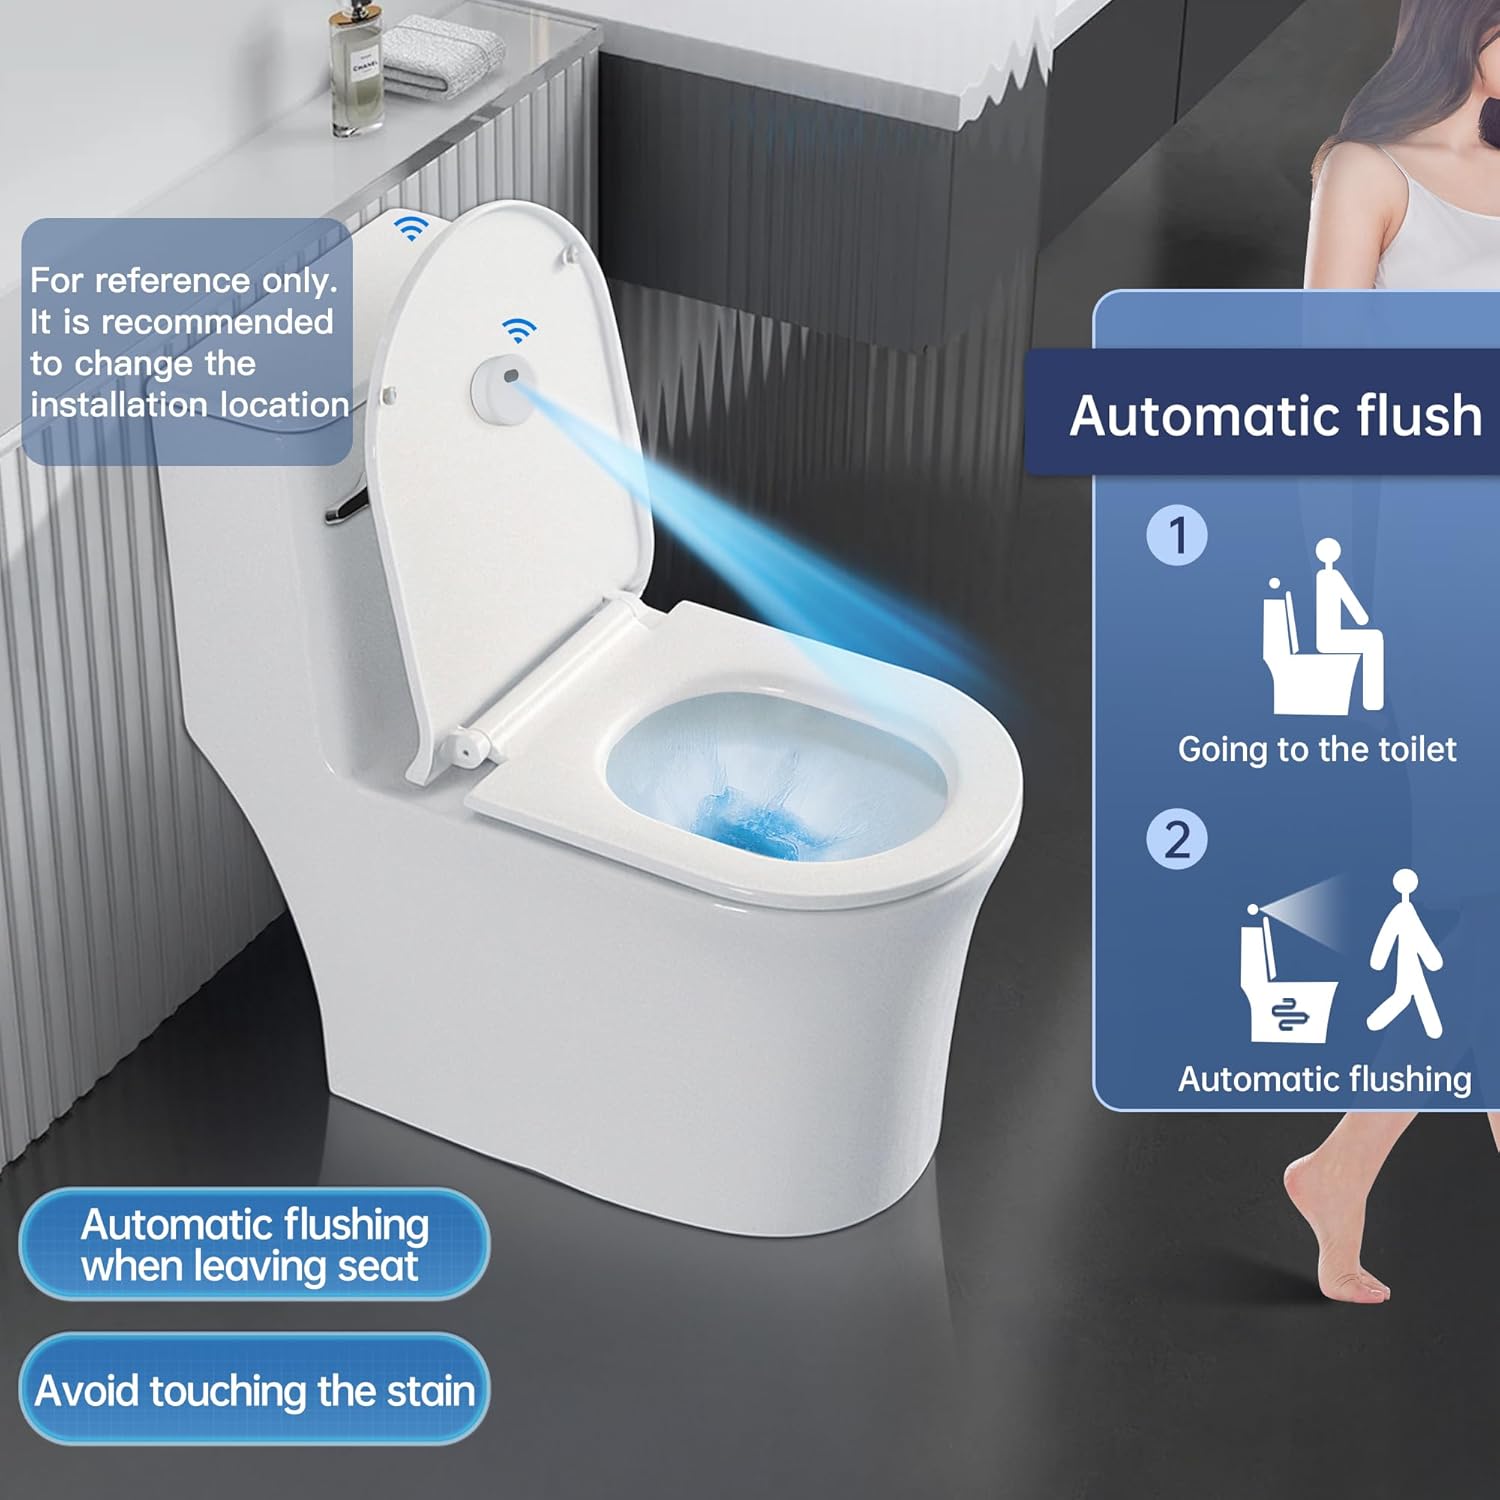
Image: Demonstrates the automatic flush function, where the toilet flushes upon the user leaving the seat, promoting hygiene.
6.2. Manual Remote Flush
For situations where manual control is preferred, the system includes a remote control with an approximate range of 120 inches (300 cm). Simply press the button on the remote to activate the flush mechanism.

Image: Shows different flushing methods, including the sensor flush and the manual remote control flush.
7. Maintenance
7.1. Battery Replacement
The flusher unit is powered by 4 AA alkaline batteries. When the unit's performance decreases or the indicator light signals low power, replace all four batteries with new ones. Ensure correct polarity during installation.
The system is designed for ultra-long standby time, potentially lasting up to 720 days or over 20,000 flushes, depending on battery quality and usage frequency.
8. Troubleshooting
If you encounter issues with your automatic toilet flusher, refer to the following common problems and solutions:
| Problem | Possible Cause | Solution |
|---|---|---|
| Toilet does not flush automatically. | Low batteries; sensor obstructed or improperly placed; chain too tight or too loose; unit malfunction. |
|
| Toilet flushes randomly or continuously (phantom flushing). | Sensor too sensitive or detecting nearby objects/movement; direct sunlight on sensor. |
|
| Manual remote flush not working. | Remote batteries low; remote out of range; obstruction between remote and flusher unit. |
|
| Flapper does not lift fully or closes too quickly. | Chain length incorrect; flusher unit motor weak (low battery); obstruction in tank. |
|
9. Specifications
| Feature | Detail |
|---|---|
| Brand | KERDE |
| Model Number | CN08C |
| Material | Plastic, Metal, Rubber, Silicone |
| Item Dimensions (L x W x H) | 1.7 x 3.5 x 1.7 inches |
| Item Weight | 11.7 ounces |
| Exterior Finish | Chrome |
| Inlet Connection Size | 2 Inches |
| Inlet Connection Type | National Pipe Tapered |
| Outlet Connection Size | 3 Inches |
| Outlet Connection Type | NPT |
| Number of Ports | 2 |
| Batteries Required | Yes (4 x AA Alkaline) |
| Sensor Range | Approx. 11.81 inches (30 cm) |
| Remote Control Range | Approx. 120 inches (300 cm) |
10. Warranty and Support
For warranty information or technical support, please refer to the product packaging or contact KERDE customer service through the retailer where the product was purchased. Keep your purchase receipt as proof of purchase.

