Introduction
The xmartO SDK4034 is a 100% wire-free Pan-Tilt-Zoom (PTZ) security camera designed for both outdoor and indoor use. It features 4MP Quad HD video resolution, dual-band WiFi 6 connectivity (2.4Ghz & 5Ghz), and is powered by long-lasting automotive-grade batteries and a solar panel. This manual provides essential information for the proper installation, operation, and maintenance of your security camera system.
What's in the Box
Verify that all components are present before beginning installation.
- 1 x SDK3034 Battery-Powered Security Camera
- 1 x Solar Panel
- 4 x Reusable Cable Ties
- 1 x Corner Installation Piece
- 1 x Wall/Ceiling Mount Bracket
- 1 x User Guide
- 1 x Mounting Kits (screws and wall anchors)
- 1 x Surveillance Sticker
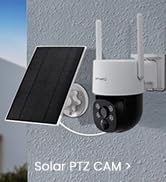
Image: Contents of the xmartO SDK4034 package, showing the camera, solar panel, various mounting accessories, and documentation.
Product Overview
Familiarize yourself with the main components of your xmartO SDK4034 camera and solar panel.
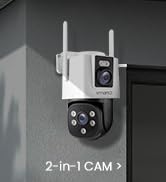
Image: Detailed diagram labeling the camera's components such as Wi-Fi antennas, indicator light, IR & spotlight LEDs, speaker, HD lens, thermal sensor (PIR), Micro SD card slot, reset key, 5V USB DC in, ON/OFF switch, light sensor, and the solar panel with its bracket and USB-C cable.
- Wi-Fi Antennas: For wireless connectivity.
- Indicator Light: Displays camera status.
- Infrared & Spotlight 2-in-1 LEDs: Provide night vision and warning illumination.
- Speaker: For two-way audio communication and siren.
- HD Lens: Captures 4MP Quad HD video.
- Thermal Sensor (PIR): Detects thermal changes for accurate motion detection.
- Micro SD Card Slot: For local video storage.
- Reset Key: To reset the camera to factory settings.
- 5V USB DC In / ON/OFF Switch: Power input and control.
- Light Sensor: Detects ambient light for automatic mode switching.
- Solar Panel: Charges the camera's internal batteries.
Setup
1. Initial Charging
Before first use, fully charge the camera's internal batteries using the provided USB-C cable and a standard 5V USB power adapter (not included). A full charge ensures optimal performance and battery longevity, especially when relying on solar power.
- Connect the USB-C cable to the camera's 5V USB DC In port.
- Connect the other end to a 5V USB power adapter.
- Allow the camera to charge until the indicator light shows a full charge status (refer to the app or camera's LED behavior for specific indications).
2. App Installation
Download and install the official xmartO app (WallPixel Cloud) on your smartphone or tablet. The app is available for both Android and iOS devices.
- Search for "WallPixel Cloud" in the Apple App Store or Google Play Store.
- Install the app and create an account if you are a new user.
Image: Icons for Google Play and Apple App Store, indicating where to download the WallPixel Cloud app.
3. Camera Pairing
Follow the in-app instructions to add your camera to your account. Ensure your smartphone is connected to a 2.4Ghz or 5Ghz Wi-Fi network during the pairing process.
- Open the WallPixel Cloud app and log in.
- Tap the "+" icon to add a new device.
- Select your camera model and follow the on-screen prompts, which typically involve scanning a QR code on the camera or connecting to a temporary Wi-Fi hotspot created by the camera.
- Connect the camera to your home's Wi-Fi network (supports both 2.4Ghz and 5Ghz bands).
4. Mounting Options
The xmartO SDK4034 offers versatile installation options. Choose a location that provides optimal sunlight for the solar panel and a clear view of the area you wish to monitor. Ensure the camera is within range of your Wi-Fi network.
- Wall/Ceiling Installation: Use the included Wall/Ceiling Mount Bracket and screws.
- Corner Installation: Utilize the Corner Installation Piece for mounting on building corners.
- Tree/Pole Installation: Secure the camera and solar panel using the Reusable Cable Ties.

Image: Visual guide demonstrating wall, corner, tree/pole, and ceiling installation methods for the camera.

Image: The camera and solar panel installed on a tree, highlighting its wire-free nature and solar charging capability.
Operating Instructions
1. Live View & PTZ Control
Access the live video feed and control the camera's pan, tilt, and zoom functions directly from the WallPixel Cloud app or an xmartO NVR screen.
- Open the app and select your camera to view the live feed.
- Use the on-screen controls to pan (rotate horizontally up to 360°), tilt (rotate vertically up to 90°), and zoom the camera lens.
- You can also set specific detection zones and privacy masks within the app to customize monitoring areas.

Image: Illustrates the camera's 360° pan and 90° tilt capabilities, along with in-app controls for navigation, detection zones, and privacy masks.

Image: Demonstrates remote viewing of camera feeds from various devices like smartphones, tablets, PCs, or Macs.
2. Motion Detection & Alerts
The camera utilizes a built-in Passive Infrared (PIR) sensor for thermal true detection, minimizing false alarms by distinguishing between people, animals, and vehicles from environmental factors.
- Configure motion detection sensitivity and alert preferences within the app.
- Receive instant mobile alerts when activity is detected in the monitored area.
- Set up specific detection zones and privacy masks to focus monitoring on critical areas and exclude private spaces.

Image: Illustrates the camera's thermal true detection capabilities, accurately identifying people, animals, and vehicles while filtering out false alarms.
3. Night Vision & Warning Light
The camera is equipped with professional IR LEDs for clear black-and-white night vision up to 65ft in complete darkness. When activity is detected at night, the camera can automatically activate its warning spotlight, enabling color night vision recording and deterring intruders.
- Configure night vision modes (IR only, color night vision with spotlight) in the app.
- The spotlight can be manually activated or set to trigger upon motion detection.
Image: The camera's night vision with activated spotlight, providing illumination and color recording capabilities in low-light conditions.
4. Two-Way Audio & Siren
Communicate with visitors or deter unwanted guests using the camera's built-in microphone and speaker. A siren function is also available for immediate alerts.
- Use the "Hold to Talk" feature in the app for two-way communication.
- Tap the siren button in the app to activate an audible alarm.
Image: A smartphone screen showing the live camera feed with options for hearing audio, engaging in two-way audio, and activating a one-tap siren alarm.
5. Storage Options
The camera supports multiple recording options to ensure your footage is securely stored.
- Micro SD Card: Insert a Micro SD card (up to 128GB, not included) into the camera's slot for local storage. No monthly fees apply for local storage.
- xmartO NVR: Integrate the camera with an xmartO Network Video Recorder (NVR) for continuous recording and centralized management.
- AWS WallPixel Cloud: Optional cloud storage service for off-site backup (subscription may apply).
Image: Emphasizes the benefit of no monthly fees for local storage options.
6. Dual-Band WiFi 6 Performance
Equipped with WiFi 6 technology and supporting both 2.4Ghz and 5Ghz bands, the camera ensures a stable and fast wireless connection. This advanced connectivity provides extended range and improved performance, especially when paired with an xmartO WiFi 6 NVR.

Image: Visual representation of the camera's 5G/2.4G Dual Band WiFi 6 performance, showing wider and faster coverage within a home environment.
Maintenance
1. Solar Charging & Battery Management
The camera's solar panel is designed to continuously replenish the automotive-grade rechargeable batteries. The xmartO All-Weather-Charge Technology ensures the camera remains powered even during rainy or snowy conditions, maintaining battery charge levels.
- Ensure the solar panel is positioned to receive maximum direct sunlight.
- Periodically clean the solar panel surface to remove dirt or debris that may obstruct sunlight.
- Monitor battery status via the WallPixel Cloud app.

Image: Depicts the camera and solar panel operating effectively in snowy conditions, demonstrating the All-Weather-Charge capability.
2. General Care
- Keep the camera lens clean for optimal image clarity. Use a soft, dry cloth.
- Avoid exposing the camera to extreme temperatures outside its operating range.
- Ensure all ports and covers are securely closed to maintain weather resistance.
Troubleshooting
This section addresses common issues you might encounter.
| Problem | Possible Cause | Solution |
|---|---|---|
| Camera not connecting to Wi-Fi | Incorrect Wi-Fi password; camera too far from router; router settings issue. | Verify Wi-Fi password. Move camera closer to router. Ensure router supports 2.4Ghz/5Ghz and is not blocking new devices. Try resetting the camera. |
| Poor video quality | Weak Wi-Fi signal; dirty lens; low light conditions. | Improve Wi-Fi signal strength. Clean the camera lens. Ensure adequate lighting or enable color night vision. |
| Battery not charging | Insufficient sunlight on solar panel; solar panel obstructed; faulty cable. | Relocate solar panel to a sunnier spot. Clean the solar panel. Check USB-C cable connection. Charge directly via USB-C if solar charging is consistently low. |
| Frequent false motion alerts | High sensitivity setting; environmental factors (e.g., moving branches, insects). | Adjust motion detection sensitivity in the app. Define specific detection zones and privacy masks to exclude irrelevant areas. |
| No mobile alerts | App notification settings disabled; phone's notification settings disabled; camera offline. | Check app notification settings. Verify phone's system notification settings for the WallPixel Cloud app. Ensure camera is online and connected to Wi-Fi. |
Specifications
| Feature | Detail |
|---|---|
| Model Number | SDK4034 |
| Video Resolution | 4MP Quad HD |
| Connectivity | Wireless (Wi-Fi 6, 2.4Ghz & 5Ghz Dual Band) |
| Power Source | Solar Powered (Automotive-grade rechargeable batteries) |
| Indoor/Outdoor Usage | Indoor, Outdoor |
| Pan/Tilt/Zoom (PTZ) | 360° Pan, 90° Tilt |
| Motion Detection | Thermal True Detection (PIR Sensor) |
| Night Vision | IR LEDs (up to 65ft), Color Night Vision with Spotlight |
| Audio | 2-Way Audio, Siren |
| Storage Options | Micro SD Card (up to 128GB), xmartO NVR, AWS WallPixel Cloud |
| Compatible Devices | Android, iPhone, PC, Mac, Digital Video Recorder |
| Controller Type | Amazon Alexa |
| Material | Acrylonitrile Butadiene Styrene (ABS) |
| Product Dimensions | 7.3 x 6.4 x 5 inches |
| Item Weight | 2.03 pounds |
Warranty and Support
xmartO is committed to providing reliable products and excellent customer service.
- 30-Day Money Back Guarantee: If you are not satisfied with your purchase, you may return it within 30 days for a full refund.
- 1-Year Limited Warranty: Your xmartO SDK4034 camera is covered by a 1-year limited warranty against manufacturing defects.
- 24/7 Online Support: Access 24/7 online support for any technical assistance or inquiries. Visit the official xmartO website or contact customer service through the app for more details.
Image: Summary of after-sales support including money-back guarantee, warranty, and online support.


