
Srliya TZ6000M
User Manual: 6 in 1 Mini Lathe All Metal Combining Machine Tool
Brand: Srliya | Model: TZ6000M
1. Product Overview
The Srliya TZ6000M is a versatile 6-in-1 mini lathe and combining machine tool designed for precision work. This robust system features a powerful 60W motor and an all-metal construction, ensuring durability and stability during operation. It can be configured to perform six distinct functions, providing a comprehensive solution for various machining and crafting tasks.
Key Features:
- Multi-functional Design: Configurable as a wire sawing machine, wooden lathe, metal lathe, milling machine, drilling machine, or sand mill. Note that only one function can be utilized at a time.
- Powerful Motor: Equipped with a 12000 rpm motor for efficient operation.
- Durable Construction: Main parts, including the motor box and spindle box, are constructed from metal for enhanced longevity and performance.
- Safety Features: Includes a belt cover and grinding wheel cover for user protection.

Figure 1.1: Packaging illustrating the six different machine configurations. This image provides a visual representation of the versatility of the TZ6000M system, showcasing its ability to transform into various tools for different applications.
2. Setup and Assembly
The TZ6000M is designed with a combined motor box and spindle box structure, allowing for modular assembly into the desired machine configuration. Before operation, ensure all components are correctly assembled and secured according to the specific machine function you intend to use.
2.1. Unpacking and Component Identification
Carefully unpack all components from the packaging. Verify that all parts listed in the packing list (if provided separately) are present and undamaged. Familiarize yourself with the main parts, such as the spindle box, middle block, and various bases and covers.
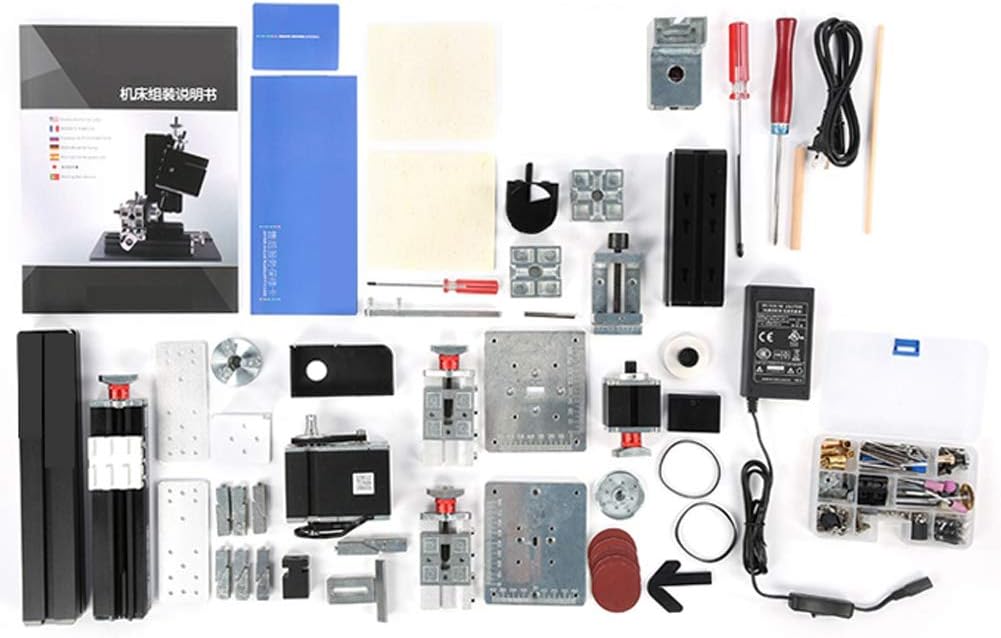
Figure 2.1: Overview of all included components. This image displays the various parts, tools, and accessories that come with the TZ6000M kit, essential for assembling the different machine configurations.

Figure 2.2: Components alongside the instruction manual. This image highlights the comprehensive nature of the kit, including the detailed manual necessary for proper assembly and operation of each machine type.
2.2. Power Connection
Connect the power adapter to the machine and then to a suitable power outlet. Ensure the power supply matches the machine's requirements (60W). Always ensure the machine is switched off before connecting or disconnecting power.
2.3. Configuration Selection
Before assembly, decide which of the six machine functions you require. Each function requires a specific assembly of the modular components. Refer to the detailed assembly diagrams provided in the physical manual for step-by-step instructions for each configuration.
- Wire Sawing Machine
- Wooden Lathe
- Metal Lathe
- Milling Machine
- Drilling Machine
- Sand Mill
3. Operating Instructions
This section provides general operating guidelines for each of the six machine configurations. Always prioritize safety and wear appropriate personal protective equipment (PPE) such as safety glasses.
3.1. Wire Sawing Machine
Used for cutting various materials with a wire saw blade. Ensure the workpiece is securely clamped on the working table (approx. 90 x 90mm). The maximum cutting depth is 4mm for hardwood, 7mm for three-plywood, 18mm for softwood, 0.5mm for thin aluminum sheet, and 2mm for plexiglass. Always keep hands clear of the cutting path.
3.2. Wooden Lathe
Designed for shaping wood workpieces by rotation against a cutting tool. The maximum processing diameter is approximately 50mm, and the maximum processing length is approximately 135mm. Secure the wood workpiece firmly between the centers or in the chuck. Ensure the cutting tool is sharp and properly positioned.
3.3. Metal Lathe
Used for precision machining of metal workpieces. Similar to the wooden lathe, it handles materials up to approximately 50mm in diameter and 135mm in length. The center height is approximately 50mm. Use appropriate cutting tools for metal and ensure proper lubrication if required for the material being worked on.
3.4. Milling Machine
For shaping materials by removing material with a rotating cutter. The slider stroke dimensions are X 145mm, Y 32mm, Z 32mm. Secure the workpiece firmly to the milling table. Select the correct milling cutter for the material and operation. Always move the workpiece slowly and steadily into the cutter.
3.5. Drilling Machine
Used for creating holes in various materials. The working table area is approximately 123 x 100mm. The chuck can hold drill bits from 1-6mm. Secure the workpiece to the drilling table using clamps or a vice (maximum clamping size approx. 50mm). Ensure the drill bit is sharp and appropriate for the material. Apply steady, even pressure.
3.6. Sand Mill (Sanding Machine)
For finishing and smoothing surfaces. Attach the appropriate sanding disc or accessory. Ensure the workpiece is stable. Apply light, even pressure and move the workpiece consistently across the sanding surface to achieve a uniform finish.
4. Maintenance
Regular maintenance ensures the longevity and optimal performance of your Srliya TZ6000M machine tool. Always disconnect power before performing any maintenance.
- Cleaning: After each use, clean the machine thoroughly to remove dust, chips, and debris. Use a brush or compressed air. Avoid using harsh chemicals that could damage the metal surfaces.
- Lubrication: Periodically lubricate moving parts, such as lead screws and sliding surfaces, with appropriate machine oil to ensure smooth operation and prevent wear.
- Inspection: Regularly inspect all components for signs of wear, damage, or looseness. Pay close attention to belts, chucks, and cutting tools. Replace worn parts as necessary.
- Storage: Store the machine in a clean, dry environment, protected from dust and moisture.
5. Troubleshooting
This section addresses common issues you might encounter. For problems not listed here, or if solutions do not resolve the issue, contact customer support.
| Problem | Possible Cause | Solution |
|---|---|---|
| Machine does not power on. | Power cord not connected; power outlet issue; machine switch off. | Ensure power cord is securely plugged in. Test outlet with another device. Verify machine switch is in the 'ON' position. |
| Motor runs but tool does not move/rotate. | Belt loose or broken; chuck/tool not properly secured. | Inspect and adjust/replace belt. Ensure chuck is tightened and tool is correctly installed. |
| Excessive vibration or noise. | Loose components; unbalanced workpiece; dull cutting tool. | Check and tighten all fasteners. Ensure workpiece is balanced and securely clamped. Sharpen or replace cutting tools. |
| Poor cutting/machining performance. | Dull tool; incorrect speed/feed rate; material too hard for tool. | Replace or sharpen cutting tool. Adjust operating parameters. Ensure material is within machine's capabilities. |
6. Specifications
| Parameter | Value |
|---|---|
| Motor Speed | 12000 rpm |
| Working Table Area (Wire Sawing Machine) | Approx. 90 x 90mm (3.5 x 3.5in) |
| Max. Diameter (Metal/Wood Lathe) | Approx. 50mm (2in) |
| Max. Length (Metal/Wood Lathe) | Approx. 135mm (5.3in) |
| Center Height (Metal Lathe) | Approx. 50mm (2in) |
| Slider Stroke (Milling Machine) | X 145mm, Y 32mm, Z 32mm |
| Chuck Capacity | 1-6mm |
| Working Table Area (Drilling Machine) | Approx. 123 x 100mm (4.8 x 3.9in) |
| Max. Clamping Size (Vice) | Approx. 50mm (2in) |
| Max. Workpiece Diameter (Three-jaw chuck) | 50mm |
| Item Weight | 18.26 pounds |
| Package Dimensions | 16.54 x 13.78 x 4.72 inches |
| Model Number | Srliya8rs6vyzcf7 |
7. Warranty and Support
Manufacturer Warranty: This product comes with a manufacturer warranty for 90 days from the date of purchase. Please retain your proof of purchase for warranty claims.
Return Policy: A 30-day return/replacement policy is typically available from the point of purchase. Please refer to the retailer's specific return policy for details.
For technical assistance, parts replacement, or warranty inquiries, please contact Srliya customer support through the retailer's platform or the contact information provided with your product packaging.
Ask a question about this manual
Ask about setup, troubleshooting, compatibility, parts, safety, or missing instructions. Manuals+ will review the question and use this page’s manual context to help answer it.