Product Overview
The Radioddity DB-25D Pro is a versatile dual-band mobile radio, offering both VHF and UHF transmission capabilities. It supports both analog and digital (DMR Tier II) operation modes, making it suitable for a wide range of communication needs. With its compact design, 20W output power, and extensive channel and contact storage, it is an ideal device for ham radio enthusiasts, emergency services, and outdoor adventurers.

Image: The Radioddity DB-25D Pro mobile radio, shown with its speaker microphone and an optional external speaker.
Key Features:
- High Power Output: Features 20W/5W high-low power selectable output for effective communication.
- Extensive Contact Storage: Supports 500,000 DMR contacts, allowing bulk import via software.
- Dual Band & Dual Mode: Operates on both VHF and UHF frequencies, with support for analog and DMR Tier II digital modes.
- Dual Standby Function: Allows monitoring of two frequencies simultaneously.
- Integrated GPS: Enables APRS (Automatic Packet Reporting System) for real-time digital communication of location and status information.
- Color Display: Equipped with a multicolor high-resolution screen for clear visibility.
- Dual Speakers: Features speakers in both the main unit and the speaker microphone, with selectable audio output.
- Customizable Keys: Seven programmable keys (3 on radio, 4 on speaker mic) with long/short press options for personalized functions.
What's Included in the Box
Upon unboxing your Radioddity DB-25D Pro, please verify that all the following components are present:

Image: All standard accessories included with the Radioddity DB-25D Pro package.
- Radioddity DB-25D Pro Mobile Radio Unit
- Speaker Microphone
- DC Power Cable
- Mounting Bracket and Screws
- GPS Antenna
- Programming Cable (USB)
- User Manual (this document)
Product Parts and Controls
Radio Unit
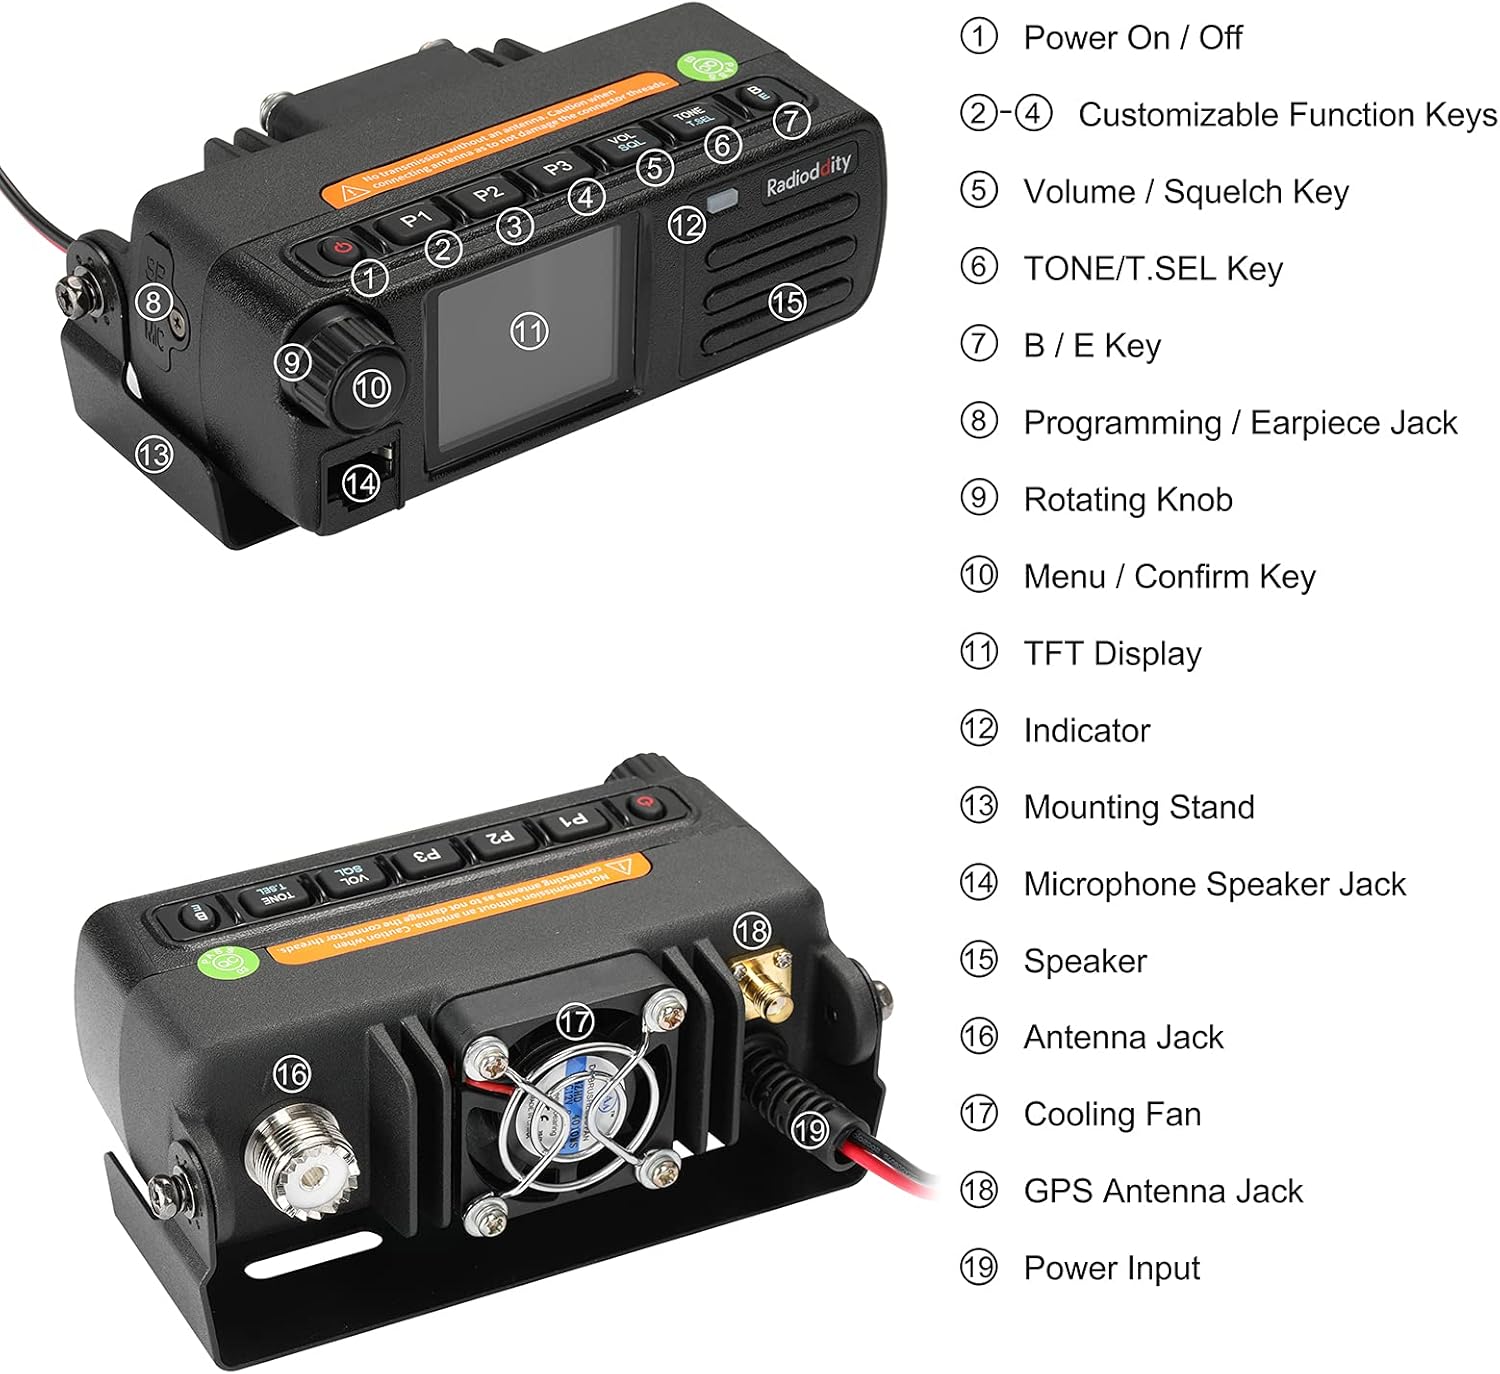
Image: Front and rear view of the radio unit with numbered components.
- Power On / Off Button: Press to turn the radio on or off.
- P1-P4 Customizable Function Keys: Programmable keys for various functions (short/long press).
- Volume / Squelch Key: Adjusts audio volume and squelch level.
- TONE / T.SEL Key: Used for tone settings.
- B / E Key: Band switch or Exit function.
- Programming / Earpiece Jack: Port for programming cable or earpiece.
- Rotating Knob: For channel selection, menu navigation, and frequency tuning.
- Menu / Confirm Key: Accesses the menu and confirms selections.
- TFT Display: Multicolor high-resolution screen.
- Indicator: LED light indicating radio status (e.g., transmit/receive).
- Mounting Stand: Bracket for securing the radio.
- Microphone Speaker Jack: Connects the speaker microphone.
- Speaker: Internal speaker for audio output.
- Antenna Jack: Connects the external antenna.
- Cooling Fan: Dissipates heat during operation.
- GPS Antenna Jack: Connects the GPS antenna for APRS functionality.
- Power Input: Connects the DC power cable.
Speaker Microphone

Image: Detailed view of the speaker microphone components.
- Speaker: Integrated speaker for audio output.
- PTT Key: Push-to-Talk button for transmitting.
- Indicator: LED light for transmit/receive status.
- Keypad Panel: Numeric and function keys for input.
- P4-P7 Customizable Function Keys: Additional programmable keys.
- Mic: Microphone for voice input.
Setup Guide
Follow these steps to set up your Radioddity DB-25D Pro mobile radio:
- Mounting the Radio:
Secure the radio unit using the provided mounting bracket and screws in a stable location within your vehicle or operating area. Ensure adequate ventilation around the unit, especially near the cooling fan.
- Connecting the Antenna:
Connect your external VHF/UHF antenna to the Antenna Jack (16) on the rear of the radio. Ensure the connection is secure. Warning: Do not transmit without an antenna connected to avoid damaging the radio.
- Connecting the GPS Antenna:
If using GPS/APRS functionality, connect the GPS antenna to the GPS Antenna Jack (18).
- Connecting the Speaker Microphone:
Plug the speaker microphone cable into the Microphone Speaker Jack (14) on the front of the radio unit.
- Connecting Power:
Connect the supplied DC power cable to the Power Input (19) on the rear of the radio. Connect the other end to a suitable 13.8V DC power source (e.g., vehicle battery or regulated power supply). Ensure correct polarity.
- Optional External Speaker:
If desired, an external speaker (like the Radioddity RS58) can be connected to the external speaker jack (usually a 3.5mm mono jack, not explicitly numbered but typically present on mobile radios). This allows for clearer audio in noisy environments.


Images: The Radioddity RS58 external speaker and its adjustable mounting.
Operating Instructions
Power On/Off
Press the Power On/Off Button (1) on the radio unit to turn the device on. Press and hold the same button to turn it off.
Display Overview

Image: The radio's bright color display showing VFO mode and dual band frequencies.
The TFT Display (11) provides essential information such as current frequency, channel number, operating mode (analog/digital), signal strength, and various status indicators. The display supports VFO (Variable Frequency Oscillator) mode for direct frequency input and Channel mode for pre-programmed channels.
Dual Band and Dual Mode Operation
- Dual Band: The radio supports both VHF (136-174 MHz) and UHF (400-470 MHz) frequencies. You can switch between bands using the B/E Key (7) or through menu options.
- Dual Mode: Seamlessly switch between analog and DMR Tier II digital operation. The radio automatically detects the mode of incoming signals in some configurations or can be manually set.
- Dual Standby: The radio can monitor two different frequencies simultaneously. If a signal is detected on either frequency, the radio will switch to that channel.
Frequency and Channel Selection
- VFO Mode: Use the Rotating Knob (9) or the keypad on the speaker microphone to directly input frequencies.
- Channel Mode: Rotate the knob to scroll through pre-programmed channels.
- Memory Storage: The radio supports 4000 channels and 300,000 contacts. Channels and contacts can be programmed via software.
GPS and APRS Functionality
The integrated GPS function allows for APRS (Automatic Packet Reporting System) communications. Once the GPS antenna is connected and enabled in the menu, the radio can transmit your location and other data in real-time. Refer to the detailed software manual for APRS configuration.
Customizable Keys (P1-P7)
The radio unit has 3 customizable keys (P1-P3) and the speaker microphone has 4 (P4-P7). These keys can be programmed for various functions (e.g., power level, scan, monitor, zone switch) via the programming software. Both short press and long press options are available for each key.
Volume and Squelch Adjustment
- Volume: Use the Volume / Squelch Key (5) and Rotating Knob (9) to adjust the audio output level.
- Squelch: The squelch function mutes the speaker when no signal is present, eliminating background noise. Adjust the squelch level via the menu or a dedicated function key to open the squelch for weak signals or close it for noisy environments.
Transmitting and Receiving
- Receiving: When a signal is received, the Indicator (12) will light up, and audio will be heard through the speaker.
- Transmitting: Select your desired frequency or channel. Press and hold the PTT Key on the speaker microphone to transmit. The Indicator will change color (e.g., red) during transmission. Speak clearly into the microphone. Release the PTT key to stop transmitting and return to receive mode.
Maintenance
- Cleaning: Use a soft, dry cloth to clean the radio's exterior. Do not use harsh chemicals or abrasive cleaners.
- Cooling Fan: Ensure the Cooling Fan (17) on the rear of the unit is not obstructed to allow for proper heat dissipation, especially during prolonged transmissions. Periodically check for dust buildup and gently clean if necessary.
- Connections: Regularly check all cable connections (power, antenna, speaker mic) to ensure they are secure and free from damage.
- Storage: When not in use for extended periods, store the radio in a cool, dry place away from direct sunlight and extreme temperatures.
Troubleshooting
| Problem | Possible Cause | Solution |
|---|---|---|
| Radio does not power on. | No power connection; incorrect power polarity; blown fuse. | Check power cable connection; verify power source voltage and polarity; inspect and replace fuse if necessary. |
| No audio from speaker. | Volume too low; squelch too high; speaker mic not connected; internal/external speaker selection. | Increase volume; lower squelch level; ensure speaker mic is fully plugged in; check speaker output settings in menu. |
| Cannot transmit. | Antenna not connected; incorrect frequency/channel; PTT key issue. | Ensure antenna is securely connected; verify you are on a valid transmit frequency; check PTT key functionality. |
| Poor reception. | Weak signal; antenna issue; high squelch setting; interference. | Check antenna connection and type; lower squelch; try a different location; identify and mitigate interference sources. |
| Display is blank or dim. | Brightness setting; power issue. | Adjust display brightness in the menu; check power connection. |
Technical Specifications
| Feature | Specification |
|---|---|
| Brand | Radioddity |
| Model Number | DB-25D Pro (Internal Model: 362d6ef7-7ef0-4c26-ac6f-4fcfafb0f46f) |
| Frequency Range | VHF: 136-174 MHz, UHF: 400-470 MHz |
| Output Power | 20W / 5W (Selectable) |
| Number of Channels | 4000 |
| Contact Storage | 300,000 (DMR Contacts) |
| Operating Modes | Analog, Digital (DMR Tier II) |
| Features | GPS, APRS, Dual Standby, Color Screen, Dual Speakers, Customizable Keys |
| Connectivity Protocol | DMR |
| Water Resistance Level | Not Water Resistant |
| FCC ID | 2AN62-DB25D |
Warranty and Support
Radioddity products are manufactured to high quality standards. For specific warranty terms and conditions, please refer to the warranty card included with your product or visit the official Radioddity website. For technical support, troubleshooting assistance, or service inquiries, please contact Radioddity customer support through their official channels.
Manufacturer: Radioddity
Official Website: www.radioddity.com


