
Introduction
Thank you for purchasing the Philips SFL3342RH USB Rechargeable LED Headlamp. This headlamp is designed for various outdoor activities and work environments, offering high brightness, multiple lighting modes, and hands-free operation. Please read this manual carefully before use to ensure proper operation and maintenance.

Image: The Philips SFL3342RH headlamp, highlighting its compact design and powerful illumination, with an owl graphic symbolizing night vision.
Package Contents
Ensure all items are present in the package:
- Philips SFL3342RH Headlamp x 1
- Adjustable Headband x 1
- Clip x 1
- USB-C Charging Cable x 1
- Instruction Manual (with Warranty Card) x 1
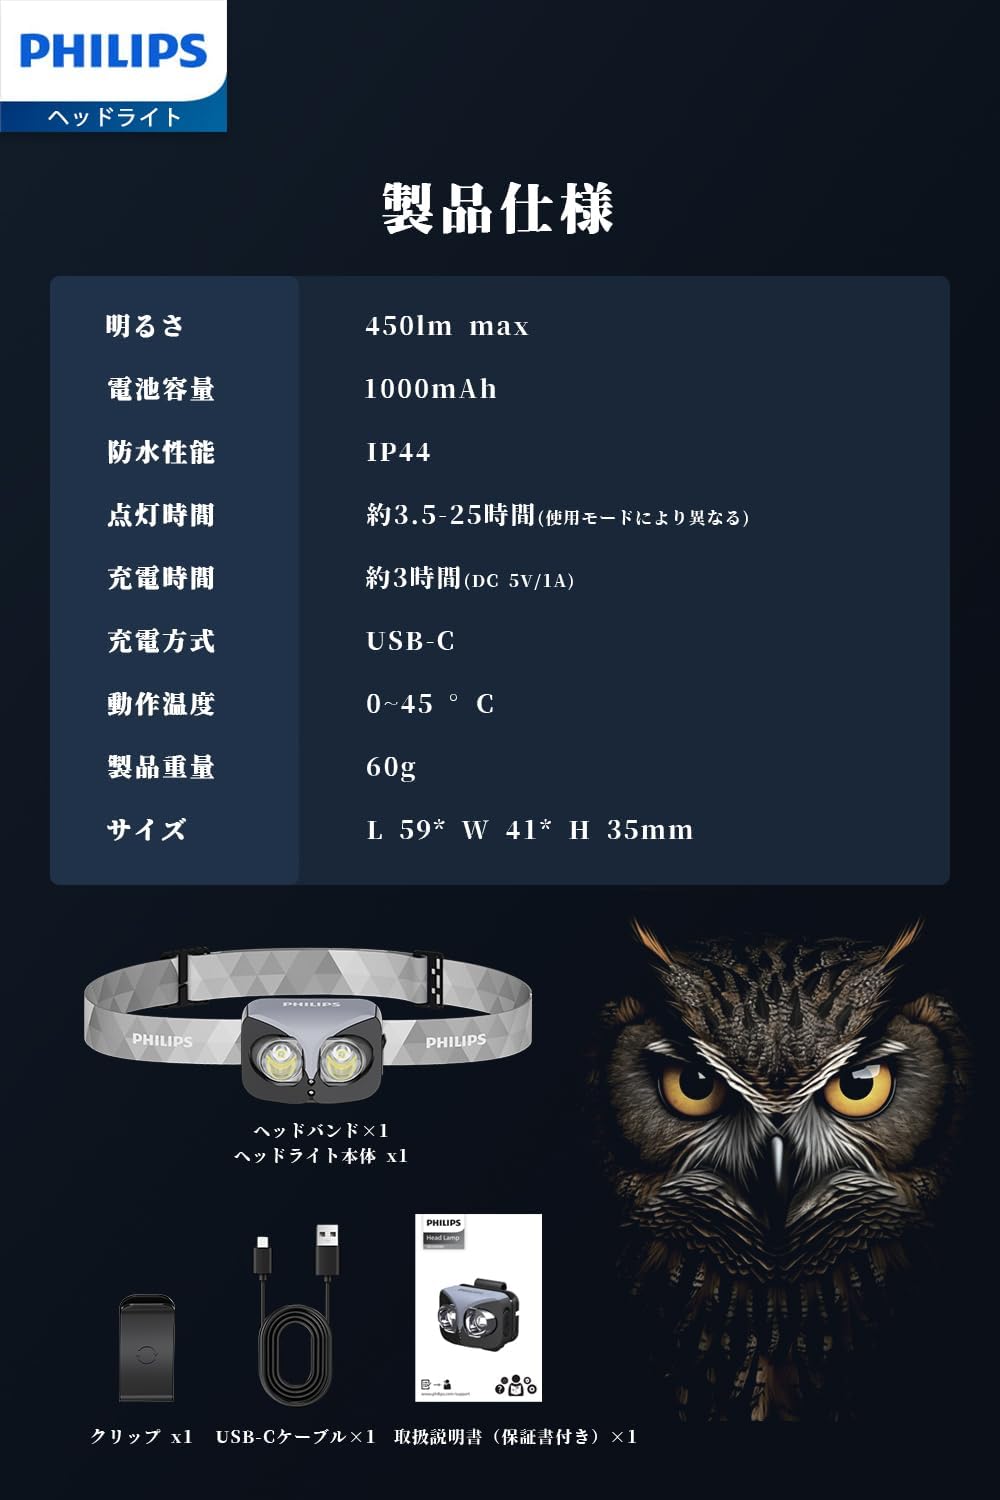
Image: A visual representation of the headlamp, headband, clip, USB-C cable, and instruction manual included in the package.
Setup
Attaching the Headband
- Thread the adjustable headband through the slots on the headlamp unit.
- Adjust the headband length to fit comfortably around your head.
Using the Clip
For alternative wear, attach the clip to the headlamp unit. The clip allows you to secure the headlamp to a hat brim, pocket, or other suitable surfaces.

Image: Demonstrates the headlamp being worn on the head with the headband and clipped onto a hat, showcasing its versatile attachment options.
Charging the Headlamp
The headlamp is equipped with a built-in 1000mAh lithium-ion battery. Before first use, fully charge the device.
- Locate the USB-C charging port on the headlamp.
- Connect the provided USB-C cable to the headlamp and a compatible USB power source (e.g., wall adapter, power bank, computer USB port).
- During charging, the indicator light will glow red.
- Once fully charged (approximately 3 hours), the indicator light will turn green.
- When the battery level drops below 15%, the lamp will flash red to indicate low battery.

Image: The headlamp being charged via its USB-C port, with visual indicators for charging (red light) and fully charged (green light).
Operation
Power Button and Lighting Modes
The headlamp features 5 lighting modes:
- Weak Light: Ideal for close-range tasks like organizing items inside a tent.
- Medium Light: Suitable for night cycling or general illumination.
- Strong Light: For identifying hazards on mountain trails or long-distance visibility.
- Flashing: For signaling or increased visibility.
- SOS: For emergency signaling.
Press the power button repeatedly to cycle through the lighting modes. Double-tap the power button to activate the Flashing/SOS mode.

Image: Illustrates the headlamp's five lighting modes in different scenarios such as mountaineering, camping, night work, hiking, and cycling.
Infrared Motion Sensor Mode
The headlamp features a hands-free infrared motion sensor for convenient operation.
- First, press the Power Button once to turn on the light.
- Then, press the Sensor Button (located next to the power button) once. A blue indicator lamp will light up, indicating that the infrared sensor mode is active.
- In sensor mode, wave your hand within approximately 10 cm (4 inches) of the sensor to turn the light on or off.
- This feature is particularly useful when your hands are dirty, wet, or occupied.

Image: A person demonstrating the infrared motion sensor function by waving a hand in front of the headlamp to control the light, with a diagram showing the sensor button and power button.
Adjusting the Beam Angle
The headlamp's illumination angle can be adjusted up to 145 degrees. This allows you to direct the light precisely where needed, from illuminating your immediate footsteps to a wider area for hazard avoidance.

Image: A diagram illustrating the 145-degree adjustable beam angle of the headlamp, showing how it can illuminate both close-up and distant areas.
Maintenance
- Cleaning: Wipe the headlamp with a soft, damp cloth. Do not use abrasive cleaners or solvents.
- Storage: Store the headlamp in a cool, dry place away from direct sunlight when not in use for extended periods.
- Battery Care: To prolong battery life, charge the headlamp at least once every three months, even if not in use.
- Water Resistance: The headlamp is IP44 rated, meaning it is protected against splashing water from any direction. Do not submerge the device in water.

Image: A woman running in the rain while wearing the headlamp, demonstrating its IP44 water and dust resistance for outdoor use.
Troubleshooting
| Problem | Possible Cause | Solution |
|---|---|---|
| Headlamp does not turn on. | Low battery or no charge. | Charge the headlamp fully using the provided USB-C cable. |
| Sensor mode not working. | Sensor mode not activated. | Ensure the power button is pressed first, then the sensor button. The blue indicator light should be on. |
| Light output is dim. | Low battery. | Recharge the headlamp. |
| Headlamp turns off unexpectedly. | Battery depleted. | Recharge the headlamp. |
Specifications
| Feature | Detail |
|---|---|
| Model Number | SFL3342RH |
| Light Source | LED |
| Max Brightness | 450 lumens |
| Max Illumination Distance | 60 meters |
| Adjustable Angle | Up to 145° |
| Battery Type | Lithium Polymer |
| Battery Capacity | 1000mAh |
| Charging Port | USB-C |
| Charging Time | Approx. 3 hours (DC 5V/1A) |
| Lighting Duration (Max) | 25 hours (Low mode) |
| Lighting Duration (Min) | 3.5 hours (High mode) |
| Waterproof/Dustproof Rating | IP44 |
| Product Dimensions (L x W x H) | 5.9 x 4.1 x 3.5 cm |
| Product Weight | 60 g |
| Operating Temperature | 0-45 °C |

Image: A detailed table outlining the performance specifications of the headlamp across its various lighting modes, including lumens, runtime, and maximum illumination distance.
Warranty and Support
This Philips product comes with a one-year warranty from the date of purchase. The warranty covers defects arising from normal use. For warranty claims or technical support, please refer to the contact information provided on the warranty card included in your package or visit the official Philips support website.
All Philips products sold by authorized retailers are genuine and new.


