1. Introduction
This manual provides comprehensive instructions for the installation, operation, and maintenance of your SPTBMDJ JP Brushless Motor Controller with LCD Display Panel. This product is designed for electric bikes and scooters, offering reliable speed control for 24V, 36V, and 48V systems with 250-350W motors. Please read this manual thoroughly before use to ensure proper function and safety.
2. Safety Instructions
- Always disconnect power before installation or maintenance.
- Ensure all connections are secure and correctly wired according to the provided diagrams. Incorrect wiring can damage the controller or other components.
- Do not expose the controller or display to water or extreme temperatures.
- Seek professional assistance if you are unsure about any installation steps.
- This product is intended for use with compatible electric bike and scooter systems. Do not attempt to use it with incompatible voltage or power ratings.
3. Package Contents
Verify that all items are present in the package:
- 1 x Brushless Motor Controller
- 1 x LCD Display Panel
- 1 x Connecting Line (Wiring Harness)

Figure 3.1: The complete package contents, including the motor controller (silver box), the LCD display panel with throttle, and the associated wiring harness.
4. Product Features
- Voltage Compatibility: Supports 24V, 36V, and 48V systems.
- Power Output: Suitable for 250W to 350W brushless motors.
- Integrated LCD Display: Provides real-time information such as speed, battery level, and mode.
- Durable Construction: Made from composite materials for long service life.
- Easy Installation: Designed for straightforward setup.
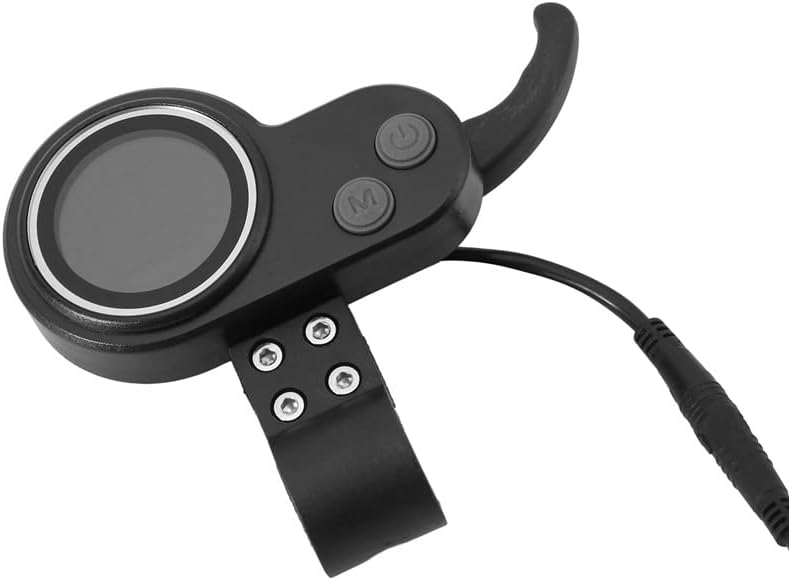
Figure 4.1: The LCD Display Panel, featuring a circular screen, power button, and mode button, integrated with a thumb throttle.
5. Setup and Installation
Follow these steps to install the motor controller and LCD display panel:
- Power Disconnection: Ensure the electric bike or scooter's power source is completely disconnected before beginning installation.
- Mounting the Display: Attach the LCD Display Panel to the handlebar using the integrated clamp. Secure it firmly but do not overtighten.
- Controller Placement: Find a suitable, protected location for the motor controller (silver box) on your vehicle, away from direct moisture and physical impact.
- Wiring Connections:
- Connect the main power wires from the battery to the controller (typically red for positive, black for negative).
- Connect the motor phase wires (usually three thicker wires) from the motor to the controller. Ensure correct color matching.
- Connect the Hall sensor wires (usually five thinner wires) from the motor to the controller.
- Connect the LCD Display Panel's connecting line to the corresponding port on the controller.
- Connect any additional accessories such as brake levers, lights, or pedal assist sensors (PAS) if applicable, following their specific wiring diagrams.
- Secure Wiring: Use cable ties or similar fasteners to neatly secure all wires, preventing them from snagging or interfering with moving parts.
- Initial Power-Up: Once all connections are secure, reconnect the main power source. Turn on the system using the power button on the LCD display.

Figure 5.1: The LCD Display Panel showing the integrated throttle and the multi-pin connector for the wiring harness, ready for connection to the controller.
6. Operating Instructions
6.1. Power On/Off
- To power on the system, press and hold the Power button (usually marked with a power symbol) on the LCD display for a few seconds.
- To power off, press and hold the Power button again until the display turns off.
6.2. Display Functions
The LCD display provides various real-time data:
- Speed: Current riding speed.
- Battery Level: Indication of remaining battery charge.
- Mode/Gear: Current assist level or riding mode.
- Odometer/Trip: Total distance traveled or current trip distance.
6.3. Changing Modes/Settings
Press the Mode button (usually marked 'M') to cycle through different display information or assist levels. Refer to your vehicle's specific manual for detailed mode functionalities.
6.4. Throttle Operation
The integrated thumb throttle controls the motor's speed. Gently press the throttle to accelerate. Release the throttle to decelerate. Always operate with caution and awareness of your surroundings.
7. Maintenance
- Regular Inspection: Periodically check all wiring connections for looseness or damage.
- Cleaning: Wipe the display and controller with a soft, dry cloth. Do not use abrasive cleaners or solvents.
- Environmental Protection: Avoid prolonged exposure to direct sunlight, rain, or extreme temperatures to prolong the lifespan of the components.
- Professional Check: If you notice any unusual behavior or performance issues, consult a qualified technician.
8. Troubleshooting
| Problem | Possible Cause | Solution |
|---|---|---|
| Display does not power on. | No power from battery; loose connection; faulty display/controller. | Check battery charge. Verify all wiring connections, especially the main power and display cable. If problem persists, contact support. |
| Motor does not respond to throttle. | Loose throttle connection; faulty throttle; motor/Hall sensor issue; controller malfunction. | Check throttle cable connection to the controller. Ensure the system is powered on. Inspect motor and Hall sensor wiring. |
| Inconsistent speed or power. | Low battery; loose motor phase/Hall sensor wires; controller issue. | Charge battery fully. Check all motor and sensor connections for secure fit. |
For issues not listed above, or if troubleshooting steps do not resolve the problem, please contact customer support.
9. Specifications
| Model Number | SPTBMDJ124 |
| Brand | SPTBMDJ |
| Voltage Compatibility | 24V / 36V / 48V |
| Motor Power Range | 250W - 350W |
| Material | Composite Material |
| Item Weight | 1.76 ounces (approx. 50g) |
| Package Dimensions | 1.18 x 0.79 x 0.39 inches (approx. 3 x 2 x 1 cm) |
10. Warranty and Support
For warranty information or technical support, please refer to the documentation provided with your purchase or contact the retailer directly. Keep your proof of purchase for any warranty claims.