1. Introduction
This manual provides detailed instructions for the setup, operation, and maintenance of your HEYAXA Wireless WiFi Pool Thermometer. Please read this manual thoroughly before use to ensure proper functionality and longevity of the device.
2. Product Overview
2.1 Package Contents
- 1 x Outdoor Thermometer (Floating Sensor)
- 1 x Digital LCD Display Unit
- 1 x User Manual
2.2 Key Features
- 4.3" Large Color LCD: Easy-to-read display with four adjustable brightness levels (10%, 40%, 70%, 100%).
- High Accuracy: Indoor temperature range: -9.9℃ to 50℃ (14.2℉ to 122℉); Outdoor temperature range: -40℃ to 70℃ (-40℉ to 158℉).
- 24-hour APP Records: View real-time data, historical curves, and temperature/humidity on the mobile application.
- IPX7 Waterproof: The outdoor sensor is designed to be waterproof, suitable for various water environments.
- Multi-location Data: Supports connection with up to 3 outdoor sensors (one included in the package).
- Two Power Modes: The display unit can be powered by 2x AA batteries (not included) or a DC 5V/1A charging adapter (not included).
- Wireless Transmission Range: Up to 60 meters (197 feet) in open areas.
- Heat & Cold Resistant: The sensor operates effectively in temperatures ranging from -40°C to 70°C (-104°F to 158°F).
2.3 Product Components
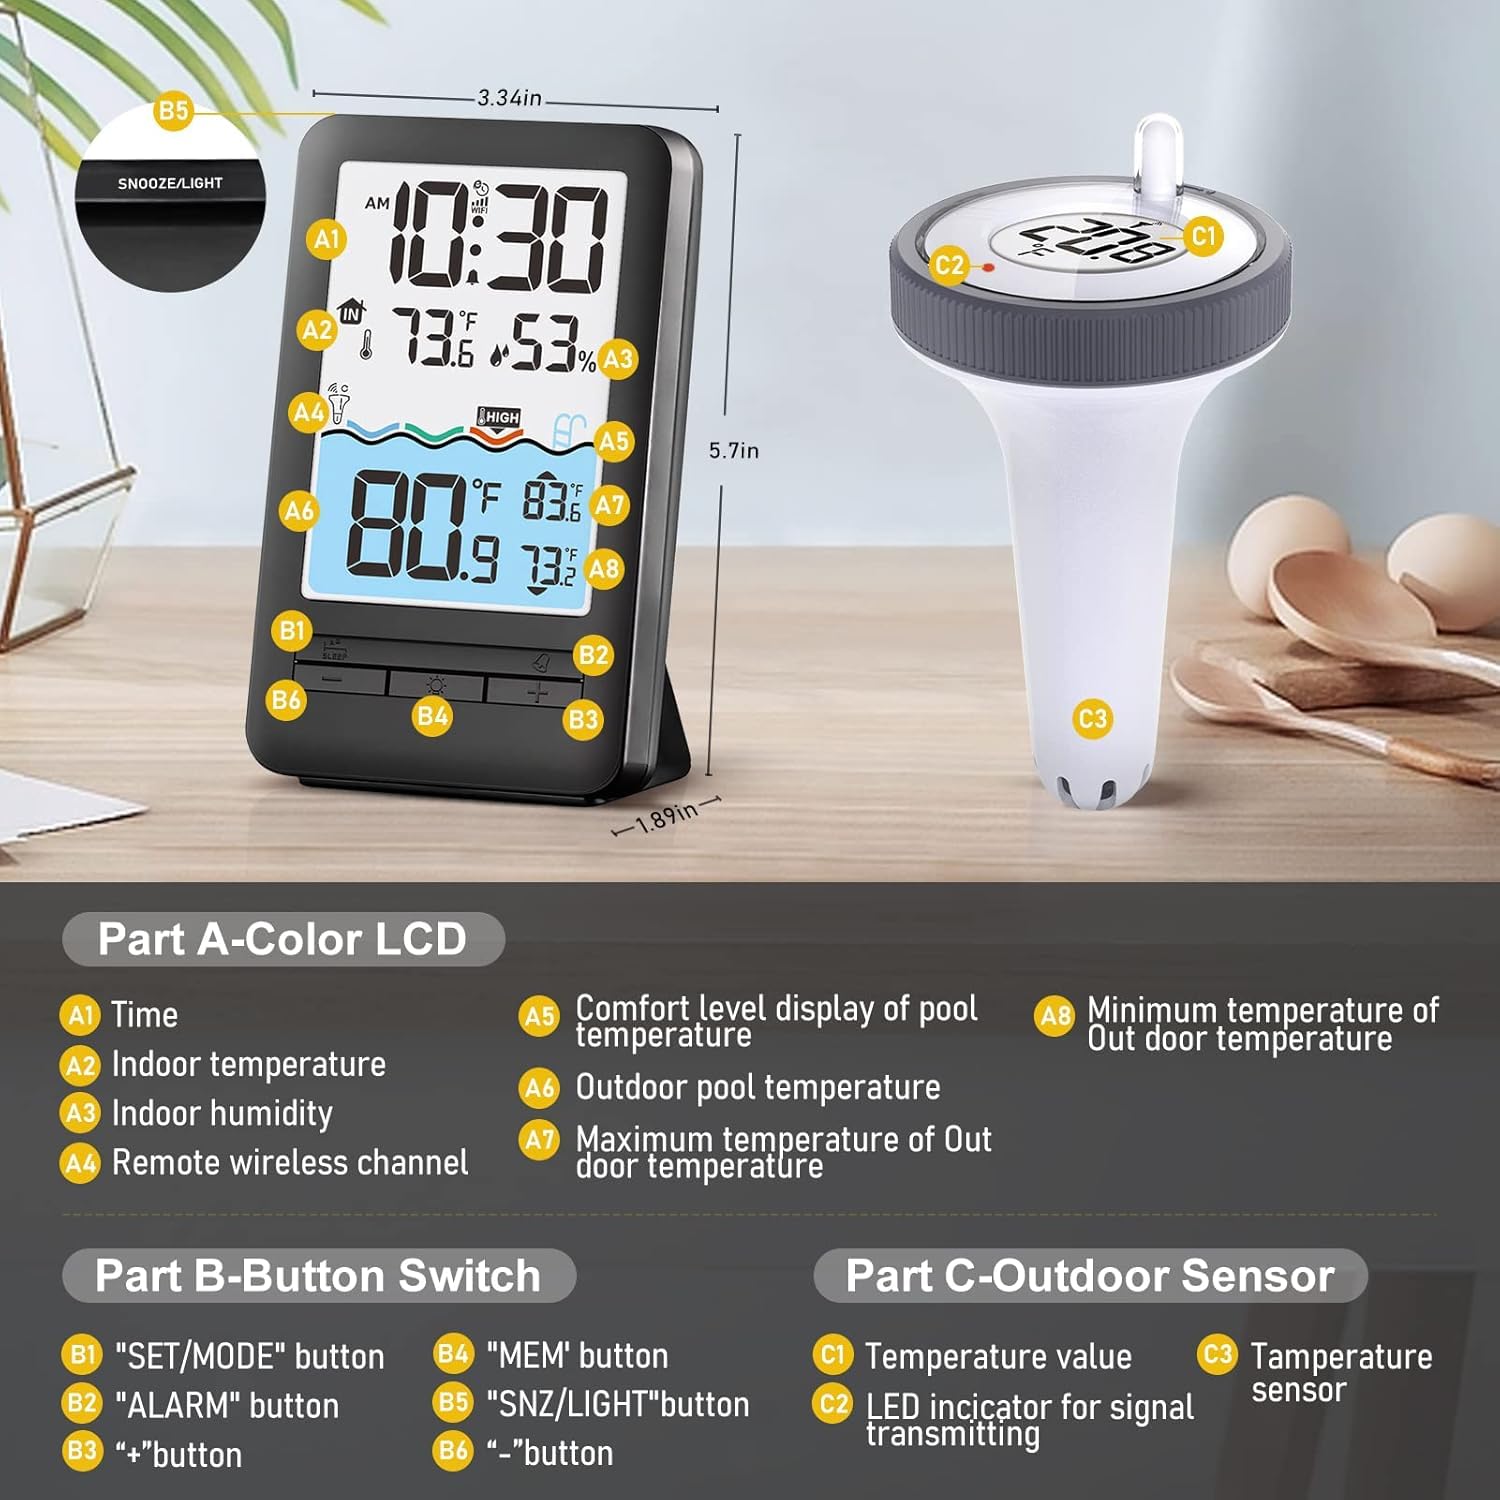
Image: Labeled diagram of the display unit and outdoor sensor. The display unit features a color LCD screen and various buttons. The outdoor sensor is a floating device with a temperature sensor and an LED indicator.

Image: The HEYAXA Wireless WiFi Pool Thermometer, featuring the main display unit and the floating outdoor sensor. A smartphone screen in the background illustrates the accompanying mobile application.
3. Setup Instructions
3.1 Battery Installation for Outdoor Sensor
- Turn the top lid of the outdoor thermometer counter-clockwise to open it.
- Remove the battery compartment lid and insert 2x AA batteries (not included), ensuring correct polarity.
- Replace the battery compartment lid, then turn the top lid clockwise to securely close and tighten it.

Image: Visual guide demonstrating how to open the outdoor sensor, install AA batteries, and securely close the lid.
3.2 Powering the Display Unit
- Battery Mode: Insert 2x AA batteries (not included) into the battery compartment on the back of the display unit.
- Charging Mode: Connect a DC 5V/1A power adapter (not included) to the power input port on the back of the display unit.

Image: Illustration of the two power options for the display unit: using 2x AA batteries or connecting a DC 5V/1A power adapter.
3.3 App Connection (HEYAXA APP)
- Download the "HEYAXA" app from the App Store or Google Play. You can also scan the QR code provided in the product packaging or visit https://a.smart321.com/kalevolsmart.
- Create an account or log in to the HEYAXA app.
- Power up the display unit. It will automatically enter "AP Mode" for initial setup.
- In the HEYAXA app, tap "Add Device".
- The app will begin discovering devices. Select your thermometer from the list.
- Select your 2.4GHz Wi-Fi network and enter the password. Note: The device supports 2.4GHz Wi-Fi only.
- Once connected, the device will be successfully added to your app.

Image: A visual step-by-step guide showing how to download the HEYAXA app, power up the station, add the device, discover it, select a 2.4GHz Wi-Fi network, and successfully add the device.
4. Operating Instructions
4.1 Display Unit Overview
The 4.3-inch LCD screen provides comprehensive information at a glance:
- Time: Current time display.
- Indoor Temperature: Temperature reading from the display unit's internal sensor.
- Indoor Humidity: Humidity reading from the display unit's internal sensor.
- Remote Wireless Channel: Indicates which outdoor sensor's data is currently displayed (CH1, CH2, or CH3).
- Comfort Level Display: Visual indicator for the comfort level based on pool temperature.
- Outdoor Pool Temperature: Temperature reading from the floating outdoor sensor.
- Maximum/Minimum Outdoor Temperature: Records of the highest and lowest outdoor temperatures.
4.2 Button Functions (Display Unit)
- SET/MODE button: Press to enter settings mode or switch between display modes.
- ALARM button: Use to set or disable temperature alarms.
- "+" button: Increase values during settings or navigate forward through options.
- MEM button: View maximum and minimum temperature records for indoor and outdoor readings.
- SNZ/LIGHT button: Activate snooze function for alarms or adjust backlight brightness (10%, 40%, 70%, 100%).
- "-" button: Decrease values during settings or navigate backward through options.
4.3 App Usage
The HEYAXA app enhances your monitoring capabilities:
- Real-time Data: View current indoor and outdoor temperature and humidity readings from anywhere.
- Historical Data & Curves: Access auto-generated temperature and humidity curves and historical data for up to 24 hours.
- Customization: Adjust backlight settings and switch between Celsius and Fahrenheit units directly from the app.
- Multi-Sensor Monitoring: If additional sensors are connected, monitor up to 3 different locations simultaneously.

Image: The HEYAXA app on a smartphone showing real-time temperature and humidity data, with the floating sensor visible in a pool, highlighting the IP67 waterproof feature.

Image: The HEYAXA app displaying auto-logged temperature and humidity graphs over 24 hours, illustrating its data recording capability.

Image: This image highlights the 60-meter (197-foot) transmission range and the capability to connect up to three outdoor sensors (CH1, CH2, CH3) for monitoring different locations like a swimming pool, bathtub, or home.
5. Maintenance
- Clean the display unit and outdoor sensor with a soft, damp cloth. Do not use abrasive cleaners or solvents.
- Ensure the outdoor sensor's lid is securely tightened at all times to maintain its IPX7 waterproofing.
- Replace batteries in both units promptly when the low battery indicator appears on the display or in the app.
- When not in use for extended periods, store the device in a dry, cool environment.

Image: The floating outdoor sensor partially submerged in water, emphasizing its IPX7 waterproof design and built-in desiccant to prevent moisture damage.

Image: The outdoor sensor depicted in both sunny and snowy conditions, highlighting its heat and cold resistance, operating normally from -40°C to 70°C (-104°F to 158°F).
6. Troubleshooting
- No Signal from Outdoor Sensor:
- Ensure batteries are correctly installed and charged in both the sensor and display unit.
- Verify the outdoor sensor is within the 60-meter transmission range of the display unit.
- Minimize obstacles (e.g., thick walls, large metal objects) between the sensor and display unit.
- Try re-pairing the sensor with the display unit by following the initial setup steps.
- App Connectivity Issues:
- Ensure your Wi-Fi network is 2.4GHz. The device does not support 5GHz Wi-Fi.
- Double-check your Wi-Fi password for accuracy.
- Ensure the display unit is in "AP Mode" during initial setup.
- Restart your Wi-Fi router and the display unit.
- Ensure your smartphone is connected to the same 2.4GHz Wi-Fi network during the setup process.
- Inaccurate Readings:
- Ensure the outdoor sensor is fully submerged in water for accurate water temperature readings.
- Avoid placing the indoor display unit near direct heat sources, air conditioning vents, or direct sunlight.
- Display Unit Not Turning On:
- Check battery installation and ensure batteries are not depleted.
- If using the charging adapter, ensure it is properly connected and the power outlet is active.
7. Specifications
| Feature | Specification |
|---|---|
| Model Number | 647379028435 |
| Indoor Temperature Range | -9.9℃ to 50℃ (14.2℉ to 122℉) |
| Outdoor Temperature Range | -40℃ to 70℃ (-40℉ to 158℉) |
| Display Type | Digital LCD |
| Display Size | 4.3 inches |
| Connectivity | Wi-Fi (2.4GHz only) |
| Wireless Transmission Range | Up to 60 meters (197 feet) |
| Waterproof Rating (Sensor) | IPX7 |
| Power Source (Display Unit) | 2x AA Batteries (not included) or DC 5V/1A Adapter (not included) |
| Power Source (Outdoor Sensor) | 2x AA Batteries (not included) |
| Material | Plastic |
| Manufacturer | HEYAXA |
8. Warranty and Support
For any questions, technical assistance, or support regarding your HEYAXA Wireless WiFi Pool Thermometer, please do not hesitate to contact our dedicated customer service team.
Email: support@heyaxa.com
Our customer service team is committed to providing prompt assistance and aims to respond to all inquiries and resolve issues within 24 hours.

Image: A customer service representative with a headset, symbolizing the availability of professional service and technical guidance, with a commitment to respond within 24 hours.