
1. Introduction
This manual provides detailed instructions for the setup, operation, and maintenance of your COOLHOOD 65-inch 4K UHD Touchscreen Interactive Digital Whiteboard Display. This all-in-one computer is designed for versatile use in classrooms, offices, and home environments, offering advanced features for collaboration and productivity.

Figure 1.1: The COOLHOOD 65-inch Smart Board, showcasing its touchscreen capabilities and integrated apps.
2. Key Features
- Advanced Processing Power: Equipped with an octa-core processor (4 A73 + 4 A53), 8GB RAM, and 128GB storage, ensuring smooth performance for various applications.
- Interactive Touchscreen: Features 20-point multi-touch capability with a 6ms response time and ±1mm precision for a lag-free writing and interaction experience.
- Integrated Operating System: Runs on Android 13, providing a familiar and user-friendly interface.
- Wireless Connectivity: Supports wireless screen sharing across multiple devices and platforms, including Mac, Windows, iOS, and Android. Includes built-in Bluetooth and WiFi 6.
- Open App Ecosystem: Allows users to download and install a wide range of applications to suit diverse business and educational needs, with enterprise-grade security.
- Collaboration Tools: Includes features like smart voting, screenshot capabilities, timer, compass, calculator, and free annotation tools to enhance productivity and teamwork.
- Cloud Storage Support: Enables saving and revisiting work in real-time, with options to share files via email or other cloud services.
- Video Conferencing Integration: Seamlessly integrates with popular platforms such as Zoom, Google Meet, Microsoft Teams, and Webex for efficient remote collaboration.
- QR Code File Sharing: Quickly distribute files and notes by scanning a QR code, improving efficiency in various settings.

Figure 2.1: Overview of the Smart Board's all-in-one capabilities, including 4K UHD display, touch screen, and connectivity options.

Figure 2.2: The Smart Board's robust app ecosystem, supporting a wide array of applications.

Figure 2.3: Wireless and multi-device connection capabilities for seamless screen sharing.

Figure 2.4: QR code scanning feature for quick file sharing and access.
3. Package Contents
Please verify that all items listed below are included in your package:
- COOLHOOD 65" Smart Board
- Wall Mount Bracket
- 16.4 FT Touch Cable
- Power Cord
- 16.4 FT HDMI Cable
- Remote Control
- Stylus Pens (x2)
- User Manual (this document)

Figure 3.1: All items included in the product package.
4. Setup Instructions
4.1 Wall Mount Installation
Follow these steps to securely mount your Smart Board to a wall. Ensure you have the appropriate tools and assistance for safe installation.
- Positioning and Drilling: Determine the desired mounting location on the wall. Mark and drill holes according to the wall mount template.
- Install Hanging Board: Securely attach the hanging board (part H) to the wall using appropriate fasteners (parts A and B).
- Install Hanging Strip on Device: Insert gaskets (G) into the back holes of the hanging strip (I). Align and attach the hanging strip to the back of the Smart Board, then secure with screws (D/E).
- Check Screws and Balance: Verify that all screws are tightened and the wall mount is level and balanced.
- Hang the Device: Carefully lift the Smart Board and align it with the hanging board (H) on the wall. Ensure it locks securely into place.
- Final Check: Confirm the Smart Board is stable and properly mounted.
Figure 4.1: Wall Mount Installation Steps 01 (Positioning and drilling) and 02 (Installing the hanging board).

Figure 4.2: Wall Mount Installation Steps 03 (Installing the hanging strip on the device) and 04 (Checking screw tightness and balance).
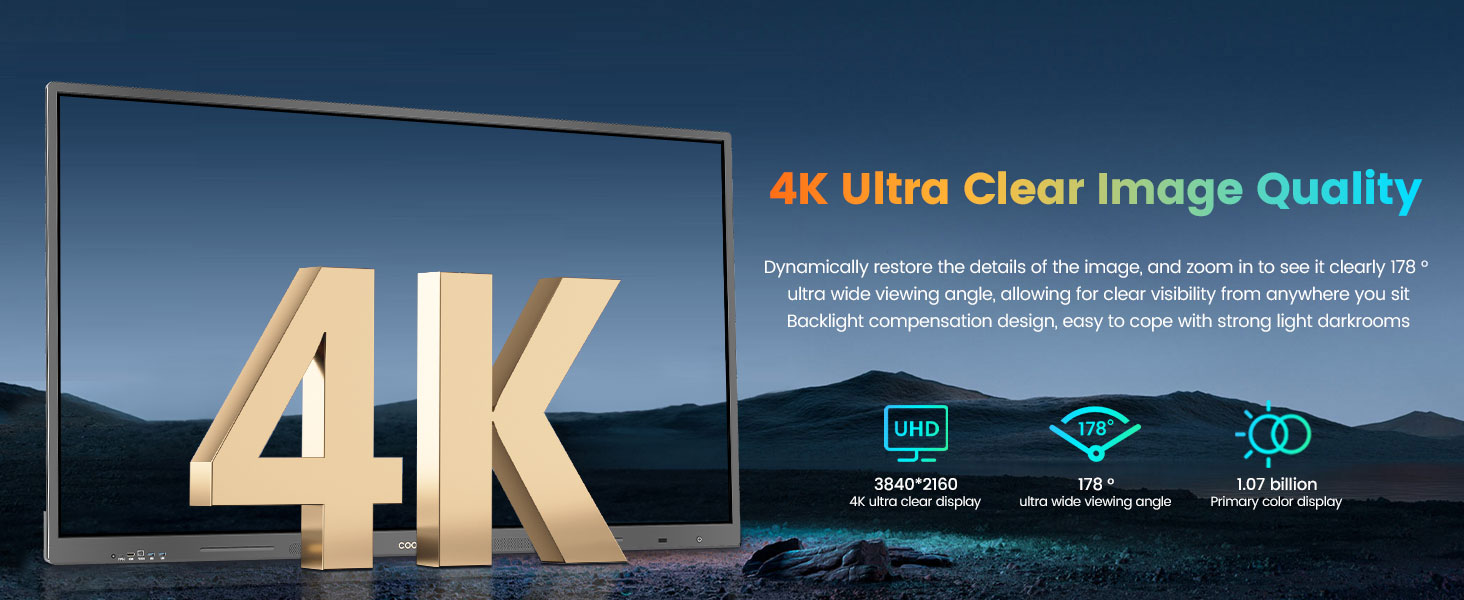
Figure 4.3: Wall Mount Installation Steps 05 (Hanging the device on the wall) and 06 (Final installation diagram).
4.2 Smart Board Bracket Installation (Optional)
If you purchased the optional mobile stand, follow these steps for assembly:
- Assemble Base: Connect the base components and secure them with the provided H screws.
- Attach Wheels: Install the wheels onto the base for mobility.
- Assemble Vertical Supports: Connect the vertical support bars to the base.
- Attach Display Mount: Secure the display mounting frame to the vertical supports.
- Secure Shelf (if applicable): Attach any middle shelf components to the main frame.
- Mount Smart Board: Carefully attach the Smart Board to the assembled bracket, ensuring it is securely fastened.
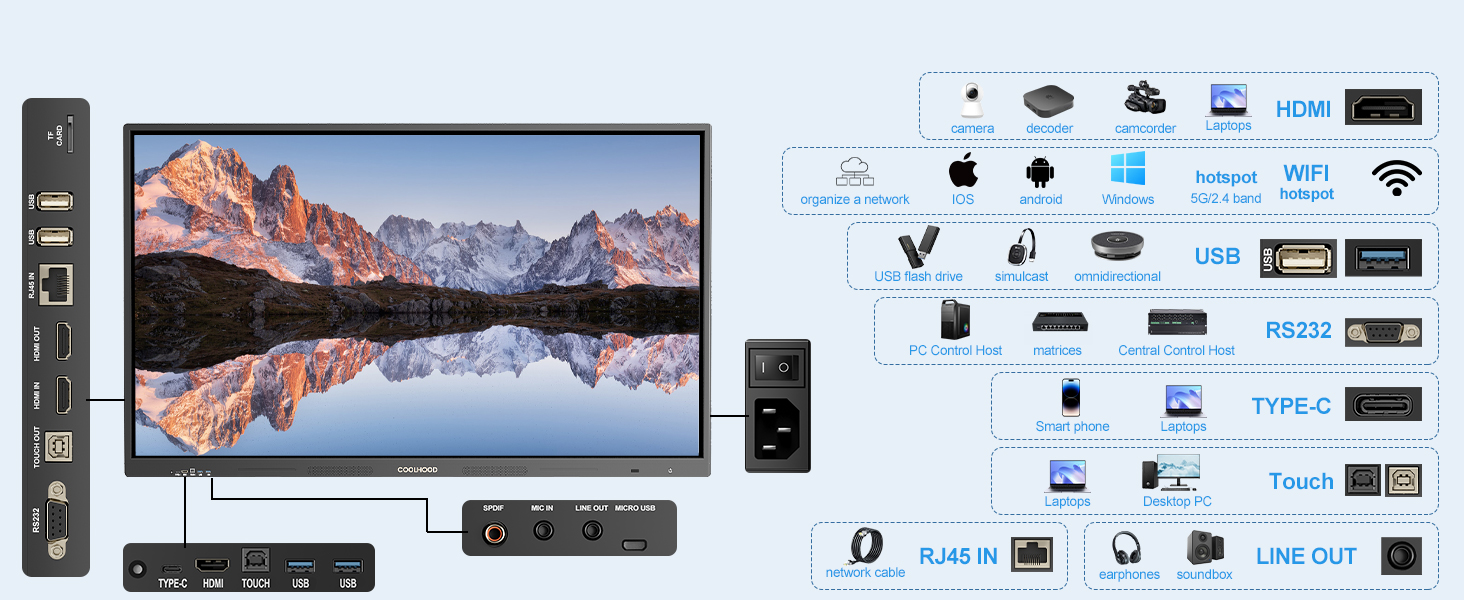
Figure 4.4: Smart Board Bracket Installation Steps 1-3 (Assembling the base and vertical supports).
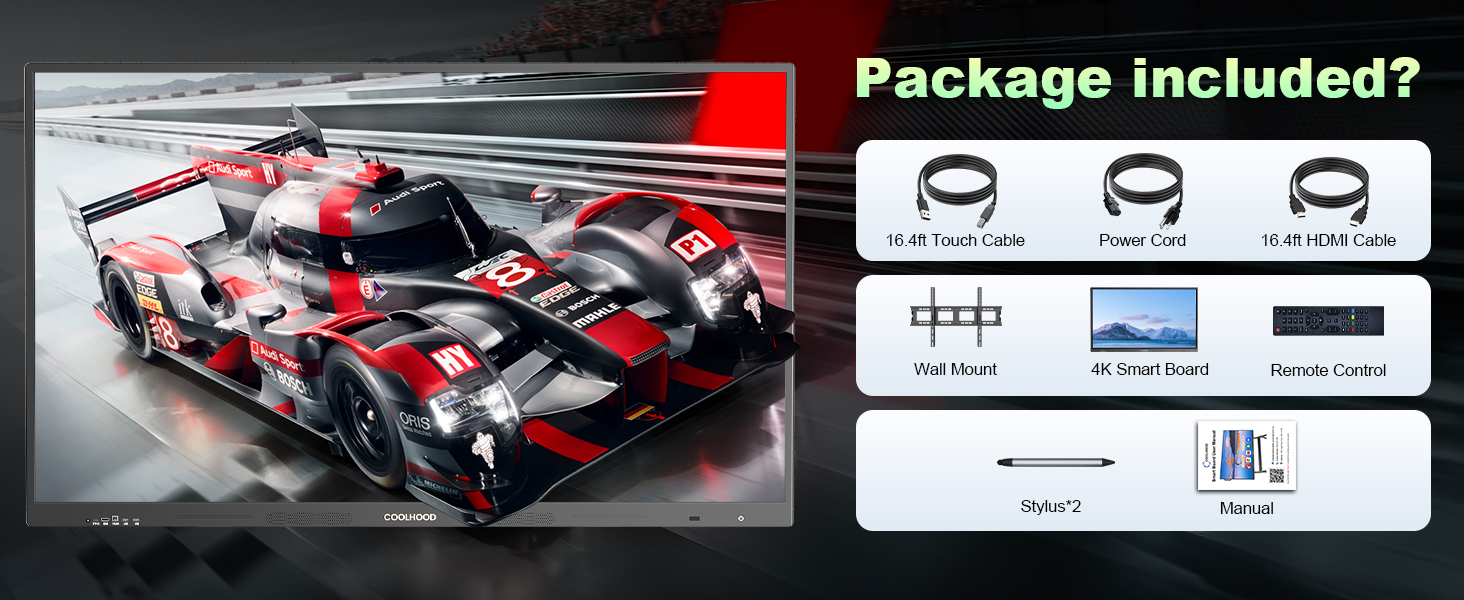
Figure 4.5: Smart Board Bracket Installation Steps 4-6 (Attaching the display mount and final assembly).
5. Operating Instructions
5.1 Interactive Whiteboard Functionality
The Smart Board features 20-point infrared touch technology for intuitive interaction. Use the included stylus pens or your fingers for writing, drawing, and navigating.
- Pen Writing: Write directly on the screen with precision.
- Gestures: Supports various gestures for zooming, roaming, erasing, copying, and pasting content.
- Content Insertion: Easily insert images, graphics, and tables into your whiteboard sessions.
5.2 Wireless Screen Sharing
The Smart Board supports wireless screen mirroring from multiple devices and platforms. Connect your device to the same Wi-Fi network as the Smart Board, then use the EShare application or built-in casting features to share your screen.
5.3 QR Code File Sharing
To quickly share files and notes from the Smart Board, utilize the QR code sharing feature. Simply scan the displayed QR code with your smartphone or QR-code-enabled device to access or distribute content.
5.4 Open App Ecosystem
The Smart Board operates on an open Android 13 ecosystem, allowing you to download and install various applications from the Google Play Store or other trusted sources. This provides flexibility to customize the board for specific business or educational needs.
5.5 Video Conferencing
Integrate seamlessly with popular video conferencing platforms such as Zoom, Google Meet, Microsoft Teams, and Webex. This facilitates efficient remote collaboration and presentations.
5.6 Built-in Tools
The Smart Board includes several useful built-in tools:
- Screen Recording: Record, review, and grow from your sessions.
- Multiple Windows: Run multiple programs simultaneously with full-view multiple windows for enhanced efficiency.
- Screenshot: Capture screen content instantly without third-party software.
- Compass: A digital compass for directional guidance.
- Timer: A convenient timer for managing activities.
- Calculator: Simplify calculations directly on the board.
- Voter: Built-in voting feature for quick feedback collection.
- Free Annotations: Access annotation features on any screen to add notes.
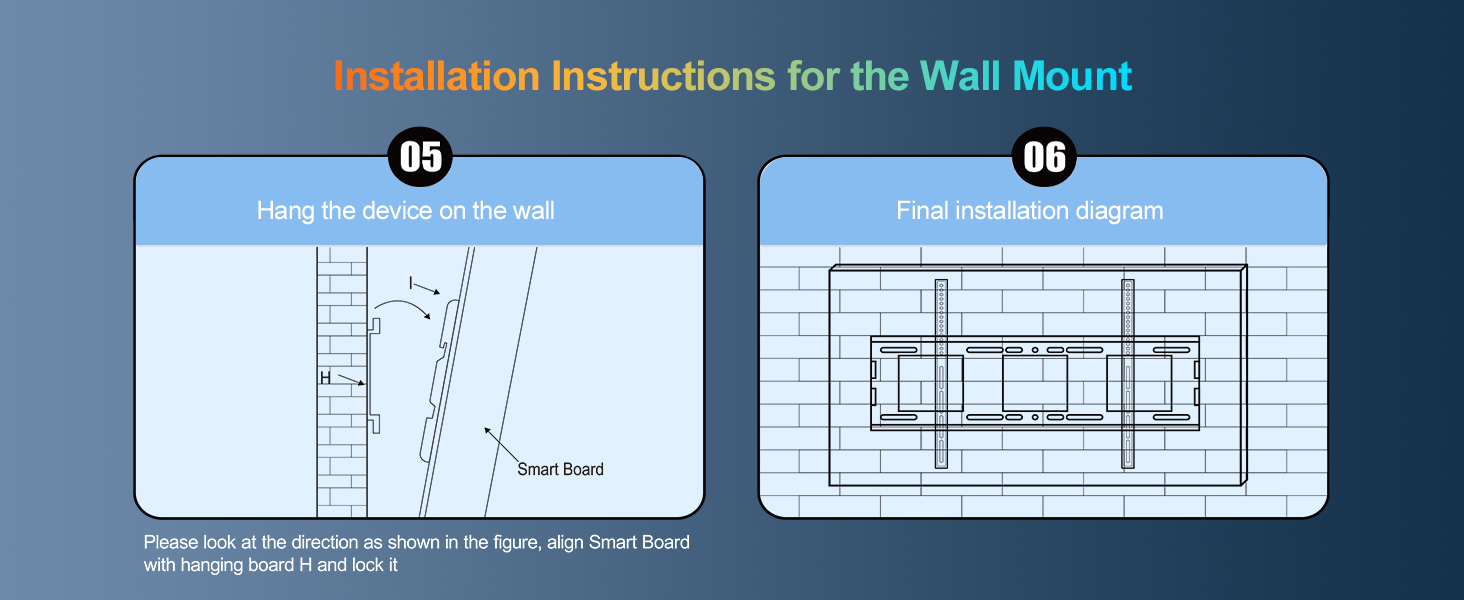
Figure 5.1: Screen Recording, Multiple Windows, and Screenshot functionalities.
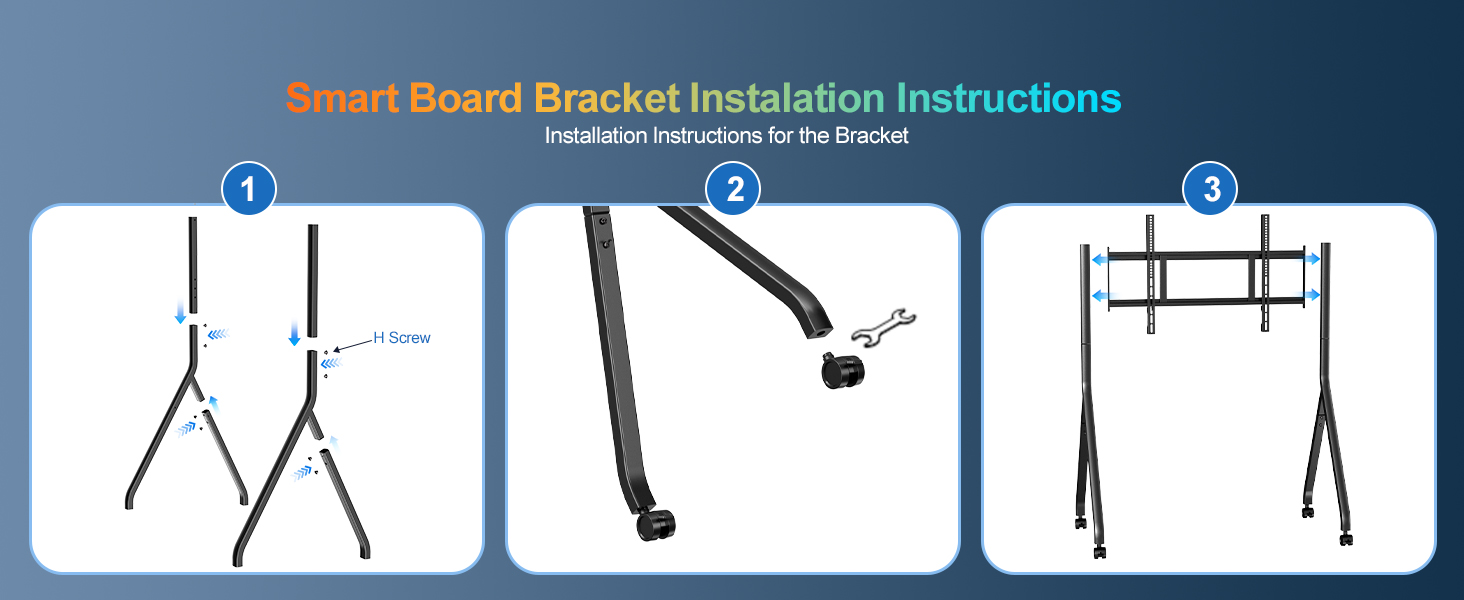
Figure 5.2: Built-in tools: Compass, Timer, and Calculator.
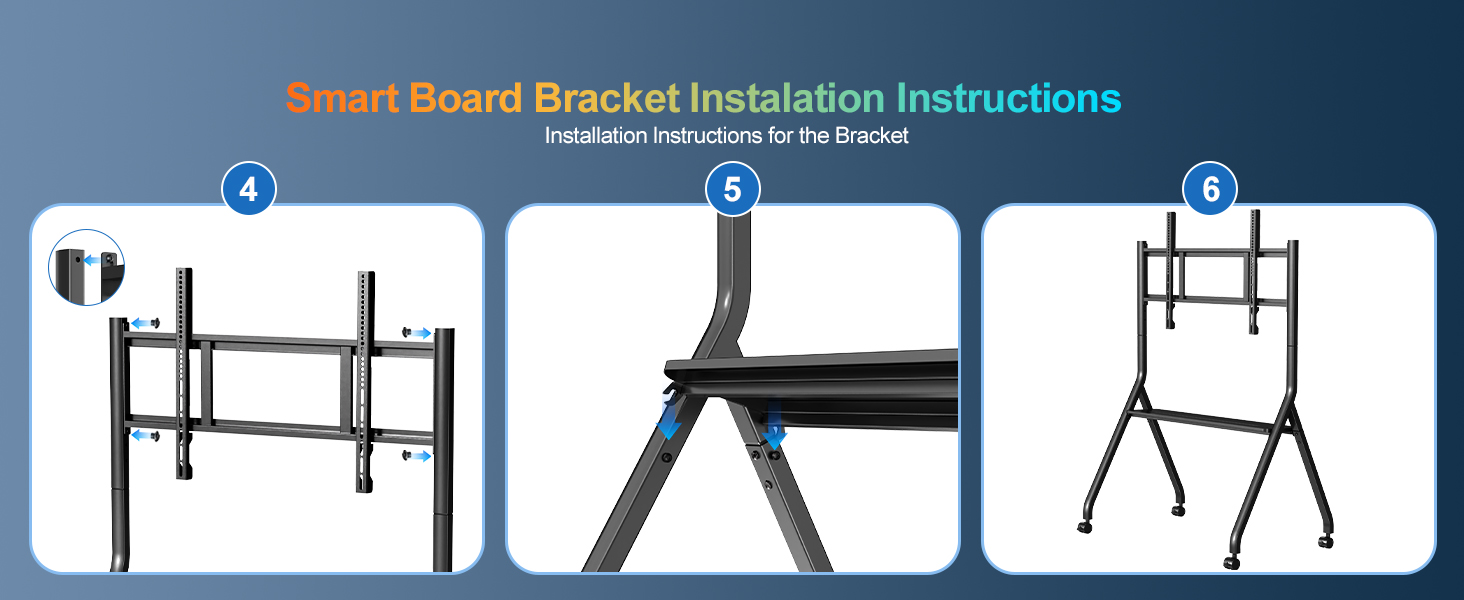
Figure 5.3: Voter, Scan to Upload, and Free Annotations features.
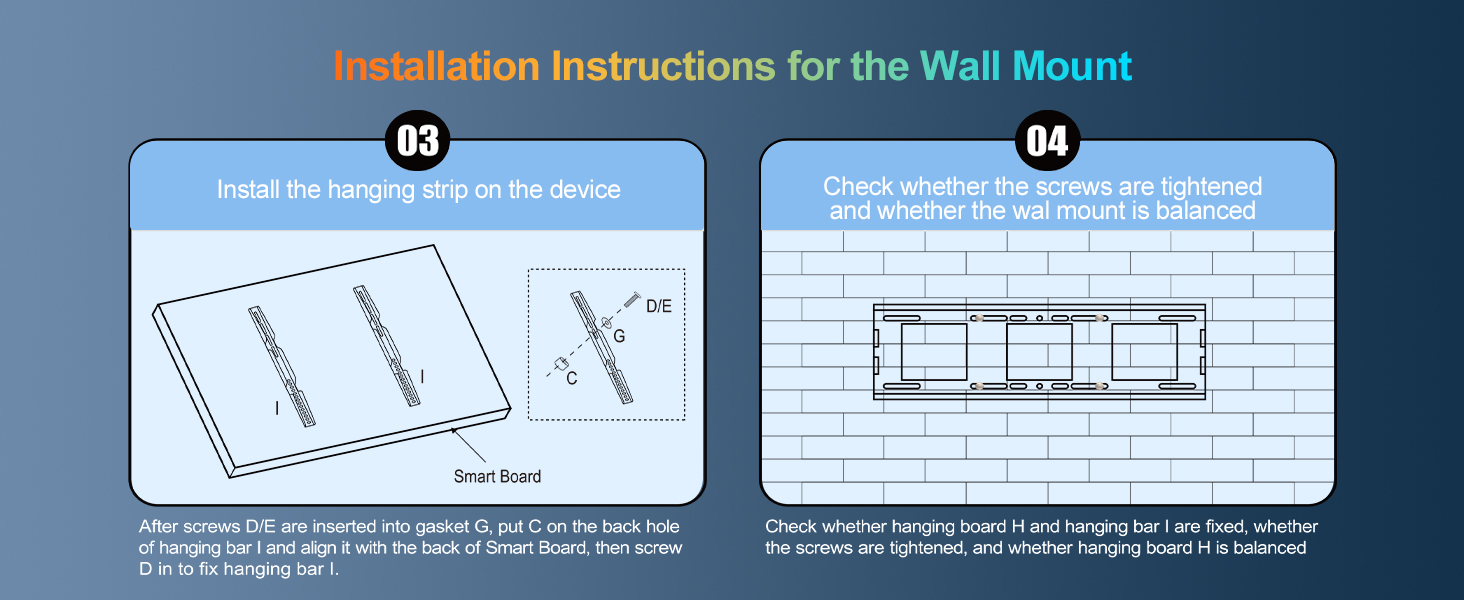
Figure 5.4: Various control panel icons for quick access to settings and functions.
6. Maintenance
Proper maintenance ensures the longevity and optimal performance of your Smart Board.
- Cleaning the Screen: Use a soft, lint-free cloth specifically designed for electronic displays. For stubborn marks, lightly dampen the cloth with water or a screen-cleaning solution. Avoid harsh chemicals, abrasive materials, or excessive moisture.
- General Cleaning: Wipe the frame and back of the board with a dry or slightly damp cloth.
- Ventilation: Ensure proper airflow around the board. Do not block ventilation openings.
- Power Management: Turn off the Smart Board when not in use for extended periods.
- Stylus Care: Keep stylus pens clean and store them properly to prevent damage.
7. Troubleshooting
If you encounter issues with your Smart Board, refer to the following common troubleshooting steps:
| Problem | Possible Cause | Solution |
|---|---|---|
| No power/Display not turning on | Power cable disconnected; Power outlet issue; Power button not pressed | Check power cable connection; Try a different power outlet; Press the power button firmly. |
| Touchscreen unresponsive or inaccurate | Screen dirty; Calibration needed; Software glitch | Clean the screen surface; Recalibrate the touchscreen (refer to settings); Restart the board. |
| Wireless screen sharing not working | Devices not on same network; Wi-Fi signal weak; App issues | Ensure both devices are connected to the same Wi-Fi network; Check Wi-Fi signal strength; Restart the sharing app on both devices. |
| No audio | Volume muted or low; External speakers disconnected; Audio settings incorrect | Increase volume; Check external speaker connections; Verify audio output settings. |
| Apps crashing or slow performance | Too many apps running; Low storage; Software update needed | Close unnecessary apps; Clear cache/free up storage; Check for system updates. |
If the problem persists after attempting these solutions, please contact customer support for further assistance.
8. Specifications
| Feature | Detail |
|---|---|
| Product Dimensions | 3 x 58 x 35 inches |
| Item Weight | 87.8 pounds |
| Manufacturer | COOLHOOD |
| ASIN | B0DSBSSRTL |
| Item Model Number | Smart Board |
| Standing Screen Display Size | 65 Inches |
| Resolution | 3840 x 2160 Pixels (4K UHD 2160p) |
| Total USB Ports | 2 |
| Screen Surface Description | Matte |
| Image Contrast Ratio | 2000:1 |
| Operating System | Android 13 |
| Storage | 128GB |
| RAM | 8GB |
| Touch Points | 20-point multi-touch |
9. Warranty and Support
The COOLHOOD 65" Smart Board comes with a standard manufacturer's warranty. For specific warranty terms and conditions, please refer to the warranty card included in your product packaging or contact COOLHOOD customer support.
For technical assistance, troubleshooting, or any product-related inquiries, please contact COOLHOOD customer support. Information regarding customer support can typically be found on the manufacturer's official website or through the retailer where the product was purchased.
