Introduction
Thank you for purchasing the 4DRC G2 Foam Remote Control Airplane. This manual provides essential information for the safe operation, setup, and maintenance of your new RC airplane. Please read it thoroughly before first use to ensure proper function and to maximize your flying experience.
Package Contents
Verify that all items are present in your package:
- RC Airplane (G2 Model)
- Remote Control
- 3 x Rechargeable 3.7V 350 mAh Batteries
- USB Charging Cable
- Spare Propellers
- Product Manual (this document)
Setup
1. Charging the Aircraft Batteries
The 4DRC G2 airplane uses 3.7V 350 mAh rechargeable Lithium-Ion batteries. Ensure all batteries are fully charged before use.
- Connect the provided USB charging cable to a USB power source (e.g., computer USB port, USB wall adapter).
- Connect the battery to the charging cable.
- The indicator light on the charger will show the charging status (refer to charger instructions for specific light patterns).
- Once fully charged, disconnect the battery from the charger. Charging time is approximately 60-90 minutes per battery.
Caution:
- Do not overcharge batteries.
- Do not leave charging batteries unattended.
- Use only the provided charging cable.
2. Installing Aircraft Batteries
The aircraft is designed for easy battery installation.
- Locate the battery compartment on the top of the aircraft.
- Insert a fully charged 3.7V 350 mAh battery into the compartment.
- Connect the battery plug to the aircraft's power connector.
- Close the battery compartment cover securely.
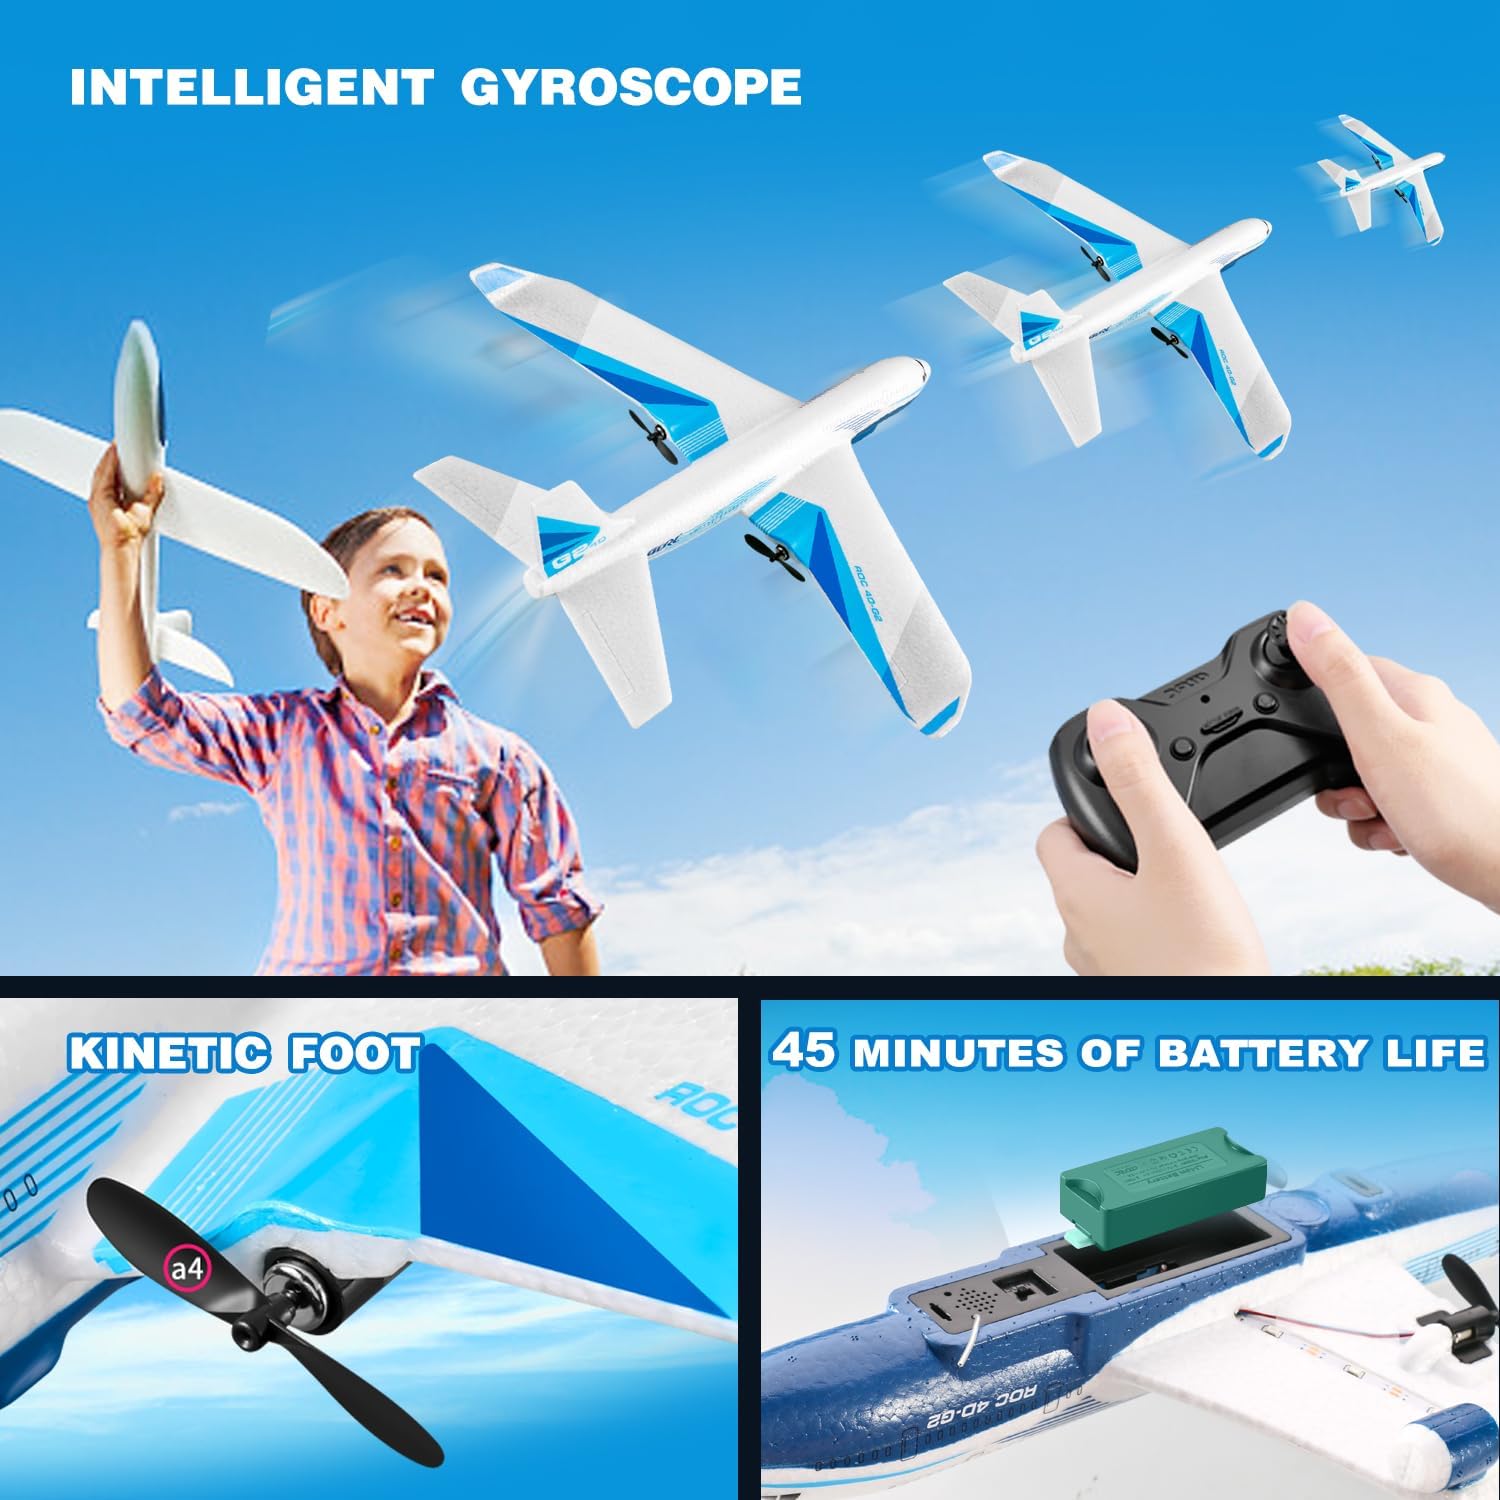
Figure 1: The 4DRC G2 airplane with a view of the battery compartment and propeller. Each battery provides approximately 15 minutes of flight time.
3. Installing Remote Control Batteries
The remote control requires 3 C batteries (included).
- Open the battery compartment on the back of the remote control.
- Insert 3 C batteries, ensuring correct polarity (+/-).
- Close the battery compartment cover.
4. Aircraft Assembly
The 4DRC G2 airplane comes pre-assembled. No additional assembly is required.
5. Pairing the Remote Control with the Aircraft
- Place the aircraft on a flat surface.
- Turn on the aircraft by connecting the battery. The aircraft's LED lights will flash.
- Turn on the remote control.
- Push the throttle lever (left stick) all the way up, then all the way down. The remote will beep, and the aircraft's LED lights will become solid, indicating successful pairing.
Operating Instructions
1. Flight Environment
The 4DRC G2 is designed for outdoor use. Choose an open area free from obstacles, people, and animals. Avoid flying in strong winds or rain.
2. Basic Controls
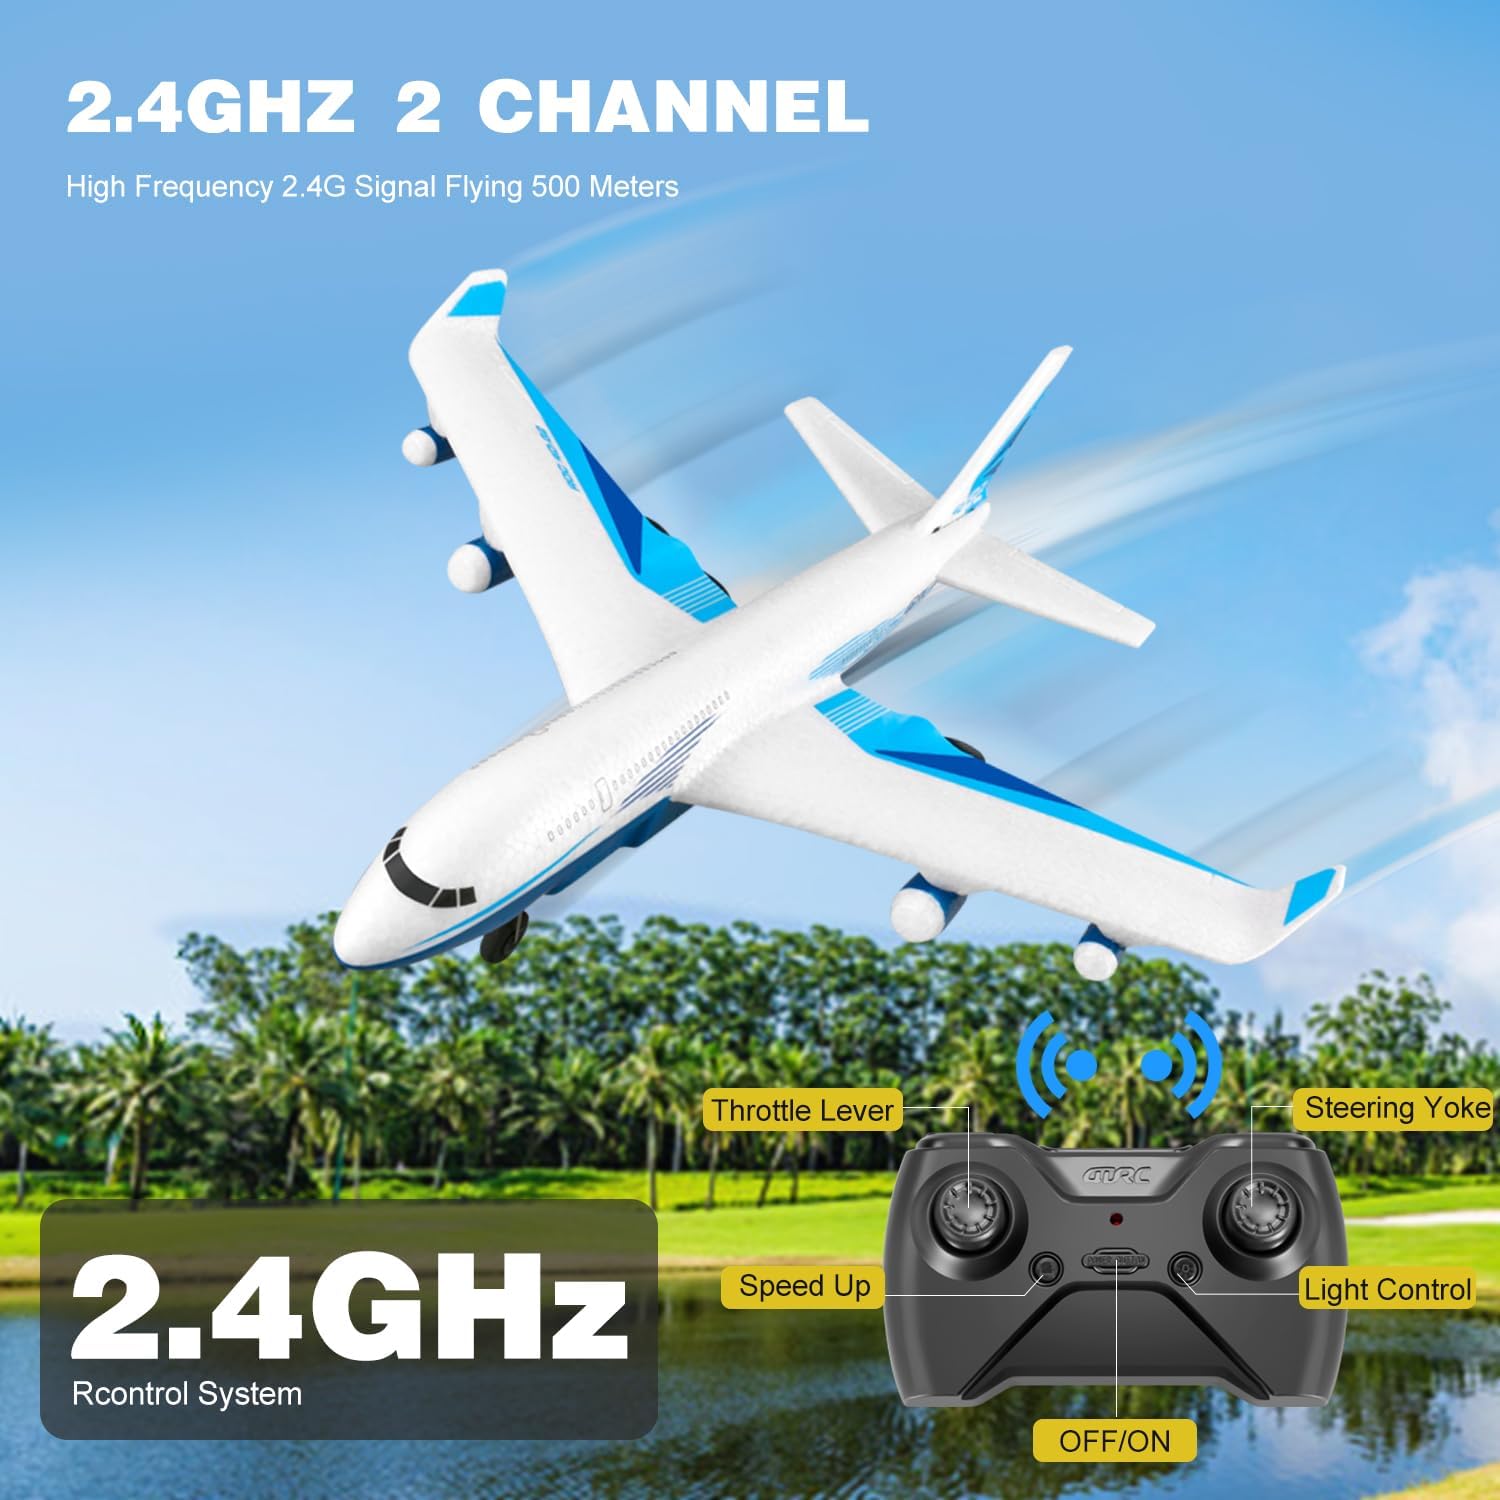
Figure 2: Remote control layout with labeled functions.
- Throttle Lever (Left Stick): Controls altitude. Push up to ascend, pull down to descend.
- Steering Yoke (Right Stick): Controls direction. Push left/right for turns, push up/down for pitch control.
- Speed Up Button: Adjusts flight speed. The aircraft offers multiple speed modes.
- Light Control Button: Toggles the LED lights on/off.
- One-Key Takeoff/Landing Button: Initiates automatic takeoff or landing.
3. Takeoff Procedures
- Manual Takeoff: Hold the aircraft and gently throw it forward into the wind while simultaneously pushing the throttle lever up.
- Glide Takeoff: For experienced users, the aircraft can be launched with a gentle forward toss and minimal throttle, allowing it to glide before engaging full power.
- One-Key Takeoff: After pairing, press the one-key takeoff button. The aircraft will automatically ascend to a stable height.
4. Flight Modes and Features
- Diverse Flight Modes: The G2 supports various maneuvers including ascending, descending, turning left/right, and adjusting speed.
- 3-Axis Gyroscope: Ensures stable and smooth flights, making it easier for beginners to control.
- 3 Speed Modes: Adjust the speed to match your skill level and flying conditions.
- 3D Flips: Press the 3D flip button (refer to remote diagram if available) and move the right stick in a desired direction to perform acrobatic flips.
- LED Lights: Bright LEDs enhance visibility and add excitement during evening flights.

Figure 3: The 4DRC G2 airplane with its LED lights active, suitable for night flying.

Figure 4: Diagram demonstrating the 3D flip capability of the G2 airplane.
5. Landing Procedures
- Manual Landing: Gently reduce the throttle and guide the aircraft to a soft landing.
- One-Key Landing: Press the one-key landing button. The aircraft will automatically descend and land.
6. Video Demonstration
Video 1: Official demonstration of the 4DRC G2 Remote Control Airplane in flight, showcasing its stability and maneuverability.
Maintenance
- Cleaning: Wipe the aircraft with a soft, dry cloth after each use to remove dirt or debris. Avoid using water or harsh chemicals.
- Propeller Inspection: Regularly check propellers for damage. Replace any bent or broken propellers with spares to ensure optimal flight performance.
- Battery Care: Store batteries in a cool, dry place. Do not store fully charged or fully depleted batteries for extended periods. Charge them to about 50% for long-term storage.
- EPP Foam: The aircraft is made of durable EPP foam, designed to withstand minor impacts. In case of damage, use appropriate foam-safe adhesive for repairs.
Troubleshooting
| Problem | Possible Cause | Solution |
|---|---|---|
| Aircraft does not respond to remote. | Not paired; low remote battery; aircraft battery disconnected. | Re-pair the aircraft and remote; replace remote batteries; ensure aircraft battery is connected. |
| Aircraft does not take off or flies erratically. | Low aircraft battery; damaged propeller; strong wind; incorrect trim settings. | Charge aircraft battery; replace damaged propellers; fly in calm conditions; adjust trim on remote. |
| Short flight time. | Battery not fully charged; old battery. | Ensure batteries are fully charged; consider replacing old batteries. |
| LED lights not working. | Lights turned off; wiring issue. | Press the light control button on the remote; inspect wiring for damage. |
Specifications
| Feature | Detail |
|---|---|
| Brand | 4DRC |
| Model Name | G2 |
| Model Number | HC-US8 |
| Material Type | Electronic Components, EPP Plastic |
| Power Source | Battery Powered |
| Aircraft Battery | 3 x 3.7V 350 mAh Lithium-Ion (included) |
| Remote Control Battery | 3 x C batteries (included) |
| Flight Time | Approx. 15 minutes per battery (45 minutes total with 3 batteries) |
| Remote Control Frequency | 2.4GHz |
| Control Range | Up to 656 feet (200 meters) |
| Maximum Speed | 25 rph (rotations per hour, likely intended as MPH or KPH, but using provided data) |
| Gyroscope | 3-axis |
| Indoor/Outdoor Usage | Outdoor |
| Item Dimensions | 9 x 9 x 3 inches |
| Color | White |
Warranty and Support
This product is covered by a standard return policy. For specific warranty details, please refer to the purchase platform or contact the seller directly. For technical support or inquiries, please visit the official 4DRC website or contact their customer service department.
You can find more information about 4DRC products and support at the 4DRC Store on Amazon.


