
1. Introduction
This manual provides detailed instructions for the installation, operation, and maintenance of your KCEVE HDMI Wireless Transmitter and Receiver with KVM Function. This device allows for wireless transmission of HDMI video and audio signals, along with KVM (Keyboard, Video, Mouse) functionality, over distances up to 200 meters (656 feet) in an open environment. It is designed for various applications including home entertainment, business presentations, and educational settings.
2. Package Contents
Please verify that all items are present and in good condition upon opening the package. If any items are missing or damaged, please contact customer support.
- 1 x KCEVE HDMI Wireless Transmitter (TX)
- 1 x KCEVE HDMI Wireless Receiver (RX)
- 2 x USB-A to Type-C Power Cables
- 1 x Type-C to USB-A Converter Adapter (OTG)
- 2 x Antennas (pre-attached or to be attached)
3. Product Overview
The KCEVE HDMI Wireless Kit consists of a Transmitter (TX) and a Receiver (RX), designed for efficient wireless signal extension. The compact, shell-less design promotes better heat dissipation for stable performance.
3.1. Components and Ports

Image: Detailed view of the Transmitter (TX) and Receiver (RX) units, highlighting their dimensions, HDMI terminals, Type-C power ports, USB-A port on the receiver, pairing buttons, reset buttons, and LED indicators. Also shown are the included power cables and OTG adapter.
- Transmitter (TX):
- HDMI Terminal: Connects to the HDMI output of your source device (e.g., laptop, camera).
- Type-C Port: For power supply using the provided USB-A to Type-C cable.
- Pairing Button: Used to re-pair the transmitter with the receiver if needed.
- Reset Button: Press for 10 seconds to restore factory settings.
- LED Indicator: Shows power and pairing status.
- Receiver (RX):
- HDMI Terminal: Connects to the HDMI input of your display device (e.g., TV, monitor, projector).
- USB-A Port: Connects to a USB mouse or keyboard for KVM functionality.
- Type-C Port: For power supply using the provided USB-A to Type-C cable.
- Pairing Button: Used to re-pair the receiver with the transmitter if needed. Also functions as a mode switch (tap) for display adjustments.
- Reset Button: Press for 10 seconds to restore factory settings.
- LED Indicator: Shows power and pairing status.
3.2. LED Indicator Status

Image: Detailed explanation of the pairing button, reset button, pairing indicator light, and power indicator light on both the Transmitter and Receiver units.
- Power Indicator Light: Stays on when the power cable is connected and the device is receiving power.
- Pairing Indicator Light: Flashes during the pairing process. It will remain solid for approximately 3-5 seconds upon successful pairing.
4. Setup Instructions
Follow these steps to set up your KCEVE HDMI Wireless Transmitter and Receiver:
4.1. Initial Connection Diagram
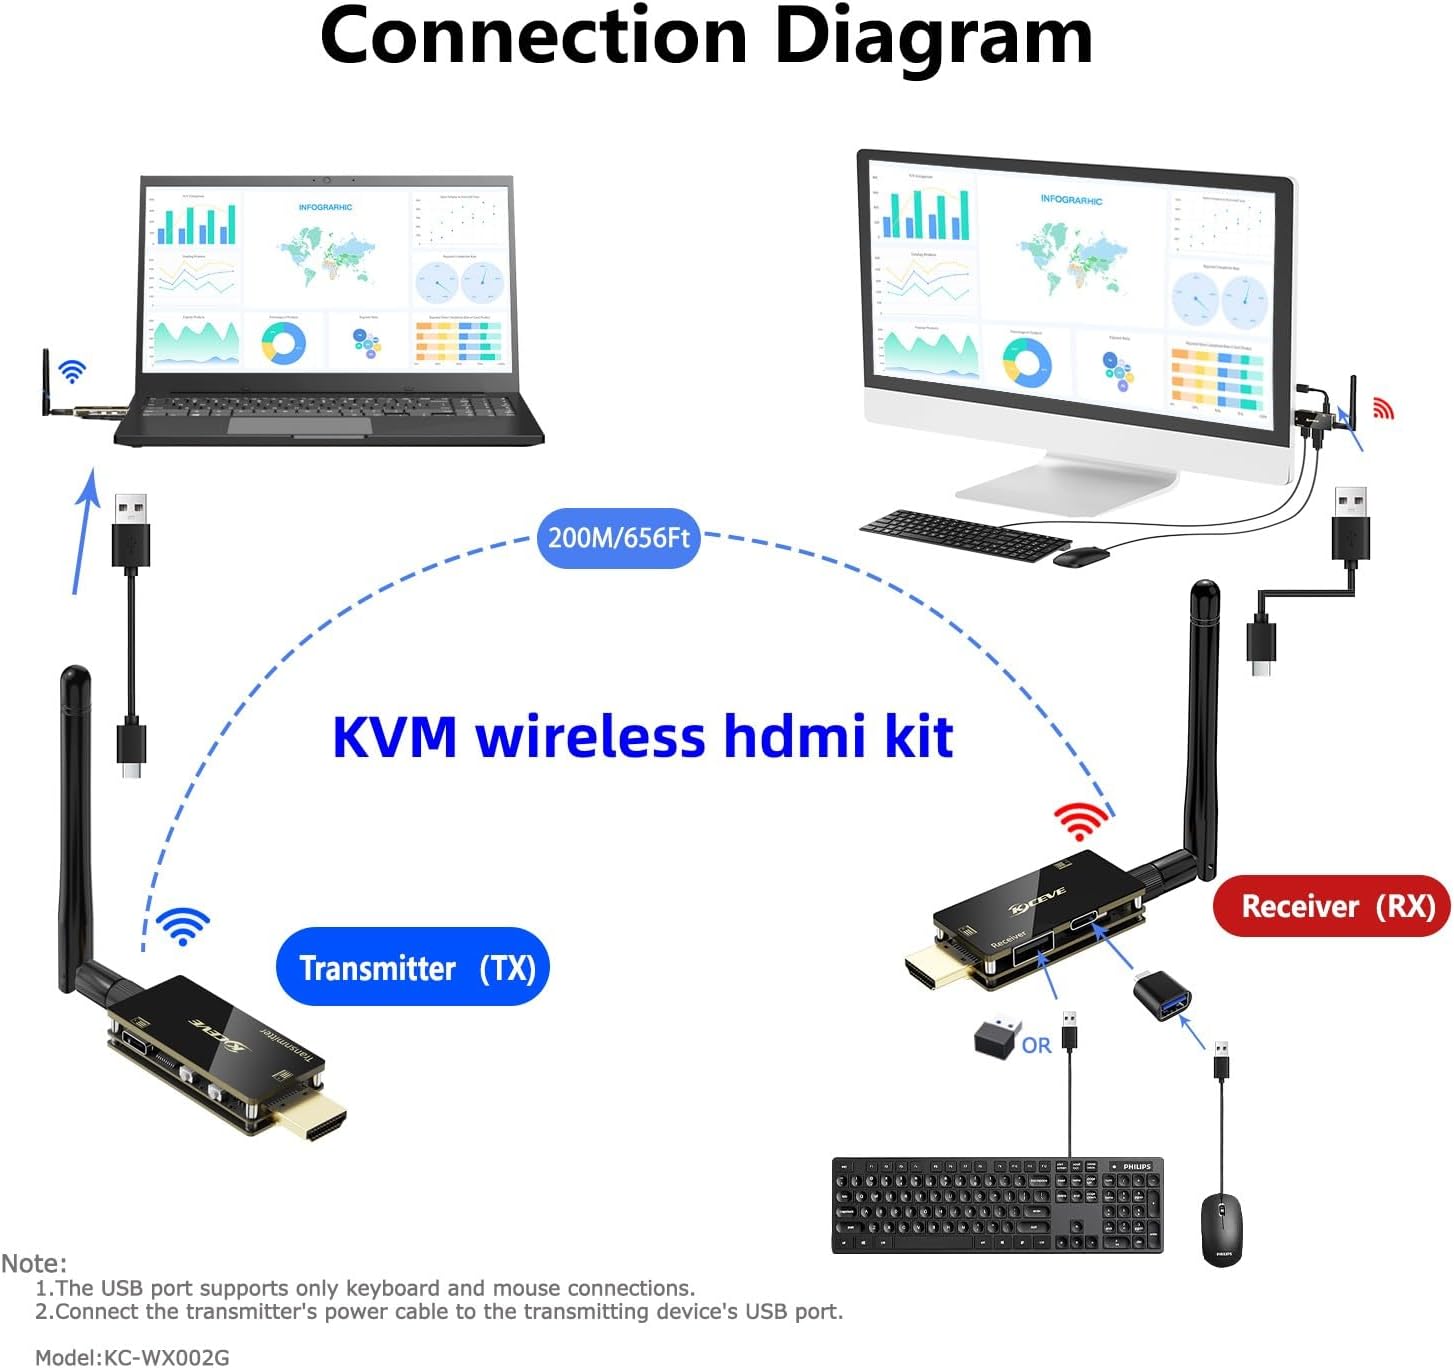
Image: A visual guide illustrating how to connect the Transmitter (TX) to a source device (laptop) and the Receiver (RX) to a display device (monitor, including power connections and the optional KVM setup.
- Install Antennas: Ensure the antennas are securely attached to both the Transmitter (TX) and Receiver (RX) units.
- Connect Transmitter (TX):
- Plug the HDMI terminal of the Transmitter into the HDMI output port of your source device (e.g., laptop, desktop PC, game console, camera).
- Connect one of the provided USB-A to Type-C power cables to the Type-C port on the Transmitter. Plug the USB-A end into a USB power source (e.g., your device's USB port, a USB wall adapter). Ensure the Transmitter receives sufficient power.
- Connect Receiver (RX):
- Plug the HDMI terminal of the Receiver into the HDMI input port of your display device (e.g., TV, monitor, projector).
- Connect the second USB-A to Type-C power cable to the Type-C port on the Receiver. Plug the USB-A end into a USB power source (e.g., your display's USB port, a USB wall adapter). Ensure the Receiver receives sufficient power.
- Power On: Power on both your source device and your display device.
- Automatic Pairing: The Transmitter and Receiver are pre-paired at the factory. They should automatically connect within a few seconds. The pairing indicator light will flash and then become solid for 3-5 seconds upon successful connection.
- Verify Display: Check your display device. The content from your source device should now be mirrored or extended wirelessly.
5. Operating Instructions
5.1. Basic Operation
- Plug and Play: Once connected and powered, the system operates automatically. No software installation or network configuration is required.
- Signal Transmission: The device transmits 1080P Full HD video and audio signals using 2.4G/5G dual-band technology for stable, low-latency performance.
- Range: The wireless transmission range can reach up to 200 meters (656 feet) in an open, unobstructed environment. Obstacles like walls will reduce the effective range (e.g., a single wall may reduce range by approximately 30 meters).
5.2. Re-pairing Devices (If Needed)
If the Transmitter and Receiver fail to connect automatically, you may need to re-pair them:
- Ensure both the Transmitter and Receiver are powered on.
- Press the "Pairing Button" on the Transmitter. The pairing indicator light will begin to flash.
- Within a few seconds, press the "Pairing Button" on the Receiver. Its pairing indicator light will also flash.
- Wait for approximately 3-5 seconds. Both indicator lights should become solid, indicating successful pairing.
5.3. Display Mode Adjustment (Receiver)
The Receiver's pairing button also functions as a mode switch for display adjustments, such as image rotation or zoom. This can be useful if the display appears incorrectly (e.g., rotated) on your monitor or projector.
- Tap the Pairing Button: Briefly press and release the pairing button on the Receiver. Each tap will cycle through different display modes (e.g., rotation, zoom levels).
- Observe Display: Continue tapping until the desired display orientation and size are achieved. There are typically 12 settings, including 6 levels of zoom and the same 6 levels rotated.
6. KVM Functionality
The KCEVE Wireless HDMI Kit includes KVM (Keyboard, Video, Mouse) functionality, allowing you to control your source device remotely from the display location.
6.1. Connecting KVM Peripherals
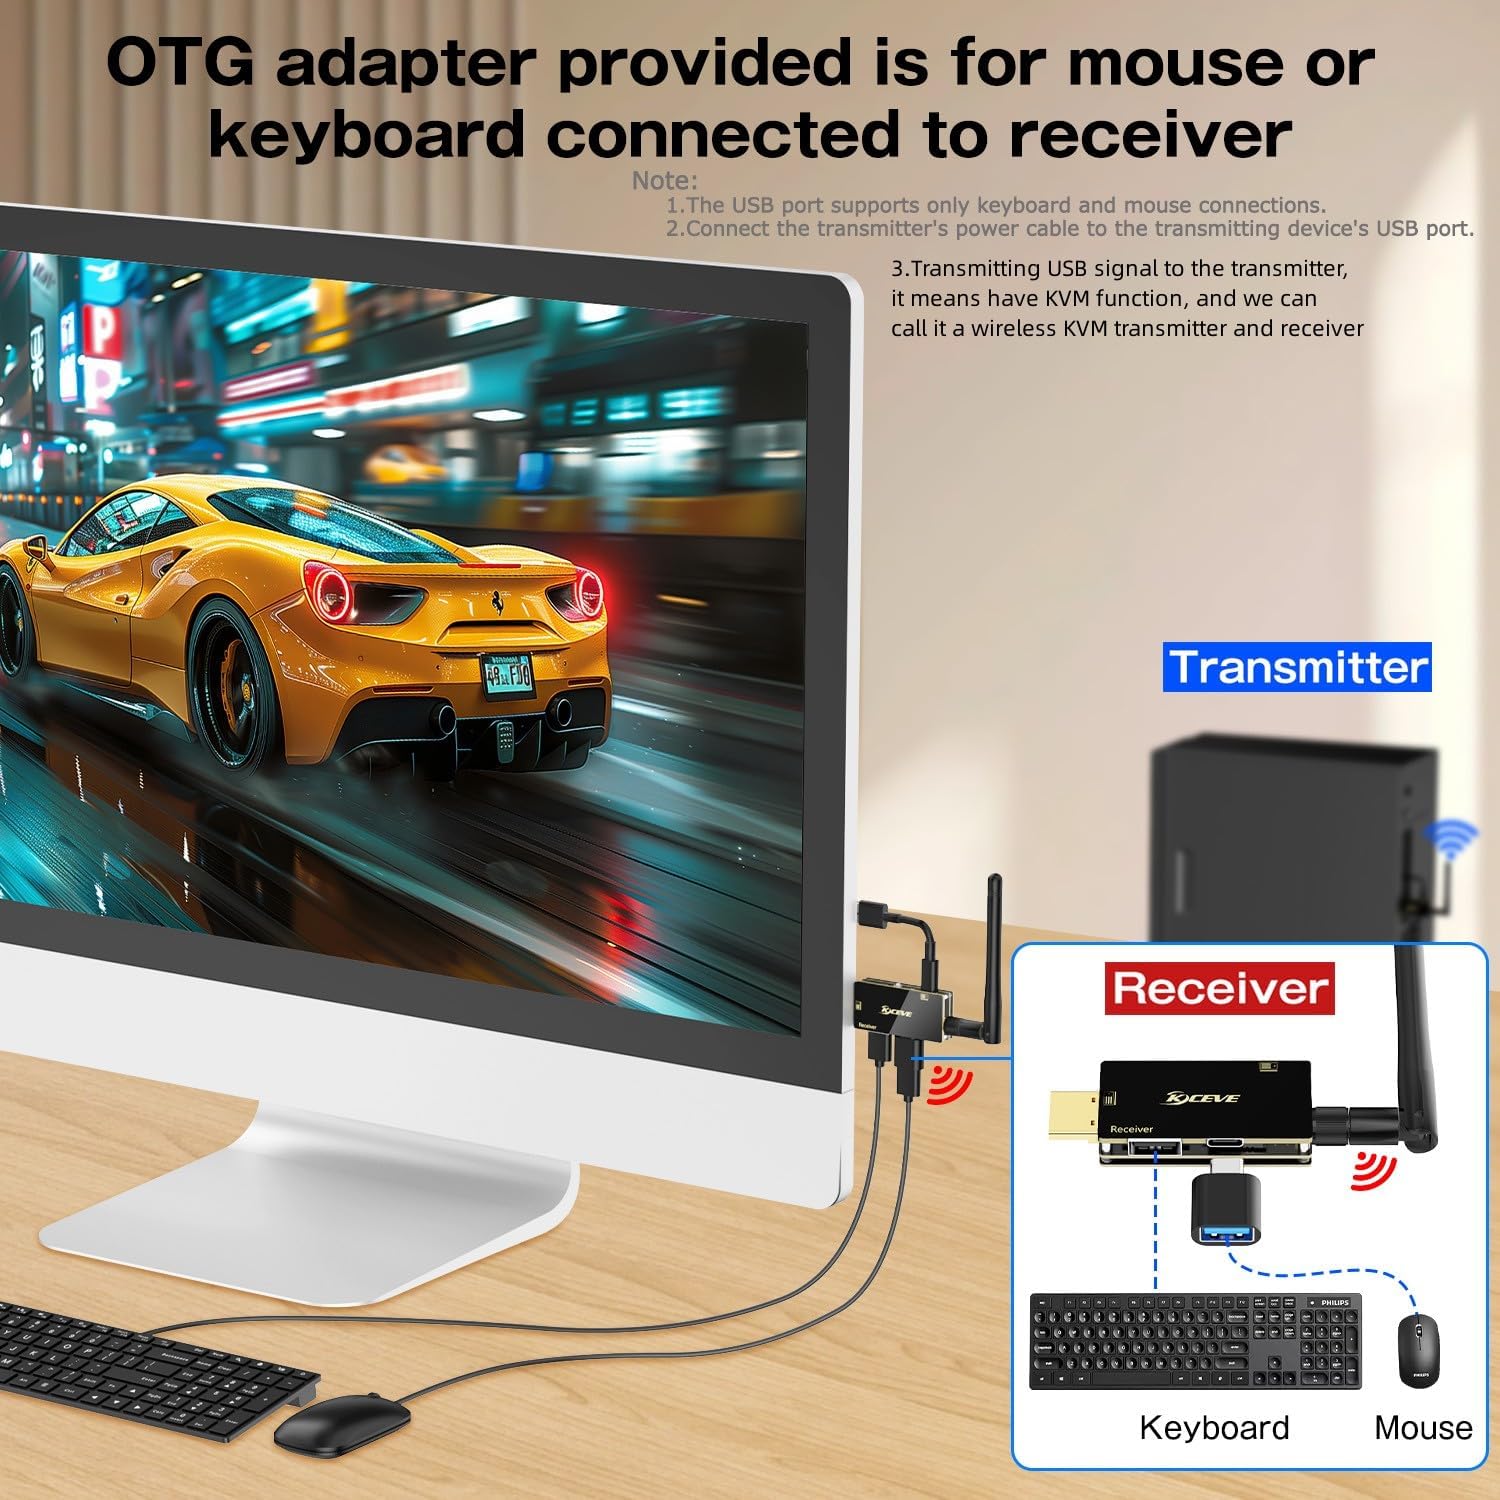
Image: Illustration of how to connect a USB mouse and keyboard to the Receiver (RX) using the provided Type-C to USB-A OTG adapter, enabling remote control of the source device.
- Connect OTG Adapter: Plug the Type-C end of the provided Type-C to USB-A Converter Adapter (OTG) into the Type-C port of the Receiver (RX).
- Connect USB Peripherals: Plug your USB mouse and/or keyboard into the USB-A ports of the OTG adapter. If you have multiple USB peripherals, you may need a USB hub (not included).
- Remote Control: You can now use the connected mouse and keyboard to control your source device (e.g., laptop) from the location of your display.
Note: The USB port on the Receiver is primarily designed for keyboard and mouse connections. Compatibility with other USB devices may vary.
7. Troubleshooting
If you encounter issues with your KCEVE HDMI Wireless Kit, please refer to the following common solutions:
| Problem | Possible Cause / Solution |
|---|---|
| No signal on display / Black screen |
|
| Image is distorted, flickering, or intermittent |
|
| KVM (mouse/keyboard) not working |
|
| Short transmission distance |
|
| Device feels warm |
|
8. Specifications
| Brand | KCEVE |
| Model | KC-WX002G (B0DS8RBBM5) |
| Hardware Interface | USB 2.0 Type A (for KVM), HDMI |
| Data Link Protocol | USB, Wireless (2.4G/5G Dual-band) |
| Transmission Range | Up to 200 meters (656 feet) in open field |
| Video Resolution | Supports 4K decoding, 1080P Full HD output |
| KVM Function | Yes, USB port on receiver for mouse/keyboard |
| Power Supply | USB powered (Type-C) |
| Operating System Compatibility (Transmitter) | Windows, Mac OS, Android (with DP Alt output and USB-C to HDMI adapter) |
| Item Weight | 0.19 Kilograms (approx. 0.42 lbs) |
9. Warranty & Support
9.1. Warranty Information
This KCEVE product comes with a 1-Year Limited Warranty from the date of purchase. This warranty covers manufacturing defects and malfunctions under normal use. It does not cover damage caused by misuse, accidents, unauthorized modifications, or improper installation.
Please retain your proof of purchase for warranty claims.
9.2. Customer Support
For technical assistance, troubleshooting, or warranty inquiries, please contact KCEVE customer support through the retailer where you purchased the product or visit the official KCEVE website for contact information.
When contacting support, please provide your product model number (KC-WX002G) and a detailed description of the issue.
